Home Technical Talk

3DS Max inset problem!

Hi guys,

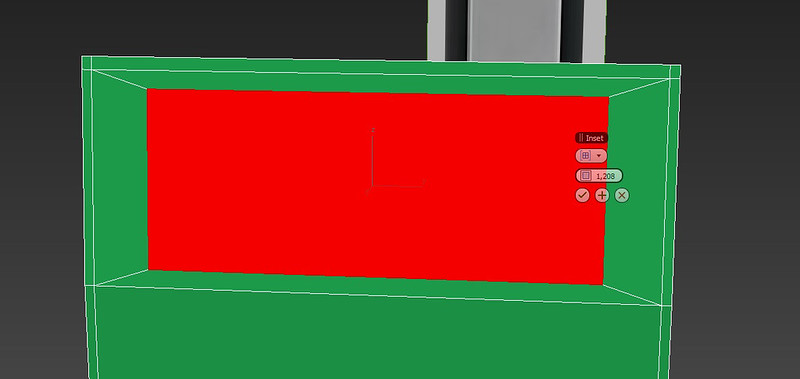
I'm following a tutorial on 3D modeling for 3DS max and have encountered a problem with inset that I couldn't solve. The problem is that the inset tool does not work evenly from borders to inside. I'm shore that for this is a simple solution which I have missed somewhere.

8452571453_4518e34d5b_c.jpg

I'm using 3DS max 2013 if it makes any importance.

Thanks in advance

Replies

  • SlyRipper
    Options
    Offline / Send Message
    SlyRipper polycounter lvl 6
    I guess this is how max is calculating the stuff, you will get similar effects on the extrude tool, it is limited to some stuff and mostly extrudes along the normals or group normals, but not in a direction you like too.

    I guess you will probably need a script for this, cuz there are no other options for inset (except the normal, group or poly selection from the dropdown).
  • Notes
    Options
    Offline / Send Message
    Notes polycounter lvl 4
    You need to reset the xform on the object....this happend because you've scale the object non uniformly by using rescale instead of using the parameters given when creating a box for the first time.
    OPGoswa.jpg
    A. Is Inset being used when the mesh hasnt been scaled
    B. When the mesh is scaled using the hot key R
    C. Is when the mesh had it's xform reset
  • Notes
    Options
    Offline / Send Message
    Notes polycounter lvl 4
    Try this, make a box in max and look at it's parameters
    N17mKYI.jpg

    Now rescale that same box using R and look at it's parameters again
    pu3sEyY.jpg

    The shape of the box has changed but it's parameters are still the same, this is how Max still sees the box.
  • Helloween
    Options
    Offline / Send Message
    Oh thanks' guys.

    I used the scale tool on my object as you explained.

    A big THX to you all!!!
  • Mark Dygert
    Options
    Offline / Send Message
    Right click the scale tool button, if it doesn't say 100, 100, 100 then you need to go to command panel, Hierarchy tab (three little boxes linked to one big box), and click reset "scale" and "transform". Like others mentioned this comes from scaling the "OBJECT" instead of the sub-objects (poly, vert, element). When you scale objects it sticks around in the transform matrix and will even be propagated to things that get linked to this object, which can really screw up some very handy techniques so keep an eye on this and reset it when you can.

    Try to avoid the reset xform in the utilities panel it will reorient the objects local pivot point to align with the world.

    ResetXformPivotProblem.gif
  • tynew
    Options
    Offline / Send Message
    tynew polycounter lvl 9
    Try to avoid the reset xform in the utilities panel it will reorient the objects local pivot point to align with the world.

    ResetXformPivotProblem.gif

    Which one are we supposed to use? I haven't seen any other options.
  • Mark Dygert
    Options
    Offline / Send Message
    If your problem is just with the scale or transform values (which most cases are), then reset just those two things in the...
    ... command panel, Hierarchy tab (three little boxes linked to one big box), and click reset "scale" and "transform"
    You don't need to destroy the local pivot point by using the xform utility to reset the two things that cause the most trouble for most people.

    As an animator who depends on those pivots to align objects, helpers, controllers and bones its great if modelers stopped using nukes to kill a fly.
  • CompanionCube
    Options
    Offline / Send Message
    CompanionCube polycounter lvl 12
    to reset xform and keep orientation this script works perfectly. http://paulneale.com/scripts/resetXform/PEN_resetXform.htm
  • tynew
    Options
    Offline / Send Message
    tynew polycounter lvl 9
    Understood :) thanks for the help guys.
Sign In or Register to comment.