WIP house - need texturing feedback
Hi guys!
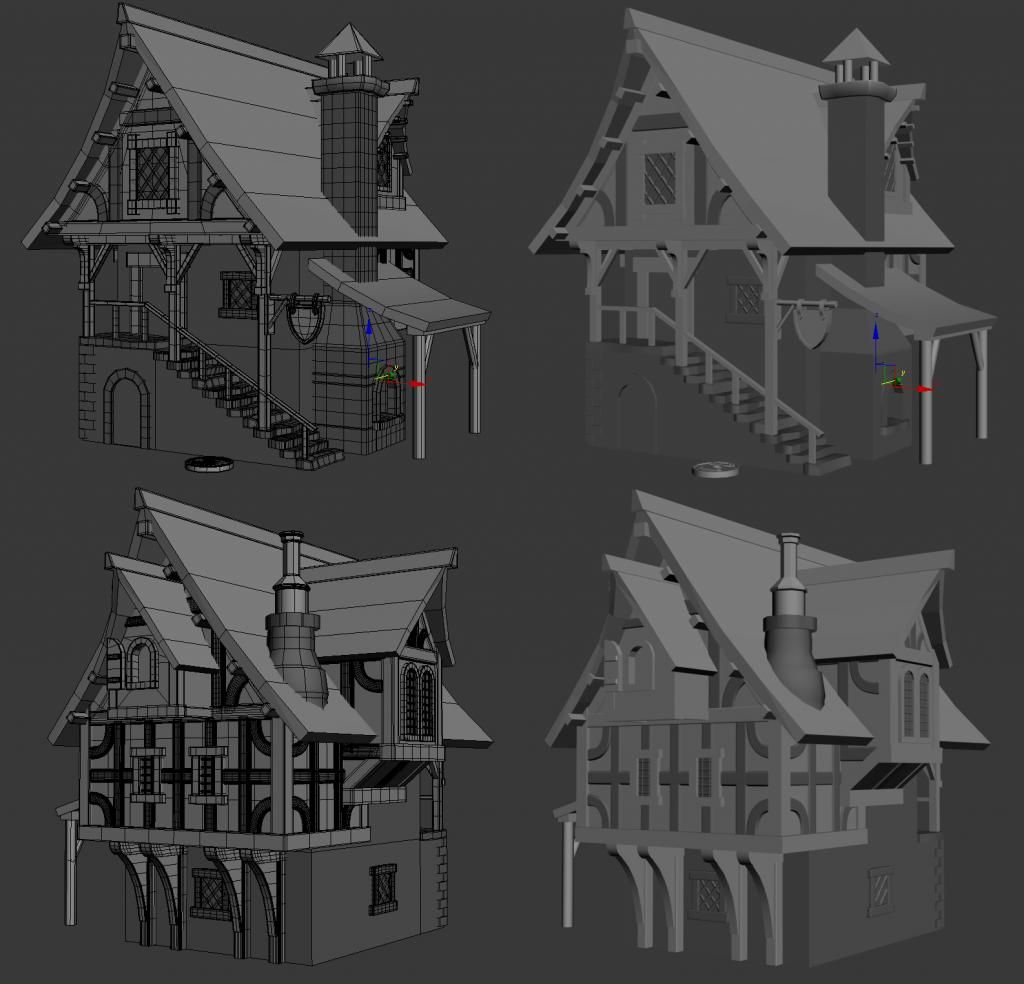
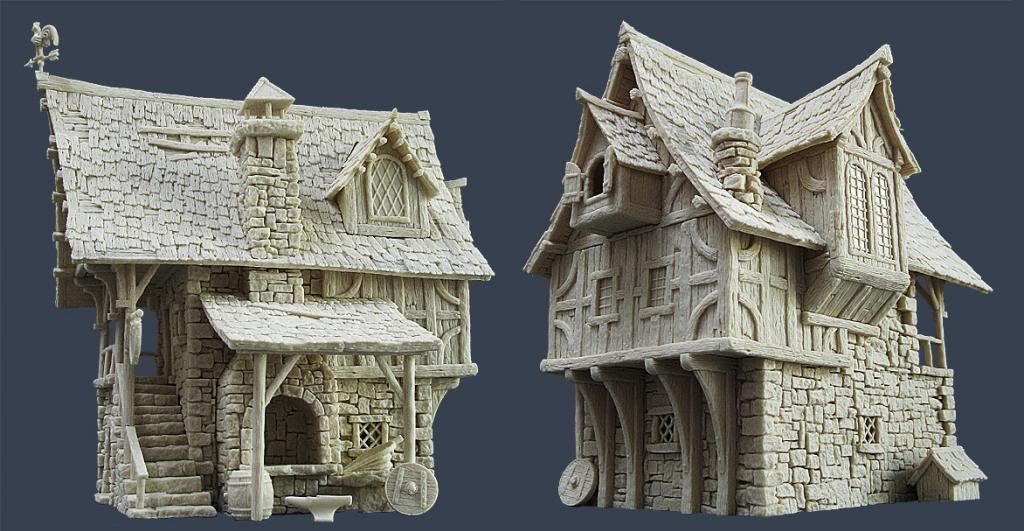
I'm currently working off a reference toy model on a warhammer style house and could use some feedback for texturing. This is just a fun, practice, portfolio piece so really no limitations but would like to keep it consistent and not crazy high poly or anything
I'm currently deciding what I should sculpt in zbrush and what not to. I would love to sculpt everything but that will just take me forever.... unless you guys think i should do it anyway. I'll most likely be doing a lot of projection mapping in 3ds max unless you recommend something else.
I was thinking the rockwalls can be sculpted as well as the doors, rooster and those small props on the ground (barrel, shield etc).
Should I use 2048 map or 2 - 1024's. Maybe a few tiles?
I'm also not sure what I should do with the roof and woodbeams. Sculpt or throw a texture and crazy bump it?
If you guys can pick on certain areas I should do, let me know. Any thoughts welcome! thanks.
Replies
The reason is you will just not have high enough texel density on unique unwrap.
I agree with Iniside, if this is for your portfolio it would probably be best to try use as many tiling textures as possible. Not only will this show you are saving texture space but it will mean less sculpting and more 'reward' for what you do sculpt as its being repeatedly used! I'm sure potential employers would rather see industry type practices being used in a portfolio.
I have included an image below which shows the way in which I would tackle this project, I hope you don't mind me painting over your renders:
Section 1 shows the edge loops (probably missed a few!) which you could easily afford to lose and not even notice. I'm sure you have left these in for sculpting purposes but thought I would include it just in case.
1b is to point out that the you don't need to chamfer the edges of the wood, this could easily be done while sculpting and achieved through the normal map.
2b is just because it would have taken a while to outline all the edge loops in these wood beams
Section 2 shows the amount of the model that could be covered by tiling textures alone.
Red: One roof tile, tiling texture
Blue: One stone wall tiling texture
Green: One plaster wall tiling texture. This wouldn't actually need to be tiling since its broken up with the beams, you could create a variety of smaller plaster sections giving you more variety!
Purple: Multiple wood section textures
One the sculpting front, if I was you I would:
1. Create 3 tiling textures for the roof tiles, stone and plaster
2. Take one (maybe 2 on the smaller more frequent ones) of each type of wood beam, create a simple box UV map, export to ZBrush, sculpt it and finally export the normal map so it can be used multiple times.
3. Same as above but sculpt one window frame, one door frame etc.
4. Same as above but sculpt the individual items (sign for example)
5. Finally compose your texture together in photoshop
Sorry this has been a little rushed, I promised myself I would go to sleep about an hour ago! Hope this helps, good luck with it mate!
I will take your advice and tile as much as I can: Roof, brickwall and plaster wall. I was thinking about creating one for the wood as well so I wouldn't have to sculpt so many individual pieces. I'm not sure if I understand #2 clearly.
There seems to be about 6 different window types on the house. I figured they are unique and can be sculpted as well. Or should I unwrap all into one texture map, texture and create normals?
Doors are unique as well. There are 2 and I think I want to sculpt them so I can get the detail of the rocks around it and show some examples of quality work on the doors. Unless you suggest something else.
For the stepping stones, chimney objects and that fire place window opening, any ideas on how to approach that? I figured that can be sculpted or I could slap on another tiled stone texture. Fire place window thing, I may have to sculpt in order to get better details for the curvy rock shape. What do you think?
For all the props, (barrel, anvil, rooster, shield, sign etc.) I down for sculpting them all.
I guess the one little thing, I'm worried is I hope I can get some good shadows/blends in. I havent done any blend map work in a while so maybe it can just paint them in the tiled textures some way like at the bottom of the tiled stone texture for the body of the house.
Any other suggestions, let me know! Thanks guys!
Use tileable wood for window frames. And reuse the same texture for actual window.
For doors make another texture with tile stone trim. Unwrap Arch around it, and after that you can try to cut in to add some depth. If you just make unique texture you will have unique texture that hardly fit anything else.
For Fire place windo you can reuse the same stone trim you will use for door (!).
For chimmey and stepping stone you can reuse stone wall texture. (And for other stone objects).
I must have missed you saying that you wanted to vertex blend, if that's the case you might want to switch this layout up a bit (and maybe use single 512x512 textures) but I don't think you need more than 1 1024x1024 texture here. This is roughly how I would think about laying out the texture:
Blue & Red: Tiling textures
Green: I would break the plaster sections up and add subtle details to each (small cracks, wood planks underneath). Because the wood beams break the plaster up you don't need to make this tiling.
Orange: You could make 1 and 2 doors then 3, 4 and 5 windows. If you need more you could start to put them into the grey or purple areas if you have space.
Purple: The smaller wood beams will only need one front face and 2 side faces (see the larger white image below the texture layout) and the larger ones can be all four sides but you should be able to fit them all into here.
Grey: This section can be used for the rest of your unique items on the model. I have put one stone step on there for now just as an example.
Sculpting
You can apply this to any of the assets but I'll go over a wood plank quickly:
> Create a simple box the size and shape of the plank you want
> UV unwrap it
> Make sure the model is divided equally with subdivisions (there don't have to be a lot of subdivisions the polygons just need to be roughly the same size)
> Export into ZBrush
> Sculpt
> Either export your maps directly from ZBrush or use another program (such as XNormal) to bake the maps out
> Take them into Photoshop, resize and fit into place on your final texture
Like I said, this is just how I would probably go about tackling this, its by no means the only way. I like Inisides idea of having trims on the texture, that's something I forgot, it will help you save space and you could easily fit them into a section of the texture outlined above. Feel free to ask any questions if you think I might be able to help, I should be able to reply faster over the weekend.
There are some good links on the Polycount wiki for this:
http://wiki.polycount.com/CategoryEnvironmentModularity
These ones are certainly worth a look:
http://wiki.polycount.com/ModularMountAndBlade
http://www.thiagoklafke.com/modularenvironments.html
For the plaster part, I was gonna normal map most of the middle wood beams in since there is so many but figured I should just leave them there to get more definition.
Thanks for brainstorming out the texture layout example! It really helped me visualize a lot rather than making a list.
I'm gonna start optimizing the final mesh soon and post some screen caps on the weekend hopefully. I think this mini project will take a little while since I work full-time but I'll keep you guys posted on how things are turning out.
Any other suggestions, let me know!! Thanks for the help
Wouldn't it be best to sculpt 4 different beams, texture them and bake out the maps, than use those 4 beams as your wood texture ?
Sculpting might take longer but you would also be improving on and showing off another skill in your portfolio. On the other side of it, photo sourcing textures and applying them will not take as long and you would be able to move on to a new project sooner.
Either way I would agree with MisterSande and have at least four different beam textures, there are so many in that piece that repetition would become obvious.
Some of the normals in your untextured shots seem off, notably the area around the forge's flue.
Here's what I managed to dish out from the textures. Not exactly the same as the reference you provided me
only weak point - roof seems terribly flat and your chimney goes through shingles just like that - you could add some geometry in there
cheers
f.
Yup, there are normal maps applied on all the textures. Are you talking about in the UDK render or just the 3dsmax render. I'll try cranking it up a bit in the texture or the slot.
Hmmm... I think I'll see if I can add more geo on the roof to make it pop out more. I guess the normal isn't doing its job there. Its pretty much a flat plane with a few cuts. Thanks for the tip! I agree about the chimney going through shingles too.
Thanks a lot Pixel! Slowly gathering some feedback here and there. I'll see if I can find some more time to fix up bits and pieces like the roof textures and maybe add more geo around the chimneys. And good point about the shield!