Cloth Simulation...
polycounter lvl 13
Hi,
I'm having trouble picking the correct settings for cloth simulation. I use Blender 3D.
I know the basics of making cloth simulations, but I'm having a hard time getting the cloth to lay right, and also for some reason it sometimes falls off the collision object.
I'm making a tablecloth, I want it to lay evenly on all sides, but sometimes, it's longer on one side.
I made sure the mesh was centered on the collision object, so it would fall evenly.
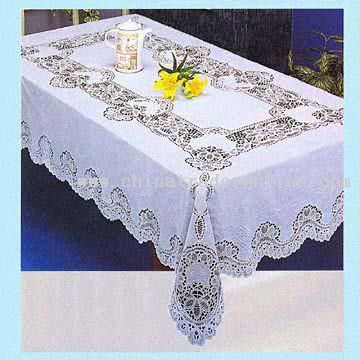
Here's how I want it to lay:

When I play the animation, the cloth moves way to much, and can't get an frame where the cloth looks even on all sides. I just want it to hang straight, but by time the animation is finish playing, the cloth still isn't settled. (If that makes sense)
Is there a setting that I can use to get the look I want? If so, please give me a step by step.
Thank you.
I'm having trouble picking the correct settings for cloth simulation. I use Blender 3D.
I know the basics of making cloth simulations, but I'm having a hard time getting the cloth to lay right, and also for some reason it sometimes falls off the collision object.
I'm making a tablecloth, I want it to lay evenly on all sides, but sometimes, it's longer on one side.
I made sure the mesh was centered on the collision object, so it would fall evenly.
Here's how I want it to lay:
When I play the animation, the cloth moves way to much, and can't get an frame where the cloth looks even on all sides. I just want it to hang straight, but by time the animation is finish playing, the cloth still isn't settled. (If that makes sense)
Is there a setting that I can use to get the look I want? If so, please give me a step by step.
Thank you.
Replies
Max has cloth properties that you can tweak making it stiffer or more elastic, you can also adjust the properties of the surfaces so its more slippery like silk or heavy stiff and abrasive like canvas.
In max you can also freeze the sim at any point and use live drag mode, where you can grab the cloth at any face and drag it around and it will sim as you move it and as soon as you let go it freezes. It's perfect for fixing and fine tuning.
Hopefully blender has some tools like that...
Another thing that you can do in max that you might be able to do in blender, is to use two splines:
- One irregular spline shape for the bottom of the cloth (spline painting is great for this),
- One round spline shape for the top of the table (derived from a cylinder edge "Create Shape" instead of using a spline circle).
- Convert them to poly, in boarder mode use the bridge tool to fill in the gap, give it some segments, twist it and taper it a bit and give it some form.
The beauty of this is that you can go back down the stack tweak the irregular spline to tweak the entire mesh, provided you set the number of interpolations in the spline to 0, otherwise it could add or remove verts causing the geometry in edit poly to change, but that doesn't happen if you set it to 0.
Then you can apply cloth, soft select preserve the verts on the top so the cloth sim only runs on the bottom (and not the round table top) to give it a hint of reality and gravity. Then use live drag to tweak it how you like.
I was looking at Blender Physics > Cloth, I don't see the settings you mentioned.
Here's photo of the interface:
I see the Damping, but not sure what I'm suppose to do there...
Here's how it turned out:
The only thing I don't like is the corners are bulky. I thought if I subdivide it more,the bulky corners would go away, but no. So now I have to figure out how to make the corners lay smoother.
Anyone know a way?
If your proportions are accurate, you probably need to change cloth thickness and/or stiffness.
Uncle:
If you are finding that it is taking too long to calculate, then you can get away with adding a subsurf modifier after the cloth modifier but you still need a decent amount of quads in the base mesh otherwise you won't get a good result, simply because there isn't enough geometry to support the deformation of the cloth and the calculation is done before any subsurf modifier is added.
In the picture below is a plane that has 7744k quads and a subsurf modifier at lvl 3 added after the cloth modifier.
I used the default setting for the Silk preset and Collision quality at 2 and self collision at level 1 .
*hugs for metalliandy* Thank you! I understand much better now! :thumbup:
I see what you mean. I forgot to mention one important part though... I'm creating this for a game called Sims 3. I can't have the poly-count too high.
With that being said, I do love how your cloth looks, and that's how I want mines to look, but it's way too high for the game!
I guess I should leave it as is. However, I'm going to create a tablecloth and use your settings, so I can add it to my (beginner) art gallery! (lol)
I still have a lot more to learn about meshing/3d modeling!
I'll probably have more question about this project, so I will be coming back. :poly121:
You would get a better results by running the cloth simulation with a high polygon count and then applying the cloth modifier and decimate/reduce the polygon count to something more reasonable, rather than running it on a low polygon count.
(lol I hate when guys call females "man" :poly117: lol )
Okay! I will do that!
Quick question: How do I apply the cloth modifier? Where is that located?
And, how do I reduce the poly-count? I know there's a way, but forgot where to go to do it. Also, doesn't this help get rid of any extra vertices/faces?
So the cloth modifier is the reducer?
The cloth modifier is in the modifier panel on the cloth object. Just apply that once your simulation is completed and then either reduce the poly count manually or use the decimate modifier.
After I've create the sim, and have a solid mesh, I can delete the flat verts/faces on top of the surface , and replace it. Because I don't need that many polygons on the surface, since it's just flat across. I'll just keep the edges.
Is that what the cloth modifier will do? Or would I have to do it manually?
Okay I still don't quite understand where it's located...
The cloth modifier is linked to the cloth simulation and it's only purpose is to convert the simulation into a mesh.
The top modifier in the picture below is he cloth modifier. Just hit the apply button
To reduce the polygon count, you must do it manually or use the decimate modifier.
I didn't tick self-collision though, Do I have to click that? I didn't, because I thought that meant I didn't need a collision object...
Go into Edit mode on the object and select, like, a single vertex in the center. Then go into the Object Data tab (The one with the triangle symbol) and in Vertex Groups, create a new one and name it whatever, and then crank up the Weight to 1 and press Assign. Then you select whatever that vertex group was called in the Pinning part of the cloth settings.
Thank you very much Marshal!
I've did everything you said, and I'm now waiting for the bake to finish. We'll see how everything turns out!
Thank you Marshal! That's exactly what I did, and it turned out just fine!:thumbup: