Bandwagon time! - Arenanet Arttest
Figured I'd hop on this as well. It seems like it'll be a fun project and it's really cool seeing everyone else's interpretation of the same concept. I'll also be doing a breakdown of my process in the hopes that it will motivate me to keep this thread posted with updates.
**Disclaimer** - I do not claim to know what I'm doing. I'm just making this all up as I go, so take everything with a big ol' grain of salt.
It's been a long time since I've followed the GuildWars development. I played the original for a brief period of time way back in the day but other than seeing the amazing concept art I haven't been following GuildWars 2. So after seeing the concept and then seeing a post from Stoofoo mentioning something about matching the current GW2 artstyle, I began my search...
The first question I had - what is a Norn and what does one look like in GW2?
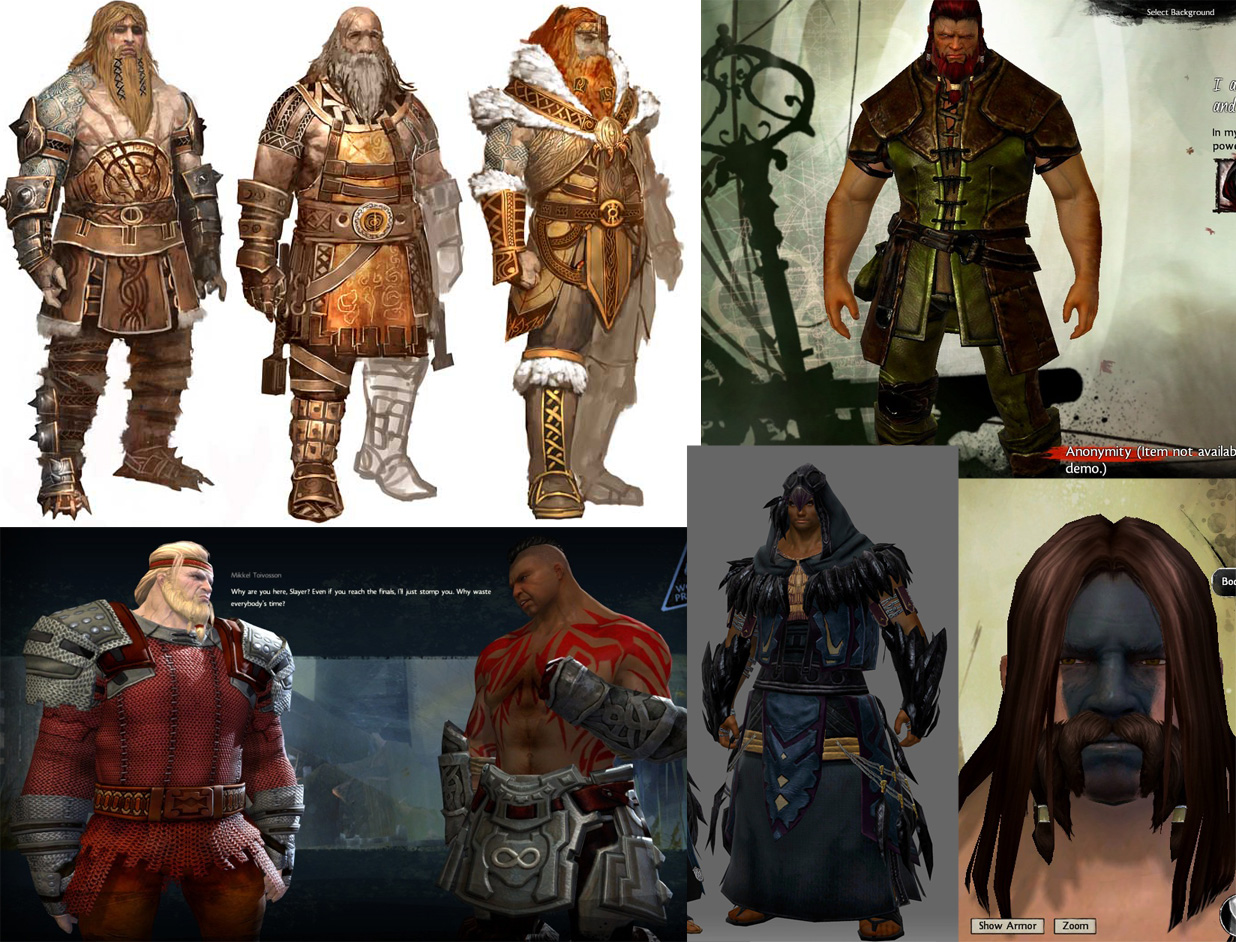
Cool, so key features that really define the character? No neck. Huge traps. Broad shoulders. Just a very solid chunky feel to the proportions.
Next I went to see if I could find some character creation shots to see the general anatomy a bit better.
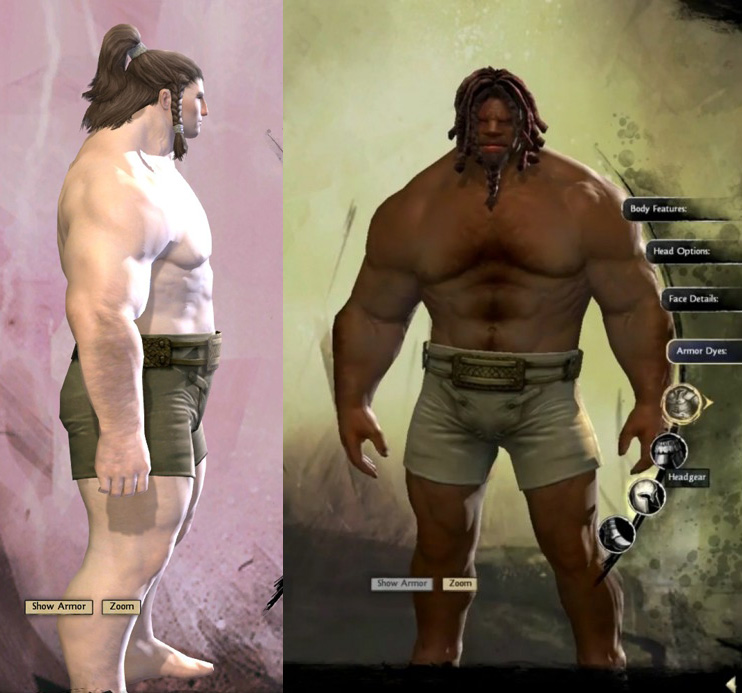
Done. Granted, there are things like weight and height sliders in character creation but I feel these shots give me a good feel of what a norn is and will really help to differentiate this character from a human character in GW2.
Base proportions time. I still use Arsh's base mesh when I want to block out quick and simple human anatomy. I'll pop the basemesh into mudbox, move some stuff around, pull it back into maya and change the topology so that's it's more evenly spaced on the new proportions - which means deleting a few loops in places, adding some in others, and in some places cutting new edge flow. This usually happens a few times going back and forth between packages but getting the mesh to a solid point now will save me the headache of dealing with bad geometry later down the road. The great thing about Arsh's base mesh is that it's low poly enough and the edge loops are simple enough that this is a very easy task yet there's enough geometry so that the form is still being held when stepping up a subdivision level in mudbox.
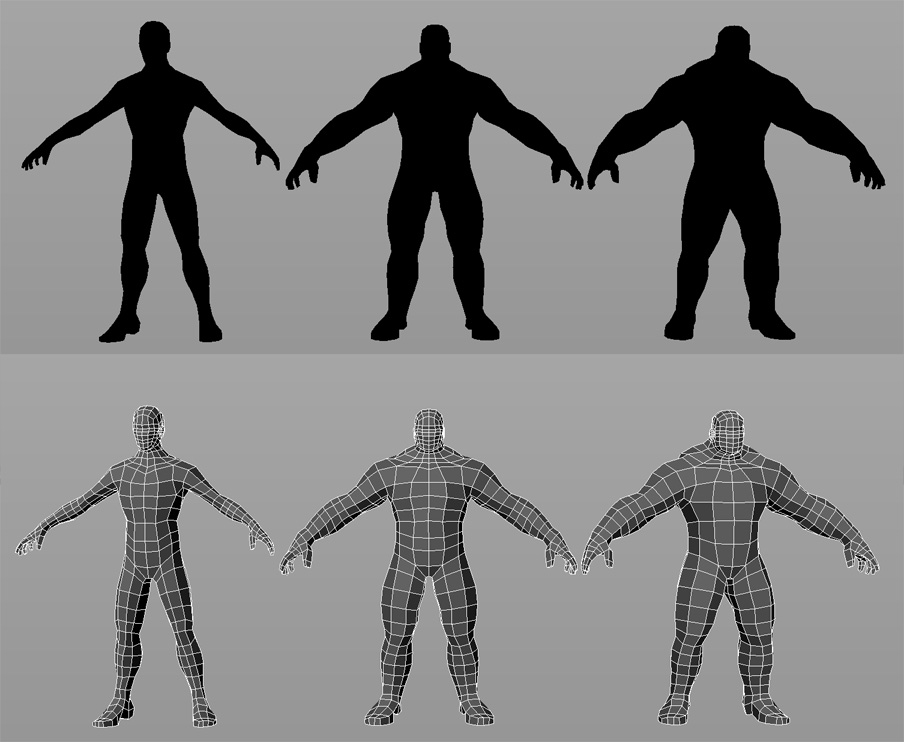
So after fixing up the topology of the basemesh I separated the head geometry from the body - later on I'll bring in a different basemesh specifically for the head that already has more detail modeled into it. I don't like really pulling on geometry for things like the eyelids and ears when starting from a very simple base mesh and the face I usually end up needing to subdivide a few more times than the body mesh to get all of the desired detail. So in this case since there is a natural break between the head and body where it is covered by armor in the concept it seems like a logical choice to have two separate meshes rather than a continuous mesh for the entire anatomy. This will save me a bit on the file size, processing power, and ease of use since hiding an entire mesh in mudbox is easier than masking off a section and then hiding unselected, and I won't need to subdivide an entire anatomy mesh for localized face detail.
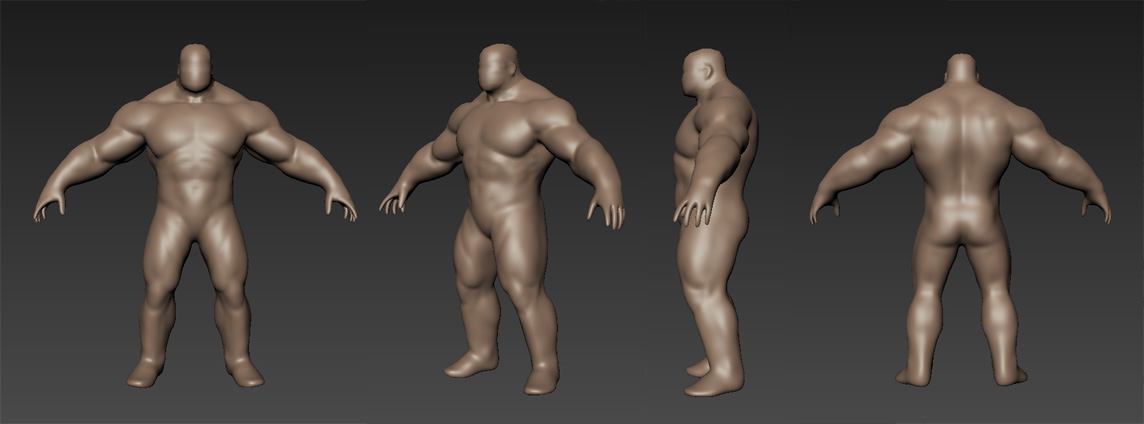
and there you have it. Some very roughed in anatomy and slightly refined proportions, trying to stick very close to the above posted character creation shots. So I know that the basemesh will hold the level of detail in the areas that it needs to for the concept - the abs, arms, hands and lower back. I also have some general shapes to conform the clothing and armor to when I get to that stage in the sculpt.
The next steps will be planning out the pieces of the model.
Which elements are repeated in the concept?
What can I get away with mirroring?
What can I get away with sculpting only once and then duplicating?
What will be easier to add the normals to inside of photoshop or subdivision modeling in maya?
Then onto the armor blockout, rough head sculpt, and refining the anatomy.
If you've made it this far - Thanks for reading and any comments or feedback is much appreciated... especially if you think I'm taking a wrong step someplace.
**Disclaimer** - I do not claim to know what I'm doing. I'm just making this all up as I go, so take everything with a big ol' grain of salt.
It's been a long time since I've followed the GuildWars development. I played the original for a brief period of time way back in the day but other than seeing the amazing concept art I haven't been following GuildWars 2. So after seeing the concept and then seeing a post from Stoofoo mentioning something about matching the current GW2 artstyle, I began my search...
The first question I had - what is a Norn and what does one look like in GW2?
Cool, so key features that really define the character? No neck. Huge traps. Broad shoulders. Just a very solid chunky feel to the proportions.
Next I went to see if I could find some character creation shots to see the general anatomy a bit better.
Done. Granted, there are things like weight and height sliders in character creation but I feel these shots give me a good feel of what a norn is and will really help to differentiate this character from a human character in GW2.
Base proportions time. I still use Arsh's base mesh when I want to block out quick and simple human anatomy. I'll pop the basemesh into mudbox, move some stuff around, pull it back into maya and change the topology so that's it's more evenly spaced on the new proportions - which means deleting a few loops in places, adding some in others, and in some places cutting new edge flow. This usually happens a few times going back and forth between packages but getting the mesh to a solid point now will save me the headache of dealing with bad geometry later down the road. The great thing about Arsh's base mesh is that it's low poly enough and the edge loops are simple enough that this is a very easy task yet there's enough geometry so that the form is still being held when stepping up a subdivision level in mudbox.
So after fixing up the topology of the basemesh I separated the head geometry from the body - later on I'll bring in a different basemesh specifically for the head that already has more detail modeled into it. I don't like really pulling on geometry for things like the eyelids and ears when starting from a very simple base mesh and the face I usually end up needing to subdivide a few more times than the body mesh to get all of the desired detail. So in this case since there is a natural break between the head and body where it is covered by armor in the concept it seems like a logical choice to have two separate meshes rather than a continuous mesh for the entire anatomy. This will save me a bit on the file size, processing power, and ease of use since hiding an entire mesh in mudbox is easier than masking off a section and then hiding unselected, and I won't need to subdivide an entire anatomy mesh for localized face detail.
and there you have it. Some very roughed in anatomy and slightly refined proportions, trying to stick very close to the above posted character creation shots. So I know that the basemesh will hold the level of detail in the areas that it needs to for the concept - the abs, arms, hands and lower back. I also have some general shapes to conform the clothing and armor to when I get to that stage in the sculpt.
The next steps will be planning out the pieces of the model.
Which elements are repeated in the concept?
What can I get away with mirroring?
What can I get away with sculpting only once and then duplicating?
What will be easier to add the normals to inside of photoshop or subdivision modeling in maya?
Then onto the armor blockout, rough head sculpt, and refining the anatomy.
If you've made it this far - Thanks for reading and any comments or feedback is much appreciated... especially if you think I'm taking a wrong step someplace.
Replies
@Donavonyoung -
It's an interesting thing with art tests really... do you try to match the concept that you're given? Do you try to match the art style of that company's games? or do you try to make the piece in your own personal style? I never know exactly which to go for. I wonder how much it just comes down to whoever is actually looking at the test results and what sticks out to them? I dunno, I'd be really interested to hear other people's thoughts on the matter.
... and more research. I was trying to figure out how much to use old texture tricks where you duplicate one element around or just remap a small section of texture to multiple elements... and well, it looks like Guild Wars 2 is relatively aggressive with such things.
Exhibit A
So if i'm reading this image correctly - the majority of the fur is the same texture, it might be two textures overall - one for the larger sections like the neck and waist and one for the thinner sections like the arm linings and the shoulder pad lining.
The circular celtic knot thing is duplicated all over the place.
The squashed pyramid thing is duplicated a lot, and my theory is that it is even remapped to things like those cube/box things attached to his arm, as well as mapped to the faces around his ankles and on the toes of his boots.
It also stands to reason that the majority of the other pieces are mirrored over - the anatomy, his pants, sleeves, boots, etc.
Taking all that into consideration...
That is my quickly sketched out plan of what is what with the arttest concept. I looked for elements that were repeated multiple times in different areas, then for elements that were mirrored across the body, and finally the last few totally unique elements were left.
I'm sure some things will change once I get into the actual modeling part. I'm also flying totally blind as to what's going on with his backside. It's times like these an art lead or art director would be nice in order to answer a few questions.
Which then leads me to the blocking out phase.
I took one of the middle subdivision levels of my anatomy sculpt as well as the very lowest level back into maya. The mid level is to give me a sense of the proportions surface of the anatomy in order to block out geometry around. The lowest level was for certain elements that I wanted to follow the anatomy surface but I needed to have different edge flow (the straps around his arm and leg) or at least have a separate mesh to sculpt on rather than the base anatomy (the leather sleeve over his left arm). Then I started throwing shapes down to get a sense of where things will fall and how they will fit together. There was a bit of tweaking since my model has different proportions from those of the concept and certain elements had to be resized or moved a bit.
Since I'm trying to evaluate my entire process and not just show my end results here's my actual blockout. The light grey fur bits are only there to get a sense of where the fur is and isn't actually for sculpting. I also have only done half of the character since nearly all of those elements will mirror over. I may duplicate and mirror some of them before going into mudbox - just to get the entire visual as I'm sculpting but I don't think that's entirely necessary. I'm also thinking now that the sections of his boot can more easily be duplicated three times and just scaled down as they go down the calf rather than make that all unique texture space.
I'm also planning on doing some things with sub-d modeling rather than sculpting them - like the unique shoulder piece, the clasps holding his skirt tassles, the bits around his belt buckle, and maybe that u-shaped thing across his chest. The celtic knot things I'm still deciding on what will be the easiest but still give me some nice normals.
Other than that the rectangle stuff at his feet - the smaller square'ish one will be the wolf's head, and the panel below that will be the sides of his skirt.
**theorizing
I'm still not entirely sure from the concept which parts of his torso are visible. There's this old screencap of the same armor but I'm fairly certain it's from a very old version of GW2 and the art direction has since moved on. Yet, in this screenshot he clearly has his abs and lower back visible. But it also lists his triangle count and texture sheets as much higher spec.
the screenshot in question - http://media.giantbomb.com/uploads/0/4689/1895731-nornsnowleopardshaman.jpg
So - let me know if this doesn't make sense - I'm going to make his abs and lower back very tight fitting leather. It will still show off the general forms of the underlying anatomy and the real bonus will come when it would be time to rig and animate the character. My thinking is that the ingame body mesh will probably be segmented - head, torso, arms, hands, legs, so that when there's an armor piece that covers the legs, for example, that the corresponding leg anatomy mesh would be entirely hidden. But if you have part of that anatomy visible you'll still have to load that mesh, plus the armor mesh on top of it, as well as worry about the topology matching up or how to keep the weights from pull those two meshes apart and showing gaps as the character moves. Which are all things you could avoid if the torso is entirely covered by the armor rather than showing the characters' midriff. So that's my reasoning for tight fitting leather for the vague sections of the concept rather than showing bare skin. Thoughts?
Next time - bringing stuff back into mudbox!
Dunno if you've seen this pic or not, but maybe it could help you make some decisions.
I'll most likely still have the abs and upper chest area, near the neck, visible as it looks like it would be the legit male version of the female's skin-bearing set.
Loving your detailed writeups so far ^^
Nice one Caldria, yeah I hadn't seen that in-game shot before. I did catch a glimpse of the female version in one of the GW2 trailers but that really only showed her upper body. That image definitely answers a lot of the questions I had, like in terms of duplicating the boot bits, and those metal clasp things around his waist.
Ok, quick head writeup - this is a very similar workflow to my initial steps.
First for the GW2 reference
Notice the face in the upper right with the scar over one eye? Seems pretty close to the face from the concept to me. So I've decided to go for something close to that. It also seems that the overall head shape doesn't change too much only subtle changes to the larger features like the jawline, and then the different faces being defined by the actual facial features - brow, nose, eyes, etc.
Basemesh time. I've heard a number of different opinions on head basemeshes - that it's better to make them very low poly and blocky so you have to freshly sculpt all of the features each time otherwise all of your faces will look the same, or that the more detail that is modeled into the mesh the better as it makes it that much faster and easier to sculpt.
Personally I like having more detail modeled into my mesh. This head mesh that I'm showing here I've been using for years and I've tweaked it now and then but the layout has remained generally the same. The poly flow is based on the book Stop Staring by Jason Osipa - [ame="https://www.amazon.com/Stop-Staring-Facial-Modeling-Animation/dp/0782141293"]Amazon.com: Stop Staring: Facial Modeling and Animation Done Right (0025211441299): Jason Osipa: Books[/ame]
I learned a lot from that book.
I'm not saying this mesh is perfect by any means - for example if there needs to be some fancy hairstyle on it the poles on the forehead get really annoying and some areas break down if I push the mesh too far away from its original shape for like a monster or demon sort of mesh. One of these days I'll make another base mesh that is about half the amount of geometry as this one but still has the ears, nose, and eyelids defined as well as holes for the mouth and eyes... someday.
Then after a few hours of sculpting it looks like this.
Still early stages but I think the general shapes are there and it gives me something to base the hair and beard meshes around.
As far as the sculpting workflow that I use I have no idea how to show that. It's really just a lot of grab, sculpt, and smooth tool until it starts to look right.
Still have all of the armor work to do, and to block out some meshes for the hair and beard.
The only way I could think to show my sculpting process, other than making a video, is to show the general steps I take on a mesh. It's the same basic idea I've always been taught in drawing classes - start with the bigger picture and then work your way into the details. Gesture, forms, then details and lighting. Refine and polish each step as you work on the next. Rinse, repeat.
I'll try to keep my initial stages really loose and just work on the overall proportions and silhouette. It helps me to stay at a low subdivision level so I'm not tempted to start really working into too much detail. Once the proportions are starting to look sort of right I'll start massing out the general forms, in this case of the anatomy. Still at a fairly low subdivision level and refining what I've already done and now adding details that the mesh will allow. Once I'm generally satisfied with a subdivision level I'll then step up one and start in on detailing that one. I'll still look for ways to improve the larger shapes that now have changed or look different to me now - it's sort of subtle but an example here would be the forms in the abs. In between the last step I changed the larger forms to define the ribcage more and push in the lateral division of the abs above his belly button.
That's really about it and then I'll just go through those same basic steps for all of the elements that I bring into mudbox and sculpt on.
So I've been wrong about at least one thing so far. My plan about only needing to work on half of the armor in mudbox and all that. Yeah, I started bringing things into mudbox and realized there are too many pieces of the sculpt for me to try and keep track of without actually having them in the scene and visible. So I'm in the process of blocking out some more bits and pieces inside of maya, as well as adding the other things like hair that I didn't block out before.
which brings me to this:
This is one of the better images I have from GW2 that shows the hairline and hair mesh. What I think is going on is the hair and beard meshes are just shells with one bit alpha for the edging and then it looks like there is a texture overlay on the actual head geometry to ground the hair around the edges.
Almost forgot, the eyebrows - as far as I can tell those are painted on the head geometry.
My hair blockout in order to keep it a separate mesh from the head and allow for easier baking down the road.
and finally a progress shot of the state of things in mudbox. He's sort of a mess right now and there's a bunch of things that I need to rework (his little gauntlet things for one, and the wolf heads are pretty mushy still). There are also a number of things that I need to bring over from maya - the hardsurface stuff primarily, and the rest of his boot.
Currently I have the sculpt close to done but I started getting into details where I wasn't entirely sure how they would bake down - would the geometry hold the normals well? would there be enough resolution for the fine details or would I need to make those details chunkier? A good example being the u-shaped metal thing on his chest with those fine lines crossing it. If I don't have enough texture resolution when I bake that out it either won't read or just won't even show up.
With that in mind I decided to start in on the lowpoly mesh, do a few test bakes to see what the deal is and if I need to go back and fix things.
My basic workflow for lowpoly creation is to bring in a lower subdivision level from mudbox into maya and then start modeling around it. In this case when working on the head I started with a cube, cut in the major edge loops and then started cutting in the details, and as I add detail I'll make sure those new verts match up to the surface of the mid resolution mesh from mudbox.
In the past for retopology I've used Topogun and Nex for maya, both of which are very nice programs. I personally like the amount of control from hand modeling everything though. I found using the retopo tools it was easier to 'skip' over areas or not pay as much attention to how the low poly meets up with the sculpted mesh and let the topo tools do the work, which can result in a lowpoly mesh that might not be the most efficient or else loses some key elements of the surface or silhouette. This might also be because I've been hand modeling things a whole lot longer than using those tools and if I were to delve deeper into them I might end up liking them more.
After a bit more time modeling I ended up with a decent looking mesh... however, I was up around 9,000 tri's. Then after a considerable amount of optimization I ended up with this:
Not everything is merged together but he's a few triangles over 6,500. I think I've maintained the important silhouette information and left enough geometry to define the surface. There is still work to be done here but he's at a point where I can quickly UV map him and then do out those test bakes.
So the next steps, uv mapping, test bakes, then finishing the sculpt. I'm hoping to have him finished up on Monday. We'll see how that goes.
Yeah, the boots were just placeholder to remind me I needed to repeat those uvs. and the arm elbow joint do you mean his left or my left? The arm with the sleeve or without?
Now I'm about 100 tri's under the poly limit and I'm thinking those will go into the fingers to fix up some shading errors that I'm getting there.
and so much for finishing up on monday... but here he is with a whole lot of placeholder stuff still.
Using Kodde's maya shader. Still mostly base colors, the fur parts are quick photo overlays to get an idea of coloration, there isn't any proper specular, but I did throw a quick reflection map on the metal parts since that was only a few mouse clicks to do.
Needs a few fixes to the normals, and there's another thing I want to sculpt on his back. Plus I'm still working on the whole color scheme... so, pretty much everything you see here is subject to change still. Heh.
UV breakdown:
Planar projection map to get some initial uvs.
Go around and select the seams and then split uvs along those seams.
A few clicks and adjusting the weight solver in the 'unfold UVs options'
Checking texel density and for relatively even layout.
Last steps (not shown) checking the texel density across all the pieces of the model and adjusting accordingly. For this model I wanted more texture resolution in the head and hair so the UVs for those pieces have about twice the scale and so twice the texel density.
Map baking:
There are so many resources for this that I think it's relatively standard knowledge I'll just briefly hit some of the things I think are helpful.
First up is XNormal
http://www.xnormal.net/1.aspx
Second is this 'cavity map' trick using Crazybump
http://www.polycount.com/forum/showthread.php?t=52183
This image only shows a diffuse + normals in the viewport of each initial stage.
So after finishing up the bakes I'll start putting stuff together. Drop in some base colors to see how everything relates and use the Crazybump overlays to get an idea of initial lighting/details. Then it's time to start painting.
For texturing I use a lot of the occlusion and cavity maps as guides and essentially try to stay within the lines. Starting out with the larger overall colors then working to smaller and smaller details and adding layers of grunge as I go along. I'll pull out useful layers from time to time and toss those into a specular folder in my psd - things like scratches, grunge anything I think would have an impact on the spec. After I have the diffuse worked up a little bit I'll get the spec going, put together a quick relfection mask, and place a realtime shader on the model to more accurately get an idea of what the model would look like in-game.
All through this process I'll notice small things I overlooked in the bake or that didn't turn out very well and I'll go back and fix up the sculpt or whatever the highpoly is, rebake out the occlusion/normals/cavity maps and fix up the problem. In the past I've tried taking shortcuts with such things - for example using the photoshop normalmap filter to try and correct a larger detail in the normals... this has always ended badly for me. It'll give me subpar results and usually I have ended up just going back and fixing the sculpt anyway... so anymore I figure it saves me wasted time and effort to 'do it right' in the first place.
This is where the model currently is. It's getting close to done. There are still a number of things that I'm working on, the specular is throwing me off - I miss my gloss maps, the fur I'm still iterating on and has changed a few times already, and the 1 bit alpha has also been a bit of a learning experience to get looking alright.
Fur:
I'm still coming to terms with the fur painting and I keep going back to the reference images I've collected from GW2. The problem I'm running into is that it seems that the fur is done differently on different models. I'm guessing there could be a number of reasons behind this - differences in texel density and so different techniques work better, simply having different artists working on different pieces, or the art style has changed over time and some of these shots are from earlier in development (it isn't like there's a time stamp so I have no idea).
My current line of thinking with the fur - I really like the style of the fur on the bear guy in the lower left. But I want to stay within the color constraints and leave it semi monochromatic... which the fur in the bottom left looks so good partly due to all the different colors and the lighting painted in there. So I've tried to sort of mix a few of the styles of fur - trying to keep somewhat of a painterly feel to it, a little bit of depth but still sticking to something simple enough that it could be color swapped and be readable. That's the plan at least... fully realizing that is going to take a bit more time.
I don't know why I didn't think of this sooner - but I finally went and dug up a bunch of the GW2 character creation videos on youtube. Seeing the characters and lighting in motion really helped out a lot. For example
[ame="
The downside comparing that to my head sculpt - I don't have the texel density in the face to support that much detail. I'm torn I'd really like to go back and change my sculpt to match but then I'll have to redo my UVs and then take that texture space away from the armor parts (the armor being what the focus of the art test is meant to be). I'm also assuming the actual in game heads will have their own texture sheets, as well as the heads during gameplay will use a mip level that is at least half the texture resolution shown in the character creation videos - which would then be closer to the texel density on the head of my model.
It also would appear that they are using different gloss settings on different parts of the model - guessing that would be based on a per texture sort of thing. For instance the eyeball has that really tight specular highlight, while the skin has a much broader softer spec, and then compared to the armor which looks like it is someplace in between.
Finally, watching closely while the sliders for the eye shape are being moved there's an overlay on the eyeballs to get the shadowing there. I'm not the greatest tech guy but I don't think that can be done with a one-bit alpha map. I'm assuming there would be an extra eyeball shell that overlays the actual eyeball and that shell has a gradient alpha (or I suppose vertex alpha might work?) in order to achieve that nice shadowing.
I guess my point being that I was wondering how the in game characters were made to look so good in the screenshots I saw if those shots were within the confines of the art test specifications. The conclusion I've come to is that is because the art test specifications are not those of the actual ingame models themselves... which does make perfect sense and I should have realized that sooner as well. Now I know I can't perfectly match the in game shots but that still isn't going to stop me from trying as hard as I can to do so but still staying within the guidelines of the art test.
Thoughts? Feedback? Did I misinterpret something or just flat out get it wrong?
Since the focus is on armor, I wouldn't sweat the limits on the face too much, especially considering the tri and texture limits we have and with the focus mostly being on armor. I think it is pretty possible to use the specs given and get close but not exact to the in game models if you use a real time shader and mess with it a lot... maybe that is all part of the test.
Originally I had wanted to try doing everything the way they would at ArenaNet - thinking that sort of reverse engineering their workflow and sticking to that would give me the best/most accurate results. I think cheating on some things though could improve the look of my model. Nothing like rendering in vray or anything but more little things that I'm fairly certain they don't do for GW2. The eye is a pretty good example:
I wanted the shadowing of the lid to seat the eye in the head so I painted that shadow into the diffuse, I wanted a really bright specular dot on the eye to make it pop a bit, but the specular is a pretty low setting (because there's more armor and skin than wet glossy surfaces on the model) so I painted that small highlight directly into the spec. It looks alright under most lighting conditions and most people aren't going to notice that the highlight isn't in the right place but they will notice if that highlight isn't there and the eyes look 'flat'.
I dunno, I'm having a lot of fun with the character and trying to figure out the GW2 pipeline. It's really been making me rethink aspects of my workflow that I usually take for granted.
All that said I'm finally finishing him up. Organizing my files and getting things together. Hopefully I caught the majority of the little mistakes I made. Here's the state of things:
Anyone know what the deliverables for the art test should be? The briefing doesn't mention anything about if they want model files, texture files, or the required formats. I'm thinking an obj, fbx, mb (just in case), and then tga texture files plus the above screenshots.
the textures could definitely use more contrast at the moment. everything is about the same value.
as for the deliverables i assumed it would be screenshots? if i hear anything back about needing source psds ztools or objs ill let you know.
Thanks for the support and feedback along the way. It's been a really fun project. Now it's onto the next one.