Home Technical Talk

The Snow and Ice of Uncharted2?

13
Bal
polycounter lvl 17
Offline / Send Message
Bal polycounter lvl 17
Hey, I've been looking into making some snow/ice effects recently, and was pretty blown away by the work that was done in Uncharted 2.
Stuff like this :
http://www.gamespot.com/ps3/action/uncharted2amongthieves/images/0/49/?full_size=1
http://img29.imageshack.us/img29/6708/uncharted2amongthieves1e.jpg
http://pic.leech.it/pic.php?id=9a508f6uc1.jpg
[ame]http://www.youtube.com/watch?v=s7BAelqlxwI&feature=related[/ame]
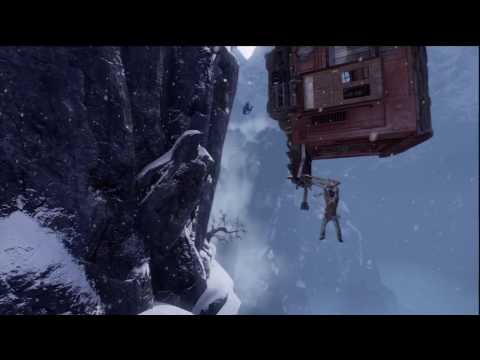
I'm having trouble getting my head around exactly how these were achieved, the texture resolutions are super-fine, and I really can't see much tiling going on.

I was thinking of maybe some funky decal-projection-system with lots of generic snow alphas, or magical shaders, or they just had tons of texture memory and have high resolution unique textures plastered all over the place?

Anyone have some ideas on this?

Replies

  • GoSsS
    Offline / Send Message
    GoSsS polycounter lvl 14
    Hehe ! You were faster than me to post this mate ;)
    Interesting post that I'll follow.

    PS : As I said to you earlier I think it's a mix between "magical shader " (funny word :D) and decals ... Come on Naughty dog's guys tell us more about this ;)
  • Peris
    Offline / Send Message
    Peris polycounter lvl 17
    They use masks to blend textures everywhere in uncharted. It's awesome and that's why everything is so sharp (unlike the usual crappy fade between blending textures). And they probably use some other techniques like tint masks and stuff to get variations without eating up the memory. I also saw they use vertex colors for getting some nice ambient shading in there etc. It should all be pretty easy to do in unreal.
  • Bal
    Offline / Send Message
    Bal polycounter lvl 17
    Thanks for the info Peris!
    I'm not quite sure I understand, when you say masks, do you mean like alpha decals, that stack above the models?
  • Rhinokey
    Offline / Send Message
    Rhinokey polycounter lvl 18
    i believe he means using an alpha mask to determin the blending between the rock and the ice, instead of the normal method of doing vertex alpha to belnd them, that way you can get variations on blending instead of the blury transition you get with vertex blending,
  • Acumen
    Offline / Send Message
    Acumen polycounter lvl 18
    i'm really no technical guy, but are you maybe talking about something like this ?
    sounds like what peris said, at least a bit to me :D

    http://developer.valvesoftware.com/w/images/9/9c/Blendmodulate.jpg

    http://developer.valvesoftware.com/wiki/$blendmodulatetexture
  • Peris
    Offline / Send Message
    Peris polycounter lvl 17
    Acumen wrote: »
    i'm really no technical guy, but are you maybe talking about something like this ?
    sounds like what peris said, at least a bit to me :D

    http://developer.valvesoftware.com/w/images/9/9c/Blendmodulate.jpg

    http://developer.valvesoftware.com/wiki/

    yep that's it!
  • hijak
    yeah using a mask to blend the textures can work really well, hell you could even blend seperate materials with the mask. And you could also have the snow build up only in the crevices and on overhangs if you made a cavity type shader, and combined it with the masks. The only issues ive run into when using masks, i call them mix textures, is that if the terrain is pretty large and your only using one mixmap then if the res is too low on that map you will still get blurry transitions, but it will still look better than vertex blending in most cases. And your not limited to just rock and snow, you could do that with a black, and white mask but you could aslo mix 4 textures if you treat an RGBA image as 4 seperate greyscale masks, one mask per channel.
  • Ryno
    Offline / Send Message
    Ryno polycounter lvl 18
    Yah, masked blending is the way to go. Pretty common for any tight terrain blending.
  • nrek
    Offline / Send Message
    nrek polycounter lvl 14
    Here is a post by Brisck over on ga that explains how he does it with multiple b&w masks.

    http://www.gameartisans.org/forums/showpost.php?p=176419&postcount=25

    And here is a post by Lamont that explains how he does it with RGB masks grey packed into a single image.

    http://www.gameartisans.org/forums/showpost.php?p=169940&postcount=15
  • Bal
    Offline / Send Message
    Bal polycounter lvl 17
    No wait, we are talking about two different things now I think...

    Just to clarify, what is described on the Valve dev site isn't the same as what hijak or brisck are doing right?
    I already know about using a large image map to modulate terrain materials of course, but in uncharted 2 and on the valve site they are actually using a smaller tiling texture that the shader uses to replace the transitions on the vertex blending (you're still painting the vertex right?).
  • nrek
    Offline / Send Message
    nrek polycounter lvl 14
    Oh I see what your saying, yea ignore my previous post then.
  • commander_keen
    Offline / Send Message
    commander_keen polycounter lvl 18
    They could be finding the world space normals of pixels and placing snow where it would collect in realtime. It wouldnt be the fastest way to do it but it would allow extremely unique and fine snow placement with just a few masks for snow density, so memory usage and artist work would be very low.
  • DEElekgolo
    Offline / Send Message
    DEElekgolo interpolator
    It may just do what Crysis did and use the World space Z coordinate to create vertex based snow. And taking normal maps into consideration for some bitmap-based snow. Polyboost(graphite tools) has a tool that renders a vertice based image depending on its normal to a specific coordinate. I think it calls it a dust map or something.
  • hijak
    yeah i think you guys are right probably a cavity/dust shader, its pretty easy to make something like that, granted you can build the network. Im sure it could be easily written by hand but would be even easier to do with some node based editor like in unreal, or a few other apps. Like mentioned you are basically taking the world space normal coordinates, and saying anything with zero slope up to like 30% slope will recieve snow. You could still mask out areas you wanted no snow on but the actual snow placement mask is generated dynamically. And it does not need to be calculated on the vertex and can be calculated from surface normals read from a normal map. So you can make a low poly rock put a nice normal map on it, and be able to get snow in all the little cracks and crevices, provided by the normal map. And yo could mix this with the slope calculate from the geo itself, that way if you had a tiling texture on the rocks you would get large scale variety from the geo and small scale from the normal map.
    There is a few ways to go about it. I would picture it like this.
    Take the surface normal of the object (mixed) With the normals from the normal map then converted to world space, have this run the position of 3 colors on a gradient, just RGB. The gradient created would serve as the mask, just like if you where using a mix texture, except the texture is being generated by the shader.
    Its confusing to write down but these exampls should be a little more clear.
    This one is about how i created a terrain shader, using the technique from above, combined with some others.
    http://forum.mentalimages.com/showthread.php?t=1554
    And this one is a tutorial on how to make a deposit shader.
    http://forum.mentalimages.com/showthread.php?t=5463
    While these are done in mental mill, looking at the network and understanding the concept should point you in the right direction for this.

  • Noors
    Offline / Send Message
    Noors greentooth
    aye bal is right, those aren't the same stuff. Splatting shader use a large map covering all the terrain. So blend quality depends of terrain size/ texture resolution. The blendmodulate thing from Valve use a tiny tiling texture which gives you way more details. Now i really don't know how the shader determine a pattern from that green channel we see, to blend the materials nicely from the vertex color shape underneath. I can't find any paper on it :(
  • Xoliul
    Offline / Send Message
    Xoliul polycounter lvl 16
    Doing it with a shader is not so hard. I wrote one that blends based on Z component of a surface's normal in world space. Mainly based on the crysis paper. I had this after an hour or 3:

    snowshaderwip04b.jpg

    Looks a whole lot better on a strong rock-type normal map. We used it for moss in our Unreal engine based game as well.
  • Bal
    Offline / Send Message
    Bal polycounter lvl 17
    Thanks for all this info! You guys rock.

    The modulated blend from Valve seems the most versatile (and maybe less expensive?), but that deposit shader you posted hijak is quite nice also, will look into all this.

    Edit : Xoliul, cool, do you have a link to that crysis paper?
  • Xoliul
  • Lamont
    Offline / Send Message
    Lamont polycounter lvl 16
    Looking at it, it's multiple things I guess:

    The shader, and the shaders reaction in shadows. It's not a tone of grey, it's blue. You got a variation specular hits (like a prism). Lighting of the snow is important, or it just looks like mayonnaise. Then you have the geometry of the snow on some parts (ice and stuff), then you have believable snow filling in the crevices of the scene with proper blending to areas without the snow.

    I'd also add in some artistic control to where the snow fell. Like use the green channel of the radiosity normal map option from xNormal to control the initial coverage, then go in and touch up. I use the RAD normal map to control all kinds of stuff in my terrain shaders.

    Again, this is just off the top of my head. Believable snow is hard. This would make for a very fun assignment in UED.
  • Lamont
    Offline / Send Message
    Lamont polycounter lvl 16
    Been messing around with something in UED. Don't have the control I want over it yet. But should be cool. Will post the shader network if it's worth it.

    EDIT - Here is the progress I've made. Right after I uploaded the files, I got specular masking properly, so the spec for the snow is separate from the spec for whatever object you're gonna put snow on. The snow coverage can be tied to Kismet. What I am working on is a way to get the effects directional, and to do that I think I will NEED to use a radiosity normal map. The normal map can be used as a way to limit coverage (say on deep cracks), this should be adjustable... to be able to turn spec off, and just have sand, dirt, grime...

    So another thing is that I would love to get a depth from the Y (or Z) and use that and blend with the normal map for crevices... but that's a dream and so I'm doing it the crazy shader way.

    SnowTest.jpg
  • Peris
    Offline / Send Message
    Peris polycounter lvl 17
    I'd love to see your shader setup lamont =). I tried making a similar shader in ue3 but couldn't figure out how to blend my blend mask with another mask in a nice way (to get that nice sharp blending effect you have in the first pic). They use this everywhere in uncharted by the way, all the architecture and stuff have textures blended like this.
    like the bricks and the plaster here http://kittygotwet.net/images/uncharted_2_01.jpg
    they have a mask that tiles together with the brick texture so it cuts them out nicely. I'm trying to get that working in unreal3 but i can't figure it out. I guess I need to modulate two masks somehow.
  • Lamont
    Offline / Send Message
    Lamont polycounter lvl 16
    That bricks in the plaster thing would rock!! I'm messing with trying to get direction and stuff now. It's my way of taking a break from doing stuff :P.
  • MoP
    Offline / Send Message
    MoP polycounter lvl 18
    Nice shader, Lamont. It reminds me of the blending stuff we used to blend terrain textures for Megatexture generation, but in realtime :)

    Yep, if you look through Uncharted 2 you'll see they're really using this stuff a lot, and very effectively. Blending plaster with bricks is all over the place in there, I guess they use vertex colour to control the "large scale" mask.
  • CrazyButcher
    Offline / Send Message
    CrazyButcher polycounter lvl 20
    you want the radiosity normalmap fetch to approximate directional occlusion? or what was your motivation for that?
  • glib
    Peris wrote: »
    I'd love to see your shader setup lamont =). I tried making a similar shader in ue3 but couldn't figure out how to blend my blend mask with another mask in a nice way (to get that nice sharp blending effect you have in the first pic). They use this everywhere in uncharted by the way, all the architecture and stuff have textures blended like this.
    like the bricks and the plaster here http://kittygotwet.net/images/uncharted_2_01.jpg
    they have a mask that tiles together with the brick texture so it cuts them out nicely. I'm trying to get that working in unreal3 but i can't figure it out. I guess I need to modulate two masks somehow.

    I was poking at that last week in shaderfx, ended up with something like:
    If 0 -> texture A
    If 1 -> texture B
    If between 0 and 1 -> blend using mask

    But that meant that my brick details tiled with the wall texture, it was too hard to get them to sit where they were needed (around windows, edges of the building etc).


    Could they have been using just normal decaling?
  • MoP
    Offline / Send Message
    MoP polycounter lvl 18
    It should be pretty easy, you just need your brick texture and mask texture to be the same size/resolution, and have the mask basically be a heightmap of the bricks.
    That way when you modulate the brick heightmap with the vertexcolour, you'll get a nice fading/mixing mask which perfectly matches your brickwork. It shouldn't really matter what size/resolution/tiling your plaster texture is.

    Edit: Did a quick shaderFX mockup tonight- my maths is still wrong on the mask (it should have a float value to allow varying the "sharpness" of the masked area) but it works fairly well as a prototype.
    There's a tiling mask which is basically a crappy heightmap of the stone texture, it's blended with the vertex colour and used to control mixing the normals and diffuse maps.

    http://www.greveson.co.uk/dump/blend_mask_1.avi

    1.5mb, XVid format - just showing how the vertexcolour change affects the shader. Could be pretty neat (and could also be used for animatable stuff like having lava/water flowing into cracks of an object).
  • Lamont
    Offline / Send Message
    Lamont polycounter lvl 16
    you want the radiosity normalmap fetch to approximate directional occlusion? or what was your motivation for that?
    To use some of the values to fill in the cracks realistically, say wind vector.

    That's really cool MoP.. I need to get into that stuff, looks fun.
  • Jet_Pilot
    Offline / Send Message
    Jet_Pilot polycounter lvl 10
    Hey MoP, any chance of sharing that shader with the group?
  • shadows
    Offline / Send Message
    shadows polycounter lvl 18
    Had a go at it inside ue3 with quick and dirty texutes. Did what Mop did, took vertex color , a mask and mixed them together.
    I don't really like the soft fading that you get from the vertex blending in some places, but depending how you lay out the brick texture and use vertex color it shouldnt be to noticeable. But for snow, dust... this setup is a great and cheap solution I think.
    vertexBlending_test_ue3.jpg
  • gamedev
    Offline / Send Message
    gamedev polycounter lvl 12
    Hey everyone,

    I saw this thread and really wanted to try something in UE3 for my Unearthly Challenge entry. Below is what I came up w/. You can read more about it and what it does on our UC thread. Cheers!

    proceduralsnow.jpg
  • [HP]
    Offline / Send Message
    [HP] polycounter lvl 17
    This thread is made of win!

    MoP, that's great stuff. I (We) would learn a lot of you could share that. I would really like to learn this kind of stuff.
  • Bal
    Offline / Send Message
    Bal polycounter lvl 17
    This is great guys, thanks! It's really made me want to sit down and learn some shader-magic.
  • Peris
    Offline / Send Message
    Peris polycounter lvl 17
    sweet mop! I really love that, it's so simple and awesome. Why isn't it done more in games?
  • shadows
    Offline / Send Message
    shadows polycounter lvl 18
    Forgot to post this last night. But could be of some interest .
    vertexBlending_test_ue3Shader.jpg

    Just connect the Lerp into the diffuse slot and it should work.
    To keep the texture calls to a minimum I used the RBG channels of a texture to create the mask, specular (grayscale only, but it's easy enough to tint it) and a gloss map.
    To make it work, just paint the vertex color that you want to blend a red color on the model.
  • Jet_Pilot
    Offline / Send Message
    Jet_Pilot polycounter lvl 10
    @ shadows... from what i get, you need to have your mask be a height map so as the vertex color fades to white, the mask then fades the height.
  • shadows
    Offline / Send Message
    shadows polycounter lvl 18
    Just think of it as multiplying two black and white maps in photoshop onto each other. Whereas in this case the vertex color of the model is used as a unique map to break up the tiling of the mask, which is the green channel for this setup.
    So that anything this black or a gray in color is shown and anything that is white or red (vertex colors) is not.
    This is the setup I used for testing.
    vertexBlending_test_ue3Setup.jpg
  • MoP
    Offline / Send Message
    MoP polycounter lvl 18
    shadows: in this setup, what are the red and blue channels of that map used for?
  • shadows
    Offline / Send Message
    shadows polycounter lvl 18
    mop: for this they are just the spec and gloss maps
  • MoP
    Offline / Send Message
    MoP polycounter lvl 18
    Ah, I see.

    I've tweaked my shader a bit now so that the vertex alpha can be used to control the falloff of the blending (0 or black = tight blend, 1 or white = soft blend), which provides a lot of variation fairly cheaply (and painting vert alpha is nicer than having to paint red for coverage and green for falloff, it just gets confusing!).

    I still need to check my maths, I don't think my blending is quite right, but it's almost done. I'll post a screenshot of the shaderFX node network, and a download of the FX file once I've done a manual pass on it to clean it up.
  • Lamont
    Offline / Send Message
    Lamont polycounter lvl 16
    @ MoP - See if you can get some sort of "edge" to the painted layer and the brick. Like an undercoat. Then have that defined by a second mask.
  • MoP
    Offline / Send Message
    MoP polycounter lvl 18
    Lamont, yep, I was thinking the same thing. Could even just be a drop-shadow or something I guess. However this sort of thing makes the shader more complex (and expensive - although I have no idea how expensive it even is at the moment by current shader standards!).

    I messed up something tonight though and appear to have been grabbing the wrong information for the vertex colour, so it doesn't work at all predictably right now. I have no idea where it's getting the info from (this is my first time actually "programming" a shader rather than hooking it up with nodes in ShaderFX).
    I think I can figure it out (and learn something in the process!) but it'll have to wait until tomorrow.

    The default output of ShaderFX stuff is pretty ugly since you have to define "constants" as nodes, and the same with math operations - stuff you can write in a single line of code usually ends up as 3 to 5 lines of "node output" code, so I'm basically cleaning the whole thing up and hooking up some UI-specific things that you can't easily do in ShaderFX (eg. overriding use of normal, spec, vertex alpha, gloss, etc).

    Edit: WIP viewport screengrab showing a constant blending amount (about half), with a variable constant "falloff" for the blend (basically how sharp the blend edges are). This falloff is also controllable using the vertex alpha if you want, for even more variation and uniqueness on the cheap.

    This is blending diffuse, normal, specular and gloss. I also have options in the shader for skipping normal/spec/gloss as needed. You can use gloss from the specular alpha channel or just a constant value.
    blend_mask_01.jpg
  • Lamont
    Offline / Send Message
    Lamont polycounter lvl 16
    If the mesh has a normal map, then take a look at using the existing normal map and dropping the effected edge pixels down a couple of values to give it depth and let PPL take care of the rest.
  • shadows
    Offline / Send Message
    shadows polycounter lvl 18
    Really cool looking Mop, can you post a screenshot of the nodes? I'm curious on how you went about to get the sharpness of the blending to work.
  • MoP
    Offline / Send Message
    MoP polycounter lvl 18
    shadows: at the moment it's literally just
    mixMask = clamp( ( ( heightmap - vertexColor.r ) / blendFalloff ), 0.0, 1.0 );
    
    I'm pretty sure my maths is wrong still, it produces a reasonable effect but it isn't exactly what I need. Will try to perfect it tonight once I figure out where I've messed up my vertex colour lookup.
  • Ged
    Offline / Send Message
    Ged interpolator
    beautiful results here mop, wish I new more about shaders.
  • Sa74n
    Offline / Send Message
    Sa74n polycounter lvl 18
    paul, i love it. i wonder what kind of possibilities this opens aside from nice texture transitions, especially when animated. maybe even some sort of cheap ambient occlusion or so, depending on normals
  • MoP
    Offline / Send Message
    MoP polycounter lvl 18
    Sa74n: Yeah, I was thinking about animated stuff too - for example, a simple sine wave multiplied over the vertexcolour could fake effects like sand blowing across cracks in cobblestones, or other sorts of vertexcolour tweaking lava filling up between stones etc.
  • Brice Vandemoortele
    Offline / Send Message
    Brice Vandemoortele polycounter lvl 19
    a lot of nice r&d in here :) kewl
  • shadows
    Offline / Send Message
    shadows polycounter lvl 18
    Second test using Mop's math formula ( well at least I think I used it correctly ;) , I always sucked at math)

    The vertex blending still works.. but I used the wrong side of the model to show it and didn't notice until now.

    At 0.005 most of the soft fading is gone but the mask starts to look like 1 bit alpha, so it is not as nice looking up close. And you can get some side effects from the vertex color. With straight cut off lines. But you can get some interesting results. Like in this more of the overlay texture is showing up. Showing more of the plaster underneath the surface.
    At 1 soft but no artifacts.
    At 5 , 50% blend of the texture overlay.
    Blend 50%, blends both textures together.

    vertexBlending_test2_ue3.jpg

    vertexBlending_test2_ue3Shader.jpg
  • MoP
    Offline / Send Message
    MoP polycounter lvl 18
    shadows: Looks pretty good. Is your 'OverlayMSG' mask texture there basically a heightmap of the brick texture? Or is it that one from the green channel of your earlier screenshot?

    I find this method works best by using an actual heightmap of the "bottom" texture (in your case, the bricks) rather than any sort of custom mask.

    Also, I actually clamp the minimum value of the blend falloff to 0.01 since I find anything lower ends up looking really "alphatest" as you found out.
13
Sign In or Register to comment.