The BRAWL² Tournament Challenge has been announced!
It starts May 12, and ends Sept 12. Let's see what you got!
https://polycount.com/discussion/237047/the-brawl²-tournament
It starts May 12, and ends Sept 12. Let's see what you got!
https://polycount.com/discussion/237047/the-brawl²-tournament
Various questions about UV mapping (Splits, overlapping, flattening cylinders...)
Hey guys,
I have some general questions about UV mapping I couldn't find an answer to or wanted to be sure, so maybe you can help me with some:
1. When you overlap the shells to make better use of the space, how would you bake? Would it be better to delete one the part of the object with the overlaped shells so it would only be baked the other one? Do you bake the two parts?
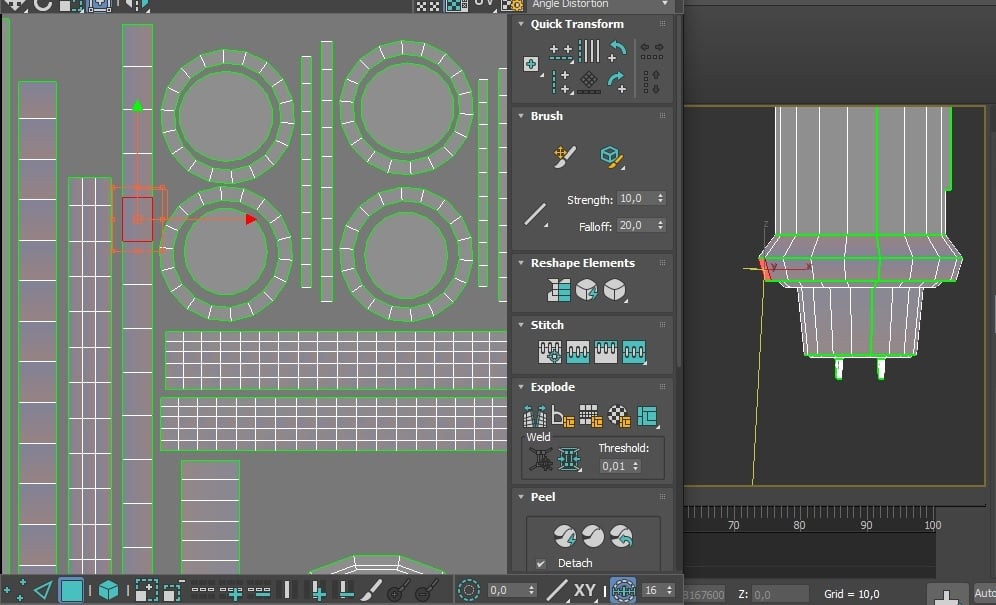
2. It's there a way of flattening the shell of cilyndrical parts that aren't 100% straight without distortion, like in this example (which I know should be one UV shell for the whole cylinder, but I didn't realised), or do you have to put up with a circular shell with a hole inside, wasting space unless you do what I did in the image?

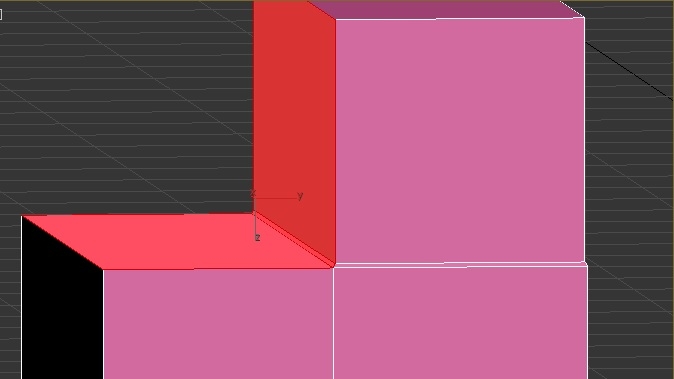
3. When it's really necessary to make a new UV split? Because I saw the threads by Earthquake and videos talking about making splits to control the shading behavior, but then I see people making a whole UV shell for parts that are almost a hard edge, but have a little bevel like this:

So by hard edge it means it has to be a 45º angle or more to make a UV split?
4. Is the orientation of the shells really important? I can't think of any problems of having shells upside down or inclined unless the model is going to be hand painted and it would be harder to know which shells are looking which way. In Substance Painter you practically paint directly over the model, so I don't see why could it be really a problem considering the time put to rotate each UV and the benefit you get for it.
5. It's there a way to save that direction of each UV shell as a map, at least in 3ds Max, so you know the flow of a texture for each shell and can paint it more easily?
6. Do you make the UVs for each object individually and then apply a UVW Unwrap with all selected to pack the UVs or do you merge them together and unwrap them as a single object? Is there a way of isolating the selection (in the viewport) inside UVW Unwrap to make unwrapping them one by one easier?
These are some questions that come to mind right now. Some are maybe pretty stupid, but I prefer to be sure.
Thanks for any help!
I have some general questions about UV mapping I couldn't find an answer to or wanted to be sure, so maybe you can help me with some:
1. When you overlap the shells to make better use of the space, how would you bake? Would it be better to delete one the part of the object with the overlaped shells so it would only be baked the other one? Do you bake the two parts?
2. It's there a way of flattening the shell of cilyndrical parts that aren't 100% straight without distortion, like in this example (which I know should be one UV shell for the whole cylinder, but I didn't realised), or do you have to put up with a circular shell with a hole inside, wasting space unless you do what I did in the image?

3. When it's really necessary to make a new UV split? Because I saw the threads by Earthquake and videos talking about making splits to control the shading behavior, but then I see people making a whole UV shell for parts that are almost a hard edge, but have a little bevel like this:

So by hard edge it means it has to be a 45º angle or more to make a UV split?
4. Is the orientation of the shells really important? I can't think of any problems of having shells upside down or inclined unless the model is going to be hand painted and it would be harder to know which shells are looking which way. In Substance Painter you practically paint directly over the model, so I don't see why could it be really a problem considering the time put to rotate each UV and the benefit you get for it.
5. It's there a way to save that direction of each UV shell as a map, at least in 3ds Max, so you know the flow of a texture for each shell and can paint it more easily?
6. Do you make the UVs for each object individually and then apply a UVW Unwrap with all selected to pack the UVs or do you merge them together and unwrap them as a single object? Is there a way of isolating the selection (in the viewport) inside UVW Unwrap to make unwrapping them one by one easier?
These are some questions that come to mind right now. Some are maybe pretty stupid, but I prefer to be sure.
Thanks for any help!

Replies
1. Do you mean bake normal map? For normal texturing overlapping faces is a great way to increase texture for a surface, so if you are able to overlap faces and think that it would work, then sure. Go for it! For a normal map, sure you can overlap faces, but it is a lot more tricky and you might have to do some tweaking in Photoshop afterwards. I personally don't recommend it and I don't have any experience doing this for larger pieces.
2. When you are working on a mesh that isn't 100 % straight, you will have to deal with some distortion. If you want to have straight UVs but the faces are a bit rotated or skewed, then you'll have too choose. I would go for straight UVs for the most part.
3. Depends on where it is going to be used, the more polygons / triangles that your mesh has the more data the computer has to work with and the slower your computer gets. If you are going to work with games, a small bevel like the one you have demonstrated seems to small to make a difference. For movies and VFX, I don't really know. This is something I am unsure of, so I suggest that you keep looking around for an answer about this. If you find something cool, make sure tell me!
4. Well, this also depends on what it is going to be used for. I tend to spend some extra minutes to align my shells so that they are in the "right" angle, but as far as I know, there are no reasons to rotate them unless you have too, which you do in some circumstances.
5. I am a bit unsure of what you mean here. So I'll answer this with, well two answers... If you are talking about saving a texture map and import it later, then sure, you can do that. I believe the keybinding is "alt + ctrl + S". If you are talking about having like arrows pointing in the direction and rotation of your shells, so that you can easily see how they all come together, then I don't think so.
6. A am a bit unsure of what you mean here too... When you create a model, it can be done in multiple ways. Let's say that I create a car. All pieces of the car doesn't have to be in one mesh. For example I can have the doors, tire / wheel and such separate. So with that in mind, I can texture my car door, and then do the tire / wheel and if I then decide that I want to have all of my UVs in the same map, so that they share the same texture. I can just attach them together and that will be it. Alternatively I can have everything attached under one mesh and then split it up in too multiple meshes.
About the isolation, there is an isolation button in 3D studio max search for "Isolate Selection Toggle", same thing goes for the UV editor. You can hide and show shells in there. The button should be in the bottom of the UV editor and it is called Hide and Unhide.
I hope this helped you somewhat! Have a great rest of the evening!
http://wiki.polycount.com/wiki/Texture_Baking#UV_Coordinates
Thanks for answering, the second answer helped me a bit.
Fuck, I thought I had read everything about UVs there.
Thanks Eric, I'm starting to feel bad everytime you send me to the wiki.