The BRAWL² Tournament Challenge has been announced!
It starts May 12, and ends Sept 12. Let's see what you got!
https://polycount.com/discussion/237047/the-brawl²-tournament
It starts May 12, and ends Sept 12. Let's see what you got!
https://polycount.com/discussion/237047/the-brawl²-tournament
Rubi Malone - Big Images
polycounter lvl 17
Hey Guys,
So I built her over 2 years ago now. Only just getting around to showing it! I see quite a few problems proportionately with her, but its ancient stuff now and would like to just close this chapter and share it round so I can get back to finishing my FFXII Fran model.
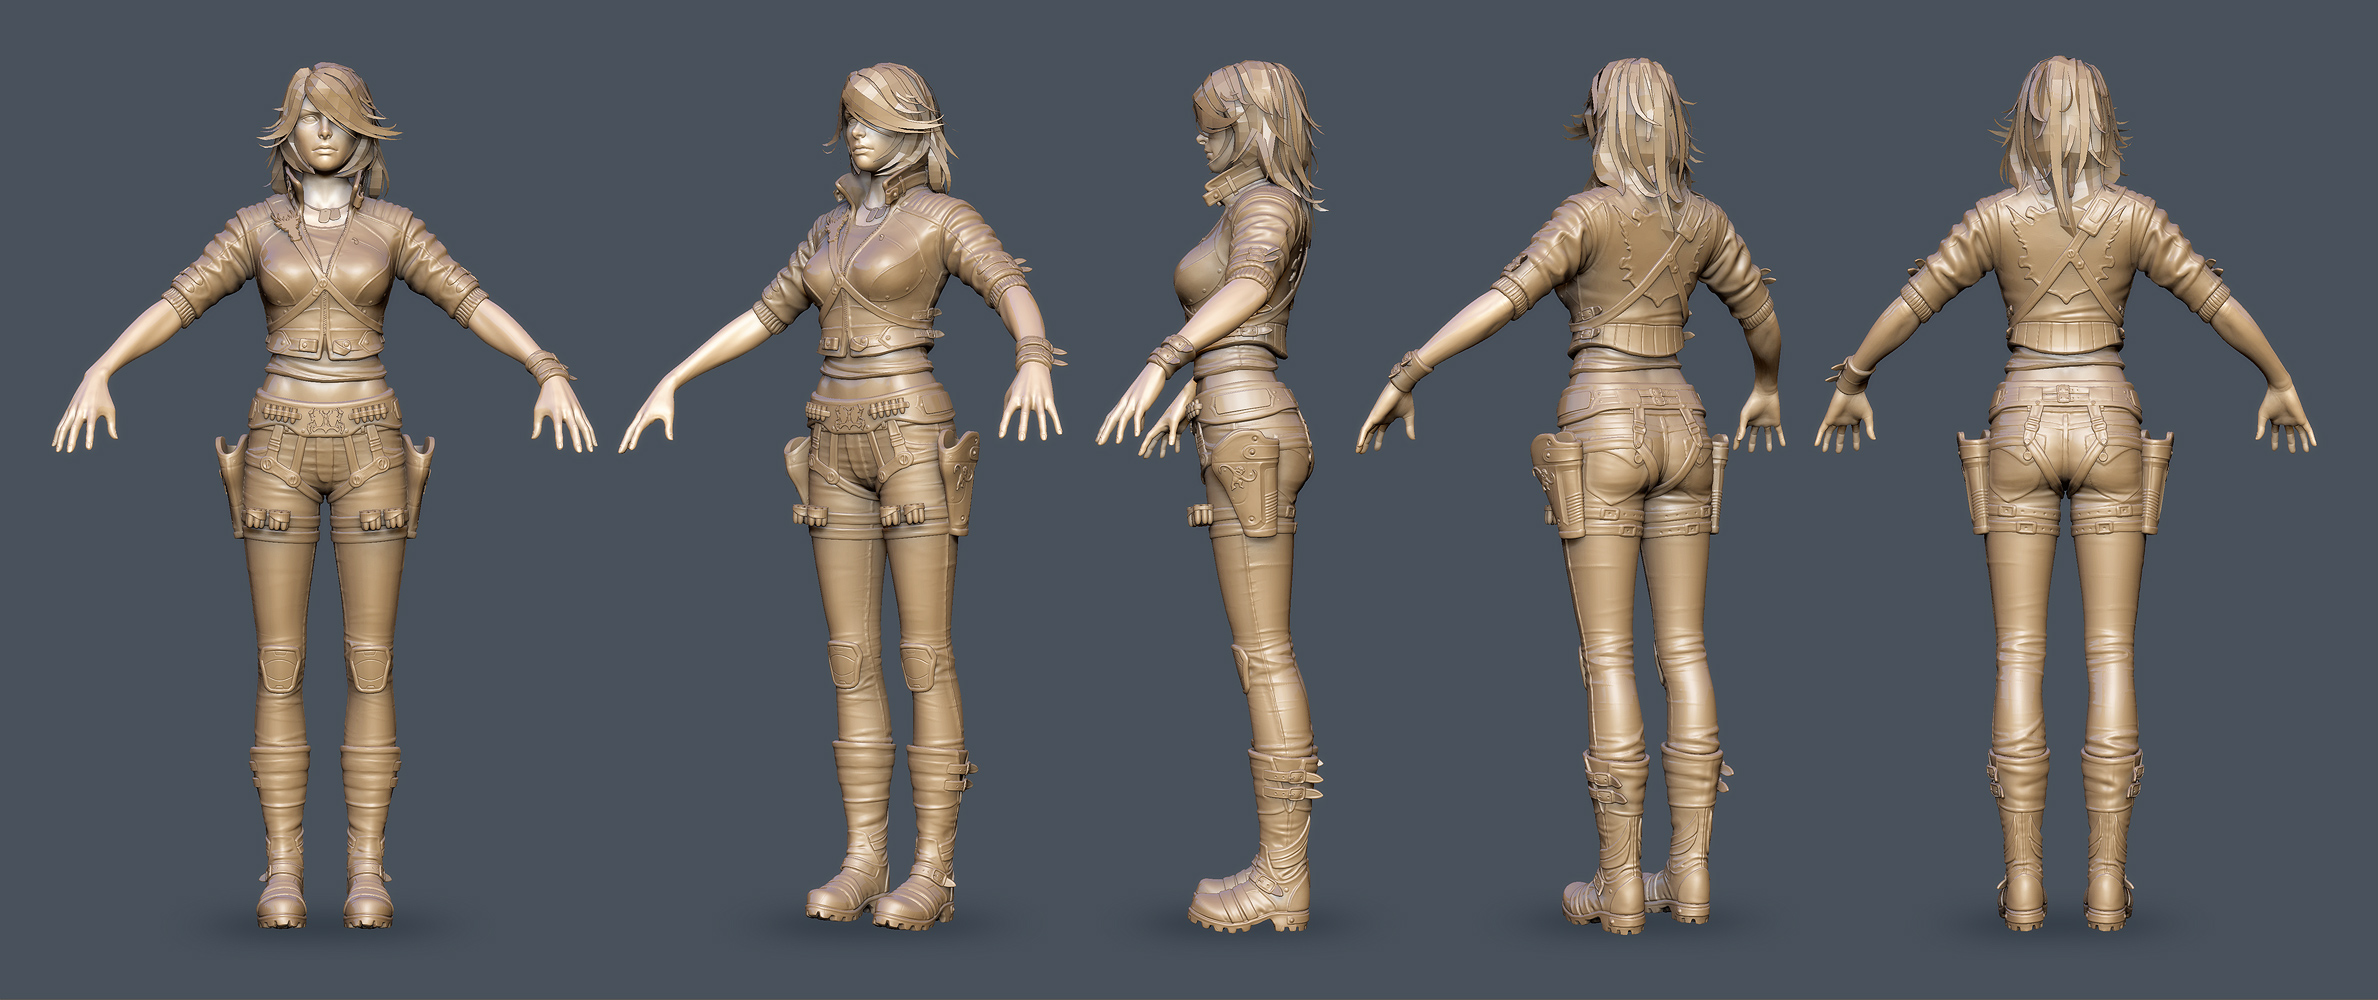


Shes been built in 3 configurations, but no naked version booooooo!
I didnt ever build her guns or her swords or finish her hair at the time. But I'm going to mod a sword I had from one of my old characters, and Haikai has generously lended me his Desert Eagle to sit in her holsters and I think I will finish her hair.... but no gaurantees!
As always these are Max2012 viewport grabs using the Beta of Xoliul 2.0 and the viewport grabber script. I'll turn on shadows and whatnot on my final Beauty Render...
I'll have some wires and posed shots coming soon as well as the texture flats, ( posing her right now )
P.S In light of Adams recent post - Ask some fucking questions!
So I built her over 2 years ago now. Only just getting around to showing it! I see quite a few problems proportionately with her, but its ancient stuff now and would like to just close this chapter and share it round so I can get back to finishing my FFXII Fran model.
Shes been built in 3 configurations, but no naked version booooooo!
I didnt ever build her guns or her swords or finish her hair at the time. But I'm going to mod a sword I had from one of my old characters, and Haikai has generously lended me his Desert Eagle to sit in her holsters and I think I will finish her hair.... but no gaurantees!
As always these are Max2012 viewport grabs using the Beta of Xoliul 2.0 and the viewport grabber script. I'll turn on shadows and whatnot on my final Beauty Render...
I'll have some wires and posed shots coming soon as well as the texture flats, ( posing her right now )
P.S In light of Adams recent post - Ask some fucking questions!
Replies
Great work, I love it.
Are you using a colored reflect mask texture to change the fresnel falloff color depending on material type?
How'd you go about doing the hair planes? They look pretty blocky in the clay render, do they not get normal mapped and textured, just stay flat black? The hair looks good but its hard to believe it would be as simple as putting poly strips there o_O Any wizardry involved?
Now, can we see some texture flats, wires and bewbz already?
Do you btw always do the little bitty detail like that dragon's head in the texturing stage?
Oh, and are the jacket/belt on seperate UV sheets? Pretty amazed at the texture density you've got going on here.
Thirds on the texture flats, or at least some more detail regarding polycount and texture size.
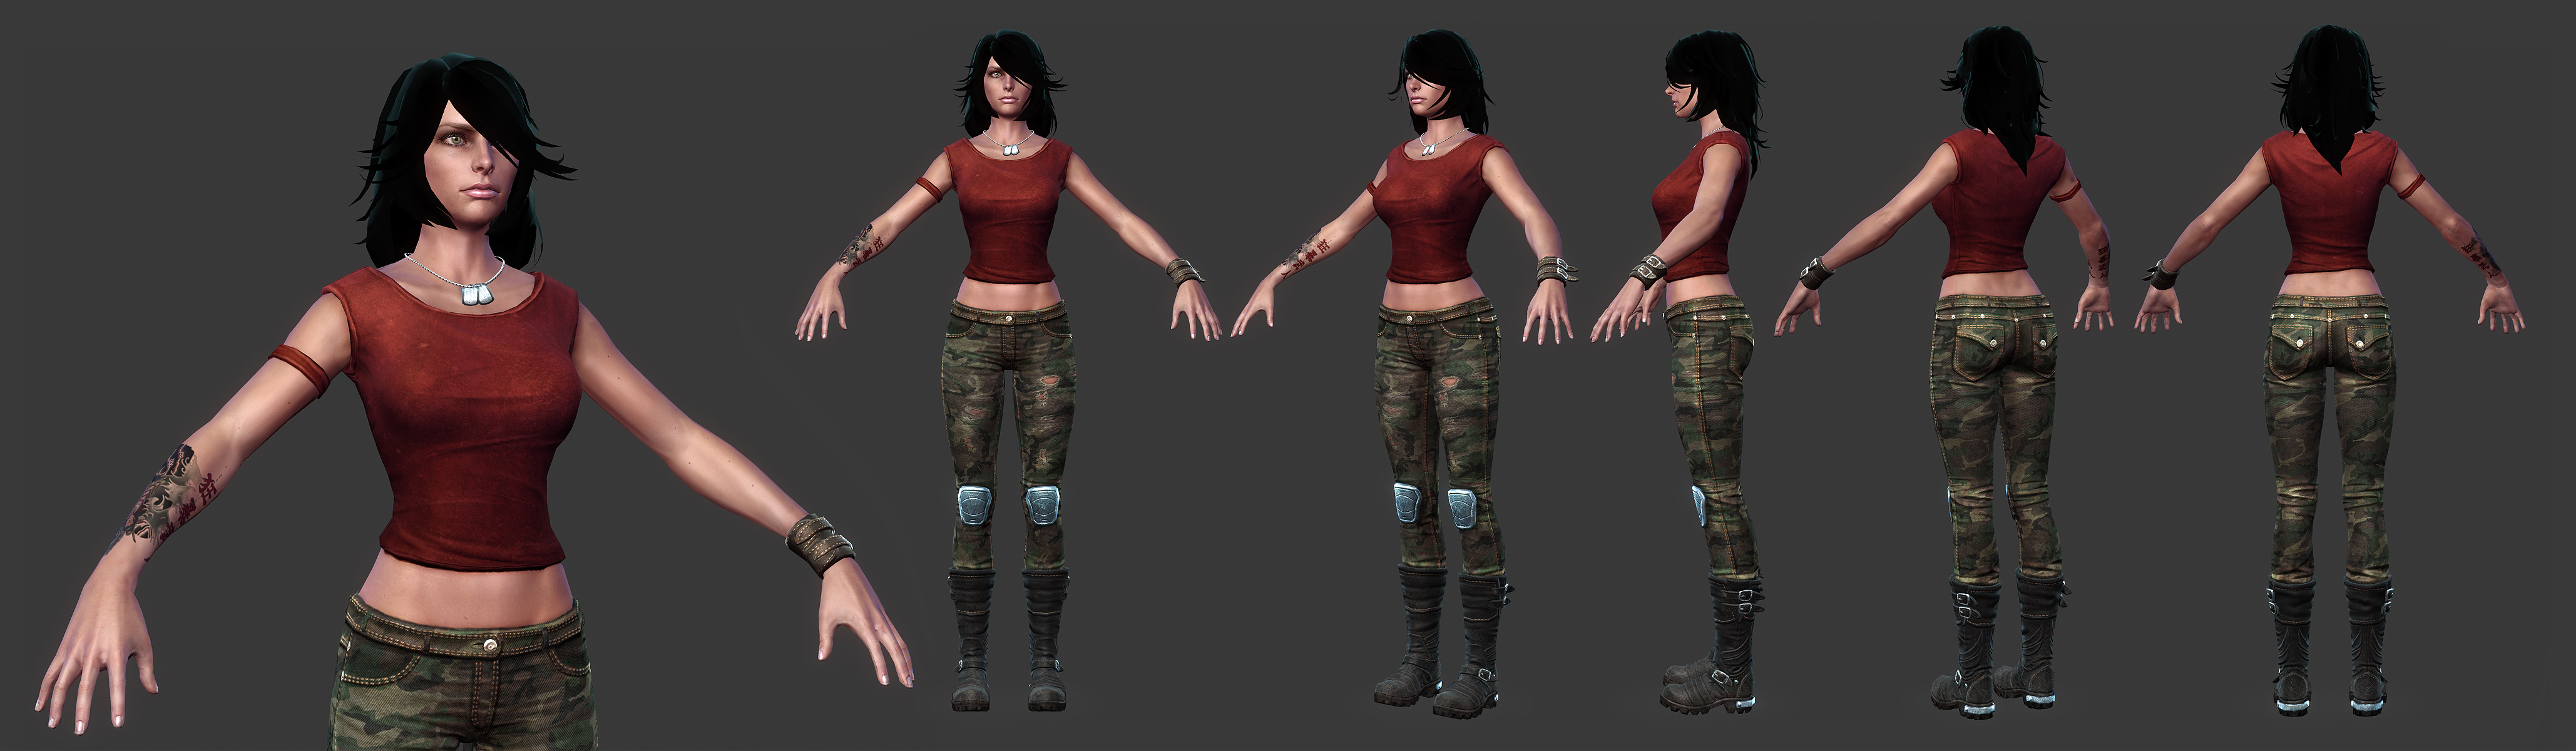
Work in progress of my beauty shot for my folio.... not done yet, but its 2:30am and im tired. for my final beauty shot im just going to paint her hair heh.
The gun and sword models are not Replicas from the game I know lol - Thanks to Haikai for letting me borrow his Desert Eagles!!
I forgot to mention, shes ranges from 13 - 18k tris depending on the config and shes using 2 x 2048 maps.
chrisradsby: Thanks man glad you like! Leather is one of those things i think is easy to overdo man, and i think youll understand what im about to say when i post up my texture flats, but basically its a fairly flat color, with some noise, and a leather pattern, with a spec map that really picks up the raised skin parts of leather, and doesnt show any spec down in the crevases, i think thats the key to getting nice leather. I know it doesnt mean much in words, im hoping the flats will show you what i mean.
Xoliul: Nah man, but that sounds interesting!?!?! I'll have a go at that!
gilesruscoe: Its just strip modelling - theres really no wizardry going on at all. I build a few strips of hair, and i throw them into zbrush and smoosh them around with the move tool, then duplicate and rinse and repeat until i get the kind of shape and randomness im looking for. THe hair is unfished in those shots above, this model is super old now and i didnt want to go back and put in a whole bunch of time.....
Maph: Thanks man! Rubi told me she loves her tatoo !! Yeah ill typically leave that stuff for the texture stage unless its a massive detail. Yup the jacket and holsters are on a seperate texture sheet - 2 x 2048's in these shots. Intended to be 2 x 1024 for ingame.
Scudz: Haha this is merely an old piece of Fanart
Daph: I never photosource my skin!!!! Well not since I started on my hand paint warpath. Its basically many many many layers of small noise brushes to create a kind of 'skin' feel, and once the base is down i start dotting some larger blemishes down and finally add moles and shit like that. I find fingers the toughest to get right because of all the wrinkles and junk so they look kinda shitty.
I am going to make a new folder in my inspiration folder with your name on it. Now I have a question that might seem silly but any way .... How are the eyelashes done man?
Is it just some splines and then you bake them to a alpha plane with some transparency? Yours always look awesome
Thanks in advance.
When checking out your first post I was like, yeah she looks great but something's a bit offputting. But when you posed her, it kinda made for much-much better first impression. She came across much more as person and you didn't really want to look for proportional errors in her, so great job on the pose as well:)
And, you know, though it's been years and there are things here and there that you'd probably like to fix, overall it still rocks the Hazardous-style quality, so I'm high-fiving the 2-years-ago Hazardous right now. High five!
Btw, it was really useful to find out about your skin process, thank you very much. Seems to make a lot of sense and I will definitely try it out.
So, yeah, thanks for sharing and now Fran please.)
awesome work bud!
am i... am i doing it right?
not much to say man, really dig the posed version and how the skin turned out :poly136:
+1 for posting more of yo fran model too btw, need those inspirations :poly142:
was gonna ask what you took the pics in but you already said it in your first post so... guess imma go learn max then >_>
Love your style as always, I think that my favourite part of your characters (besides the obvious
edit: You know..is it just me or are her cheeks bones and jaw more defined in the concept?
As far as the tattoo goes, personally I would have gone for something more traditional like http://www.akiba4you.com/wp-content/uploads/2010/11/Yakuza-Tebori-style-Tattoo.jpg
But since I'm sporting two sleeves of oriental tatts myself, I'm kinda biased of wanting to see those done "correctly".
Anyway, this still rocks mah socks though.
So thats her all done.
Mad props to Xoliul and his 2.0 Shader - that shits badass - and TOTALLY FREE.
I keep getting PM's asking to share my 'render settings' when these are just viewport grabs. Aside from the dodgy hair paintover in the Beauty shot, all this stuff is caputured at 5000 pixel wide images and shrunk down in PS for some nice AA goodness.
I've gotten a few private messages from deviantart about my claims of painting the skin instead of using a photo - so I thought I'd clarify here as well. I use a very similar process to this metal texturing tutorial that someone linked in the WAYWO thread just a few pages back - I'll update this post when I find it again. You'd actually be surprised at how this layer upon layer upon layer of random brushes can end up mimicing just about any damned material you can possibly think of and look remarkably photorealistic without just slapping a photo down.
Basically once I've got a massive sheet of this raw skin like material, i pull up some reference photos and make note of where skins lighter, and where colors and tones shift around, and start painting color layers over the top according to where they should be, then I start adding in greens, blues purples reds / yellows and gives those noise masks and jumble those layers together in a really organic way. To be honest I just noodle using this method until I get something im happy with.
I take the same approach with my polypainting in zbrush, splashing shit down all over the place and working something out of it rather than tackle this shit in a scientific way - thats what makes it very difficult to document. Ill just have to get around to doing some screen recordings at some point when I get around to it.
disanski: Actually the eyelashes are this time actually modelled into place individually with planes, but i usually dont do that - i usually do exactly as you guessed, just paint a nice alpha and whack that on a nice shaped curved plane for the eyelashes
ErichWK: Heh yeah, I agree with you, she looks harder in the original concept art for Wet 1.
Kot_Leopold: I have a base mesh that I start all my sculpts from unless told to do otherwise ( for comps etc ) Although I think thats a dumb thing for comps to ask for because I dont see the point in building the same little blockman every time lol.
Maph: Thats a sensative question lol! PM incoming.
One little thing that could be improved in my opinion is the metal on the blades ( it does read as metal but it it s bit too wavy and perhaps the gloss on it is a bit too tight?)
http://www.epragueknives.com/media/catalog/product/cache/1/image/9df78eab33525d08d6e5fb8d27136e95/i/m/img_9956.jpg
http://www.pattonblades.com/61511-1.jpg
Working with Damascus is freakin awesome, I want to try and do it one day.
EDIT: ah, question answered..
edit; this explains it better, ....hope you dont mind
Just my 2c, both look good so its up to Hazzard's preff in the end :P
The only thing about this I dislike is the rip in the camo pants just below her (grenades?) on her right leg. Something about it just makes me feel unconvinced. And, not sure if it is illusion, but it looks like the normal map of the "jeans" go straight through the holes. As if her skin is textured like jeans. Wish I could help more, haha, but it is really quite wonderful. Great job!
If I had to critique something it would be the curvature of the red shirt towards the bottom. It gives me the impression of the shirt being much thicker than it probably is made out to be.
However when looking at the shot with the shirt alone it seems like it's thick around each orifice; maybe it's supposed to be thick? It throws me off with the folds that are going on.
I am curious to find out if you use any specific third party unwrapping tools/plug-ins when you create your UV sheets too?
Thanks,
- Andr
thanks for the breakdowns
I'm a bit with crazyfool about the face, but she's nice like that too
Great jerb!
^_^
Crazyfool: THanks bro - I dont mind at all, in fact its one of the things I noticed when I opened the file bak up after a couple of years! I could get back in there and tweak around but I want to move onto finishing my other unfinished projects! dozens and dozens and dozens of sculpts and characters that are nearly finished / half finished and barely started.
Joopson: Eagle eyes man, I forgot to turn the rip layer on in the normal map WHOOPS! Thanks for that!
Andr
think her leg flesh is a little too red in the rips (shader?)
feel like the clothing overall is a bit too noisy/grainy. Being noisy everywhere detracts from the design, and is a little confusing to look at. Think some areas of noise would be great, but the clothing/accessories overall have a very grainy feel. Its all beautifully done, just think its a tad high contrast with noise & grain where the info could read just as textural lower contrast with some help from the spec & normal. The noise & uniform spec quality makes it a little difficult to tell the difference between cloth and leather too. This isn't not a natural way to approach spec, but adding some subtle color (blue is my go-to leather or rubber color) to leather gives it a nice pop off of other surfaces. The lack of noise in the flesh definitely helps pop it from other surfaces, but I think it may be too extreme
fucking love the hair & face... top notch f'in stuff man.
now, gogogogogogogo fran!!!!
SupRore: Firstly a warning, this could get kinda creepy and weird but you asked for it. Its too long Im going to have to break it into parts. Get popcorn.
Tackling the Female Face part 1:
For any face that I'm about to undertake I do hours of serious 'looking' first. I look at photos and pieces of concept art that I find visually appealing. I spend time surfing deviant art, flicker etc etc for female faces and I often look back through my own massive image bank of female face reference photos.
This kind of serious looking I find helps in multiple ways, sometimes youll find new photographers, new artists that you like etc, also it gets the gears in your mind ( whether you realize it or not ) working, your brain is actually taking in all of those images, and the more you consume during this time thats relevant the better.
I always tend to prefer the extreme photos, because I find every idea tends to ( at some degree at least ) get watered down and loose impact. My work suffers greatly from this, but im slowly working my way out of that dirty filthy grey hole.
What I mean by extreme photos is, lets say you want to create a really wicked set of makeup on this chick - then dont bother with just pics of makeup that looks average on a average looking chick, look for a chick wearing makeup that makes you go ' holy shit! ' that very sensation is the wave you want to be riding when your 'looking'.
Youre Moms Makeup:
Holy Shit Makeup:
Your moms lips:
Holy Shit Lips:
You get the point....
Also without a doubt, every time I do this I pick up nuances that I like to try and capture that I didnt see / notice before, its like a never-ending reward system that keeps giving the more you look and the more you put it into practice - its super addictive.
Once I'm through that stage Ill get straight into sculpting in zbrush - I have a fairly average head base mesh that I use, it kinda looks like a generic and somewhat naive 'poser' looking head, though I think I will start to not use this anymore as Im afraid my faces may start to look derivative over the long term and its always good to build things from scratch as it keeps your knowledge up and encourages you to 'go back to basics' as it were.
For the actual process, I ALWAYS start at a low subdivision and work my way up. getting as much as possible out of the lower before moving to the higher - Ill always be jumping back and forward between these especially if I can push or refine something more.
Its at this point I make the decision on whether i want to go for a more realistic or stylized approach.
Idealized Realistic:
Idealized but Stylized Exaggeration:
I tend to hover somewhere in between which seriously, isnt a good thing at all and something I need to work on - but I think its been a necessary step in my evolution.
Once Ive got a rough idea of the proportions and stylization of the face Im looking for, it becomes a process of refinement. I'll break each feature down and work on it for maybe 15 min at a time, lips, eyes, nose, whole face, then lips, eyes, nose, whole face - always zooming right out and paying very special attention at the outset to the profile and the front view, once those 2 views are beginning to take shape, its all about giving volume to those features which is where you begin to focus on your 3/4 view.
When Im working on any given feature I cant stress enough how important it is to be constantly looking at it from every possible angle, trust me, youll find an angle it looks weird, fix it asap. Also aside from having your favorite sculpting matcap, get into the habit of constantly be changing it for inspections while you work, its like instantly changing your lighting and can really highlight problem areas with forms.
Once you get into this micro-building flow of constructing the face, youll see it all starts coming together - I keep doing this loop of lips, eyes, nose and the whole face ( relationship between all of them ) until I can see that its going in the right direction.
Your typical 'pretty' female face is the opposite of a male face, in that I mean you can keep adding and building up forms and cutting lines into a male face and it just keeps getting cooler and gnarlier, more weathered, more epic - a process of addition. But a female face is all about smoothing instead of chiseling, rounding out forms instead of defining them, its about adding strokes as mass, and then polishing them into a nice appealing shape - more akin to a process of subtraction. Yin / Yang etc etc
You can see particularly in a lot of the eastern games / anime etc where their male characters end up taking on androgynous and effeminate qualities, when they switch the principals from addition to subtraction for the males as well, you get guys that look more girly than guy'y:
Western Fellas too:
You questioned your sexuality for a microsecond or more looking at that pic of Bill just above didnt you, it makes you feel uncomfortable doesnt it! *evil laughter echoes* ....dont lie.
Anyway, *cough* I digress:
Once the sculpt reaches a point where I know its going the right way, I stop and go straight into polypainting mode. I always start with the eyes - easily the most important part of any female character - get these right and it will light the way for the rest of the face. I absolutely always look up reference again at this point, searching for sultry Smokey eyed reference and or pieces of stylized concept art that hyper-realizes 'the look' youre going for.
Remember again that all the reference I use dont necessarily have to be images that I simply want to replicate, but the emotion or sensation of ' fuck thats awesome ' is what I look for, and its in that, that I find inspiration.
I'll polypaint the face because at this point it gives me a brand new perspective on the forms and direction Ive chosen. I usually dont spend any more time than a couple of hours doing this - it doesnt have to be fancy - just enough to reaffirm that I made the right choices. Sometimes at this point I can fuck it up and I realize I need to go back and rework some stuff. So I'll do that and then come back to the painting.
My Chun Li for brawl is a perfect example of how I reached a point and then went, nope I need to go back and do some more modelling from this:
To this:
Looking back and reflecting - I think I made the wrong choice and ended up tumbling down into the grey filthy hole I mentioned above and ended up pushing her to a more boring / grey area rather than running with the weird mousey stylisation and pushing that stuff even further. Hopefully I'll be able to break out of this in the near future.......
Once Im happy with the polypaint ill often go into photoshop and start painting over a screengrab - playing with things like a matching hairstyle volume, eye makeup style, lipstick style and basically the colors of stuff to find something that I like. I hate to use this pic to illustrate because I really hate the look of this face now but its a good ilustration of what I'll tend to noodle around with at this point, in thise case some simple eye color completely transforms her persona:
If that all goes awesome, I basically go back to sculpting and attempt to realize the face to the best of my abilities using that same approach of moving from one area to another always remembering to jump back and see the face as a whole.
And thats pretty much how I tackle the base sculpt for all my girls faces with some other random nonsense thrown in there to ponder
TLDR:
1) Do some serious 'looking'.
2) Only pick extremes for your reference. Remember every image, whether its photographic or a piece of concept art should be absolutely biblical / epic and go as far as whatever style and subject you are working towards, can possibly go.
3) Get straight into sculpting and creating.
4) Break the head down into the lips, eyes, nose and the face as a whole and get into the cyclic rhythm of tackling these regions 15 min at a time each.
5) When it starts to take shape, stop and jump straight into polypainting.
6) Jump to photoshop and start playing with colors and makeup styles and choices.
7) If everything is satisfactory, go back and refine your sculpt until your happy.
I'll write more about this in Part 2.
Thanks for taking the time to write it out, and bring on the next part.
Your models show how much you think things out, and take your time to get things "just right" and your explanation proves it =P
I definitely agree with the changing of matcaps while sculpting. Too often people get accustomed to their favorite matcap(usually because it makes their models look nicer)
Quickly checking the model with the basic material is a real eye opener sometimes. But its great for finding any bumps in the surface (plus its interactive with the light, unlike matcaps)
Also, slightly off topic, but I remember your work posted on the Sumea forums(way back in the day). Your work was great back then, but you have stepped things up several notches since then. At least I think it was your work >.>
Thanks again for the write up _b
Can't wait to read what's next, thank you~