Home 3D Art Showcase & Critiques

M35A2 `Deuce` Transport

polycounter lvl 12
Offline / Send Message
Shogun3d polycounter lvl 12
Hey guys,

I'm currently working on a new project, trying to get some more practice with vehicles. I decided to take on the 2.5 ton M35A2 truck, this one is specifically based on the 1988 M35A2 C AMG USAF Military truck, although the family of M35's are extremely similar in build and style.

I wanted to document my work online so I can get some feedback in my processes. Thanks Polycount!

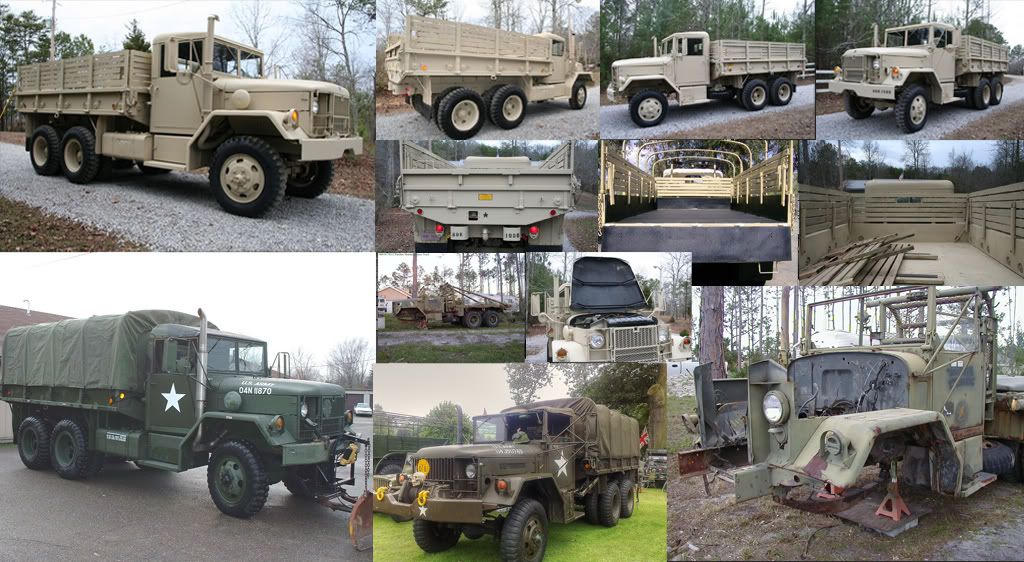
Here is a small reference sheet, about what i'm generally aiming for. I'll be keeping the hard cover top based off of the later models, and will definitely complete two variations based on the soft canopy and interiors.

Ref_Sheet.jpg

As of now i'm working in a general blockout using simple shapes in order to nail the dimensions of the trucks very bulky frame and various parts. These are currently kept in quads and instances so I can begin transitioning into high res meshes.

Blockout_1.jpg

As always feedback, hints, tips, tricks are welcome! I will post more during my process as I continue along. Thanks!

Replies

  • Xoliul
    Options
    Offline / Send Message
    Xoliul polycounter lvl 14
    Cool, good start, don't see anything wrong at this stage, as we'd expect from you :)
  • letronrael
    Options
    Offline / Send Message
    hey this is a great start!

    your front windows is a bit small tho compared to the references.

    cant wait to see the progress!
  • SnaFuBAR
    Options
    Offline / Send Message
    The concave shape on either side of the hood has to terminate before reaching the hinge line. This is pretty obvious in the cross section in the bottom right of your ref sheet.

    Also, be sure to check where you're placing your shapes. The thickest part of the exhaust pipe starts basically level with the fender flare, and on your model, is above the top of the headlight. Just some issues like that to be aware of. Shape placement and surface transitions are everything.

    Other than that, have fun. Going to do the entire frame and drivetrain? Reminds me of a Zil-157 that I modeled a long time ago.
  • Shogun3d
    Options
    Offline / Send Message
    Shogun3d polycounter lvl 12
    Thanks for the crits guys, good eye on the winshield, letronrael, I raised it up a bit and worked the cover a bit more.

    SnaFu - I'll be giving the hood some more love once I get to building the low and high resolution mesh to match the chassis. I'm currently keeping that concave section in a quad until I start previewing with smooth and adjusting that sectoin of the mesh. Thanks for pointing that out and the shape placement of the exhaust.

    Canopy - Added rear canopy, kept in quads for zbrush in future.
    Winch - Extended bumper comparable to the older model M35's with the short grill and added winch.
    M66 Gun Ring - Added basic blockout of the M66 Gunmount for the 50 cal which will be coming along for the ride.
    Tires - Started building out the tires, to match the THawk 373's

    Some more work was done on the drive train as well but not enough to justify detailed shots, I won't be nailing every aspect of the under-carriage but enough to communicate the major parts such as the suspension, axels and carriage frame. Same thing goes for the engine and interior.

    Blockout_2.jpg
  • Shogun3d
    Options
    Offline / Send Message
    Shogun3d polycounter lvl 12
    Began work on the high res, haven't done a high frequency detail pass yet (working on a hardware set, nuts, bolts, rivets, etc) and still a lot of details missing. My focus this pass was getting the overall shapes setup for subd.

    Also began work on the M2HB 50 Cal, though not completed yet either. Basically still plugging away, but wanted to post an update for any feedback before I get neck deep into a detail pass.

    Going to also take the Cold Weather Cover into zbrush to sculpt the folds and major welds on the body.

    High_Res_1-1.jpg
  • ariofighter
    Options
    Offline / Send Message
    ariofighter polycounter lvl 13
    I keep looking back at your ref looking for a problem, but I cant find one at the moment. A very well done block out. I almost feel like I am missing a middle progression from your last post. I can't wait to see it when you put more details in.
  • bbob
    Options
    Offline / Send Message
    There is some pinching going on on your hubcaps, and the holes are a wee bit too small, aside from that, its looking great, can't wait to see the final result.

    As for the zbrushing though, the cover I understand, but the weldings can be done with splines+displacement/bump and still RTT beautifully.
  • Quickel
    Options
    Offline / Send Message
    Quickel polycounter lvl 12
    Great job so far. Your high res model shows off well. It still looks like the front might be too narrow in the grill area and being nitpicky it looks like the hood contour at the bump up is a little different.

    Like others, I can't wait to see more.
  • Shogun3d
    Options
    Offline / Send Message
    Shogun3d polycounter lvl 12
    Thanks for the crits guys, and feedback.

    Immediate corrections:
    1. Topology of hood needs to support reference, going to modify and clean up.
    2. Rework Hub holes.

    BBob, i've never done any weldings via spline/displacement can you clarify or point to where I could find info on this? Thanks for the advice.
  • oobersli
    Options
    Offline / Send Message
    oobersli polycounter lvl 17
    man, these are fun as shit to drive. a brick with wheels. looking good so far!
  • teaandcigarettes
    Options
    Offline / Send Message
    teaandcigarettes polycounter lvl 12
    Looks awesome so far Will :thumbup:

    ...and it will look even better once you give it some zbrush loving.


    If I had to be a prick and find any faults I would say that the cowl looks a bit different than your ref. The angle is a bit too high and its front part looks a bit too sharp.
  • Shogun3d
    Options
    Offline / Send Message
    Shogun3d polycounter lvl 12
    Thanks for the comments guys!

    Quick pass on those parts I mentioned, the hood still needs more work so i'll be investing some more time into correcting its topology. This should be better though, having a tough time with the sharp corners since I need edge support to match the curvature of the base of the hood. It's definitely a wierd shape and a pain in the ass to work with.

    Corrected the wheels and also went into some sculpting for the canopy.

    High_Res_2.jpg
  • Daniel Doerksen
    canvas top looks nice, be really nice if u added some straping holding the bottom down
  • bbob
    Options
    Offline / Send Message
    kaburan wrote: »
    bbob, i've never done any weldings via spline/displacement can you clarify or point to where I could find info on this? Thanks for the advice.

    Weldyness.jpg

    It basically looks like that and is useful for doing quick and dirty welds that aren't seen closer than that.

    You subdivide the crap out of your geo, plug in a stripy map into the displacement modifier, and fiddle with the orientation and stretch of the tile, in this case its flipped to VW and tiled 8 times in the V direction. Oh and add noise to randomize it a bit.

    You can use any kind of geometry strips that you like, I personally use splines because of their automatic unwrap thingie. If you unwrap your own geo strips, you can probably get better results.
  • Shogun3d
    Options
    Offline / Send Message
    Shogun3d polycounter lvl 12
    canvas top looks nice, be really nice if u added some straping holding the bottom down

    I'll definitely be adding straps. Thanks!

    bbob wrote: »
    Weldyness.jpg

    It basically looks like that and is useful for doing quick and dirty welds that aren't seen closer than that.

    You subdivide the crap out of your geo, plug in a stripy map into the displacement modifier, and fiddle with the orientation and stretch of the tile, in this case its flipped to VW and tiled 8 times in the V direction. Oh and add noise to randomize it a bit.

    You can use any kind of geometry strips that you like, I personally use splines because of their automatic unwrap thingie. If you unwrap your own geo strips, you can probably get better results.


    Very cool technique, thanks for that. i'm not sure how it would fair against more complext objects and welds, but for primitive objects such as boxes and pipes, sounds like it would be a great way to do that. Only thing I can think of is to extract an edge, to shape and then unwrap and apply displacement.
  • bbob
    Options
    Offline / Send Message
    Well, you can just select the loop on the underlying mesh where you want the weld, and hit "Create Shape From Selection". Make sure "Generate Mapping Coordinates" is checked and your good to go..

    Or if you feel frisky you can also draw splines on surfaces in the freeform tab of the graphite tools.
  • Shogun3d
    Options
    Offline / Send Message
    Shogun3d polycounter lvl 12
    Sweet, ill take that into consideration, fortunately this vehicle isn't like a tank, and has a lot of separate pieces. Thanks again bbob.
  • wester
    Options
    Offline / Send Message
    wester polycounter lvl 13
    Glad to see you doing personal work will! It looks awesome, no crits just yet.
  • Mistry10
    Options
    Offline / Send Message
    Mistry10 polycounter lvl 8
    Great looking HP model dude !
  • Shogun3d
    Options
    Offline / Send Message
    Shogun3d polycounter lvl 12
    Thanks everyone.

    Quick update, started working on some detailing, Right now I have separate chunks, mainly Exterior, Interior, and the 50 Cal as all of them together are pushing my PC to the limits.

    Speaking of which, i've been getting this lately.

    "out of memory for advanced raytrace shadow generator. cannot render shadows"

    I'm assuming i'm pretty much capped out on my resources, and tried increasing my virtual memory on Win7 64. I may have to invest some time in organizing my scene management but if anyone have any pointers on this i'd appreciate it.

    Anywho, here's where i'm at.

    high_res_3.jpg
  • Apophis3d
    Options
    Offline / Send Message
    This is starting to look very nice, how many tris are you pushing right now and how much ram do you have?

    You planing on doing a normal back on a low poly after also?
  • Shogun3d
    Options
    Offline / Send Message
    Shogun3d polycounter lvl 12
    7 Gigs of ram, i've been importing meshes from zbrush for renders so about 15 million faces, and yes they will all be baked down to a low poly.
  • Shogun3d
    Options
    Offline / Send Message
    Shogun3d polycounter lvl 12
    Finally had a chance to work on the truck for a little bit. So far I have a first pass complete, with focus on the diffuse and normals. As it stands, there hasn't been much love placed into the Spec map yet. Here are my results thus far. I also have the 50 cal mounted with the baked normals and high poly AO thrown on.

    2048 Diffuse, Normal, Spec(Still WIP)

    Rendered using Xol's Viewport Shader
    Texture_1.jpg

    Texture_3.jpg

    Texture_2.jpg


    Wireframe

    textured_4.jpg
  • Kitteh
    Options
    Offline / Send Message
    Kitteh polycounter lvl 18
    Could use a ton more dust and grime kicked up inside the wheel wells and underbody, it's way too clean and bright atm. The whole thing could use some dust over the bodywork as well.
  • Shogun3d
    Options
    Offline / Send Message
    Shogun3d polycounter lvl 12
    The texturing work continues..

    textured_5.jpg
  • Oniram
    Options
    Offline / Send Message
    Oniram polycounter lvl 16
  • Kitteh
    Options
    Offline / Send Message
    Kitteh polycounter lvl 18
    that dirt looks kinda unconvincing, more like rust or something. I think it has too much noisy texture in it. There ought to be more dirt on the running boards and stuff too, and those bands around the fuel tank are way cleaner than the actual fuel tank which looks a bit odd. Also I think the normals might be flipped on the wheels, they look like they're being lit from underneath.
  • Shogun3d
    Options
    Offline / Send Message
    Shogun3d polycounter lvl 12
    Kitteh wrote: »
    that dirt looks kinda unconvincing, more like rust or something. I think it has too much noisy texture in it. There ought to be more dirt on the running boards and stuff too, and those bands around the fuel tank are way cleaner than the actual fuel tank which looks a bit odd. Also I think the normals might be flipped on the wheels, they look like they're being lit from underneath.

    Exactly the kind of crits I need. Thanks :)
  • Kitteh
    Options
    Offline / Send Message
    Kitteh polycounter lvl 18
    The inside of the wheel wells and underbody and stuff might look better if it's caked in a smooth light brown dust instead of dark grimy mud like you have now.
  • Shogun3d
    Options
    Offline / Send Message
    Shogun3d polycounter lvl 12
    Alright folks, calling this one complete.

    There are definitely areas I could have improved and it was a challenging study but I learned a lot. Between balancing high and low frequency details, I tried to sell some decent mud but that really ended up blotting up areas of interest. I decided to keep it somewhat clean but aged at the same time. So texturing for the most part, worked out alright but really I need to practice on some good grime such as mud materials and such.

    I'm pretty happy with the canopies, sculpting out folds worked a lot better than trying to fumble with the cloth modifier and using a combination of high frequency normals allowed me to sell off the material a bit better.

    Anyhow, learned a lot from this, going to try and tackle a smaller vehicle with a more focus on textures.

    Thanks for the crits!

    m35_900_1.jpg

    m35_900_2.jpg

    m35_900_3.jpg

    M35_900_textures.jpg
  • Mik2121
    Options
    Offline / Send Message
    Mik2121 polycounter lvl 9
    Woah, looks great. Though, and this might be just me, the canvas looks a bit like Aluminium foil because of the specular. And perhaps the same for the tires. But still, looks great.
  • MsMarvel
    Options
    Offline / Send Message
    This looks great! You put so many hours of hard work into this, and it definitely shows. I love all the small details on it. I love the canopy on it. I think the model looks great, but the textures could definitely have been pushed a little bit more. For example; I like how on your post "06-30-2011 02:29 PM" has the dirt/rust on it. I feel it looks a bit more realistic than the cleaner version. You could have toned it down a little bit, but otherwise, i liked where that one was going. It could also just be from the different lighting. Also, for the canopy texture, you could have added a little bit more wear and tear, and maybe made some small holes/frays with an alpha. Especially around the edges, and where the ropes are holding it down. It would look pretty cool. =]

    Anway, overall.. great job! Keep it up and can't wait for the next post! =]
  • Oniram
    Options
    Offline / Send Message
    Oniram polycounter lvl 16
    in the first shot the canopy is reading as somewhat too specular. also i cant help but feel that the lighting on this is hurting the model. looking at the previous textured version and the high polys, it seems a bit different. im seeing a lot of nice detail in the texture, but the orange/brown in the texture seems to be washed out by the light. maybe change up the light with a bit more of a desaturated color.
  • Digital Dino
    Options
    Offline / Send Message
    It turned out awesome man
    Some great detail in there, especially for 1024 maps
    I actually really like the level of wear on the body
    I do agree with Lisa about the tarp needing some damage though
    Maybe not rips and holes, but possibly some variation to show staining and sun bleaching
    Also, the windows could use a collection of dirt and grim in the corners and around the edges where they meet the frames
  • Mio
    Options
    Offline / Send Message
    Mio polycounter lvl 13
    very nicely done!

    agree with Oniram mentioned, the canopy got too much specular
Sign In or Register to comment.