"Mod Facade" Challenge - Tumerboy - Run Down Motel
polycounter lvl 17
Alright, so I've had this idea of doing an old run down motel in my mind for a while. The kind that was nice at some point in history, but you would never want to stay at. Yet, it somehow stays open despite it's lack of customers. Besides, the pinicle of modularity is the motel . . . shut up, I'm right damn it!
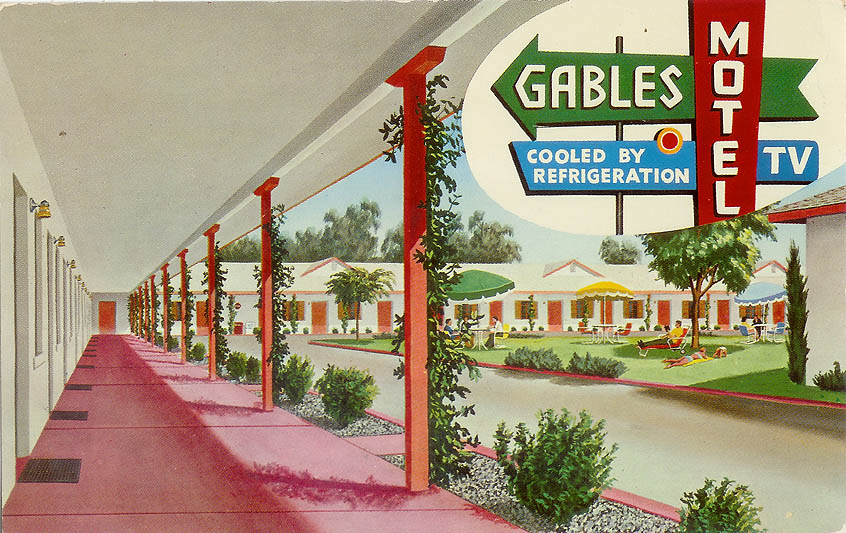
Also, I've always loved this sign at a motel near my old apartment:

Here's some other early referrence gathering:


Also, I've always loved this sign at a motel near my old apartment:
Here's some other early referrence gathering:
Replies
"Hourly fees" available!
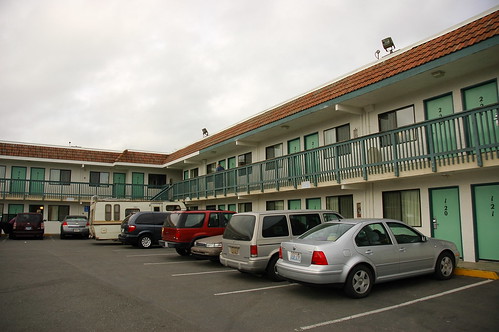
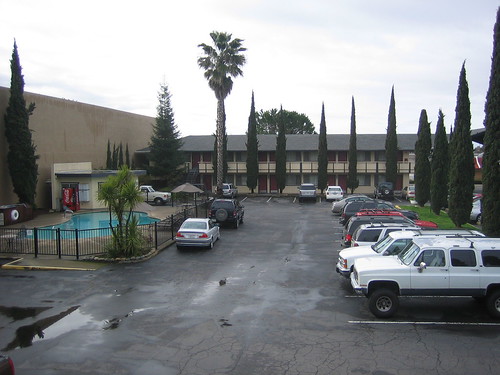
I drove around and collected some referrence tonight, but I'm going to go get a bit more tomorrow.
http://www.flickr.com/photos/22290667@N08/sets/72157605854480574/
Alex
I'm looking forward to this "metric shit ton" and have high expectations!
-caseyjones
mainly just laid out the UVs for all of the tiling stuff, and have all the smaller (non tiling) details broken up.
It's sitting at 8100 tris right now, or so. Gonna add the office and the pool, and then any details I can cram into the left over texture/poly space.
Comments/Critiques/Ideas are all welcome.
and Eric, you're crazy, it's all tiling textures, and modular pieces. 2048 should not be a problem.
[ame]
about 10,500 tris
I was liking where it was heading until I redid the plaster, and then realized I'd pushed it too far with that. I think if I bring the stucco bit back a bit, the rest will fit together better.
I'm going to get into seams more with decals, this was just laying out the basics, but you're totally right. Thanks for the crit.
This is what I was going for with the rock wall:
http://www.flickr.com/photos/neocles/2294952151/
I think it would help sell the 60's feel if I can pull it off. Is there some way to do this RIGHT? or am I totally fucked and should just pull it?
Input from anyone would be appreciated.
You can't expect lighting in the diffuse to not wreck our scene lighting when its ripped from a photo taken on a sunny day, then flipped upside down. If you have any lighting in the diffuse at all it needs to flow with the scene not fight it.
And the dirt pass was overkill. It looks like the inside of a prison after 3 years of rioting, there's sh!t all over. You should restrict some of that damage to areas that would make sense, instead of applying blanket damage that flows right under major pieces.
Also the rock you picked is more like a blown up walkway paver instead of the faux 60's slate you have in the latest ref.
If you want that material, you'll need to do one of three things:
- Hand paint/retouch the texture to exclude the direct lighting.
- Find a new source as the base of your texture. I suggest not using the innertube and shoot some ref yourself with a good quality camera on an overcast day. (like that will ever happen) or be very selective about where and who you get your material ref from... <cough> cgtextures.com<cough>...
- Create it from scratch using Filter Forge or Genetica
http://www.culturedstone.com/stonecad/
http://www.culturedstone.com/products/productdetail.asp?id=12
Has a decent library of tiling textures you could use as a base to start from or just a guide to z brush a good pattern. I use it quite a bit for viz stuff.
Good start man keep after it.
Tis true I use CGtextures and Environment-textures.com for some of my stuff, I also use my own photos for some. This image actually came from Environment-Textures.com
I thikn it's rather clearly a wall in the image, but maybe after I tilized it, and tinted down the grout it got confusing.
As for the lighting in the diffuse. . . I don't think there really is any, but I think I have a bounce light in the scene that's fucking stuff up.
I'll play around with some stuff tonight, simplify the lighting, and post the actual textures.
Thanks for the crits Vig, that helped me understand better what EQ was talking about.
Thanks for the links IronHawk!
Better? Worse? Same?
Here's the texture, and normal map. Admittedly it was a very quick job on the normal map.
So. . . give up on this? I'll play around some tonight, assuming I can even handle sitting at my desk. . . it's 102 inside here and the AC's busted, yeesh!
maybe something more like this?
Edit: Alright, I toned down the grime a bit:
Now onto the normals.
What you've got here is too blurry again, your forms are all very large, but in your ref these rocks have very crisp shapes to them. You dont need to try and reinvent the rocks just to make the normals more apparent, normals can be subtle and still look good
Then the small scale detail, a lot of hte small little details you have in your normals really should only be in the color map, or only very slightly in the normals. Those little paterns and such are mostly just color, not actually shape, but from the normals you have there it looks like they are large indents and such. To fix this i often find myself just painting 127,127,255 directly over the trouble areas, but there is probabbly a better way, maybe render out a large scale normals from cb, with NO small scale and very little medium scale and use a larer mask to mask off some of those small details and tone them down a bit....
Anyway, hope that helps you out man.
Ya, the Normals were definitely just a quick, rough job, and I planned to get back to them, just haven't yet. . . I guess it's that time. Good tips, I'll play around with it tomorrow and repost.
Edit: Or, you know. . . I'll just do some quick shit now, because I'm like that:
Obviously, the lighting in the render isn't showing the new normal at all, but I'm too tired to deal with lighting right now, so I'll screw around with it again tomorrow.
You need something for the dirt to contrast with, some clean parts that show what it should look like. When everything is dirty and damaged it starts to become just noise.
Motels are normally covered in stucko, wood degrades quickly making stucko a low maintenance option. Also these places have been around a while and painted every few years. I see one layer of thin paint. That might be ok on some new upgrades but pieces that have been around a while especially wooden pieces will have quite a bit of caked on paint.
Also remember that you can use decals for weathering water stains, dirt and as patches to cover up tiling parts.
The sky light is working much better then the previous lighting. You might want to look into setting up a light dome instead of a sky light they render faster. A nice script for doing that is E-Light Dome great little script. I think there are some updates from various other people I think they're up on scriptspot.com
I'm a little tossed up about doing paint overs now but I think in this case it will help. Paint Over
First of all, set the filtering to catmull-rom (F10 > Renderer tab > filter (next to anti-aliasing).
Don't use skylights when you want to show off normal mapped stuff, better to use multiple ray-tracing omnis instead.
As for the actual piece, the geometry is fine but boring. Top and bottom are exactly the same (ok, it's modular, but still) and the entire thing is just too symmetrical.
The textures are what really lets this piece it down IMO. Might want to use more simple, cleaner textures instead.
Vig, I agree with the layers of paint thing. I'm just not terribly certain how to make it look like there ARE layers of paint on top of a board, versus a single layer of paint? Is the normal map just blurrier? is there a second color that shows up in places where the top coat has worn down? I admit fully that texture PAINTING is not my strong suit. I can fiddle with blending modes and source images alright, but I'm a shitty painter. While I would love to get this kind of look on the wood, I'm not certain how to go about it. I think a big problem is I want it to look old, and run down, maybe abandoned. So I want the paint to be peeling and such, but often my attempts to make peeling paint on wood, turn into generic grimy noise. Anyway, I'll go texture shooting this weekend and see if I can find what I want.
I'll try the light dome thing.
I know it's boring, and I have no expectation to win the comp, it was more of a kick in the ass to do something I've wanted to do for a while. I think a lot of the interest will come from the rest of the scene, which won't really fit into the competition's constraints, so I'm not bothering with them for now.
In any event, thanks for the tips and paint over, that's all very useful, and I do appreciate it.
MOTHER
FUCKER
THAT
SHIT
IS
TIGHT*
*i quite like the white grout
besides what others is saying about smaller textures/pieces of your scene i think one of the bigger problems with your piece is that you havnt really got the different elements of your texture to blend in togheter really well. think u need to work on some transitions and also som larger scale dirt nd grime.
this is a really bad paintover but you know. i just try to tie it all togheter a bit more.
I touched up some on the stucco and the plywood, and added a VERY simple corner grime (I'll work on it more tomorrow night)
Is Adam on a drinking binge or something?
dude thats amazing work!
i personally liked the wood with less 'yellow' in it, but its brilliant either way
can't wait to see it donez!
desaturated the stucco and plywood.
Tried to dirty up the white grout, without making it too dark. Added streaks and the like. . . not sure how I feel about it at this point.
Started puting basic textures on the downspouts, gutters, AC units, lights, and parking uh. . . deelies. All of these are just a start, and I will be redistributing damage to logical corners and such.
Little more done.
And Adam demanded a wireframe. . .
Looks pretty awesome. I love the beach style you need a big camper van with some surf boards on the roof parked in that parking lot!
now go do something about that asphalt texture so u get some consistency in your pixels/cm!
I'll try making a smaller tiling version of the underlying asphalt, and then a small tiling crack decal maybe? If you have a better idea, please let me know.
I'm also curious how poeple paint grass planes. I wan there to be grass (just low stuff) groing through the cracks in places. I haven't been able to find a good picture of what I want, that would be usable for texture. I'm going to try and go find it IRL today or tomorrow, but may end up just painting it, so if anyone has brilliant grass painting ideas, tell me.
Thanks
Things are looking good with this, i think you could break it up even more by changing the color on the drainpipe so it doesn't blend it as much with the railing
I bet the level is made for Alien vs Predator! Need some more ceiling climbing
Yes, they're all beveled once, no they don't all have sides and backs, and yes I am planning on normal mapping the creases instead, just haven't gotten to it yet.
AVP2 was one of the greatest games of all time, so you shut your mouth!
Small update:
re-cornerized it, re-stairized it, grassized it, and fiddled with the parking lot minorly.
I just remapped the parking lot texture to half the size to see how it would look, but I'll probably still go back to tiling with degals, we'll see.
MikeF cool grass tut. I made these the best way I've known how so far, using fade on my brush, and drawing little lines similar to your crescent, and tehn gradienting them, and giving them a couple of layer styles to separate them from eachother a bit. Anyway, it was quick and dirty, so they're too dark and kind of funky right now. But I'll work on it.
Going to keep tweaking some things, but need to get started on the little details, fire extinguisher, ice machine, etc.
If I render the viewport (or camera) the stretching isn't ACTUALLY there, only in viewport. On top of that, if I do certain things, like apply a UVW Unwrap, the stretching goes away, but then as soon as the Unwrap is collapsed, the stretching comes back.
Doesn't seem to go away by restarting the program. Haven't restarted my computer yet.
Anyone have any idea wtf is going on!?
thanks