[UE4] Modular Building Set Breakdown

polycounter lvl 14
Update 1-23-2015
So I figured I had a lot of questions about how I created my high poly concrete trim texture and a lot of the process that went into it. So I decided to give away the concrete trim texture and the high poly to all of you guys so you can take a look at it, mess around with it, and hopefully learn from it! It can be downloaded from my gumroads page here.
https://gumroad.com/purepolygons
Update 12-17-2014
I finally made a video for this thing. Enjoy!
 Building Set (UE4) - YouTube
Original Post
Hey everyone! So I know I am a little late on this, but a lot of you were asking me to create a breakdown for how I created my Modular Building Set on the Unreal Marketplace. So here it is finally! Feel free to ask anymore questions, but i did my best to explain at least some of the aspects of the creation process and the modularity of the set.
[UPDATED PDF - Much prettier]
Here is a PDF file too if anyone wants to download this guy.
Building Breakdown PDF

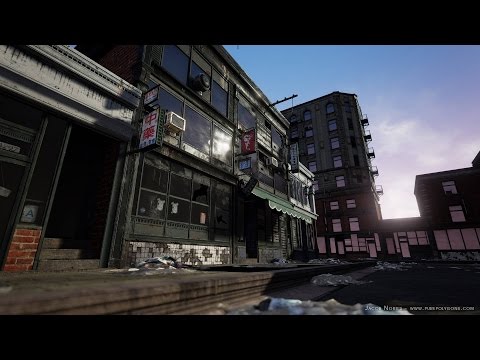
So I want to first start off by saying that my intent with this Set was to allow for as much flexibility as possible while using the least amount of Textures and Static Meshes that I could while still maintaining a certain level of quality throughout the Set. In order to do this I had to think A LOT about what Textures I was going to make and how i would lay them out in order to get the most use out of them. With store fronts, the entire thing can be created simply by making some solid Trim Textures. These trim textures would allow me to create pillars, window frames, door frames, vents, air conditioners, roof trims, awnings, overhangs, the works. So I needed a variety of different shapes in my texture. Now that I know what I will be making with this texture I can create some interesting shapes and bevels that I can unwrap my static meshes with. Here we have the first example.
You'll notice that I kept the EXACT layout for my metal and concrete materials. As I mention in the image, this is because very early on I decided that most all of my roof trims, pillars, store fronts, etc. could easily be swapped for either metal or Concrete throughout my Building Set. Doing this alone has already created a TON more options for how my buildings will look and I could have even taken this a step further and made multiple different metal trims/concrete variations.
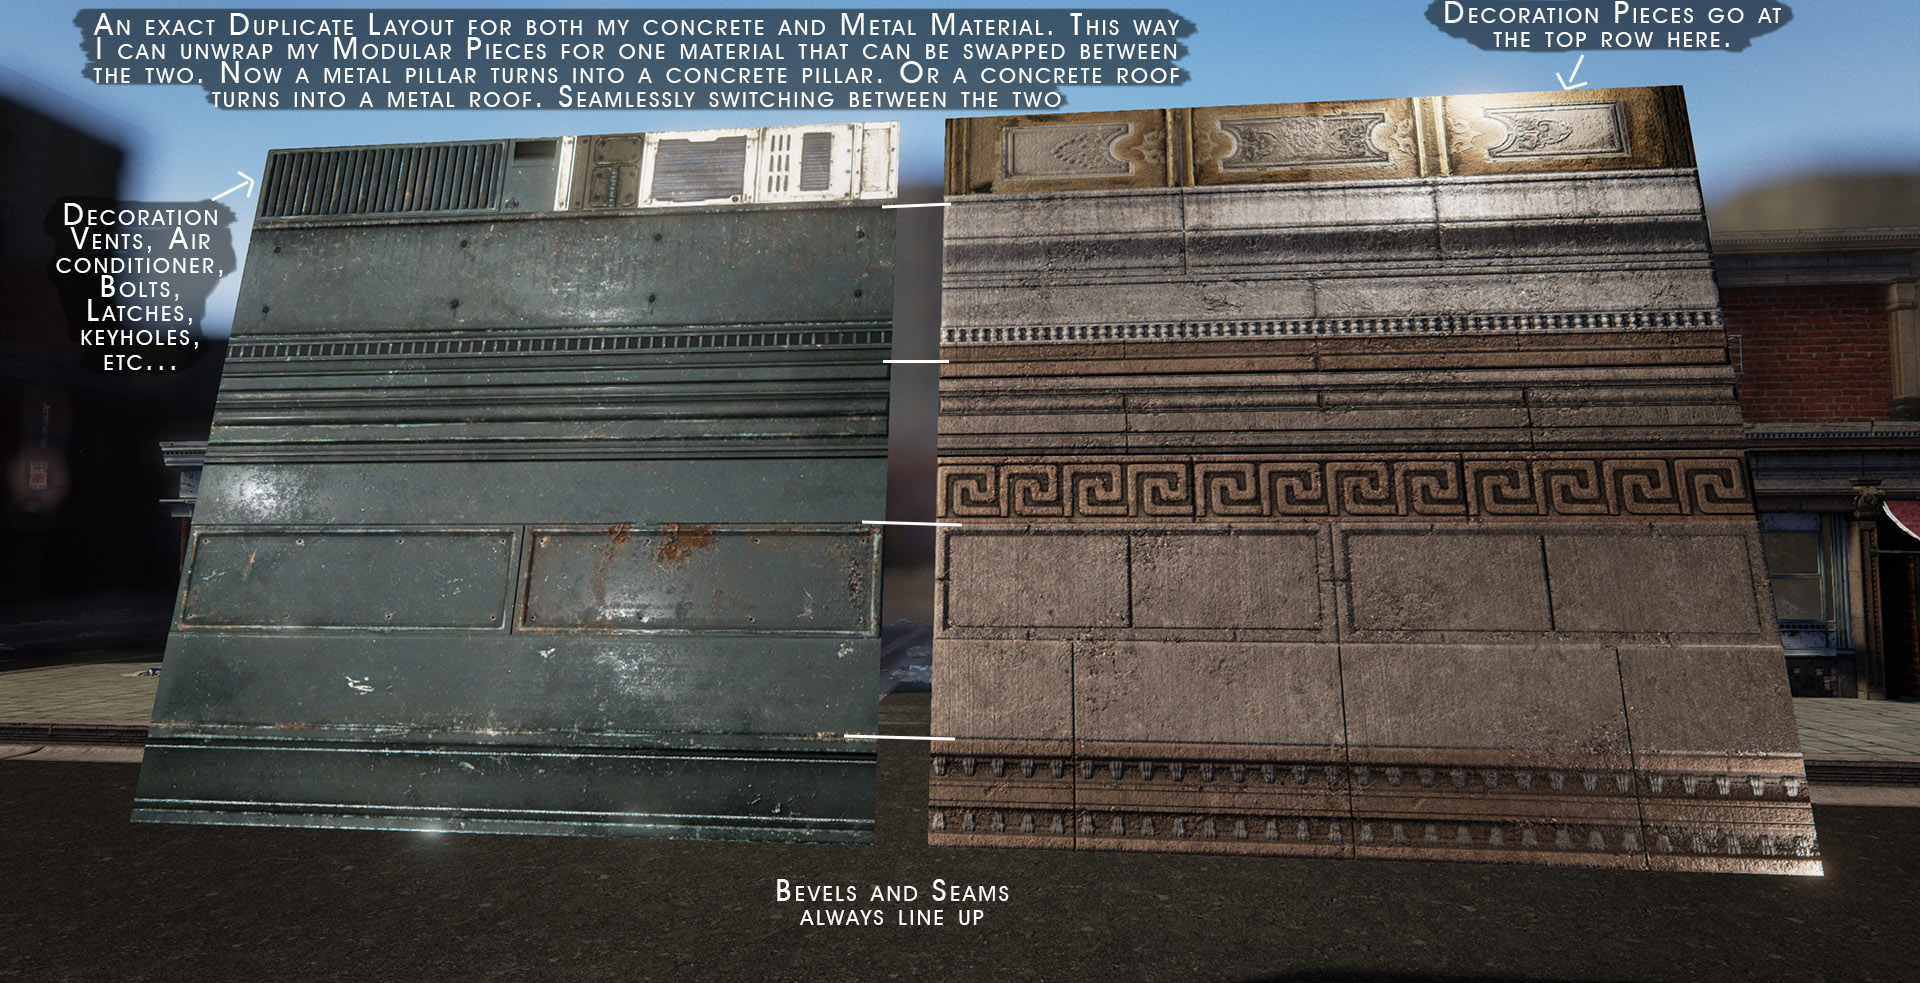
At the base of my store fronts I wanted the same ability to easily swap out materials to create even more variety. So I looked at many different reference images to see how store fronts of large and small buildings were built. What types of materials they would use, how they transitioned into the sidewalks, how wide/tall/short they were. Then I picked a couple different material types and create my store front base textures.
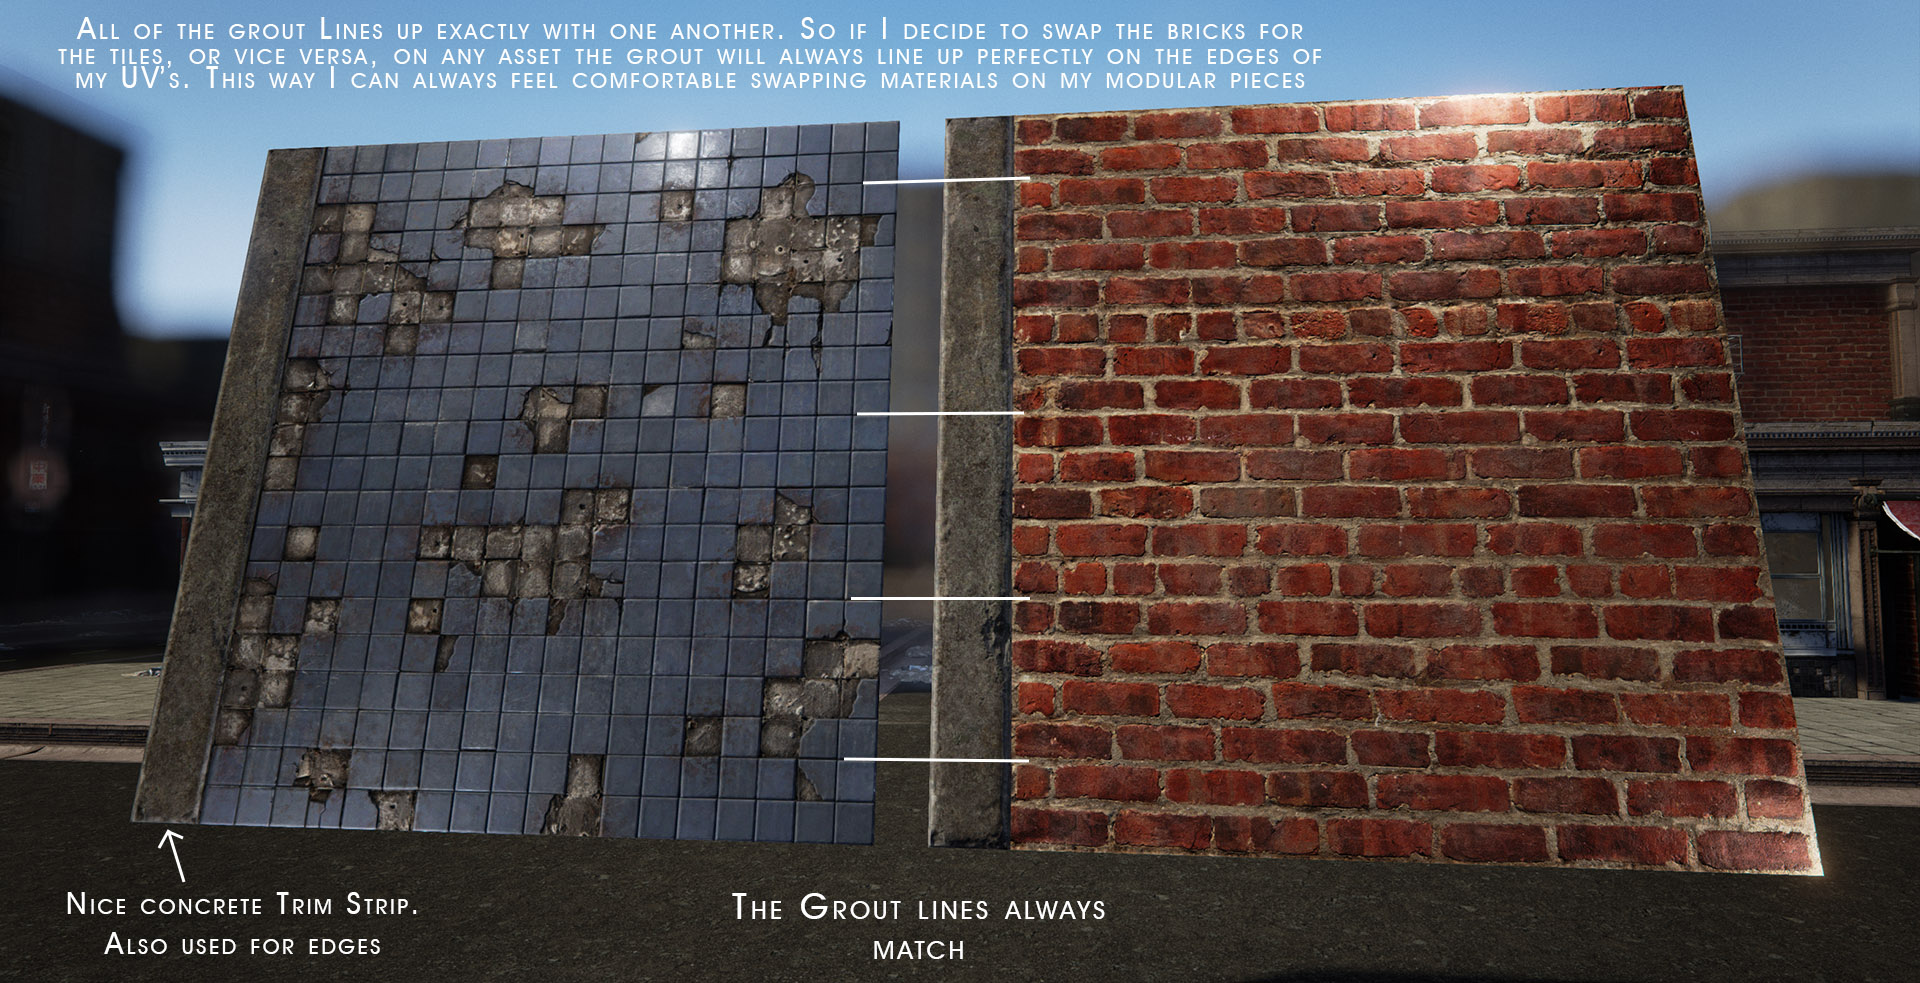
Making sure that everything within my textures is very important because when I swap them on the assets if anything is out of place I will get weird seams and noticeable issues with my textures.
Now that I have some initial materials created I can start to unwrap things and create my Static Meshes. At this point I need to make EVERYTHING snap together. So no matter what it is that I am create it HAS TO LINE UP ON THE GRID. The top, the bottom, the sides, all of it needs to be directly on the grid or else it will be very hard for my building to snap together once I get it into the engine. So from here I brought a scale human reference model into my Maya scene to make sure that everything I made not only snapped to a grid, but would look accurate in size and scale. For those of you in need of a human scale model you can use mine here.
Unreal Engine Human Scale Reference
Be sure that you have your metrics in Maya set to “Centimeters” because this is the unit system that Unreal uses. So for my store fronts I decide on creating pieces that are 4 meters in length and 3 meters in height. I have also decide to place my pivot at the BOTTOM of my static mesh in the center of the two sides. Again I am looking at a TON of reference photos online of different store fronts to find variety and make sure that the way I am setting up my store fronts is accurate to real life. Where do the doors go, how big are the windows, are there any signs in the windows? Paint on the windows for different store sales throughout the year, can the windows open or are they always closed? Is it a restaurant, a clothing store, a convenience store, all of these things matter because they will determine how the windows are laid out and where the doors are, if they need space for displays in the windows etc..
Now before I apply my materials to the store fronts I have already imported the assets into the Unreal Engine to make sure everything is snapping together and that all of my metrics are correct. There is no point starting to texture your assets yet before you know if they even snap together properly, otherwise you will have to do a ton of re-work making it all snap together first and then having to unwrap it all again too because now you have stretching. So start getting it into the engine right away. Then once you have checked and made sure that it all snaps together well and is on the grid, you can start unwrapping your Static Meshes. Here is an image showing how I am aligning all of my edges along the trims on my Metal Material that we made earlier.
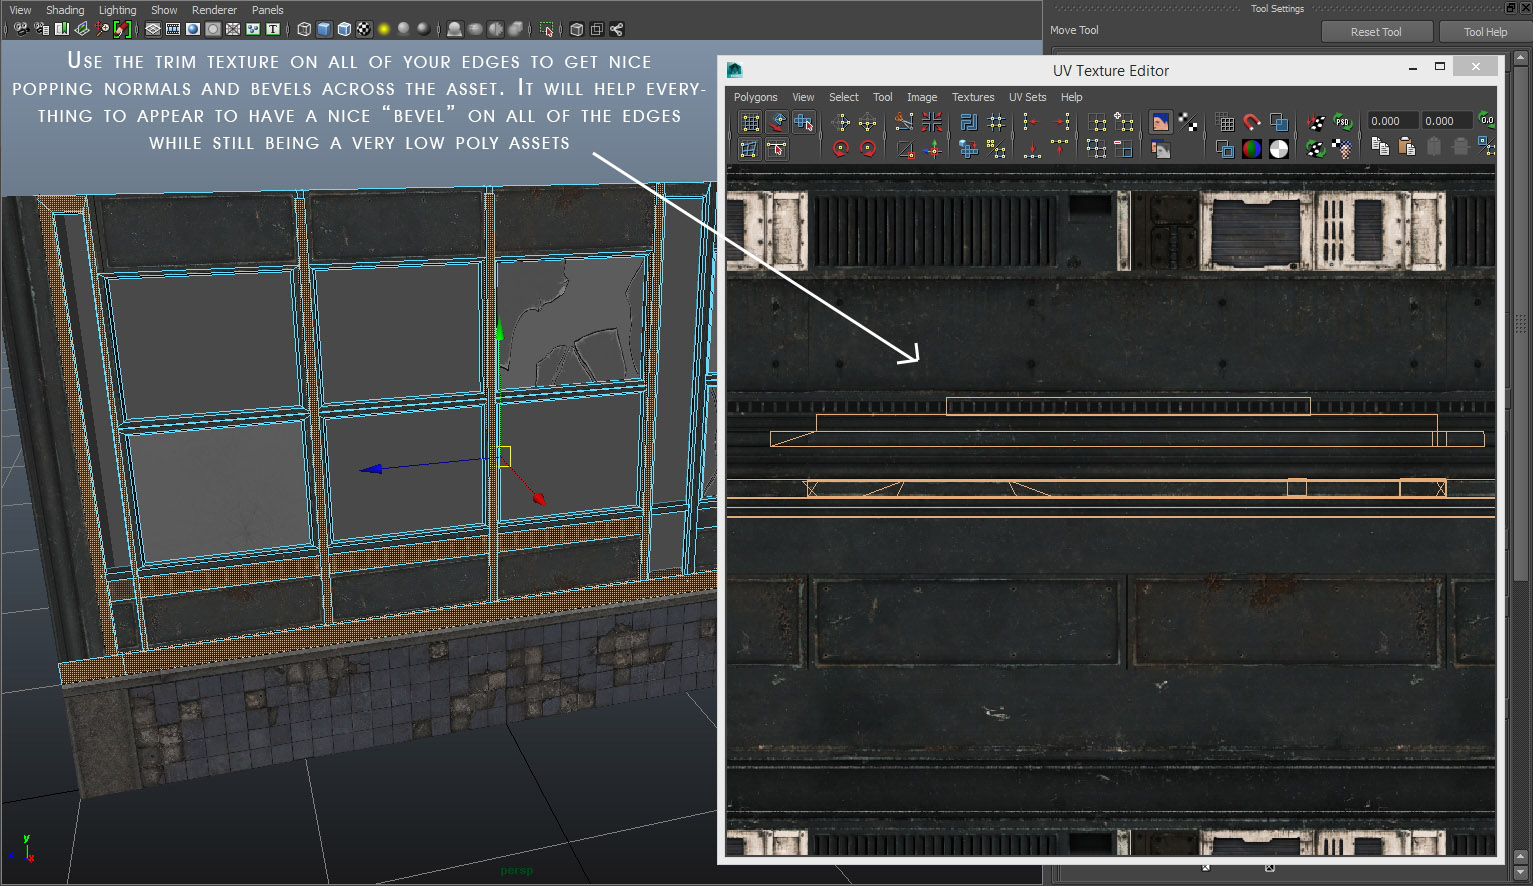
I will continue this method until I am happy with my amount of store fronts at the base level of the building. At this point I have started making some pillars and corner pieces to allow me to make 90 degree turns with my assets so that we can get a full 360 degree building with all 4 sides. There are other ways to achieve your corners, but pillars are the easiest and allow for the most functionality and modularity in your building set. I am still using the same Metal Material to create my beams and pillars. We are trying to get as much use out of these textures as possible like I mentioned.
Now I can finally start moving on to the upper parts of the building. This can be a lot trickier, because in most cases you have no beams and no metal frames to help your assets give the appearance of proper tiling. If you unwrap these pieces incorrectly you will very quickly start to see seams and gaps in your geometry. Just so you are clear here is an image to show that I am talking about making the upper windows to your buildings now.
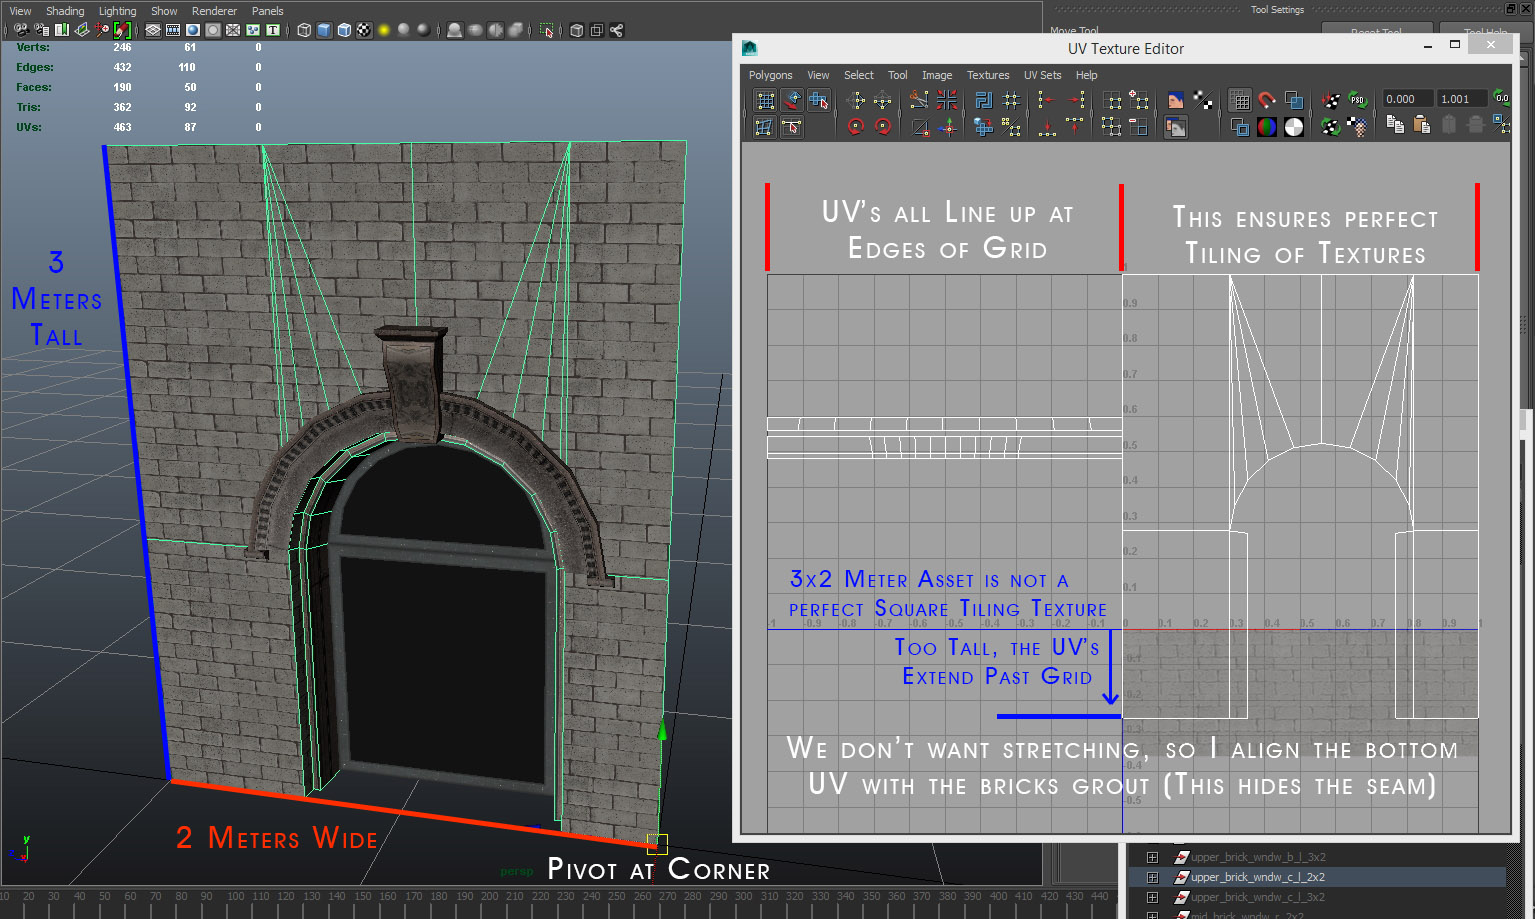
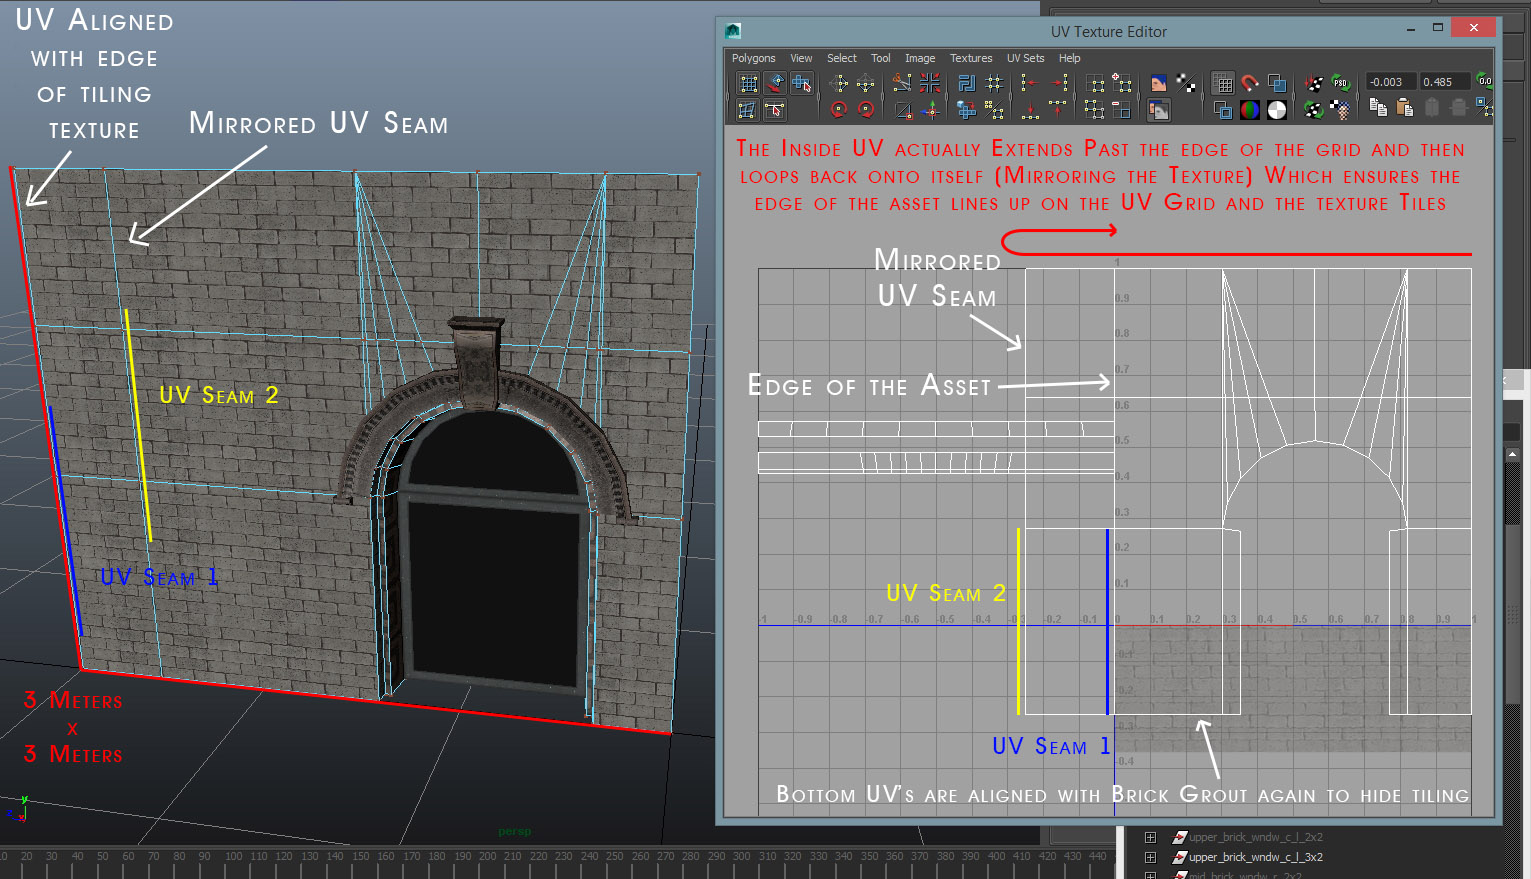
So as I mentioned ensuring that your pieces tile is very important and this all comes to down your unwrapping and where you place the UV edges on your texture. You should always try to find a way to either line up your UV Edges on the edges of the grid, so that the texture just naturally tiles itself, or if you can find a nice bevel or some grout in the case of these bricks, you can place the edge of your UV’s there to hide the seams of your static meshes. In the case of this next image, that became very tricky. Because I made a long wall piece that was 3 Meters wide, but still needed to make sure that the edges of my static mesh lined up on the grid, so I had to insert an edge loop into my geometry and mirror the texture on top of itself to keep proper tiling on the asset. Like so.
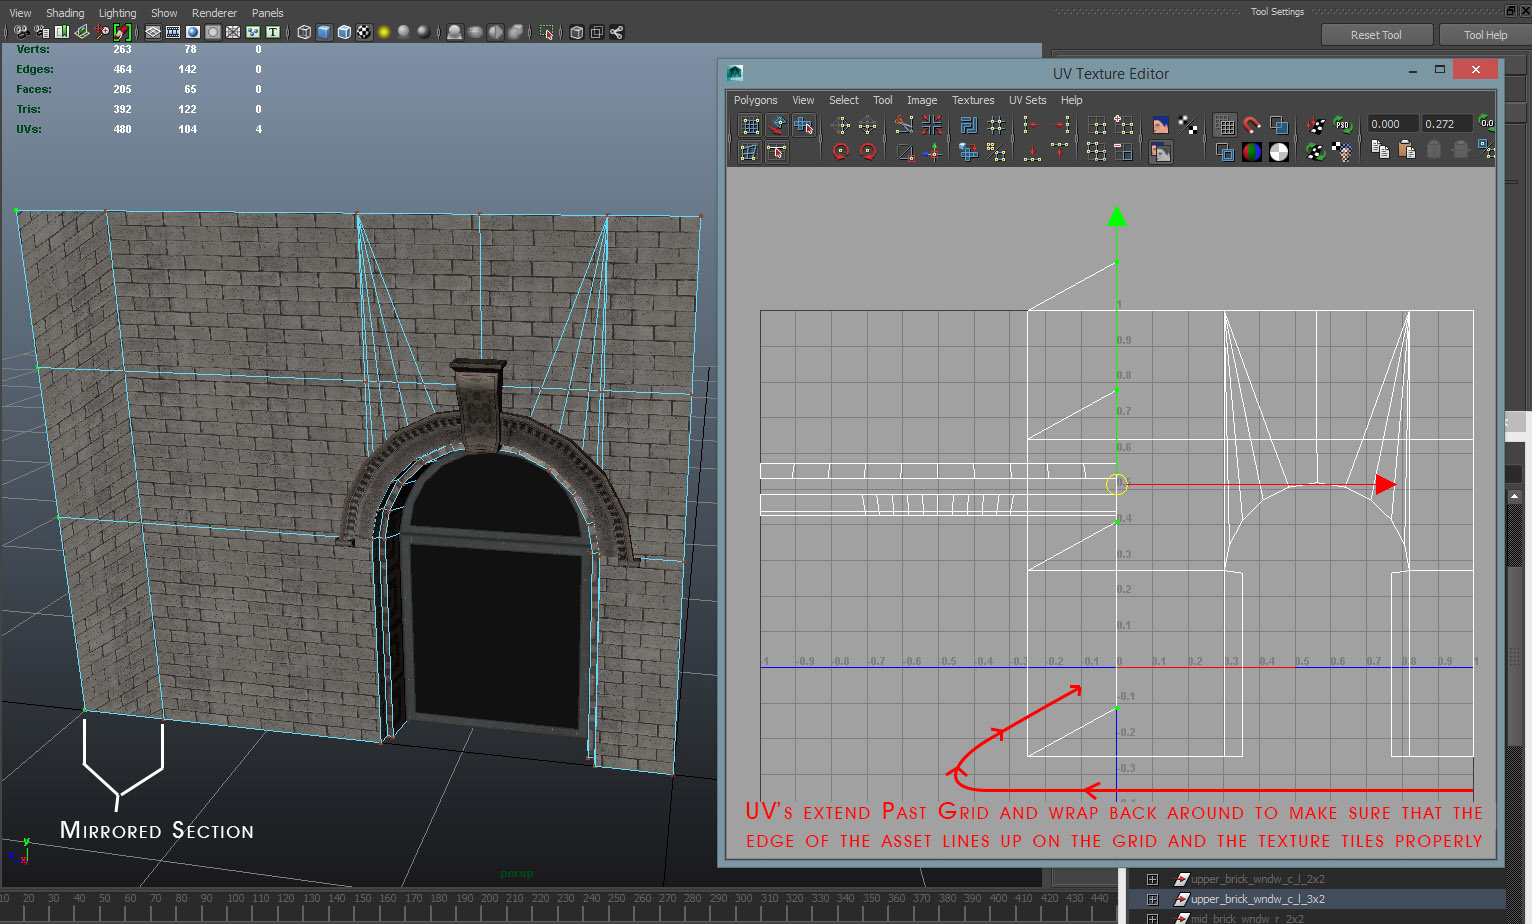
Here is another image just for clarification purposes on exactly what I am doing with the UV’s to ensure the proper tiling of the asset.
As with the store fronts, I will basically continue with this method on the upper half of the building until I have created what I feel is a sufficient number of assets and variations to get a lot of use out of my pieces. All the while I am looking at reference images for everything that I am making. As I said before, reference, reference, reference.
At this point I have created pretty much all of my modular pieces for the building. So now I can make some nice decoration pieces to accompany the buildings that I have made. This can be anything you want it to be, but for myself I made some store signs, some rubble piles on the ground, fire escapes that can go on the side of the building, awnings both torn and intact, some broken windows that I can swap out in the different store fronts, little posters and papers, Health rating Grades for the restaurants, store hour signs, security alarm signs, the list goes on and on. You can really have a lot of fun with this stuff.
So that’s the general breakdown for how I am making the building set, but there is a lot more we can still do with our materials now. Why should we be happy just making one color of metal? Or just making one color of awning cloth, or store front tiles, or bricks. We shouldn’t we can make as many as we want! But bringing in more and more textures for all of this is going to quickly eat up your Memory Budget if you are trying to be efficient with how many textures you can load onto your VRAM at once in a game. So there are ways we can get around this and still make a TON of different colors or all of our materials. Here is what I have done in this case.
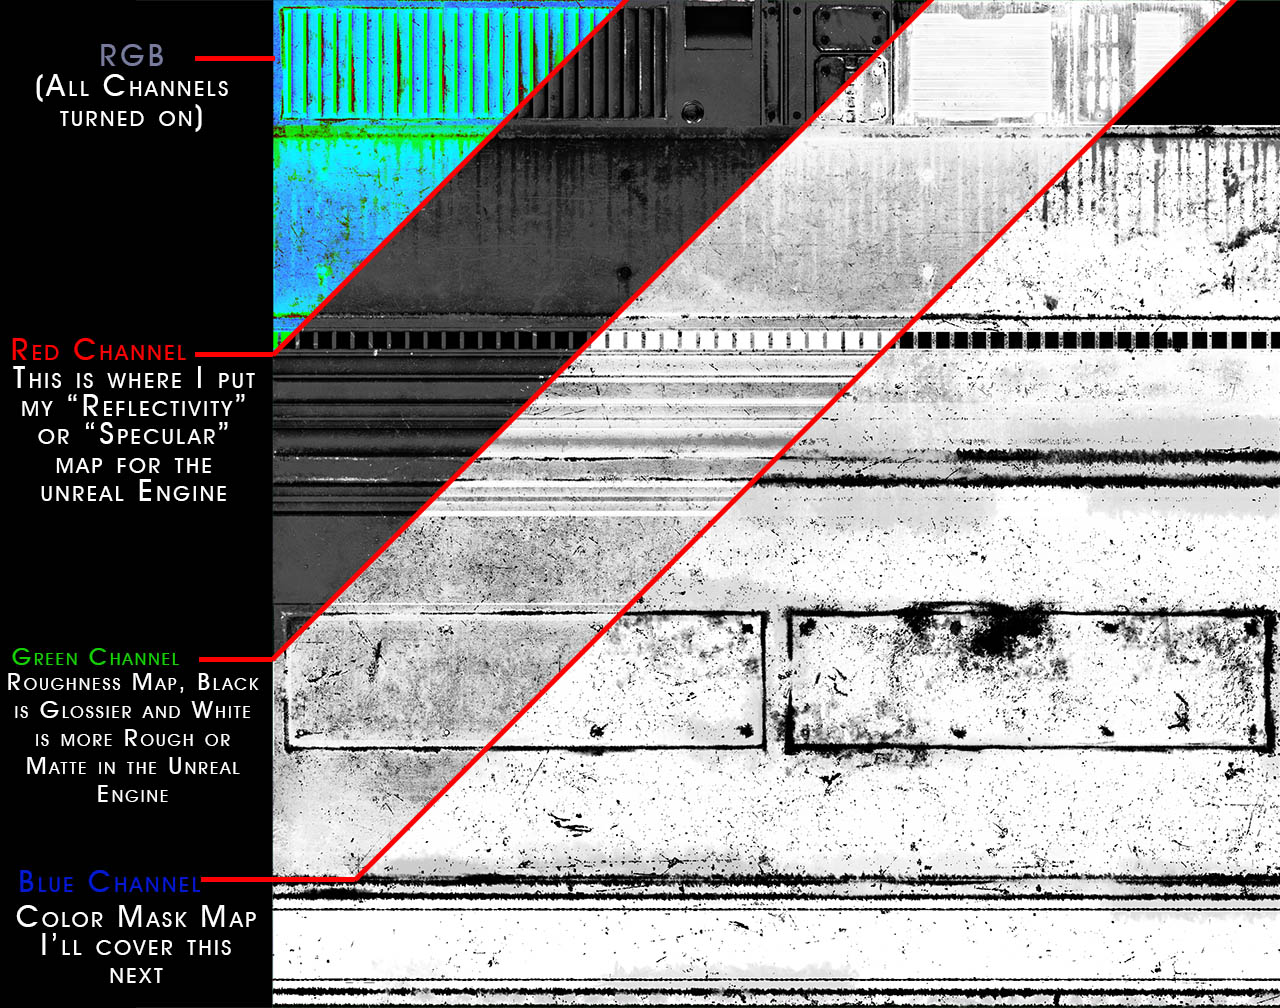
We can very easily combine a lot of our Textures into one texture file just by using the different channels. Then we can split all these channels up into their proper nodes once we have brought it into the Unreal Engine. Your textures don’t need to be in any specific channel for this to work, as long as they are divided across the different channels of your texture you can do this. For myself though I have placed the Specular Map into my Red Channel, my Roughness into the Green Channel, and my color mask into the Blue Channel. What is a color mask you might ask? It is what is going to tell the Unreal Engine where on the texture we want to replace the color with any color of our choosing. So things like rust or scratches, we will want those things to hold their color, because it would be weird to have blue or magenta rust in your texture. So in our color mask we are going to make all of the parts that we want to hold their color BLACK and all of the parts that we want to change color WHITE. If your mask has any grey’s in it then in these places the Unreal Engine will do it’s best to blend between your original texture and the new color that you overlay on top of it. How do I setup my material graph in the Unreal Engine now you might ask? Well I have just the image for you!
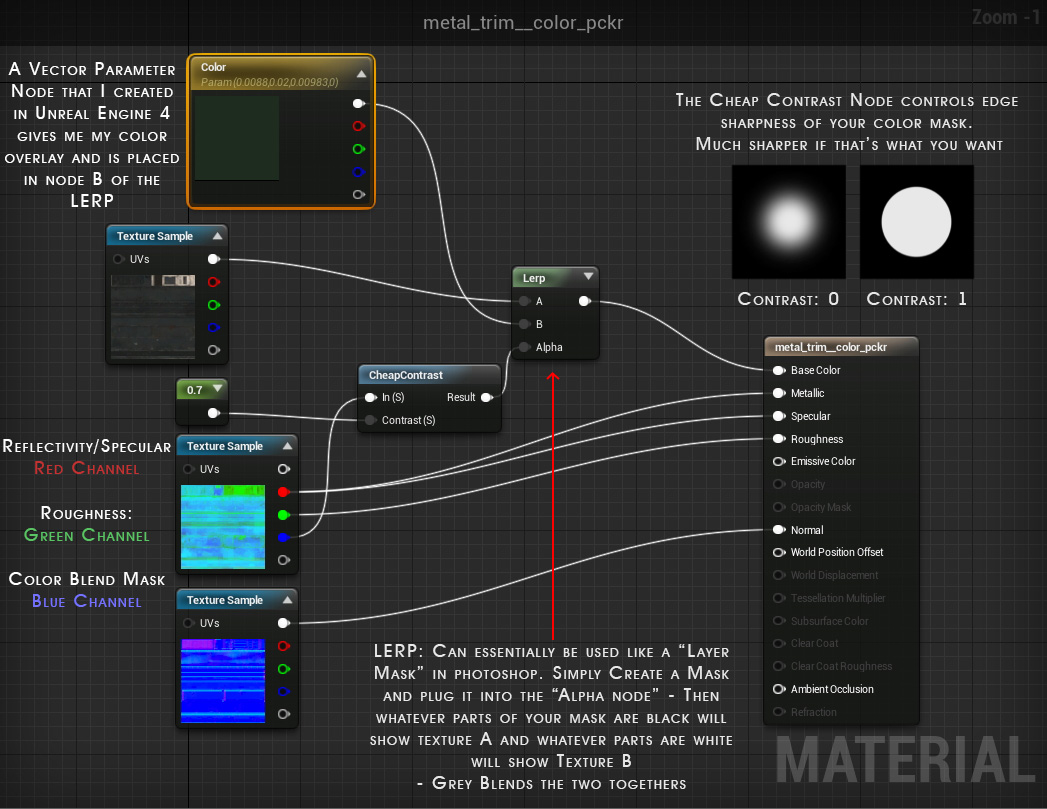
The diffuse Texture which contains all of your original colors, rust colors, scratches etc. Will be plugged into the A node of a LERP. I like to go one step further and use the color mask that I created, then make all of that space grey in my diffuse map. Basically I don’t want any colors that shouldn’t be there bleeding through into my newly color picked material so where I have made my color mask texture “white” I have made those areas completely grey in my diffuse texture. I hope that makes sense. Looking at the image above now, you can very easily use the Vector Parameter node to pick ANY color you want. Now the sky is the limit for your materials and the amount of variation and use you can get out of just one texture is really awesome. Look at all these colors I can get with just this one metal material.
Since you have now taken the time to very neatly and nicely created your textures that can all be swapped out with each other, you can go wild with your scene. I know you did a great job lining up all of your UV’s and making sure all of the pieces snap onto the grid too, so I’m sure you will have no problem being creative with your scene now making it look like whatever you want! Here are just a few examples of all of the different variations we can create with our scene now after following these steps.
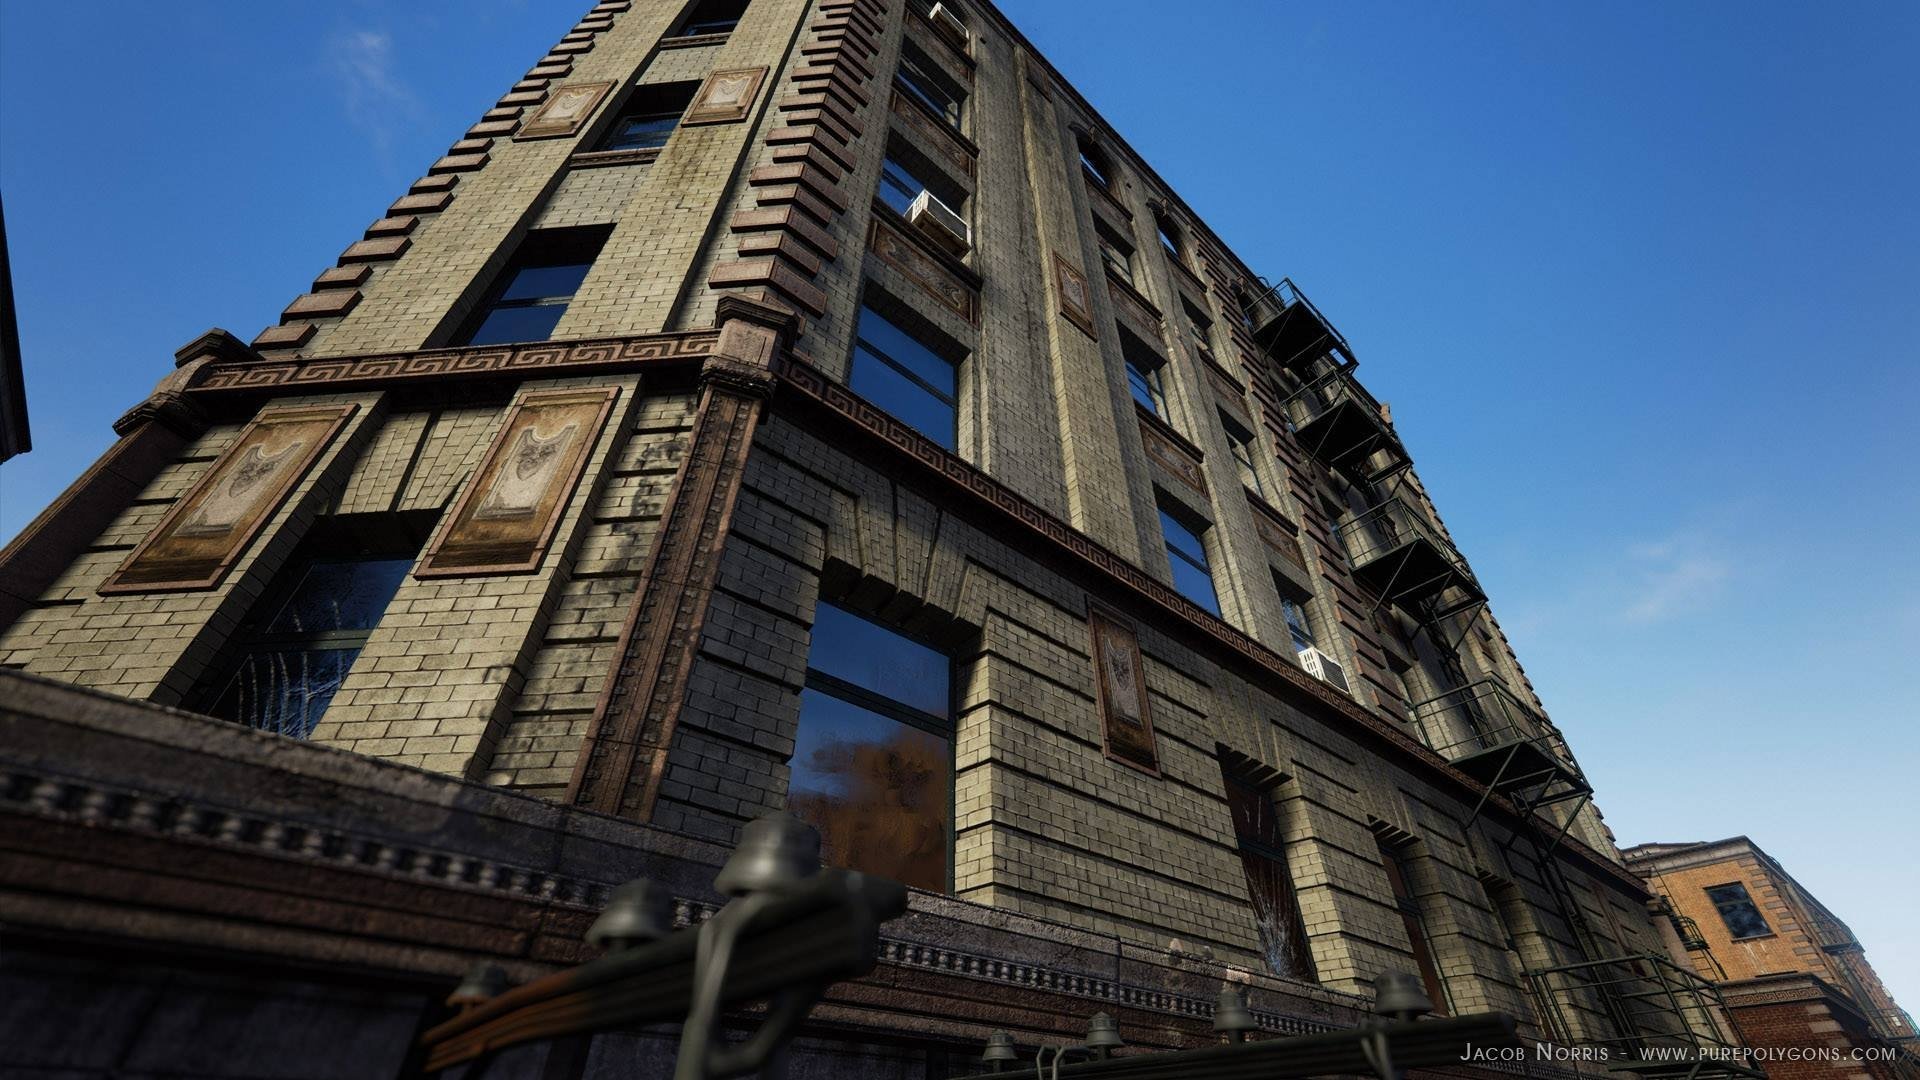
Lastly, here are some images of the final scene I ended up creating with my modular building set. Things that I did not create for this set:
Street lights, street signs like stop signs and no parking signs, plants or vegetation, official sidewalks or roads (these are just created by altering some materials and assets, but I didn’t make any actual roads for this set) benches, telephone poles, bus stops, hanging laundry, large billboards, etc. But you should totally add all of these things to your scene! Haha I would have loved to, but decided to call it finished after spending so much time on it. Perhaps one day I’ll go back to it and make those additions, but until then I hope this breakdown helped some people! I haven’t proof read it yet, cuz I have been staring at the computer for way too long now, but I hope it still conveys the message properly. Enjoy! And as I mentioned before please let me know if you have any other questions or comments!
Replies
Thanks for checking it out Daniel
when you do the grid snapping.
in unreal, there are different values in snapping like 100 - 50 - 10 etc...
sometimes you need to make the wall 2 meter and another wall 2.5 meters.
what if you have different walls modular you will get confused and if you give it to someone to handle the level he will need to change the snapping grid value each time.
and another question what the meaning of naming your modular like( 1x2,2x2_3x2).
thanks
For your second question I believe he names the modular pieces like that in terms of it's dimension. 1x2 is 1m by 2m, 2x2 is 2m by 2m, etc.. It's simply a naming convention for clarity when quickly selecting different modular pieces.
The answer to the first question is also great. Generally when working in the engine, I use a snapping grid of either 50 or 10cm. 50 should work for most pieces. Since the pieces are either 1 - 2 meter or 1.5 - 2.5 meters, but it's uncommon to have something at 2.25 meters. In that case I use a 5cm snapping or 25cm.
I hope that helps and thanks again for the response zachagreg
How you do determine what type of UVing your going for with buildings, with the way unreal does its rendering
1 mesh = 1 draw call and 1 material = 1 draw call
wouldn't it be easier having the outside and inner walls as one material to reduce draw calls.
I'm little confused with your UVing since i was taught going out of the boundary is bad
I'm learning how to do buildings myself for a game i'm creating and probably way overthinking it which is leaving me stumped.
I'm doing mine modular like you have done here, but getting confused on which way i should do my UV's since with UE4 has like 4 ways you can do it
UE4 overlapping UV's Assigned with Materials which act as different Texture sets, UDIM's , having different channels UVs or Atlas
I have the inner and outer walls as one mesh, but i'm fusing both the textures together into one material, due to the unreal devs saying using memory is better than accumulating draw calls with equal balance.
tho I've seen UE4 packs of buildings just use the UE4 overlapping method but then you have the issues with the draw calls since some have like 8 material nodes on the one model of the building mesh which is insane.
People have said that doing Atlas is the way to go but then you lose the ability of tiling and the ability to have damage textures fused into the material
I have my buildings like the Sims with premade building layouts with some walls destructible and has a transparent roof while having decay over time, but is also being seen in a TP view after leaving its construction mode
The way I read it, is everything snaps to either 1:1 UV ratio, 1/2 UV ratio or 1/4 UV ratio so textures align correctly. I could be wrong though, I'm a bit dense.
BTW @OBlastradiusO I like the stuff in your Artstation portfolio")
Can I unwrap the high poly model and export it to Substance Painter for texturing, then just export the roughness/metallic map for low poly to use?
I searched in google but counld not find any tutorials about making and exporting the roughness/metallic map in Substance Painter.
I will so grateful if you explain in detail how to make the roughness/metallic map or just provide a link about making them.
But if you want the trim sheet to have its own roughness/metalness then bring the lowpoly plane into substance painter.
Below is a video by @PixelMasher he goes over this a bit.