Search
-
Re: Project "About a Girl"
 Not too bad, congratulations on finishing it. What kind of project was this? Honestly it looks like you took on too much. I can tell a lot of work went into this, but even then nothing seems particularly polished. The characters are a bit stiff and wooden, the animation is a little robotic and at times hard to follow, the…
 -
Re: Crystal Maiden possible idea
 Without going to far into detail, since that will require a lot of research/practice on your part, you will want to create an ambient occlusion map to give yourself a nice base layer to paint on top of. But you will in fact need to learn how to UV before jumping right in to painting. There are programs that will allow you…
 -
Re: Low poly base mesh, what are you priorities?

 Thx pior! I followed your shoulder suggestion and with a bit of skeleton update, I think her shoulder line is now decent. However, I just don't think I can fix the underarm strangeness with topology alone, paint skin weight visualisation shows my underarm torso is under too strong an influence from skeleton arms. As for…
 -
Re: Walking Animations Tips? Using Maya LT HumanIK Rig - Low Poly Human Character.

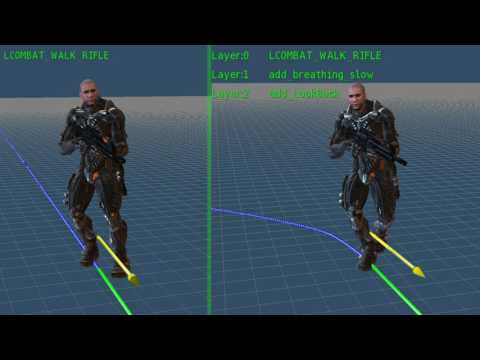 Very helpful video to demonstrate additive animations. So they are just 1 frame poses, nothing else, no motion OR CAN THEY have their own animations but you just mix them together from chosen skeleton bone like hip to upper body? So I could have the following animations for example: * Idle Standing Unarmed / Relaxed *…
 -
Re: C&C Please. Newbro not really sure what will make this better.
 honestly lighting is probably my strongest weakness, but what really helped is watching digital painters talk about lighting in random online tutorials. and there are a few workflows you learn when doing it too. like the most important thing about it is guiding the eye of the viewer, so that's what you should be thinking…
 -
Re: polyToSubdiv Failed
Convert displacement to polygons derived from a displacement map on the mesh. You can't simply run convert displacements to polygons without first converting the mesh to a subd mesh, followed by converting the subd mesh to polygons in maya which gives you the dense geometry required, then and only then can you convert… -
Re: Official handplane support thread - Now freeware!!
 Thanks for the swift reply, Alec. I can't seem to get things going however. I've done a very basic bake with mirrored UVs (offset with 1 uv space horizontally) and separate smoothing groups for top part, sides and bottom. I've baked out an object space normal map: I've then exported the LP as an FBX file with the following…
 -
Re: Alchemicals's journey (to improving)

 Hi @Dezzipixels thank you so much for the feedback, I followed up on your advice and did this days still life entirely in greyscale. And Im happy I did, it forced me to look at the objects differently and I feel as if I got a better understanding of volume. Not too pleased how it came out however; so I'll take another…
 -
Re: How to make a quad-based sphere for TurboSmooth/SubDiv Proxy later on?
 So one way to make this in maya is as follows. 1 make a cube give it like 8 divisions each way 2 make a sphere with 50,50 divisions 3 scale the cube so the sphere is inside it. 4 select the sphere then select the cube. (in this order) 5 go to mesh>transfer attributes the settings should be as follows. vertex position on…
 -
Re: Admitted Norway killer Breivik says he trained on video games
 Don't forget, also sexist! They post articles about 'women in video games' then follow it up with a Cosplay articles choke full of ladies wearing next to nothing (Lord forbid a single guy slips by, everyone will start commenting about how the guy is a douche). Then, they will follow up with a female writer, who she herself…
>24891 results