Search
-
Re: backface culling?
 I'd check back in maya if your polys are flipped in those areas. An easy way to check it is to turn off Two Sided Lighting in your perspective viewport > Lighting menu. If you see the polys are black, it means they are facing inside, you can then flip them by going to the Polygons menu > Normals > Reverse.
 -
Re: zbrush workflow
 That's the way it works. The lower the subdivision, the easier it is to shove polygons around, so if you've got big lumpy bits that are in your way, drop down lower. Ideally what you want to do is stay as low poly as you can for as long as possible and then gradually work your way up to higher resolutions.
 -
Re: A Horse thread, from concept to ingame ready model!
 1) There is lots of edge rings around the eye but not here which when subdivided a lot this would be very uneven area of the eye which would have less polygons 2) Firstly to support 1 and you have a line there which would could extend for extra geo in that area of the back which needs it
 -
Re: Using a modeling technique from Blender in Maya
 Seems interesting but what this method doesn't offer from what I can see is the ability to decide which polygons from the mesh exactly get shrinkwrapped, as it can be signed in blender under "vertex group", but this is quite interesting, seems less intuitive than blender though but will try it as soon as I can :)
 -
Re: normal map issues in maya
 Also a quicky. Since quads are build of 2 triangles, this could mean some distortion could happen, no matter how good you bakes/cages/normals. This is especially true for very long polygons. Try adding a loop cut down the middle,vertically, where the distortion is taking place. See if that helps.
 -
Re: Monstrous Mounts 3: Termite Sloth
 Just tried my hand at as realistic creature sculpting as I could while learning zbrush. Some parts are a bit stylized but in each iteration I've tried to do more with the given polygons, adding more texture and color variation. And yeah tapirs are awesome and freaky, especially when they don't have eyes ._.
 -
Re: more than 4 sided faces problem form Zbrush
merging vertices doesn't help, only way to fix it that i found it to delete the face and fill hole or append polygon in there. but that is very tedious process. And i would like to know the root of the problem it self? and i checked it has the right amount of edges and vertices, i'm very confused that never happened before. -
Re: double normals 3ds max...
 Basically what you need to do is clone the faces and flip the normals on the clones. 1)select the faces you want to double side 2)click "Detach" in the command panel and check "detach to element" and "detach as clone" 3)the cloned faces are now selected, click "Flip" in the edit polygon command panel
 -
Re: Tech Substances

 I added a new polygonal capsule tool to the free substance pack. I used it pretty liberally in that stamp tool, as well as the sci-fi plugs I'm working on now. Not much to look at, but it's stupidly useful. You can control the X/Y scale independently while maintaining the same curvature, as well as the rotation.
 -
Re: LeRhone Engine
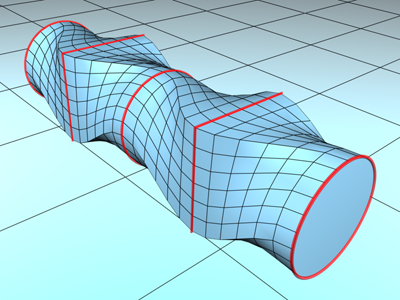 Yes, it is hipoly. The mesh here is subdivided and, actually, is based on low polygons. But the curved pipes look significantly better when subdivided. They are the only parts that I have done in Max, since I did not find a way to make a pipe from different shapes. I used the 'Loft' modifier that does this thing:
>10648 results