Search
-
Re: How The F*#% Do I Model This? - Reply for help with specific shapes - (Post attempt before asking)
 You can stop the random colors from the Object Color menu. Here is a rough script that I made to set selected objects to black wire frame and the first material in the Material Editor slot and apply a 50 specularity. macroScript Macro12 category:"DragAndDrop" toolTip:"Gray Spec Material"( $.wirecolor = color 0 0 0…
 -
Re: How The F*#% Do I Model This? - Reply for help with specific shapes - (Post attempt before asking)

 One of my lab assignments is to use 3Ds Max's MaxScript to model a snowflake. Here is the supposedly outcome of this model. You'll find details here: https://github.com/Seneca-GAM536/Wiki/wiki/Lab-9 As mentioned above, I am to model this snowflake (minus the wirecolors) using MaxScript with quaternions (No eular rotation).…
 -
Re: How The F*#% Do I Model This? - Reply for help with specific shapes - (Post attempt before asking)
 8th Scepter yes you ll thank us later, I have made a full reference folder filled with cool tricks posted here from page 1 to 146 took me couple of hours to do so. Would suggest you do so same ;) Also someone shared all the pics too from this thread somewhere here.
 -
Re: How The F*#% Do I Model This? - Reply for help with specific shapes - (Post attempt before asking)
Once i saw some mini tutorial here of a handle made from torus and cylinder then bridge together. Something like this http://prntscr.com/anp0l1 Can anyone get me the link please? i have tried from page 1 to 130. If anyone know about the link please let me know else i will keep searching. -
Re: How The F*#% Do I Model This? - Reply for help with specific shapes - (Post attempt before asking)
It still needs some optimizing, but should give you one, of many, ways. Clockwise from top left: 1. spline 2. renderable spline converted to mesh 3. delete some edges and caps 4. extrude and refine 5. symmetry 6. smooth -
Re: How The F*#% Do I Model This? - Reply for help with specific shapes - (Post attempt before asking)
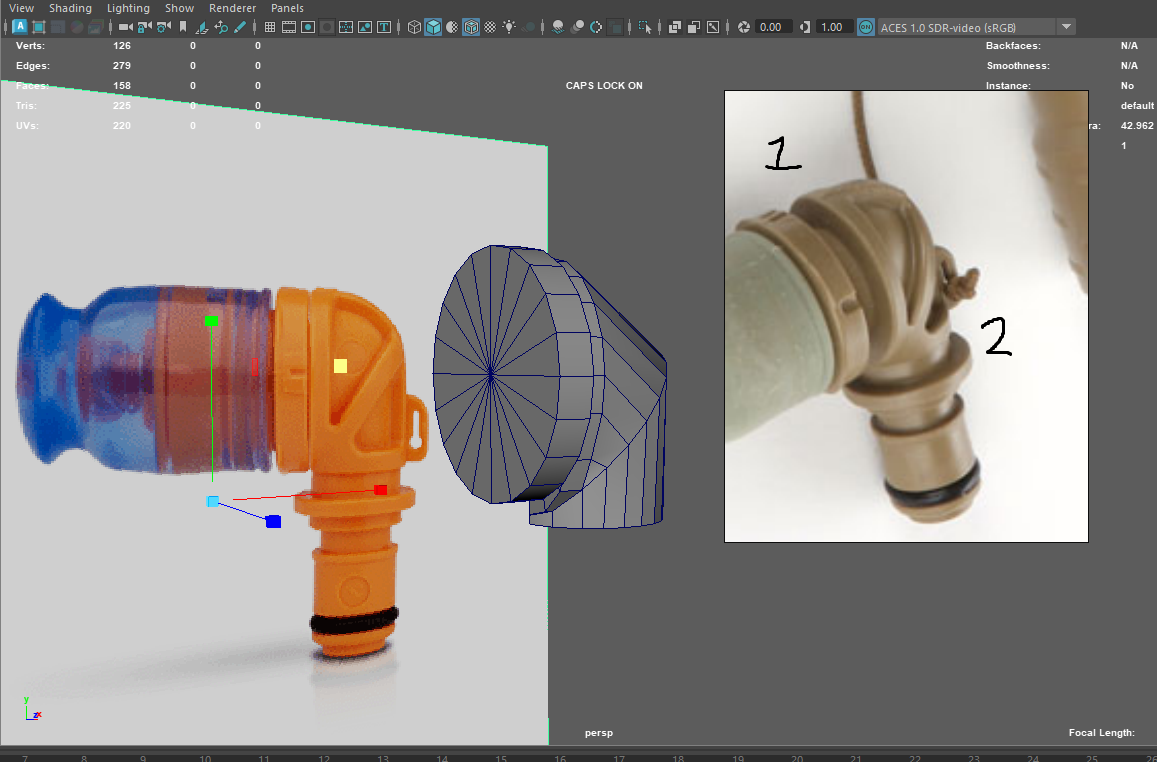 Hi! So I have been struggling with this for a while and figured it is time to reach out for help! What I get from the image and reference is that number 1) is an eclipse shape and 2) is a perfectly round cylinder. They both meet at 90 degree turned angel. Any suggestions on how to approach this?
 -
Re: How The F*#% Do I Model This? - Reply for help with specific shapes - (Post attempt before asking)
Hi I'm replicating a tarp (red in picture) that's wrapped around a model. I'm a newbie so I don't have a clue how to approach this (it's a plane I believe). I was thinking I could start with 2 curves, 1 profile for the bottom, and 1 for the top, and "loft" them together. Didn't work out though when I tried :( EDIT: whoops,… -
Re: How The F*#% Do I Model This? - Reply for help with specific shapes - (Post attempt before asking)
 Why don't you Give the mesh a material then set the Wireframe colour from the little colour box next to the mesh name (top right of step 3) and press f4? Then you dont need to constantly add or remove meshes, the colour and material of the mesh is controlled with the material and the wireframe colour is controlled from…
 -
Re: How The F*#% Do I Model This? - Reply for help with specific shapes - (Post attempt before asking)

 This is how i would do it. From top left to right and down . 1. Baseshape of where the fingers would go out 2. the back that would connect to it 3. fixed the finger shape 4. Meshes inside that i duplicated and scaled down to boolean 5. Union boolean the main shapes 6. Difference Boolean the holes 7A. Fixed topology 7B.…
 -
Re: How The F*#% Do I Model This? - Reply for help with specific shapes - (Post attempt before asking)
Clockwise from back left: 1. Box with divisions 2. Scale in alternating divisions 3. Connect rings running length of mesh (see inset) 4. Connect rings around inner parts (see inset) 5. Sub-D (TurboSmooth in Max) 6. Bend Modifier
111 results