The BRAWL² Tournament Challenge has been announced!
It starts May 12, and ends Oct 17. Let's see what you got!
https://polycount.com/discussion/237047/the-brawl²-tournament
It starts May 12, and ends Oct 17. Let's see what you got!
https://polycount.com/discussion/237047/the-brawl²-tournament
Difficulty Applying Normal

mod
Hey all. So I created a creature for school as a final project. Had to model it then zBrush it. I had alot of problems applying the normals when I bring it into maya and unreal. It just doesnt look anything close to what it did in zBrush.
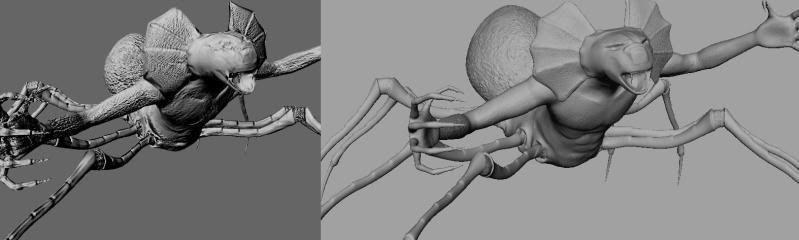
The right picture is what it looked like in zBrush, and the left picture is the normal applied in maya. I tried adjusting the bump depth and all that. but still nothing. Any help would be appreciated.
I would have gotten help from my teachers, but it was a final project, so i havent seen them since.
also, any C&C on the model itself would be great, if you want to keep going with it")
Thanks.
Stefan Lipsius
The right picture is what it looked like in zBrush, and the left picture is the normal applied in maya. I tried adjusting the bump depth and all that. but still nothing. Any help would be appreciated.
I would have gotten help from my teachers, but it was a final project, so i havent seen them since.
also, any C&C on the model itself would be great, if you want to keep going with it
Thanks.
Stefan Lipsius
Replies
And which app did you use to bake the normal map?
Also some additional infos would be great, especially the texture size since the detail seems to be rather fine.
Show your textures and people will be better able to help.
I think maybe im just expecting too much from my first real go at it, especially since i see so many professionals posting on these forums, and most of which, appear to be the high poly render, not the normals applied to the low poly. Im just use to seeing games look so good, i was expecting it to look exactly how it does in zBrush.
ah well. with practice, right?
Yes I was right.
Normal map thread page 11
katzeimsack's specific post on the topic
Hope that helps
No matter how much detail you put into your high poly or what setting you are doing in Maya, the simple fact remains you have poor UV distribution which will translate into extremely small and poor results for the normal map.
Re-UV it with some actual decent pixel density and you will see an enormous improvement overall. And don't be afraid to overlay some of those chunks to get even more space if possible.
Hard to explain, basically if you have 4 UV pieces that can use the same normals (something like those legs in your texture), shrink 3 and put them aside in the UV space. Once baking is done rescale them and place them where the 1 fullsize chunk baked so they all use the same part of the texture.
But this is something pretty advanced that you shouldn't worry about until you had at least a couple satisfactory bakes with any ol UV layout. You often have to play with normal smoothing to pull that off seamlessly on a character. I say for now keep doing UVs the way you are, just try and squeeze everything into one square area instead of so much blank space like you have there.
nononno do NOT do this. All you need to do is simply offset your mirrored/overlapping uv chunks 1 unit in uv space, this will make for a proper bake, and you dont ever have to put it back or do any other silly stuff. Its very easy.
It looks like your problem here may be that you're applying your normal map as a bump map, instead of a tangent space normal.