High Poly Practice - Vatican
polycounter lvl 11
Hi
trying to learn to do some high poly stuff. I've been experimenting with Sub-D with moderate success but I thought I'd like to try some straight up polygon modeling.
I'm going to work on this until it looks kickass, so I'll start making posts now, and hopefully receive a lot of crits and helpful tips.
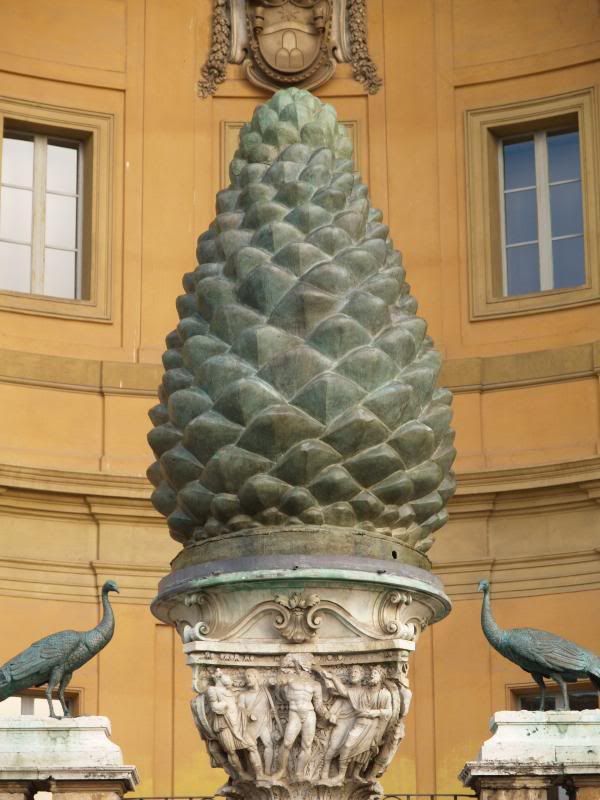
This is a sculpture from the Vatican. Just fleshing out the base right now, and I"m not really sure how I'm going to go about making all of the small details with the figures etc, but I want to take a real stab at it.
I don't think my current workflow for the small details is the one I will stick with, so if anyone has some advice on a solid way to go about making models of this kind, I'd love to hear your methods!
thanks in advance - fire away!
o yah - the rendered shot has a big obvious seam, but i just wanted to see how it would look so i hastily slapped it together for the screenie
cheers!
trying to learn to do some high poly stuff. I've been experimenting with Sub-D with moderate success but I thought I'd like to try some straight up polygon modeling.
I'm going to work on this until it looks kickass, so I'll start making posts now, and hopefully receive a lot of crits and helpful tips.
This is a sculpture from the Vatican. Just fleshing out the base right now, and I"m not really sure how I'm going to go about making all of the small details with the figures etc, but I want to take a real stab at it.
I don't think my current workflow for the small details is the one I will stick with, so if anyone has some advice on a solid way to go about making models of this kind, I'd love to hear your methods!
thanks in advance - fire away!
o yah - the rendered shot has a big obvious seam, but i just wanted to see how it would look so i hastily slapped it together for the screenie
cheers!
Replies
I work at a library so I just turned on an AO render while I shelved books away and it was done before I got back. Long render times FTL.
Cedar Falls? I'm from Davenport lol - cheers to Iowa.
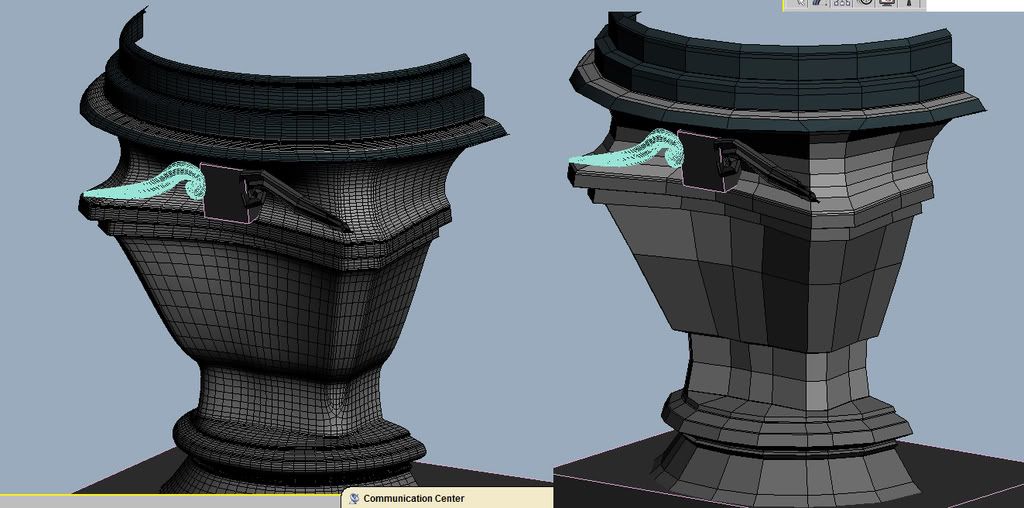
ps. the swirly thing you have made doesnt dead end, it flows into the next swirly thing on the edges.
I feel like I understand the principles of how all this works so I wanna try to make this work through trial and error.
The swirlies that I started aren't yet finished. I planned on just modeling the corner swirlie piece out of the existing piece. I'll stick with this project for a bit longer and see if i start making any decent progress.
How's business in LA mr. phil?
keep modeling! only way to get good is to fail then learn why and improve. there are honestly 10 diff ways to do any 1 thing it seems. I usually stick with poly pushing, lofts, path deforms and a few other random functions to make stuff. Others like to use displacements, and more advanced crap. in the end its what ever makes the best result for your piece, so keep it simple and organized.
reference image
Proportions don't match the image exactly but I was just kinda looking at it for a general guide.
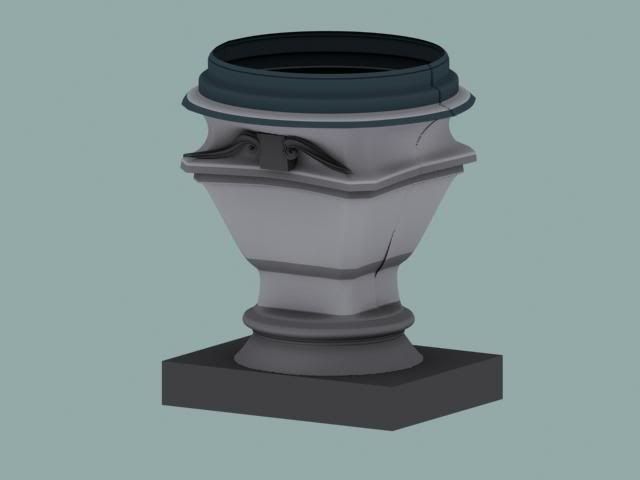
Here's what I'd like to consider the finished product (aside from the mammoth seam at the base that I'll paint out in the morning)
Any suggestions before I make a sheet for this item?
it's 2k tris, and I've used 2048 maps for it (I know that is an unreasonably large map size but I figured I would rez down to a more appropriate size after getting some guidance from the community).
So yah, it's 5 am and I'm tired and drunk from solo-beer-modeling night. cheers
Shep - alphas for the glass? Haven't had time yet. The inside of the lantern is not modeled so I didn't actually think I was going to put any alphas on it, but go for a more stylized look with an emissive glow.
Oh yah, and Phil, I don't know if I agree on the saturation. touch
in photoshop, i just crop down the image to the area of the item, then i go "image - mode - index color" in that, i turn down the colors to 16ish. then in the dropdown i hit custom and it gives you that sampling of the colors from the image. You can either print screen and make a tiny jpg to sample from, or just save that pallet off and load it into photoshop.
Thanks so much Stimpack!
Nice hipoly lantern!
I didn't end up getting time for an Alpha for the glass, perhaps in the future I'll get that done and add some emissive glow to the glass panes.
1: Add an Unwrap UVW to your Editable Poly.
2: Under Parameters hit Save and save your current UV layout from channel 1.
3: Change your map channel to 2.
4: Under Parameters hit Load and load your UV layout from channel 1 onto channel 2.
5: Fix your UV layout in channel 2 to your new desired layout.
6: Collapse the stack to apply UV channel 2 changes to the Editable Poly.
7: Add an Unwrap UVW to your mesh and save UV layout from channel 2.
8: Unstack any overlapped or mirrored UVs so you just have one piece from the stack in the 0-1 space on the UV sheet. (Just as you normally would if you were rendering out a normal map or AO map).
9: Change map channel to 1 and collapse the stack
10: Assign a clean material to the object.
11: In the diffuse color map select bitmap and put your diffuse color texture into the slot.
12: Keep Map Channel in the bitmap set to 1.
13: Open up render to texture and add a DiffuseMap to the output. (do not enable projection mapping)
14: Select the height and width and spot to save the texture.
15: Under Mapping Coordinates select "Use Existing Channel" and change the channel to 2.
16: Hit render.
17: Your diffuse texture should now be changed to coincide with your UV channel 2 layout.
18: Go back to direction 11 and replace your diffuse texture with the specular texture in the DiffuseMap slot. Repeat steps 12-16.
19: Go back to direction 11 and replace your specular texture with the normal texture in the DiffuseMap slot. Repeat steps 12-16.
20: Keep repeating 11-16 until all your textures are re-rendered to the new UV channel 2 layout.
21: Add an Unwrap UVW to your mesh and make sure the map channel is set to 1.
22: Load your saved map channel 2 (the one that has your UVs stacked properly) onto map channel 1.
23: Rebuild your material with the new textures you've generated.
a forewarning. if you delete and faces or verts. or even cut around on the mesh This will scrap your saved uvw file, and not reimport it. so uhh make sure your absolutely done with the model when you go to change uv's like this. if you need to make changes on the model do so after or before you attempt this not during.
ps. Those directions look long and confusing, but i guarantee once you do this it will be soooo easy, and make tons of sense. I cant tell you how many times ive done this. Its an invaluable method.... for me atleast.
If you get in and look closely, I've painted each one of the faces differently. Some of them have bird shit on them, some dont, etc. How can I get unique sides to each face of the lantern if they are all stacked upon each other? Would I have to go ahead and make some additional detail maps at maybe 128x128 and use them as decals?
map it as you did but instead of having them separately you can just move them on top of each others so everything without bird shit uses the same texture space. right now the smaller lanterns got 8 sides total. let's say two of these need to have bird shit.. different bird shit at that. you'd have to use 3 "unique" areas instead of the 8 you are using now.
however.. uhm.. unless it is a lamppost climbing game no one is going to notice it. you could map quite a lot of other things onto the same texture space and probably reduce this to a 1k texture and keep about the same detail level (although a bit more repetitive)... it might look a little worse but hey.. you can fit 4(!!) 1k textures on a 2k texture. You could make 4 different lamp post textures with it! (or you could fit your diff, spec, normal and greyscale glow/alpha/specpow into a 2k texture).
Also I believe you could cut down on some of the tris at the topside actually.. since you are using a normal map (and no one is going to see it).
Erh... and just so I don't forget. This looks really good but for being a game asset I think you could compromise some more.