Hi/Lo Baking - Silhouette Issues
Hi all,
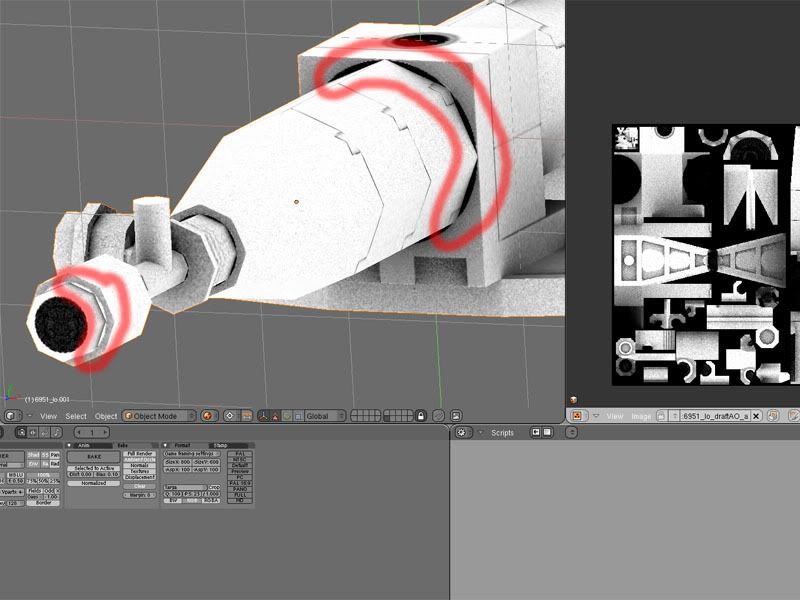
I'm baking hi poly versions of Lego models to low poly game models for use in my mod for HW2 (http://boards.polycount.net/showthread.php?t=52808). However, I'm having issues with where segments of the mesh intersect.
In the high poly, these are smoothed, subdivided cylinders, while in the low poly, it's a simple octagonal cylinder. Naturally, this produces a round silhouette on the low poly model, which doesn't match up with actual geometry. I've included a pic to hopefully show better what I'm talking about. Note the areas outlined in red.

So my question is this - is this a problem encountered in "typical" models and if so, how is it corrected or addressed? I should note also, I can't simply bake the chunks seperately, as many individual Lego pieces have these problem regions, and it would be an absolute nightmare to try to manage them.
Thanks in advance, and my apologies if I missed a previous post on this topic!
-Stefan-
I'm baking hi poly versions of Lego models to low poly game models for use in my mod for HW2 (http://boards.polycount.net/showthread.php?t=52808). However, I'm having issues with where segments of the mesh intersect.
In the high poly, these are smoothed, subdivided cylinders, while in the low poly, it's a simple octagonal cylinder. Naturally, this produces a round silhouette on the low poly model, which doesn't match up with actual geometry. I've included a pic to hopefully show better what I'm talking about. Note the areas outlined in red.

So my question is this - is this a problem encountered in "typical" models and if so, how is it corrected or addressed? I should note also, I can't simply bake the chunks seperately, as many individual Lego pieces have these problem regions, and it would be an absolute nightmare to try to manage them.
Thanks in advance, and my apologies if I missed a previous post on this topic!
-Stefan-
Replies
I see your problem. Not 100% sure what's happening in your model and UV layout without the wires. Do you need the parts separated/dead UV space in those particular areas? If you don't I would delete those faces and bridge the remaining open edge faces. Remember to crease the edges for sub-d time. Possible bonus: More UV space!
If not, well there's correcting by hand. The AO spread on those faces looks pretty uniform, just clone, blur, or copy pasta until it looks how you want it.
Okay, so is there a way to get Photoshop CS2 to bleed an edge pixel of a selection by a certain amount? Like UV margins, only with Photoshop selections instead.
I'm not entirely sure what you mean about the dead space in the uv and the open areas. The texture error in the bake is caused by the round hipoly object butting up against another object. But since the lo poly geometry isn't nearly as round, it leaves a black circle on the texture, which is unsightly to my eye.
Oh, and a note on the mesh topology. On the low poly, that main cylinder simply goes through the box, they are not manifold.
Ok, by dead UV space I mean its not being used on a detail that's going to be seen. If you have a face with something abutting it or another chunk O geometry inter penetrating it, the covered areas still have UV space assigned to them but that area could be considered "dead" as far as usefulness in displaying textures to the viewer.
Clear as mud still?
Now, it may be there's a reason to keep the geometry all modular and seperated, in which case that's all part of the plan and will have to be lived with at some level. If not, then you could free up that occluded texture space for details that are actually going to be seen with some (minor IMO) rebuilding to make objects manifold.
In Photoshop you can set the selection Feather by pixel value, or you can go into Quick Mask mode and use standard filters and tools on the selection area.
Hope this helps.
MoP - Adding more polys I agree would likely minimize the issue, however, the model shown at the bottom of the post clocks in at 6924 triangles already with 8-vertex cylinders on all the round stuff (it's fairly optimized too), so I'm hoping to avoid adding more polys. Since many cylinders of differing sizes butt up against each other in the different models I'm making, I'm hoping to avoid changing the resolution of those cylinders, since I assume it would look odd (and does to me, at least). I'll try it out though.
Nezach - Thanks for clearing that up. I knew what you meant by dead space in the uv's, but not how it was related to the problem. Oh and what dead space there is I traded for a reduced poly count, so that was a conscious decision. Thanks for pointing that out though, I'll have to remember it if I have similar areas in other models. I can see what you're saying about how to solve the problem though. Scale in the areas with a bad bake on them, so they're hidden by the other geometry, right?
Thanks for the photoshop tips, but they all seem to involve adding to the image - there's no way to scale down a selection and stretch a 2 or 3 pixel margin at the edge of the selection, is there? I realize I'm not saying it very accurately, can't think of how to say it better.
Also - I bevel the meshes instead of creasing them for the highpoly - any opinions on which is the better one to use? Also, that lo-poly can't be subsurfed, it would look horrendous. The high poly is made of individual pieces (each brick is a discrete mesh).
Illusion - Thanks for the tip. I do that already in fact. Used it to solve the problem on a previous model, but while it would solve the problem on that main segment, it wouldn't work for the smaller cylinders at the front of this model.
Oh, another note on the geometry, the model's mirrored down the centerline if it wasn't apparent already - conscious decision again, the tradeoff between a few extra polys and extra texture space (though that may sound hypocritical in light of my previous comment).
And a final note - I'm somewhat of a perfectionist (or just OCD), so if there's something that I'm missing because I want it to be perfect, and either no one will notice or it's simply a waste of time to be perfect on in these models, just bitchslap me and tell me to settle for "good-enough".
And a final note, because it inevitably comes up - I think the models look fine with only textured studs (those bumps on top of Lego bricks), and that they add far too much to the poly count to physically model them. Any opinions on studs/no-studs?
Thanks for the comments so far!
-Stefan-
Heres a little bit i wrote up on the exploding mesh stuff, and AO workflows.
Sastrei, it sounds like you are looking for the Expand and Contract options under the Select>Modify menu in Photoshop.
-Stefan-
Nezach - While I don't think the question was directed at me, I set the energy level to 2 (so twice normal) for my ambocc bakes. Blender also has a new noiseless ambocc, called approximate, but it produces some funky results at times. And no, select/contract wasn't what I was looking for, but it was what I ended up using.
And so, here's the fruits of the labor! In the Homeworld2 engine, if y'all want I'll upload the texture map too.
-Stefan-