Help modeling a robot for animation
polycounter lvl 18
I am taking the time over the next month or so to learn roughly how to animate. I am just now starting to get the grasp of modeling efficiently, and now i need to work on modeling for animation.
From what i understand, if i am modeling a mechanical creature, i want the limbs to be made of separate objects grouped together so that the "metal" does not stretch. correct? So here is my concept drawing divided:
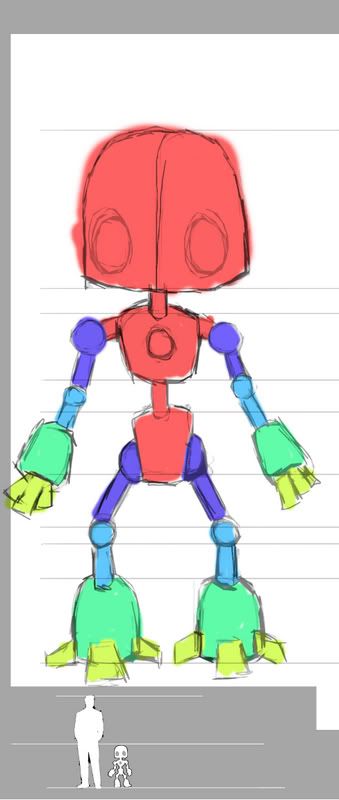
(left and right arms and legs would be separate from right arms .. blah blah if you get my drift)
Is this the correct way to go about this? I tried looking for some tutorials, but I'm never sure who it is posting this stuff. I had a bad experience learning how to "correctly" model a human face.
From what i understand, if i am modeling a mechanical creature, i want the limbs to be made of separate objects grouped together so that the "metal" does not stretch. correct? So here is my concept drawing divided:
(left and right arms and legs would be separate from right arms .. blah blah if you get my drift)
Is this the correct way to go about this? I tried looking for some tutorials, but I'm never sure who it is posting this stuff. I had a bad experience learning how to "correctly" model a human face.
Replies
Hierarchy tab > Pivot > Affect pivot only (as long as this button is on you will move only the objects pivot point and not the object itself.
Then move the pivot to the joint, set the drop down by your rotation gizmo to Local and it should be easy to animate.
Of course if you are looking for experience with the rigging tools then I guess you can go thru the whole pain of creating bones, making sure they are aligned, skinning, and weighting.
If you do go skin/weighting I would suggest making it all one object (not joined/welded mesh but separate sub objects) that way you only have one skin modifier with all the bones easy to select and easy to work in. Otherwise you will have a dozen pieces each with their own skin modifier and only one bone. It will be extra unnecessary, tedious, clicks getting to the skin table and other tools.
Also, if you want to model properly for animation, make sure you put the character in a pose that's easy to rig. For a rigid character such as this one, put it in a T pose, arms straight to the side, no bends. It looks lame, but it's easier in every step of production (modeling/UV/rig/animation).
Also, don't make knees like in your drawing since that's 'impossible', and very hard to rig up properly. You'll want IK (Inverse Kinematics) for the legs, which works in a plane. If you apply IK to the legs, they'll only be able to bend sideways. As soon as you rotate them forward, the legs will come out straight when viewn from the front anyway. I'd model the legs straight down. Because it has large feet, the feet will clip through each other, but that doesn't matter since you'll fix it when posing/animating. This is one of the most commonly made mistakes by modelers who themselves do not really rig, let alone animate.
So you can just model an "upper arm" section, make sure the pivot point is in the right place, model a "lower arm" section with the pivot point at the elbow, etc etc.
Then you can just hierarchically link them (link hand to forearm, forearm to upper arm, etc), then select the first object of the chain and choose any "IK Solver" from the "Animation" menu.
However, SkullboX is correct that using a "proper" skeleton of bone objects would be more versatile and better practise in the long run. It's easy to apply a Skin modifier and weight a whole object or element to a bone anyway.
SkullboX is right about the legs too, you'll want to model them straight, otherwise you will run into problems when applying IK and trying to animate them.
It really doesn't take to long to do it this way and you can have the benefit of iks and if you were going to drop into a game engine it would be much easier to do it this way.
Actually, in Max you can apply IK to any objects, not just "joints".
So you can just model an "upper arm" section, make sure the pivot point is in the right place, model a "lower arm" section with the pivot point at the elbow, etc etc.
Then you can just hierarchically link them (link hand to forearm, forearm to upper arm, etc), then select the first object of the chain and choose any "IK Solver" from the "Animation" menu.
[/ QUOTE ]
Thanks for clearing that up, it's been quite a while since I've used max. I remembered it had some features that allowed you to use 'normal' objects as bones but I personally never used it - let alone IK. I'm all spoiled by maya now.
As for skinning the robot, I would simply link the individual parts of the robot to the skeleton, unless you're making it for a game which exporter requires skinned objects. Linking is faster to do, easier to change and updates faster in the viewport as well.
just remember setting the bone's properties to renderable
and yes, it will retain material proterties and UVs.
it will behave like a bone, and look like a model,
with no skinning required.
best of both worlds