The BRAWL² Tournament Challenge has been announced!
It starts May 12, and ends Oct 17. Let's see what you got!
https://polycount.com/discussion/237047/the-brawl²-tournament
It starts May 12, and ends Oct 17. Let's see what you got!
https://polycount.com/discussion/237047/the-brawl²-tournament
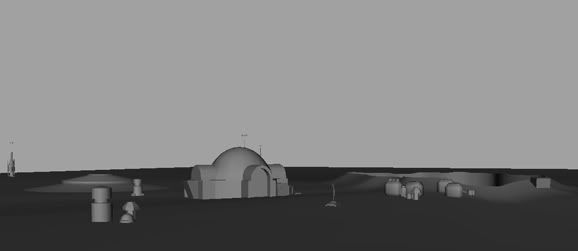
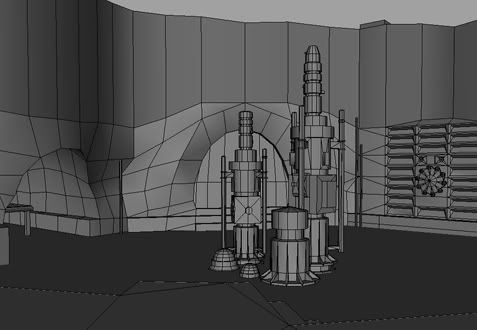
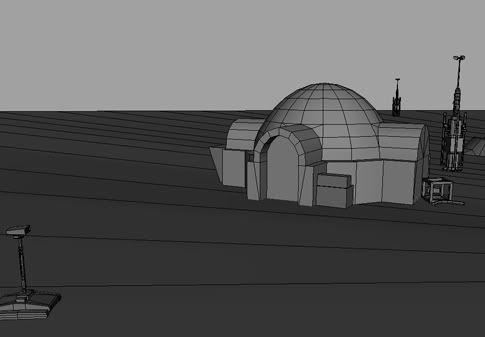
Lars Homestead WIP
polycounter lvl 18
Alrighty heres a scene for my portfolio. If you've seen Star Wars then you should recognize this. I'm a huge Star Wars fanboy and am proud of it. As it stands I have the models done with the exception of vegetation and a little bit more clutter. Textures on the way.
No sky box yet, I will add more polys to the terrain, I built everything in pieces and haven't combined everything so there are some 'seams' due to crazy normals action.
So polycount for everything is 22248, now actual main enviroment geometry is only 4382 tris. Thats because all the props amount to alot of polys. The reason for this is the moisture vaporators are 1600 tris each. I'm planning on making a smaller LOD for the vaporators since some will be see very far off. So hopefully I can get the polycount down. So should I be worried that these moisture vaporators amount to the majority of the polycount?
Crits and comments are definitely welcome.
Replies
You need more chamfers on the edges of things - particularly the steps, edges of the buildings, and the cliffside where it drops into the hole.
I would also look at your scale. If that archway is a door, then to the right of it you have 7 steps that equal about 8 feet at least.
Overall I would suggest some small rocks and perhaps some sort of small dry flora throughout as well. Something to break up the giant expanse of flatness.
Otherwise - it's coming along. Can't wait to see more of it.
where are the power converters?!?!
[/ QUOTE ]
At Toche station.. mwahaha
thanks for the feedback thusfar everyone
Besides that will have mass updates soon, need to get this project wrapped up in the next week.
http://www.poopinmymouth.com/tutorial/normal_workflow_2.htm
2) Too many polys where it doesn't count and not enough where it does.
- What engine is this for?
- What angles are you going to be viewing this? First Person Shooter, Top Down RTS or Locked 3rd Person Camera? With this info you can pack the most detail into what will be seen the most on the screen.
3) If you're doing it just to do it, then toss low poly to the wind and go nuts. Read: going nuts doesn't mean more edges on cylinders it means detailing out the rim of the hole, adding rocks and plants ect...
4) Your "high poly" version is lacking in detail, the details you added really don't require a normal "bump" map. Normal maps are a way of capturing high poly detail like metal seams, vents, rivets, wires, dents, paint chips, beveled plating detail ect... Its not really good for baking a 32 sided cylinder into a 8 sided, the normal is pretty devoid of detail when you use it that simply.
[ QUOTE ]
1) Everything does NOT need to be one continuous mesh.
[/ QUOTE ]
I guess it has kinda stuck in my head to extrude everything rather than to combine. From now on that will probably change.
[ QUOTE ]
2) Too many polys where it doesn't count and not enough where it does.
[/ QUOTE ]
This isn't for any game its just a portfolio piece so it won't be in any engine. However, I imagine it being in some kind of action game probably first person. This vaporator is one of the most important pieces in the scene. The cameras in my demo reel will get up close to it but there will also be duplicates of at varying distances from the camera. I will make a small LOD version of it for those situations.
[ QUOTE ]
4) Your "high poly" version is lacking in detail
[/ QUOTE ]
Here's a picture of what I'm trying to make. Being an actual prop on a movie set they made it out of wood but its supposed to be metal. I captured as much detail as i thought was necessary since I can't actually find much more from any ref pics. Its just my first model of it doesn't completely capture the silhouette of it with all of the rings it has. All of those tiny rings and square indents wouldn't be modeled for any game model I wouldn't think? But I do agree its not really a 'high' poly model.
So where should my polys go in this object? Its stands around 1800 and will lower now that I will just combine the small tubes instead of extruding them.
But thanx for all the c and c so far. This is exactly the kind of stuff I need to hear from all the vets around here.
I believe xNormal also has this feature.
So where should my polys go in this object? Its stands around 1800 and will lower now that I will just combine the small tubes instead of extruding them.
[/ QUOTE ]
After comparing your high poly version to the ref photo, I would suggest going crazy insane on the high poly detail. You'll more than likely only use the high poly version to make a normal map, its a working mesh that doesn't need to be optimized or pretty. It just needs to get the job done of translating a crazy amount of detail over to the normal map.
If you're going to bake that detail down to a lower poly version then you don't have to worry about the high poly being too high, go nuts, model every last rivet, every last vent slat, every dent and plating seam, apply some procdural noise and dirt. I would even be tempted to cut into the model where the paint chips just so that translates to the normal easily. There is so much detail that is in the ref that is not on the model, either put it in the high poly version or be prepared to paint it. Right now your high poly version straddles the line between poorly optimized game asset and barely usable high poly object, not a good fence to be sitting on, push it one way or the other.
Vents and vent slats, very easy to make, just make one and instance it 15-20 times. it will take less than .5 seconds and translate pretty easy to the normal.
Little detail boxes and knobs are easy to do also but you left them out. I don't see that R2D2 style vent anywhere on your model, thats some cherry detail and should be in there. It screams I'm a piece of Star Wars recognize me!!
There is a center ring that has some great Star Wars-esk pattern detail running around it, yet not on the model.
Most of the inner ring pieces have some kind of exposed detail to them. The outer pieces are more like armor or plating. I get the impression that your model does not have this distinction and looses some of its resemblance.
Here this is easier...
All details I don't see on the high poly version.
It's starting to take shape and you're getting the bugs worked out. Keep plugging away and you'll have a great piece
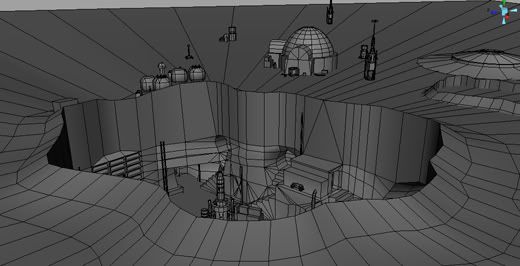
You should be able to spot a seam in the skybox, fixing that at the moment. Speaking of which I am trying to investigate further into image based lighting in maya. Currently I have just a mesh for the skybox, so if anyone knows anything about that or any great tutorials that would be great.
So any crits or suggestions on what they can see so far would help out alot.
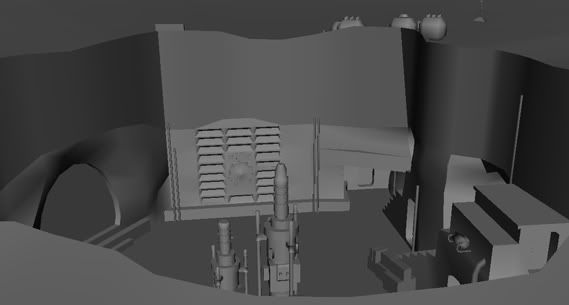
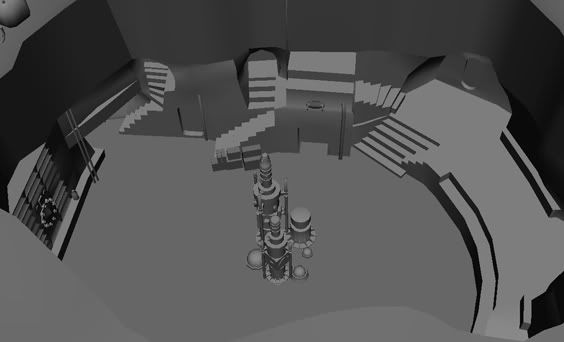
Here's some renders.