Sketchbook: Celosia
greentooth
Hello everyone!
I'm a 2D artist looking to move to 3D character art. I'm not sure specializing in faces, hair, textures is a viable career path, so I'll move onto full characters once I feel more confident in my skills. I also do some general environment art sometimes for a sandbox game I'm using to learn Unreal.
Critiques and tips welcome! It's hard to switch gears at this point, but in these awful times this seems a slightly more secure path in the long run.
Replies
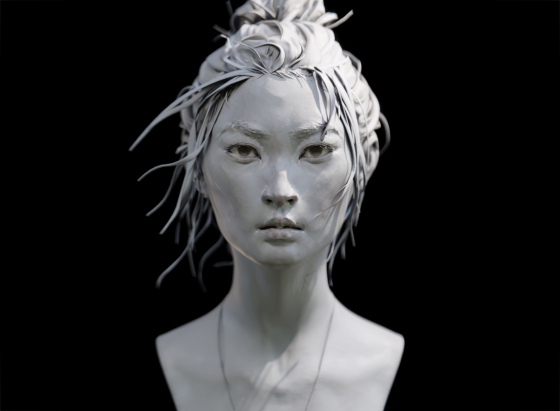
Dynotopo sculpt from scratch in Blender, I used it to figure out how to use curves for hair for this kind of clay bust, also to come up with a quick and flexible way to setup the base material so these busts look pretty.
Blender Hair
Also, a hair curves WIP. Out of the box the hair system interpolates hair in perfect circles around the hair guides. That's not organic looking at all, and the way children also clump in circles make some hairstyles impossible to setup.
I'm trying to create a few geometry nodes to interpolate them in layers that follow the curves more closely. It could also double as a base for hair cards, so there's that too. To make that possible I also wrote an add-on to change the attributes of hair splines and control points more easily.
Left to right: Output of my custom nodes, the "card" geometry creating them, Blender's default output for the same curve, Blender's output from a plain curve + curl geonodes.
What the curves look like. 3 first are the same, last is simpler. And my little addon with many junk attributes that were used to dev the custom node but aren't being used here.
The nodes still need lot of work and I have to look up ways to minimize intersections for extreme curves, but I'm quite happy already. The children follow the shape more closely, I've got per point tilt and radius going on, opening up the possibility of creating hairstyles like finger waves and curls that revert their rotation direction mid-way with full artist control. I also find it easier to place the hair layers. You can't do this at all using the default nodes.
Edit: Today's progress
I implemented a rudimentary "offset from surface" toggle. It's just a modified shrinkwrap, a bit expensive on performance, but a game changer for hair regions like eyebrows that lay very close to the surface and looks obvious when intersecting with it. I'm sick of tilting curves to fractions of degrees to avoid that. There's still room for improvement here.
I also fixed the curves resolution. Forgot to adjust that in the children spawner haha.
Next in my to-do list:
- Stagger roots for better but still layered hairlines
- Blend different profiles for roots, body and tips of hair, so you can have flatter profiles for roots but still nice wild curved shapes for the body
- Optimize children generation by pruning intersecting standing too close
And in far off future:
- Dive into my old custom hair implementation to see if my solution for self-intersecting guides/cards will work here
- Implement a new horizontal clumping that follows the "card" profile instead of going round the guides, so the hairs kinda slide onto themselves more like real hair locks
I added some offset to the specs (actually roughness and maybe translucency?) because its lack was annoying me.
Left to right: No offset, offset, macro offset, offset per hair (they get added in the material). I guess I could add an extra offset layer per card too, let's see later.
I'm thinking of adding an automated method to create base hair layers, the kind of layer with more and/or thicker hair strands to fill up the hairstyle. Already started, hit a snag on the iterations because I really wanted to do that on a certain spot of the node tree but it's no-go, hah.
Proof of concept with source layer + a second automatic layer of thicker hair (red) trying to keep itself inside and below it:
Finally, a test of surface offset + stagger roots + pruning intersecting hairs on a real usage case: eyebrows. The pruning turned out to be quite useful after randomizing their flow, without it some strands read way as thicker than they were because they were actually, 2, 3 hairs stuck together by sheer fate.
Please ignore the skin, everything is a mix of a fairly strong procedural generation (made to remain visible from a greater distance, with denoiser on) and quick and dirty base panting on a lowres sculpt without wrinkles or pores.
------------------------------
I'm going to use this thread to keep track of tasks for those hair curves nodes, don't mind me.
Status (2025-04-25):
Initial implementation done
☆ Possible improvements: Add an extra noise layer and/or also stagger by sub-guides
- Blend different profiles for roots, body and tips of hair, so you can have flatter profiles for roots but still nice wild curved shapes for the body
- Optimize children generation by pruning intersecting hairs
Initial implementation 50% (It works but no performance gains seen, must try a different approach)
- Auto-generate base layers (+)
Initial implementation 50%
Add merge with source curve position by spline factor support
Add normal-based offset to keep it away from source curve on twist Not bulletproof, need to try new approaches
Add constant offset from source curve position mixing support
Add transform to card to base layers
Add trim at start/end attribute support
- Offset material specular by attribute (+) √
Initial implementation done
☆ Possible improvements: Mix in an offset by noise or similar method for a more organic macro offset. I'll know f it's needed when I test it on a real hairstyle
- Line up highest point of pseudo-card with source curve by default for better previews when the card isn't a straight line √
- Implement custom snap to surface because the default alters too much of the source curve (+)
Maybe:
- Dive into my old custom hair implementation to see if my solution for self-intersecting guides/cards will work here
- Implement a new horizontal clumping that follows the "card" profile instead of going round the guides, so the hairs kinda slide onto themselves more like real hair locks
- Add clump towards helper curve to point hair tips towards a spline. Useful for eyebrows, dreadlocks, braiding close to the scalp and more (+)
-----
Thought about two alternative approaches for the base layers thing and made some progress. I'm pushing it to absurd degrees to see when it breaks and I think it's good enough for the intended purposes, I should never need to create so many layers so spaced. Now I only need to merge a few controls from the first attempt and clean up the nodes.
Bonus: Accidental continuous finger waves. Nice, I've been planning to do a 30s inspired hairstyle in the near future, this could help. 😁
I've been using Blender's default Principled Hair BSDF out of convenience, but it eats resources and there's something wrong with it in 4.4 because CUDA keeps choking on it or causing Blender to crash when changing the setting, so I setup a PBR + translucent version of it. I'll tweak it when working on a real hairstyle.
Hopefully I can also reuse it to bake card textures later so there's that.
According to http://wiki.polycount.com/wiki/Transparency_map#Sorting_Problems:
Because a game renderer typically renders triangles in the order they were made, an artist can often fix sorting errors by manually re-ordering the vertices.
A renderer usually draws vertices in the order it receives them; this can be exploited to help it draw alpha blended surfaces in the order that's desired. The behind-most faces are drawn first, and the front-most faces are drawn last, with the rest drawn in order between those.
Is this still valid? It's easy to reorder cards so the deepest layers come first, but I can't see this helping with overlaps between cards in front and back of the head because you got to work from the presumption you can move the camera in the game, so what's in front for the camera changes with the pov.
--------------------
Not many showy things to show, I spent some time cleaning up the hair interpolation node tree (it's where most magic happens), changing approaches to make it easier to use that for both real time and groom hair, implemented the profile shape blending from roots/body/tips of a card, and been working on the auto layers.
How the node tree looks now vs how it was in the initial dash to get as many controls in as I could. 😆
One use case I have in mind for the auto layers is a sort of floater base layer to fill up hair that gets dramatically wide at points. I can't see a reason all cards got to be "attached" to the body, but I'm a rando with barely any knowledge about engines. Am I missing something that would make this unwise?
The idea is to have a non destructive workflow that would let me style the hair without worrying about placing those. Need to edit a hairstyle to create a variation? Easy peasy, the nodes will take care of repositioning those fillers for me.
I also just started a playground hairstyle to test out the modifications I'm doing, with the ultimate goal of turning it into realtime hair. It's a pretty easy style, wavy, bangs and that's about it. Working on the silhouette and trying to come up with a good, straightforward way to trim sections like bangs.
Already tried out the base layer fillers (also using the offset from surface and a different, flatter profile for roots). They're highlighted in red below, and there's also the version without it. I can see myself using it for bangs all the time.
I'll work on the clumping next because that Blender vanilla version looks just terrible besides going wherever it wants instead of going where I want it to go. I'll also see if I figure a good way to squash cards by control point. It may take a little time because I like math but it doesn't like me, and fiddling with normals and tangents vectors and the like can be hard.
Hair tasks status (2025-05-02):
- Support attribute-controlled resolution per spline to make conversion to real cards with minimal tris waste easier
- Trim hair using helper meshes
Initial implementation 50% (very rough, slow, little artistic control over it)
- Store source splines data into generated hair for later use, as they're destroyed by the interpolation process and keeping them around is problematic
- Stagger roots for better but still layered hairlines √
☆ Possible improvements: Add an extra noise layer and/or also stagger by sub-guides
- Blend different profiles for roots, body and tips of hair, so you can have flatter profiles for roots but still nice wild curved shapes for the body √
- Optimize children generation by pruning intersecting hairs
Initial implementation 50% (It works but no performance gains seen, must try a different approach)
- Auto-generate base layers
Initial implementation 90%
Add merge with source curve position by spline factor support
Add normal-based offset to keep it away from source curve on twist Not bulletproof, need to try new approaches
Add constant offset from source curve position mixing support
Add transform to card to base layers
Add trim at start/end attribute support
- Offset material specular by attribute √
☆ Possible improvements: Mix in an offset by noise or similar method for a more organic macro offset. I'll know f it's needed when I test it on a real hairstyle
- Line up highest point of pseudo-card with source curve by default for better previews when the card isn't a straight line √
- Implement custom snap to surface because the default alters the source splines too much
Maybe:
- Dive into my old custom hair implementation to see if my solution for self-intersecting guides/cards will work here
- Implement a new horizontal clumping that follows the "card" profile instead of going round the guides, so the hairs kinda slide onto themselves more like real hair locks
- Add clump towards helper curve to point hair tips towards a spline. Useful for eyebrows, dreadlocks, braiding close to the scalp and more
FWIW it somehow reminds me of the work of pattern maker Shingo Sato.
Not much to add besides this somewhat unrelated remark !
-----------------------
No showy progress today. Took care of several minor tasks not worth listing, and improved the trim by shape, both in performance and functionality, adding support to cards. I can turn bowl cuts into reality now!
Trimmed cards by shape and their curves:
Everything controlled by attributes as always, I can freely ignore any cards I wish like some at the corners. By "trim by shape" I mean any geometry:
You can't simply boolean your way into it or it'd look like this:
How badly adapting the cards could distort the texture remains to be seen. I need to explore baking addons to find something I like and start baking cards to test this in practice. I also implemented basic unwrapping:
Something in the node tree is sliiightly distorting the UVs, I spent some time debugging but couldn't locate the flaw, will have to do that later.
Hair tasks status (2025-05-03):
Initial implementation 60% (Hacked the values, I need to find the correct formulas)
- Support attribute-controlled resolution per spline to make conversion to real cards with minimal tris waste easier √
- Trim hair using helper meshes √
- Auto unwrap hair cards √
☆ Find out what's warping the UVs
- Store source splines data into generated hair for later use, as they're destroyed by the interpolation process and keeping them around is problematic √
- Stagger roots for better but still layered hairlines √
☆ Possible improvements: Add an extra noise layer and/or also stagger by sub-guides
- Blend different profiles for roots, body and tips of hair, so you can have flatter profiles for roots but still nice wild curved shapes for the body √
- Optimize children generation by pruning intersecting hairs
Initial implementation 50% (It works but no performance gains seen, must try a different approach)
- Auto-generate base layers
Initial implementation 90%
Add merge with source curve position by spline factor support
Add normal-based offset to keep it away from source curve on twist Not bulletproof, need to try new approaches
Add constant offset from source curve position mixing support
Add transform to card to base layers
Add trim at start/end attribute support
- Offset material specular by attribute √
☆ Possible improvements: Mix in an offset by noise or similar method for a more organic macro offset. I'll know f it's needed when I test it on a real hairstyle
- Line up highest point of pseudo-card with source curve by default for better previews when the card isn't a straight line √
- Implement custom snap to surface because the default alters the source splines too much
Maybe:
- Dive into my old custom hair implementation to see if my solution for self-intersecting guides/cards will work here
- Implement a new horizontal clumping that follows the "card" profile instead of going round the guides, so the hairs kinda slide onto themselves more like real hair locks
- Add clump towards helper curve to point hair tips towards a spline. Useful for eyebrows, dreadlocks, braiding close to the scalp and more
I'm working out the hair cards material, and I really would like to be able to bake maps without having to jump between programs, but being forced to bake at 2x to 4x the target resolution is proving to be a big hassle! For now I'm combining downscaling with texture dilatation and a set of Krita filters to smooth the alpha map edges, but not only I'm having to perform extra steps anyway but my old computer simply can't bake some maps at 4x without crashing Blender.
Before and after Krita "AA":
Anyway, initial workflow and shader experiments. It's not really possible to see the translucency (Blender's poor man's SSS) in those solo cards and few geo strands, but it improves the look of the hair.
Top view. For now I was a bit heavy handed when thickening the hair to have fewer ray misses and I'm aware a few strands on the edges got clipped, heh. Easy to solve and good issue to catch before calling the nodes done.
Comparison between my tests and the results of the kind of standard hair approaches you see out there. They're exactly the same maps, normal, tangent, diffuse etc, but I'm experimenting shuffling some of the effects to different maps, like roughness to normal maps by adding noise to it (roughness is faked surface irregularities after all) and more, trying to capture certain details of hair strands and push the illusion of depth for single cards.
How it will play out in realtime still remains to be seen, no Marmoset or UE installed at the moment. I think I'll settle for these results for now, just implement the results of a few observations and proceed with the test hairstyle... And try to free up space to install UE.
Oh, and I also put some more work into the UVs generator + exploding and straightening cards for protagonist cards I'd to bake "in place" instead of using an unrelated texture strip.
This is why I'm going all the trouble. It's non destructive: Cards generated from larger silhouettes that can be individually configured and positioned in all ways you can imagine without ever losing the relationship to their parent pseudo cards. They're positioned and tilted relative to them, change the parent and the changes cascade to the cards. They can be deleted without actually deleting them so you can always change your mind, I can add new cards to clumps besides the auto generated, assign them to different parents, everything you can imagine. Tweaking the hair is so, so easy, and by working with clumps from start to end I get to avoid most of the awful visual jumble of overlapping lines and dots that are splines in the new curves system.
Their UVs are also automatic, and because they're also generated in real time I had to come up with a way to visualize and position them.
I'm using proxy planes. It's pretty fun and it has the perk of auto numbering every new "unwrap" proxy plane so I always know exactly to which one I'm assigning cards to because it's right there on the tin.
The cards here are the equivalent of a break up layer. The base layer would be created from the red ones I posted earlier, I and think I'll do flyaways on the fly. I assigned the poorly baked maps from the post above to the cards to check it out from glancing angles and even without matching the texture to the cards I'm pretty pleased with how it doesn't look like a cowlick already without any intervention from my part besides marking a checkbox on a few to flag them as billboards.
Edit: Got the gifv working!
------
I'm doing the nodes equivalent of refactoring code, still a work in progress, but I got a few interesting things to show. Technically I already can easily create hair with them, I just want to wrap up some things.
I created a blockout for a short bob to test a few things better seen on straighter hair. I didn't tweak the positions of the cards themselves yet, it's all automatic, but this base was amazingly fast to setup and and the experience was very fun.
The weird wild baby hair cards are me testing Blender's hand drawn curves vs classic control point pushing for this kind of hair.
For this hair I barely changed any settings besides the profiles types and their blending, radius and tilt, leaving the cards count and resolution and other things in the automatic mode, then enabled a few under and over layers for sections needing them. It's at 13k tris now, I have to bake generic textures to get a better sense of how many extra filler cards I'd need.
The nodes take care of the technical aspects for me, but when I need to override something I can. Here's a speedrun through some of the things they do:
I also got the axis locked noise working among other things (got plenty to cross out from the task list!), and while I had actual hair in mind when I planned this it's also pretty interesting for cards:
These aren't the best thing about this update. I got sidetracked by something else as soon as I started that hairstyle, and it was so worth it!
One beef I have with curves is how much friction you go through when you need to move control points, specially roots. The default curve normal solver (minimum twist) flips the entire curve wildly while z-up is stable... so stable it never tilts properly to adapt to any steep angles, it just breaks. So I'm working on a custom normal with stable and smarter roots that still can twist after a certain point to adapt to steep angles.
It's not perfect and I was skeptical it'd help in setting up a hairstyle but holy shit, it does help a lot, glitchy and all. I can't believe I lived without it until now.
I already have some ideas of how to fix the problems, which are mainly larger parent cards getting crumpled at the edges. It's a serious issue because it's transferred to the cards, you can spot some weird cards suffering from it in the first animation.
Hair tasks status (2025-05-25):
- Refactor children cards nodes (30%)
- Improve profile blending controls and performance (95%)
Mostly done but I have to think through the best way to flip profiles, which isn't trivial due how curve to mesh is implemented
- Interactive gizmo tools to speed up hair manipulation ✔
- Roll on axis per control point 50% (hard to control and doesn't look good yet)
- Squash cards per control point attribute 50% (hard to control and doesn't look good yet)
- Support attribute-controlled resolution per spline to make conversion to real cards with minimal tris waste easier ✔
- Trim hair using helper meshes ✔
- Store source splines data into generated hair for later use, as they're destroyed by the interpolation process and keeping them around is problematic ✔
- Stagger roots for better but still layered hairlines ✔
- Blend different profiles for roots, body and tips of hair, so you can have flatter profiles for roots but still nice wild curved shapes for the body ✔
- Optimize children generation by pruning intersecting hairs ✔
- Auto-generate base layers ✔
- Line up highest point of pseudo-card with source curve by default for better previews when the card isn't a straight line ✔
- Implement custom snap to surface because the default alters the source splines too much ✔
Maybe:
- Dive into my old custom hair implementation to see if my solution for self-intersecting guides/cards will work here ✔
- Implement a new horizontal clumping that follows the "card" profile instead of going round the guides, so the hairs kinda slide onto themselves more like real hair locks (that's the biased noise) ✔
- Add clump towards helper curve to point hair tips towards a spline. Useful for eyebrows, dreadlocks, braiding close to the scalp and more ✖
That's thinking about hair as particles, not the best approach for these. I'll likely add a way to split parent cards instead and just use their radius + layers to create the "pointing" effect.
------
Tiny update just to say there's one!
I scratched a hair alpha directly in Blender with a mouse and no stabilizer to better understand the type, scale and amount of variants I need for each type of hair layer. Looks better than I expected, hahah, I'm shocked the baby hair isn't a full disaster, and it's not as see through as I expected given the low amount of base layers.
For context, these are going to be my first proper realtime hairs. I've done one or two solid mesh bun styles for game jams before, and I'm used to grooms or hair for sculptures like in that first bust, but realtime? That's new.
Speaking of sculptures, I'm doing my best to not get sidetracked testing the system to create hair for them. 😂
This one was my first Blender bust and you can see that with the min twist annoyances and everything at the time I just gave up on the back. I feel using these nodes would go so smoother, I'd have room to experiment with placement and giving the hair a nice flow instead of spending 90% of the time pushing control points around. Refrain from doing thin loose strands, throw a remesher over it to join them into a mass and I might even have a way to do some very fine-looking hair for printing.
Edited to add today's QOL node: Hair clamping for baking.
Long overdue since I baked those hair locks weeks ago and got a bit of clipping at edges. Runaway strands are clamped and flagged so I get to decide how smooth them. Now I can pack as many card variants as possible without anything getting visibly clipped or accidentally invading their neighbours' real state.
First one: Sometimes I sink edge loops of clothing to create the appearance of invisible seams.
My usual approach involved manually prepping the mesh in Marvelous Designer with extra edge loops, exporting an unwelded mesh and manually grouping edge loops in Blender to offset them along normals. Do you need to alter some part of the clothing? Shit luck, enjoy redoing all of that.
I got Blender to do all of it by dropping a single geo node on the clothing now; no prior prep in MD or Blender required. It's configurable to accept manual loop additions and removals and works by using boundaries from uv islands, which due to using actual sewing patterns to model clothes tends to make UVs coincide with most invisible seams.
(these clothes are direct exports of early drafts in MD hence the weird topology)
It was a pain to get the loop cut and slide to work correctly and without destroying UVs, geonodes still don't have anything for either op.
The same boundary edge loops selection logic led to the solution of another issue: Sometimes I want to just smooth surfaces without subdividing them; or subsurf them without changing the shape of their boundary loops at all.
Now I can.
Custom smoothing node with pinned boundaries ◼ x standard subdivision surface ◼
No edges grouping or manual creasing required, although you can manually include boundaries by marking the area if you wish. This node can also restore some of the volume lost to the smoothing process.
When I went down this rabbit hole it wasn't with the intention of solving my crumpled hair cards issue, but the solution is somewhere in there. The custom surface smoothing works wonders for small deformations of the cards:
And I got something more or less working for the edges. I'm not happy with it because they lose too much volume (the trick I'm using for surfaces doesn't work in this situation), and I'll probably have to pull data from each boundary loop individually because being lazy and using values from the control curve to restore volume didn't fly. It's either too little or too much:
Many unknowns, I'll only be sure it works when I get it into an engine, but I'm wondering about what vertex color is normally used for in creatures and clothing, because I got some interesting and easy to create fur effects from it.
Here's a 6 levels shell and fins long fur created from a single 256px x 256px texture set of diffuse, alpha, height, roughness, normal, metallic:
I'm using geometry nodes both to create the shells, drive the alphas and displace vertices to make the fur flow, each using a vertex color channel. I'd probably need another channel to control height properly. For this kind of straighter fur I don't even need extra subdivisions to displace it.
The tips are shitty from glancing angles, but I believe it can be solved with proper math.
Two further tests:
Decreased the distance between shells, slightly increased displacement. The second ball also has a fresnel-driven alpha, err, dampening? The fresnel is adding black to alphas, with higher shells being more influenced by the fresnel, so the fur looks slightly better from glancing angles. Looks cool but increases transparent planes overlap considerably so likely very expensive.
The distance between shells is the main factor in it looking good or not because height maps only go up and the displacement direction here isn't just vertical. I have to look up if Unreal has something like vector displacement and get around learning it (never needed it before) as it probably would help here, reducing the amount of shells needed for longer fur.
I managed to further improve their look, but they still have the obvious fins and shells frizz from certain angles. Maybe there's a way to blur it with shader magic, I don't know, it's way above my pay grade. What I can do is change spacing and levels amount, which... I actually may be able to without getting stuck with an awfully high poly count because I came up with a very comfortable method to prune fully transparent faces (and also groom shells using hair guides!).
Anyway, here are two furballs using an uneven level distribution. So far testing shows deeper levels don't matter nearly as much as the ones on the surface, they just need to exist, so you can push them up to make the fur look thicker, with a different clumping.
The sheep ball is just using the fur texture height while the punk ball height map is being influenced by a vertex color channel. This can't be easily replaced by textures because each level has an automatic but different vc height map intensity. You'd need to create a new map for each level.
Colors though can be just inherited from a texture set. I'd use a tiled texture for the fur itself and another mapped to the object for colors and stuff.
This is how I'm adjusting the alpha for now (before I put in the fresnel):
The values are simply 1/shells number on a curve I came up with by eyeballing what looked good.
So far I'd been creating new levels using base mesh + normal + displacement, with the brushing effect just a haphazard extra displacement to see if it would create the illusion I wanted. I'll take it into this direction next and it'll either fit the way I'm creating the fur like a glove - perhaps even helping with the frizz - or it'll look exceptionally bad.
In principle I can't see a reason to not have sort of floaters for tips of longer fur like that (besides stacking way too many transparent planes), but I know so little about realtime 3D I don't know how much I don't know.
Also the alpha blending is a difficult thing. Some will need to depend on alpha test, like Shadows of the Colossus. We have some info on that in the wiki fwiw http://wiki.polycount.com/wiki/HairTechnique
This page is the one that first introduced me to the technique. I keep returning it once in a while to refresh my memory. 😌
For people randomly stumbling on this thread in the future, two related sections on alpha:
http://wiki.polycount.com/wiki/Transparency_map#Sorting_Problems
http://wiki.polycount.com/wiki/Transparency_map#Alpha_Test
--------
I went back to the hair system this week. Created eyebrows and eyelashes to test how it's doing with very short, real hair, and because the hairless face was annoying me. Mixed results.
I breezed through the eyelashes because all they need are the cards. The eyebrow was more of a challenge and missed the mark. I'm going for dense but groomed eyebrows: Brushed, trimmed, with make up retouches. Not something I recall seeing in 3d yet. When people do good, realistic eyebrows they go for natural sparse or messy ones.
For that I outlined the eyebrow with a curve and used one of Higgas' geometry nodes groups to loft it into quads. It's a good geonodes setup but not ideal for what I'm doing. I created some parent cards using my system and used them as guides and edge hair, then used the base eyebrow mesh to create a gradient to spawn children and also paint the skin.
I'm using cards for edges because I want full artistic control over the placement. This went okay, the interpolated hair that's problematic.
The issue I'm having is the gradient. It's generated from the geometry, which isn't well spaced for what I'm doing (besides the ends of eyebrows curving inwards and top overlapping itself). And the gradient is important, I'm using it to control radius, length, opacity so the interpolated hair fades nicely. All this trouble so I can just drop the base mesh + hair onto new characters and tweak it without having to paint custom texture masks, which I hate.
I'll fallback to my usual way of lofting splines into meshes next, but only after doing the hair.
I also tested some ways to split hair (also not a priority for now). It's useful for more than the obvious, I used it already to get a more organic distribution in the eyelashes, getting a light "wet look" mascara effect.
I also finished refactoring the main system for hair (and completed all other tasks in my list) and don't think it'll change drastically now. So I can move on to doing hairstyles without worrying about having to redo anything because it became incompatible with the system, and that's what I'll do next. Wish me luck.
Current progress with skin tone adjusted but no other adjustments yet and partial eyebrows to mark their place:
I have to nudge the texture here and there and reproject, then work on the hues, roughness and normals, likely replacing the large pores on cheeks with something more subtle and this kind of thing, but it's a nice workflow in general, so fast.
The pain in the workflow is sculpting. I decided to use a not very good base mesh I have with multires so UVs are preserved, it's easier to keep the eyelid creases of open eyes intact, I can push vertices in edit mode, etc. I just couldn't quite remember why I intensely disliked multires. Now I do. It's a nightmare of a mesh-exploding, software-crashing feature incompatible with pretty much everything else. 😂
I only wanted to sculpt wrinkles for the eyes, lips, neck, but didn't get very far. I'll probably have to redo it in dynotopo because it refuses to bake and export and even render (here's a viewport capture below).
Oh well.
All that to say I progressed on the character above but the files are exiled somewhere else and I don't have the time to hunt them down and pick up from where I stopped just yet. But I have something else to show.
I joined the polycount challenge #100 and I'll be posting a collection of a few mini-breakdowns here so they don't get lost in time when the challenge thread closes, starting with the stylization of the locking mechanism.
The original concept is by Georgi Simeonov.
It's made from mirrored curves, using geometry nodes to create non-destructive randomization, with manual guidance from a couple of attributes. Using a faceted profile alone already creates instant stylization, and I'm pretty happy with the chiseled look without the need to break out the sculpting tools. It was faster than sculpting too, and those nodes are something I can reuse again and again in the future.
I'm going for a variable chiseled look for the lid and glass too, and will probably use the toned down version of the lock in the final prop. I want it to look more geometric than wavy and broken, and the edges treatment shouldn't deviate too much from the rest of the jar, which won't be as chipped.
I had this kind of geometric edge treatment in mind for the wires.
And I lifted the locking mechanism from a real jar.
It works like this:
I also did a initial unwrap with geonodes and resampled the curves using a tree I created for the hair cards project that decimates splines automatically based on angle/tilt/radius. I don't know yet if I'll try to use a simple quad profile with baked normals or actual geo for the low poly lock yet. These wires are pretty but they're hands down the most dense part of the prop. I don't know if they're worth all these tris.
This is the same skin texture I showed before, after a polishing and detailing pass. There's some contribution of cavity maps and procedural noise added to just good old hand painting.
Can you see the little depression where the nostril meets the cheek? I thought I made a mistake when transferring the UVs from the scan to this head, but this and other oddities in the nose area, eyes and ears are in the original textures. Now I saw this I keep finding them in work of other people too. 😂 I'm very tempted to scratch most of the scan and just sculpt the pores in problem areas now I got hang of making brushes for Blender. I had to erase and sculpt a fair number of areas already because the pores were too large, or the scan didn't have enough definition.
And yes, characters are getting silly caps while they're hairless now because the not-scalp skin creeps me out.
I also accidentally created a sort of broken layers of snow/ground geo nodes generator this week. I just wanted a nice base for sculpting something for work but it looks better than I expected. I'm really enjoying mixing nodes with sculpting.