Home Technical Talk

Issue with normal map and rotated clusters in UV

arkaneXXI
polycounter lvl 10
Offline / Send Message
arkaneXXI polycounter lvl 10
Hi people. I need help or tips with an issue I'm having with normal maps related to the angle of the clusters in the UV mapping.

Here is an example (ignore the wasted empty space in the UV):
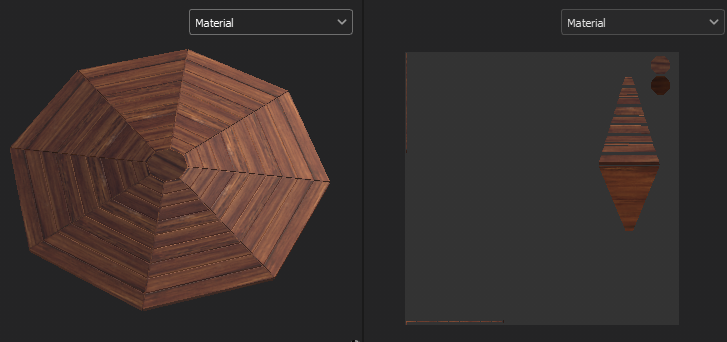

Since every slice of the octagon is identical, I want to texture only one slice and clone it 7 times with a rotation of 45º and then attach all in a single mesh, but I get that horrible shadow in every slice when I add a texture with normal map.

I know this happens because all the elements are rotated in a same position inside the same UV, so the solution is to have something like this (ignore the quick bad texturing):
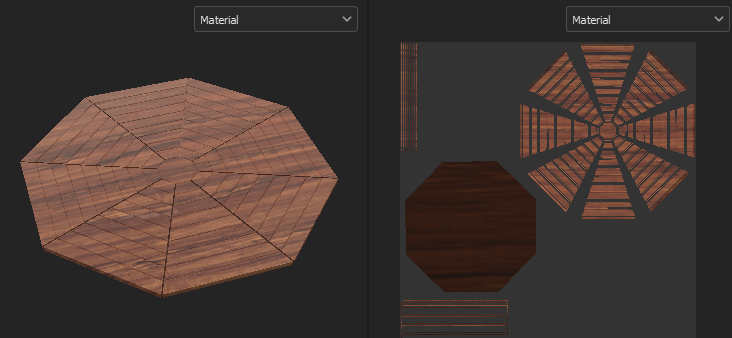

But I wanted to know if it's possible to solve this problem using the first method since I have seen a model in Sketchfab that has a similar object with all the clusters in a same position and orientation, but no shading problem (I don't know how it was made since I couldn't download it).

The softwares I use are 3DS Max and Substance Painter.

Replies

  • Fabi_G
    Offline / Send Message
    Fabi_G insane polycounter
    Hi! If this is a platform built out of wood boards, you could map the boards UV strips to a horizontally tiling wood trim, offsetting them for variation. 
  • okidoki
    Offline / Send Message
    okidoki polycounter lvl 2
    Indeed.. something like (maybe even positioning according to the board width on UV-Y-axis);  also usabel for the normals (as asked (?) in the subject line):

  • arkaneXXI
    Offline / Send Message
    arkaneXXI polycounter lvl 10
    I thought that using a trim sheet could cause the same problem since the clusters will be in the same orientation but different position. I'll try it anyway and tell what happens.
  • arkaneXXI
    Offline / Send Message
    arkaneXXI polycounter lvl 10
    Fabi_G said:
    Hi! If this is a platform built out of wood boards, you could map the boards UV strips to a horizontally tiling wood trim, offsetting them for variation. 
    Yes, but that doesn't solve the problem with the normal map. Here is the result with and without normal map:


    As you can see, the second one looks much better. The only way I know to get this result with the normal map on, is that the uv clusters follow the angle of every slice or every slice be a different mesh.
  • Fabi_G
    Offline / Send Message
    Fabi_G insane polycounter
    Hm, interesting. I think the image in okidokis reply shows the principle well. What does the normal map and the shading of the lowpoly look like? Any gradients? You can also share the files if you want them looked at.
  • arkaneXXI
    Offline / Send Message
    arkaneXXI polycounter lvl 10
    Fabi_G said:
    Hm, interesting. I think the image in okidokis reply shows the principle well. What does the normal map and the shading of the lowpoly look like? Any gradients? You can also share the files if you want them looked at.
    I attach a zip with the model and the textures. The texture is just a PBR texture with albedo, roughness and normal map from internet. The problem happens in Substance Painter and Marmoset Toolbag as well, so I guess isn't a problem of the software settings but of the model, probably the UV. 
  • Fabi_G
    Offline / Send Message
    Fabi_G insane polycounter
    Hi! Looking at the color of the normal map, it seems like it had some gamma correction applied (compare the color against a flat normal color (128, 128, 255)). I simply reverted the gamma correction in the attached file, however you might want to find a normal map in the correct color space, as through the gamma correction data got lost.
  • arkaneXXI
    Offline / Send Message
    arkaneXXI polycounter lvl 10
    Fabi_G said:
    Hi! Looking at the color of the normal map, it seems like it had some gamma correction applied (compare the color against a flat normal color (128, 128, 255)). I simply reverted the gamma correction in the attached file, however you might want to find a normal map in the correct color space, as through the gamma correction data got lost.
    Thanks a lot! I found the cause of the problem already. The original format of the normal map it was .exr. When I import that file to Photoshop or Krita to change the format, the color is like that. Luckly, the website where I downloaded the texture had the option to download it in other formats.

    P.D.: I did a short visual explanation of the problem and solution for anybody who has the same problem:

  • poopipe
    Offline / Send Message
    poopipe grand marshal polycounter
    the important thing with normal maps is that you make sure you're reading the information out in linear space..  most applications have a specific texture sampler for normal maps or at least specific settings for loading them - provided you haven't taken the texture through photoshop that will always* work 

    *assuming the software involved isn't crap
Sign In or Register to comment.