[WIP] Miss Peregrine - Eva Green Likeness (Realtime)

polycounter lvl 13
Latest shot:

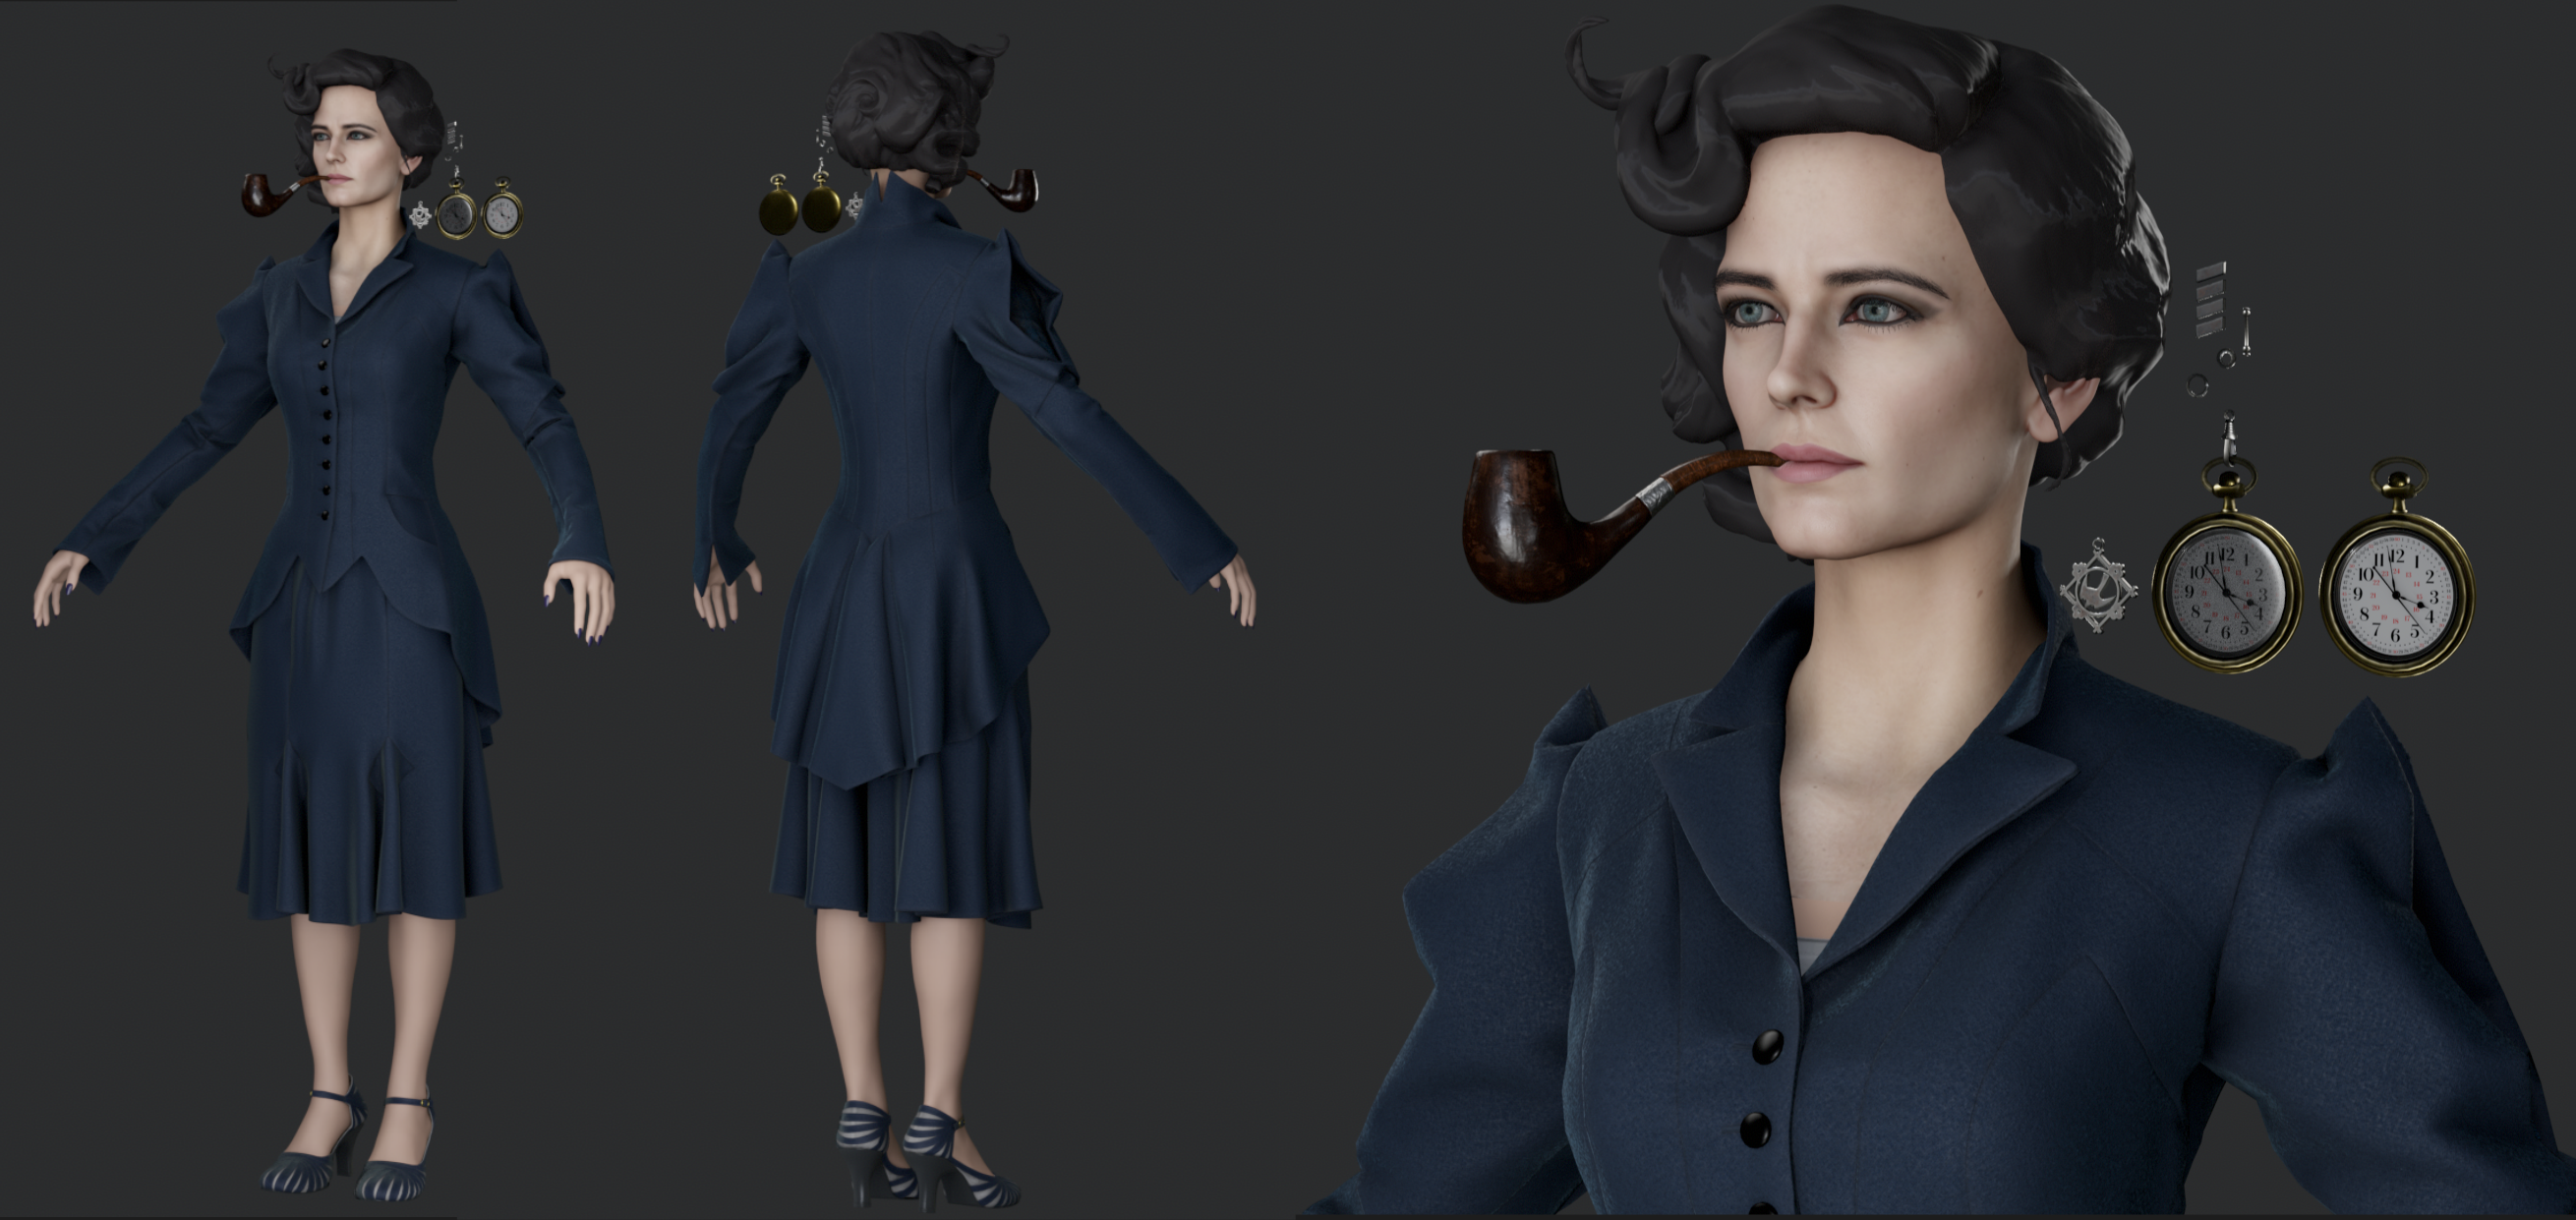
Hey everybody! Figured it was time to starting posting some of the work I've been doing for my second character under the mentorship of Georgian Avasilcutei. This time around I'm pushing the realistic game ready angle, challenging myself to create a likeness as well as tackling hair for the first time.

I'll be looking to recreate the character from the Miss Peregrine movie. The film had its cool moments and I really enjoyed a lot of the character design, especially for the title character herself.


Hey everybody! Figured it was time to starting posting some of the work I've been doing for my second character under the mentorship of Georgian Avasilcutei. This time around I'm pushing the realistic game ready angle, challenging myself to create a likeness as well as tackling hair for the first time.
I'll be looking to recreate the character from the Miss Peregrine movie. The film had its cool moments and I really enjoyed a lot of the character design, especially for the title character herself.
Replies
Forgot to add some shots from the high poly sculpt!
From there I started plugging in some card action. Still needs a lot of work and refinement but I'm slowly crawling closer to the hairlines. I'm finding that working in smaller chunks of time has been helping me to see and course correct bad issues that may have become longer term problems.
Still need to fix that skin as well... and bake the eyebrows.. and the list goes on haha.
Was happy to step away from the hair for a little bit but back to tackling that as my #1 priority this week.
- Overall changes to the proportions of the face
- Texture revamp, more work on the albedo + some reworking/rebaking of pore detail. I was especially missing proper tuning in my spec and roughness textures.
- Reworked the Marmoset scene and solidified some proper preview lighting.
Currently back on trying to get the hair to look like hair and not janky card things. The hairline itself is really hard to pin down in the movie reference and mine keeps coming out looking like a square from the front haha.
HAIR
I used Maya's XGen feature for the eyelash/eyebrow geo and hair texture creation. I had baked the eyebrows down onto planes already but I ended up changing the face around a lot and having geo proxies to move around in zbrush works a bit better than moving a texture plane.
If you like me are learning Xgen for the first time id recommend checking out the Dua Lipa timelapse by Hadi Karimi as well as Adam Skutt's hair tutorial which you can find on Gumroad. A good written alternative and a little more up to date overview of the methods found in Adam Skutt's tut can be found here: https://marmoset.co/posts/how-to-create-realistic-hair-peach-fuzz-and-eyes/
In terms of actually placing the cards I did that in 3ds Max by binding the hair cards to splines (A method that was pointed out to me by my Mentor, he has a tutorial available on the workflow in max on his gumroad, you can also catch him doing it live on twitch at https://www.twitch.tv/nimlot26). This can also be done to a similar degree in Maya using the GSCurvetools plugin. Combining the spline workflow with a lot of reference and that base hair sculpt as reference really helped me find the general flow for the hair.
LIKENESS
The likeness is a huge challenge and mostly consists of time invested but there are several factors that have helped me move along in this department:
1. Straight up I have an amazing mentor and mentorship community who wont let me get away with making potatoes instead of heads. Having a trusted source(s) to run your work by whenever you feel stuck is priceless.
2. Finding solid reference. I used to take this for granted and just grab whatever very few photos and work from there because I was working under a widely held belief that one could obtain too much reference and end up in a wormhole of endless confusion. The real happy middle ground I found is having lots of very organized reference. Using pureref and grouping things based on the position the head is in can help you find a lot of the nuances and give you lots of info to confirm you are indeed seeing whatever it is you think you are seeing. Also hunting for images of life cast masks is helpful as well, though beware the camera lense on these shots, they tend to get a bit fisheyed.
3. Workflow. I will again shoutout to my mentor Georgian Avasilcutei for guiding me in this department, and luckily he just released a bit of a guide on the exact sort of process I ended up following.
https://gumroad.com/nimlot26?recommended_by=library
But it essentially goes like this:
-> Study anatomy -> Sculpt from a sphere using some scanned human reference which helps you study anatomy -> Make a basemesh based on your presumably anatomically correct sculpt -> Study anatomy -> Attempt a likeness but instead make 1000 potatoes -> get lots of critique -> look at more reference -> study more anatomy -> time goes by -> profit?
The one key tip I can give away is work on the big forms in lowest subdivisions. You should be able to get it looking like your reference on a pretty low resolution. Also use super low sensitivity on your strokes and really work the volumes up.
PORES
I'm using a combination of things. My forehead detail is still kinda busted but what I am pointing out below is basically what needs to happen to different degrees to fix it.
So mainly I have some XYZ data that I zwrapped to my sculpt and baked displacement from. This only covers the main region of the face but there is a lot manual blending that needs to occur to bring the pores over into the scalp and towards the ears and underneath the chin into the neck and beyond. If you don't want to stray to far from your scan data you can create alphas from the XYZ info and drag rect that stuff until the cows come home.
More unique details all need to be done by hand. Clay buildup/dam standard and layers + morph targets is the way to go there. Also this is all covered in Georgian's face guide pretty well.
I've also been streaming my progress in the mornings between 4am - 6am EST. Not sure who is up then but come hang out:
www.twitch.tv/nathanelliott3d
I also do plan on having a few expressions done. I hear those blend shapes are an important part of the Character Artist pipeline so pursuing a couple of facial expressions wouldn't hurt the portfolio.
In terms of the pipe I had it started. Here's a quick screengrab of where I left it last:
Also I forgot to add the hairdoo shots from the back so here is that as well:
Still working piecemeal on this.
Tried out a new hairstyle in November which I've since restarted (a little too low poly looking) but wanted to post something since its been yet another year. A little happier with the sculpt as time chugs along but still not there yet. Textures meh though I did switch to Marmoset 4 to do the texturing here which I'm really enjoying. Way more organic of a workflow especially when one needs to jump back and modify proportions and rebake details.
Special thanks to Mentor Georgian Avasilcutei and the gang over at the Mentorship and in the Twitch community keeping the bar high.
wow, nice job. this is really turning out very good.
Thanks so much! Now I just need to finish it at some point lol
Got some low polies/textures going for the clothing and props. Back to working on the likeness some more!