[WIP] Sighiskor - a medieval village - Environment Art

Hi all!
My name is Alan, an environment artist from Brazil who is constantly learning and falling in love for 3D environments.
Thanks to Thiago Klafke’s mentorship, who is Senior environment artist at Blizzard, I am taking things to the next level. As an environment artist I was full of doubt about how would you tackle a huge environment.
How does one make a big environment under a tight deadline?
My objective doing this mentorship is to have this question answered and learn workflows that will help me quickly iterate around my environment in each process and create a somewhat flexible but yet sistemic pipeline that will balance quality and agility. For this I’ll be experimenting a lot of different workflows that I’m used to and with the help of Thiago I am sure that we’ll achieve something really unique.
I decided to make an environment based on Lovecraft’s stories (no story specifically), where a cosmic creature fallen from the sky would twist people around it, making those people behave strangely and starting a cult to praise this creature. Other influences that made me write a backstory to this environment were the French movie Brotherhood of the Wolf (Le pacte des loups), the anime Berserk and the game Bloodborne.
The first step was to gather a lot of references, from movies, old art, books, everything that could help me imagine an environment and start doing a mood board that will drive everything on my scenario.

I kept the mood board with just a few pictures per topic, as this will keep straightfoward as possible on making each part of my environment.
Later I can gather more references as I’ll be doing specific things such as materials, models, architecture, etc, but this will be my “art director”.
With this I was ready to write a backstory for my environment, and this is amazingly helpful when creating an environment because everything that you create will have a meaning and you can create a very strong atmosphere and start to make your environment come to life.
In the next post I will describe how I tackled this part. So stay tuned and until the next time. Thank you guys and have a nice day ☺
Replies
Salve, galera! How are you guys?
So after writing a good backstory and spending some weeks gathering more references, doing some doodles and blocking out the map using a new perspective given by Thiago, it was time to go hands on and start texturing.
Before that, I would like to show a bit of my progress in the blockout process, where I started from a generic village with plenty of repetitive buildings to something more unique, with more life and feeling that this village really exists.
So it was time to start experimenting new workflows for my textures. On previous projects I used a lot of Substance Designer to create my own tileable textures and trim sheets and on even past projects I even textured every prop and modular asset using the high poly to low poly workflow. So it was time to try something new.
First I started with my landscape material and for organic textures, and for that I used Quixel Mixer to blend some grass, dirt, moss and leaves and reach a nice result
An everlasting question is always in my head while making environments: Do I start my textures first and after I’ll do the meshes or its the other way around?
Well, now I think that there is no right answer to that, I think it will never be a 100% precise pipeline regarding this one. But what helped me was the previous art blockout process, because it gave me an overall look at what kind of materials I will need and now I can choose more precisely what I want to do.
And for this project I choose to create the textures first, almost like a “pallette of textures” where I can test my meshes with different kind of textures per pack. The pack mentioned is related to each part of the village. I divided these parts like this:
Pack 1 – Castle Walls and village gates;
Pack 2 - the Castle itself;
Pack 3 – Houses, corner tents and maybe the big building (church);
Pack 4 – smaller props, assets;
For each pack I will do a bunch of tileable textures and trim sheets and after this I’ll make a mid poly mesh and send to Unreal and start the real deal!
So far I have these textures:
For these textures I decided to make a highpoly mesh in ZBrush and then baking and coloring in Substance Designer/Painter. It was totally new for me this workflow and I enjoyed a lot since it kinda of gives you more artistic control over proceduralism.
I think I can improve this workflow a lot, since my Zbrush skills are very rusted and the software has a scaring UI (a lot of times Zbrush bugged me with the autowrap tool), but in the end, myself and the software got along together, and this may be a starting of a good friendship between a man and its software hehe.
Stone trim sheet high poly
The textures applied to the modular meshes. The trim textures is very subtle on the castle gates but I will use more of this trim in later packages. It’s always good to save resources!
A very nice Blender addon that is fastening the process to import the meshes into Unreal is the Blender to Unreal addon. I will link a tutorial from my friend Jean Negreiros on how to configure and in the end you can send your mesh from Blender to Unreal and just one simple click!
The tutorial is in Portuguese but if you guys follow along what he is doing you’ll do just fine. Besides, you can reach me and ask if you don’t understand something from the video
https://www.youtube.com/watch?v=BbcrDcNkRqQ&t=443s
This has helped me a lot to iterate my meshes and reach a good shape very quickly.
And that’s it guys! The next few days I’ll start to work on blocking the lighting and adjusting the scale of a few things before proceeding to the next pack.
Any feedback of how this is doing I’ll be very happy to adjust ☺
Thanks guys and stay safe and tuned!
Hey guys, how are you doing?
It’s been a few days after my last post and I can say that I’m progressing at a good pace. I’m breathing this project almost 24x7. Watching medieval movies, games and looking for art in general that makes me remember this project. I can see the importance of trying to “live” in your environment as you start to feel and think about that age.
Last time I started to work on the lighting blockout but that didn’t go very well. I tried to follow more precise and realistic workflows such as shown in the Lightning Academy channel on Youtube, but it happens that Unreal’s lighting measure system isn’t very precise with the real numbers, meaning that if you put a real point light of exactly 600 lumens with the correct exposure the scene will look weird.
So after tips from Thiago and my other mentorship colleagues I decided to do a more neutral lighting as it was before, but this time everything was turned to static. The good news is that it got 10% better than before. The bad news is that I had some lightmap issues that I had to deal with, mainly with the city walls and gates, the blockout meshes had some huge errors too but they’ll soon be replaced so I don’t think it will be necessary to fix it.
After these problems Thiago decided to make a change into the mentorship program. We would simulate a production environment, with milestones, feedbacks, and he would play the role as production manager.
With that in mind, he put an intensive goal for my project that is to finish all the environment’s textures within two weeks. So I focused most these past few days on texturing more than on working with lighting. As you can see above, one of the textures that I’ve (re)made for this goal is the tileable bricks.
As I progressed with the ZBrush workflow, I’ve learned that I’m more productive if I combine ZBrush + Substance Designer/Painter. I started to work with ZBrush to generate a shape or a height map and export into Substance Designer to “bake” all the other maps based on this height, finishing the texture in Substance Painter or Designer (whatever has the necessary tools to help me finish the texture). With this I was able to put more details and love into the texture, giving almost infinite variations to work from and the “procedural” looking texture is 90% gone.
Here’s a piece of what I’m actually doing to generate a nice heightmap without needing to bake a high poly to a low poly mesh:
Put a plane underneath the mesh that you’re sculpting.
Make sure that your canvas is the equal to your texture resolution (you can change that by going to document and document Size) and focus on your plane in front view (this tutorial from Flipped Normals is excellent explaining that and how to make tileable textures: https://www.youtube.com/watch?v=Pdh0peG4oys&t=516s)
Use the GrabDoc command in the brush Alpha settings to grab your canvas as your alpha. Use the Export button on the side of the Alpha settings to export the alpha as a PSD image.
That’s pretty much it! There are some tricks that I’ve learned throughout the process. One of them is to keep in mind that the distance that your “camera” plane is from the mesh you’re sculpting matters, as the farther away your plane is, it will result a white height map without any information for you to work on. So always try to keep your plane as closest as possible to your mesh.
One extra step that I do is to bring a levels layer in Photoshop to show more details that I’ve worked on my sculpture.
All you have to do now is take this height map into Substance Designer and “bake” into the maps you need it!
Here’s a picture of my brick texture in substance designer.
Basically I imported the height maps that I sculpted, and for the bricks I plugged the height maps into a tile sampler node, after the tile sampler I “baked” the maps, plugged into a normal node, the normal node can generate a Curvature Smooth node (or Curvature Sobel). From the Tile sampler I plug a new Ambient Occlusion node and invert the Ambient Occlusion to get a Thickness Map. With these maps generated, I can continue in Substance Designer and finish the texture here or I can send these maps to Substance Painter. It’s up to the tools that each software has.
That’s how I managed to sculpt and texture almost 6 textures (between trim sheets and tileables) in three days. For now I have listed 5 more textures to work and finally reach my goal.
I’ve set up a basic scene using Unreal’s standard environment to show the textures that I have up until now.
There are four trims (two for the castle and two for the houses that I’m going to work) but two of them are a variation of the other.
The next textures will be a concrete variation texture, another brick texture (this one is going to be more messy, as it will be the bricks that the peasants build their homes with less care than the soldiers that built the castle and castle walls), a messy roof tile, a hay tileable texture and a cobblestone for some walls.
And that’s it for today guys, for now I’ll continue to work on my textures and let’s hope that I can achieve this goal haha
Any critics and feedbacks will be very welcome.")
Thank you guys very much and keep on going! Tomorrow is Friday YAAAAY
Hey guys, how ya doin’?
It’s been more than a week that I haven't posted here. But the progress on the environment has been good since my last post and I think it is time to say what I’m doing.
This past week I focused more on texturing and creating a “texture palette”, so when modeling everything it would be easier to fit the UVs in the places I need and test directly on a “real” texture.
So my texture palette has come to this:
Some textures might be discarded later (i.e.: the last one in the first row) and others might be added, but overall, that’s a good palette to start from. As I see the textures applied into the 3D models I’ll tweak them to reach a better result.
One of the good things about learning different workflows is to have options on the best way to make each texture.
The majority textures were made using heightmaps imported from Zbrush, but on the last four textures I found that working directly in Substance Designer was going to give me better results. Specifically on the two last textures (the Thatch texture) I started in Substance Designer and finished with some final touches in Quixel Mixer, all I can say is: use the best tools you have available!
And meanwhile, I was struggling with the lighting in my environment. As noted before, I had some issues in my lighting such as lightmaps errors, and one of the errors that I didn’t mention nor have noticed was that my Sky lightning wasn’t affecting anything at all.
The issue is related to the GPU Lightmass in Unreal 4.25 and I didn’t find anything explaining why that happened. So if anyone knows what I was doing wrong or if it is indeed a bug, please let me know.
The same picture of the last post, I didn’t notice back then but the sky lighting wasn’t affecting anything.
I decided to go back and change the lightmass for this project to CPU and tried to work again with physical light values in Unreal. Thiago provided some awesome tips and finally I managed to reach a good start point for my lighting and then start to tweak from there.
Working with physical lights in Unreal goes somewhat like this:
Enable “Extend default luminance range” in Auto Exposure in your Project settings, you may have to restart your project;.
Then you must find a decent exposure value based on the time of the day that you want for your scene (you can find exposure table values on the internet, I used the table from this link: https://en.wikipedia.org/wiki/Exposure_value#:~:text=In%20photography%2C%20exposure%20value%20(EV,for%20any%20fixed%20scene%20luminance). ). Configure your post process min EV100 and max EV100 to the number in the table that relates to the time of the day that you want;
Then you will set your directional light to a real world intensity. You can google for sun intensity in lux and you can start from there;
If you don’t have a sky light, put one. If you don’t have a sky box/sphere/atmosphere, now it’s the time to put it too. Leave the sky light with the default values. Bake the lighting;
To set the intensity correctly, enable the Eye Adaptation debug menu under the Show>Visualize tab;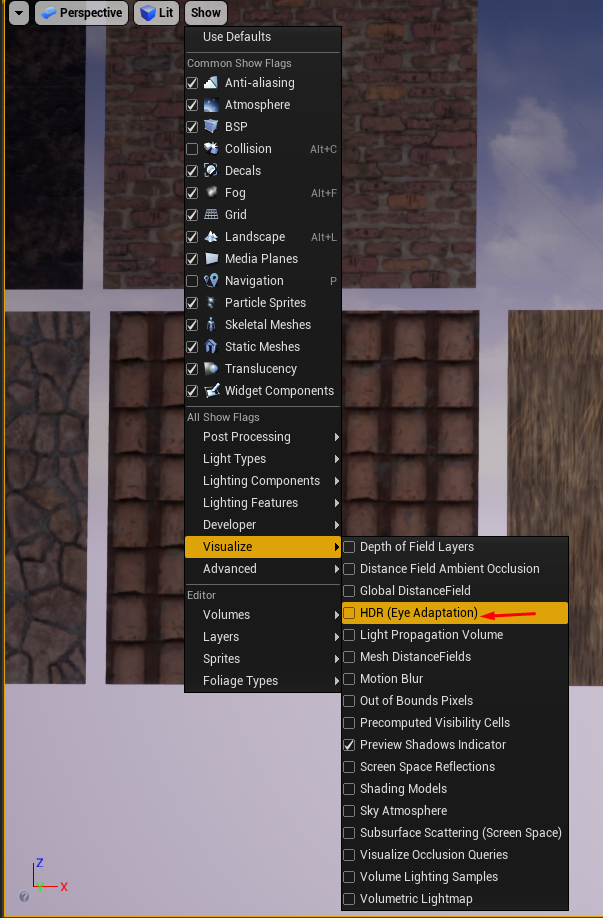
You’ll see a histogram at the bottom of your screen and a small square with two numbers rolling at the center of the screen as you move your camera. Look at the sky with your camera and search for a place that is not so bright and yet not so dark in it;
Now see the first unit called Nits? That stands for Candela per square meter (cd/m²) and without getting too much extended here, we’re going to search for sky intensity in cd/m² in order to configure the sky box related to the time of the day we want, using this link: https://en.wikipedia.org/wiki/Orders_of_magnitude_(luminance) ;
Adjust the intensity of your sky box until you reach the Nits you’ve chosen in the table. For me, as I chose a clear sky the value to set was approximately 7k cd/m².
Now you can set the intensity of your sky sphere by tweaking the sky material. If you have the Default Unreal BP_Sky, you can set this value in the “Overall Color” parameter under the Value bar. Remember to uncheck the “Color Determined by Sun Position” parameter before doing so, otherwise it won’t have any effect. Other sky custom materials should have a similar parameter to control the sky intensity (i.e.: emissive strength for a simple sky material);
If necessary, bake the lighting again;
That’s pretty much it, now you can start tweaking the lighting according to your needs. But notice that everything in the scene creates a very believable space with minimum effort.
The bake quality is set to Preview and the Lightmass World Settings is almost untouched (I cranked up the indirect lighting bounces and sky light bounces to 6), still, I had little to none lightmap issues, such as seams between modular meshes.
At first I had some problems using this kind of workflow as you’ll see below, but after some tips I could reach a good configuration:
One of the first attempts to use physical lights. The sun was super bright and the sky was super dark, creating inconsistency.
As the time passed, I was tweaking more and more the exposure and sky box values, and finally I could see some light at the end of the tunnel. Still, the sun would blind instantly anyone who looked at it..
After following that workflow above, finally I reached a nice result, created a believable lighting set and I think it is a good base for me to start from. I can improve the sky intensity a bit more so I can see the clouds better, but for now I’m happy.
For these two next weeks, my main objective will be to replace the building blocking meshes with the real ones. I started already with the castle and soon enough I’ll bring news here.
Thanks guys and everyone that is helping me achieve this amazing challenge.
I hope to hear your feedback and if anything that I said here about the lighting isn’t accurate, please feel free to say it.
Stay safe!
So after dealing with the lighting I started to get into the mood that I wanted and started creating some foliage
After a lot of trial and error regarding the vegetation, I managed to get good results thanks to the mentorship's feedback and I continued advancing, changing the castle walls textures for example was a huge deal for the environment. Also using techniques such as vertex painting and Second UV blends I was able create quick variations of the same meshes. That was incredible!
Another tool that was really helpful during modeling props to populate the scene was Quixel Mixer. With it I was able to give high detail information to my meshes in realtime and without needing a sculpted highpoly mesh. That saved ton of time.
All of the minor props were textured in Quixel Mixer.
After this process I started creating some unique places inside the village so that it feels like there's people living in there and adding storytelling to each of the houses.
something happened here, can you guess what?
Currently I'm trying to refine some more each region of the map, giving more storytelling, breaking the silhouetes a bit here and there and gathering more feedbacks so I can leave this environment really beautiful.
I feel that I'm coming to an end with this environment, it has been really a great journey, but it's not over yet, there are a few steps before we call it done, but for today that's it. Stay tuned for more
So I continued my studies for the environment last week, I focused on the screenshots, how to tell good stories with them and have a nice composition while. When you stop to think it's a process that can be easily missed, but if your shots are carefully taken and you start to set dress your objects in a way that tells a readable story, your environment can pop up.
I used the advantage of Quixel Bridge to add a few more assets to the environment and help with the storytelling.
Also I played with the camera lenses in some shots to get a better angle at specific places (such as the bar, church, or even the castle)
From now on I'll continue to work on the composition and I believe that in two more weeks this will be ready
Lemme update here: I am trying to find some shots that tells more the story of this village while trying to show some artistc creativity:
These are some of the shots that I've came up with:
The texture has already changed, but currently the facade is looking a bit more different, I'm trying to find a robust shape while keeping it simple:
Finally I added some more leaves to my tree, making it look more fluffier, also at distance they looked better too. In the end I had some trouble with mip mapping that made my leaves turn to white at very far distances, which I quickly resolved with more dilation in Substance Painter.
And that's it for today. I am really enjoying this final process and I'll continue to polish some more to give more realistc feel
This last week has been a little crazy since I changed my job, so I focused mainly on working hard and learning the new company's workflow, with that said it didn't left too much time to work on my project. But I did some minor changes to the castle's bricks and remade entirely the church, giving a more detailed look.
I started to put some particle fogs in my scene to give more depth to it. Right now it's very basic and rough, but I'll be adjusting that so that the fog remains only on the background of my scene.
New bricks
My next plans are to refine more the churches bricks, taking out it's "procedural" feeling and giving an extra depth of realism.
And that's it for today guys, thank you very much!