Home Technical Talk

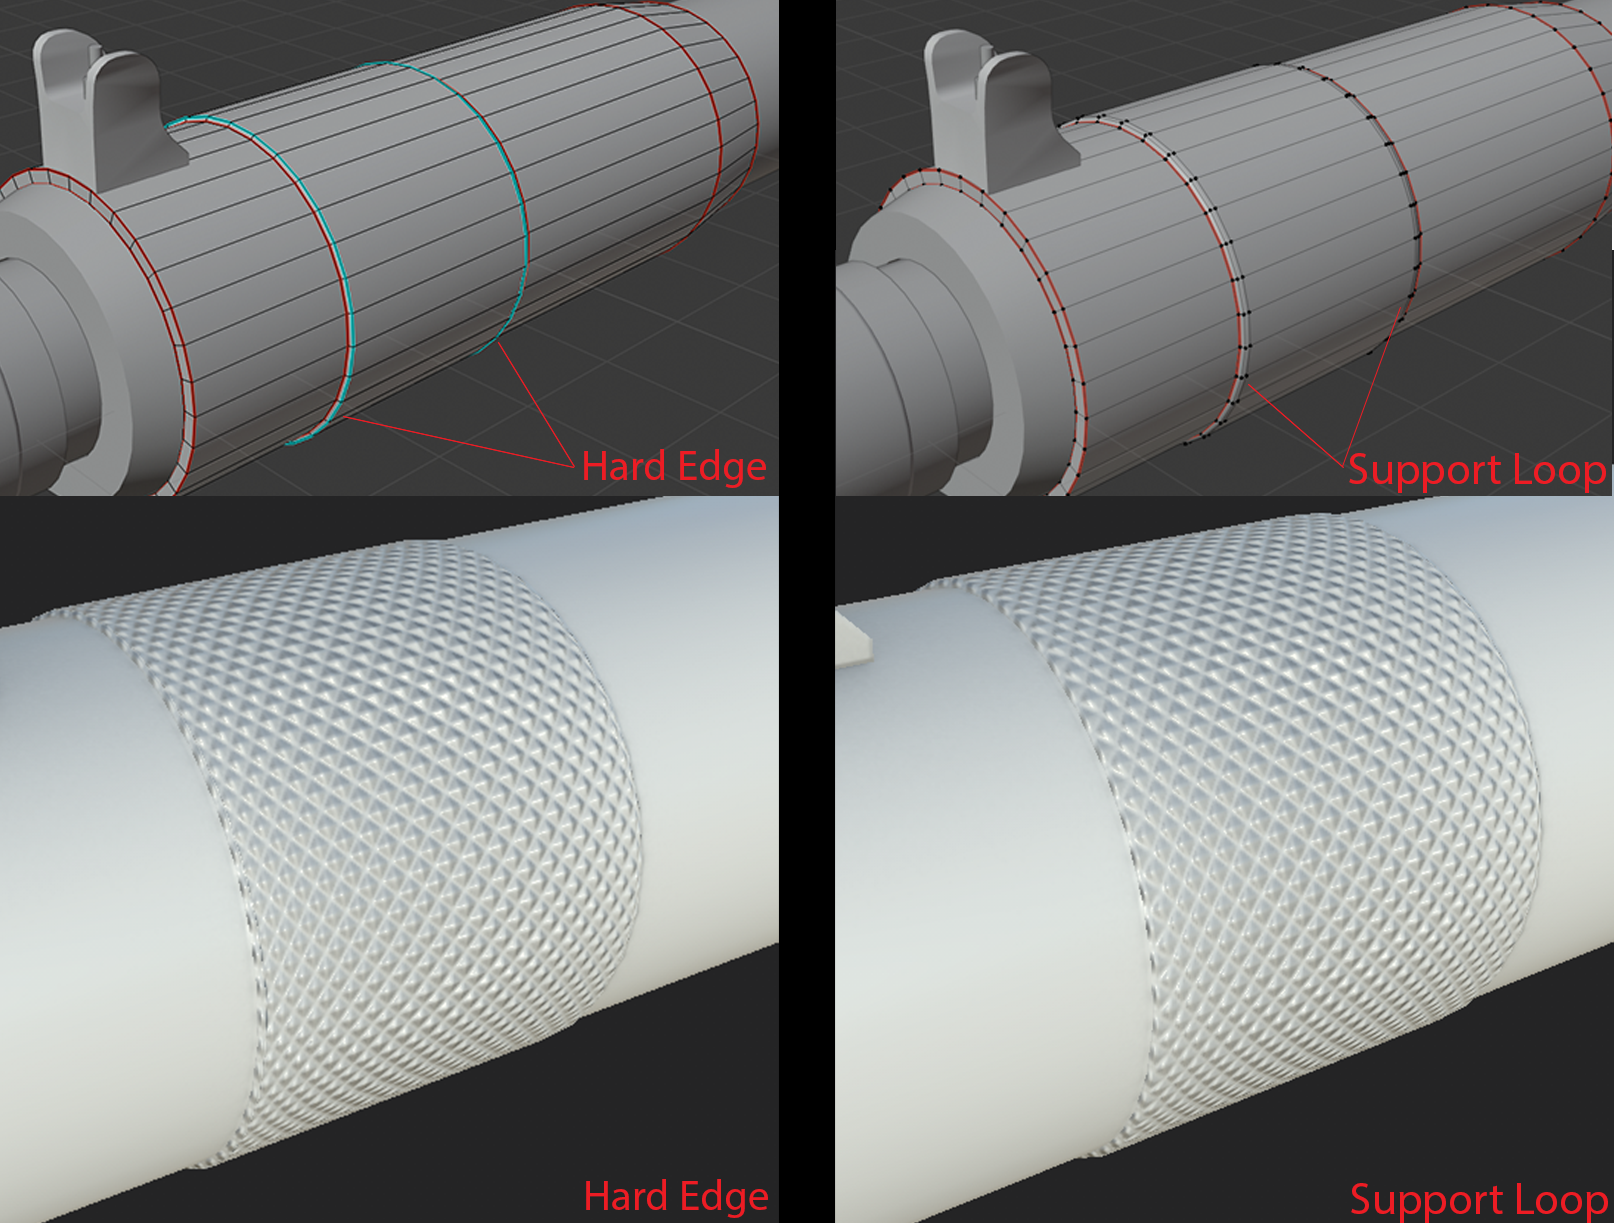
Hard edge VS Support loop Baking results! Which is better?

polycounter lvl 5
Offline / Send Message
JordanDaushvili polycounter lvl 5
Disclamer: I am newb and i was just exploring the difference between hard edges and support loops when it comes to smoothing groups
from all of the tutorials I have seen everybody's advice is "Use different smoothing groups on creases or edges for better baking results"


I have done some tests and I like the support loops better than hard edges. It looks cleaner and doesn't have an ugly seam. So what am I missing here ?

Thanks!
Replies

  • Obscura
    Offline / Send Message
    Obscura grand marshal polycounter
    Yes it looks a little bit cleaner to my eyes too. You need to decide if you can live with the extra polygons and thats it. 
  • JordanDaushvili
    Offline / Send Message
    JordanDaushvili polycounter lvl 5
    Obscura said:
    Yes it looks a little bit cleaner to my eyes too. You need to decide if you can live with the extra polygons and thats it. 
    Hmmm, i thought hard edges already counted for separate polygons. Doesn't that make them even?
  • Obscura
    Offline / Send Message
    Obscura grand marshal polycounter
    Hard edges creates extra verts, not extra polygons.
  • JordanDaushvili
    Offline / Send Message
    JordanDaushvili polycounter lvl 5
    Obscura said:
    Hard edges creates extra verts, not extra polygons.
    Thank you! 
  • FrankPolygon
    Offline / Send Message
    FrankPolygon grand marshal polycounter
    It looks like there's a ray miss where the hard edges split the mesh. Hard edges that aren't pared with UV splits can generate extreme normal values that will cause artifacts when blending across the split edges. This can be resolved by adding a UV split along the hard edges and adjusting the padding so there's adequate space between the UV islands. Another possibility is the baking software isn't capturing the rays along the split. Depending on the software, resolving this may be as simple as changing some settings or it may require a different approach to setting up the hard edges and UV splits.


    Here's a few examples of how these elements interact with each other. Perpendicular transitions and a single smoothing group (no hard edges) produces harsh mesh shading and a strong normal gradient. Though the mesh and baked normal map render correctly in the target engine, the strong normal gradient could cause issues when the texture mips down or when the asset is ported to an engine that doesn't sync perfectly with the normal tangent basis.


    Adding hard edges to all of the major shape transitions, without adding additional UV splits, improves the mesh shading and removes the normal gradients but it also causes normal artifacts where the extreme values from the adjacent sides of the hard edges try to blend near the split. In some areas the baking software is also missing rays near the split.


    Matching UV splits to hard edges, adjusting the UV layout and baking projection settings resolves the normal artifacts.


    Using a single smoothing group (without hard edges) and tapering the shape transitions reduces the normal gradient but doesn't eliminate it. This also removes the dark horizon occlusion outline around the ends of the cylinder.


    Adding hard edges and tapered transitions without adjusting the UV splits removes the normal gradient and the dark horizon occlusion but introduces bright normal seams along the hard edges and severe projection issues along the tapered transitions.


    Adding UV splits and adjusting the UV layout and baking projection settings resolves all of the previous issues.


    An alternate option, for cases where the baking software can't compensate for projection issues caused by hard edges, is to place UV splits and hard edges in areas that will minimize normal gradients without introducing project based ray misses.


    Adding support loops near transitions areas minimizes the effect of mesh smoothing, distortion and projection issues but can be more expensive than using hard edges over existing UV splits.


    Below is a comparison of the normal maps generated by the different layout strategies for hard edges and UV seams. What's right for a particular model depends on the scope of the project, whether it's a synced normal workflow and what limitations are imposed by the tools or target engine. Working with a synced normal workflow should be fairly straightforward but anything else will require some experimentation.


    Once the mesh has been split by a hard edge or UV seam then it's split. There's no additional performance cost for combining a hard edge on an existing UV split. Take advantage of this and try to place hard edges and UV seams strategically.

    It's also worth noting that a mesh with fewer hard edges and UV splits will generally be easier to texture and have a smaller resource footprint than a mesh with many hard edges and UV splits. If the normal gradient is tolerable then reducing the overall number of mesh splits will generally make the model more efficient. Run a few test bakes to evaluate which approach is best for the project.
  • poopipe
    Offline / Send Message
    poopipe grand marshal polycounter
    @FrankPolygon - that's an excellent breakdown/practical example and i feel like I've seen you do something similar before. I think if you got your examples and breakdowns together and made them into a sticky the world would be a better place. 

    also.. 
    its worth mentioning that if you're going to LOD the object then you really, really want to avoid gradients.

    As a rule of thumb the third example (split and harden with padding where practical)  is the safest place to start when planning an asset - with the caveat that you'll always find a reason to do something else
  • rollin
    Offline / Send Message
    rollin polycounter
    @FrankPolygon
    hope you move all these great pics to the wiki!
    Not just @Eric Chadwick would be very glad about this.

  • sacboi
    Offline / Send Message
    sacboi high dynamic range
    Thought I'd mention:
    ...alongside other knowledgeable people, have regularly contributed their workflow solutions on the long running subd modeling thread/sticky and personally over the years has really proved entirely useful not only leveling up my own progress as a hard surface modeler but a host of other artists as well.      

    Also recently noticed FrankPolygon had released a Gumroad tutorial series so in my opinion if interested well worth spending the time and money too dive into the topic.

Sign In or Register to comment.