Home Technical Talk

Height based Texture Blending in 3dsmax?

polycounter lvl 10
Offline / Send Message
melviso polycounter lvl 10
Hi,

https://www.youtube.com/watch?v=dghCetkArJI

Is this possible using 3dsmax material nodes?

Sometimes, I wonder why things are so backward in these 3d applications these days compared to ue4.
I was able to find this:
https://www.youtube.com/watch?v=MFZo-q2-EZo
But this is for Maya. How would this work for 3dsmax?

Replies

  • Eric Chadwick
    Options
    Offline / Send Message
    On a train, can't see the vids. Do you mean in the viewport while you work, or at render time?

    For viewport, yes. Use Shader FX, works basically the same as Unreal. 
  • melviso
    Options
    Offline / Send Message
    melviso polycounter lvl 10
    At render time with offline renderers. If possible, see the vertex blending in viewport and works when rendered.
  • srsface
    Options
    Offline / Send Message
    srsface polycounter lvl 5
    Should be doable with OSL as well.
  • gnoop
    Options
    Offline / Send Message
    gnoop polycounter
    it's possible to do anywhere with Max ("lighter" in photoshop terms)  and subtract  arithmetic nodes working  with texture pixel values (blending modes) .   Perfectly doable in Photoshop, Substance Designer/Painter, Blender  shader nodes, etc      

    Sure in 3dMax too but i did it years ago in old shader fx only  before they bought it.    in Blender it's super easy.      I don't remember if Max has  blending nodes like Photoshop but Arnold has enough math arithmetic nodes for sure to recreate them. Just find blending modes math examples in Wiki and recreate it in Arnold graph.   

    I mean you don't need to learn shading language for that. it's all just 5 grade school arithmetic doable with nodes or blending modes  usually.
     
    In fact this U4 video is  not true Height blending for which you would need  height values of both materials you are blending   but rather kind of height level  mask                   
  • Eric Chadwick
    Options
    Offline / Send Message
    You can get it to work both in viewport "live" and for rendering, but you would need to setup two separate shaders and feed them into a master Shell material.

    You'd also probably want to wire up controller nodes to change both settings at the same time, like height cutoff level and blend sharpness. 

    Then you could use vertex color to paint the masks live in the viewport.
  • MadsD
    Options
    Offline / Send Message
    MadsD triangle
    Hi,
    The good Vojtech pointed me to this thread.

    It is indeed possible to fabricate this workflow in max, and be very efficient and fast.
    I am currently setting up a 2020 project file for you guys I will be making over the next couple of hours:
    Painting returns over 100 fps in my viewport, so texture artist wont experience any lag painting the initial mask.

    We only need to use 1 physical material for everything abd we dont need to set up a bunch of things before it works, Ill see if I have time to write a special custom shader, else you can start with getting a shading network we can later collapse and customize, no problem.

    In OSL we can do everything you want, once the initial mask is painted realtime, so I dont think you can come up with a wish we cant solve.
    Ill grind out a template as mentioned and return with some material later.
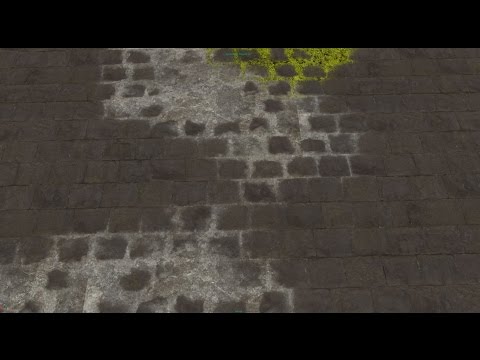

  • MadsD
    Options
    Offline / Send Message
    MadsD triangle
    Sorry for the delay.
    Here it is.

    https://youtu.be/QPQFBK4d0as
    Small walkthrough on how to setup the basic, communication between painter and shader is a simple construct to manage.

    Link to max scene:
    https://github.com/gkmotu/ArnoldSceneConverterScripts3DSMAX/tree/master/Scenes

    And you should see something like this, there is a custom displamcent slot on the bitmap which does not figure on the original bitmap shader, so maybe save this one out for later as its updated to send out blured images for rounding displacement errors off.

    Just pick the vertex paint tool and use either whiteish or darkish, does not need to be exact tone, the more the more contrast and so on.

    You can use this to control all aspects, using the displacement as a guide for various elements, pipe the displacement or the raw color out to an interpolate node as guide and mix in 2 shader types, you can stack these things.

    Load a new HDRI to the Environment
    And load a new Brick displacement texture inside the Bitmap Lookup node.


    So what you want to do is to probe this and find some "looks" for input in interpolation maps where you mix things in, grade them so the right place and amount of the displacement is sourced, for example you can filter out so we just paint in the cracks very easily, or just the tops, based on a custom mask, we put into looks and momentarily just look at for debugging the particular mask, then switch back to final and implement debugged mask.

    We can do this manually, or we can set up a single shader taking care of it all, giving us a UI we pritty much want within the frames of OSL UI'ing.


  • melviso
    Options
    Offline / Send Message
    melviso polycounter lvl 10
    Thanks a ton Mads, really appreciate the help :- )
    Here is another method as well with Corona renderer:
    https://www.youtube.com/watch?v=RGSEgFJDqjw&feature=emb_logo
  • MadsD
    Options
    Offline / Send Message
    MadsD triangle
    https://i.imgur.com/yCGT6lZ.mp4

    A variant, FBM smoke mixed into the emission equation.

  • melviso
    Options
    Offline / Send Message
    melviso polycounter lvl 10
    Thats really cool, mate!! This is very powerful.
  • Amiminoru
    Options
    Offline / Send Message
    Amiminoru polycounter lvl 8
    melviso said:

    Sometimes, I wonder why things are so backward in these 3d applications these days compared to ue4.

    Parallax + height blend. But this a EEVEE in Blender 2.8.

    https://www.youtube.com/watch?v=y14X7P0bTPs&feature=youtu.be
  • melviso
    Options
    Offline / Send Message
    melviso polycounter lvl 10
    @Amiminoru This is excellent. Thanks for posting. Nice to see ue4 techniques in 3d modeling programs for offline rendering. Any chance u could pls share the material setup for eevee in Blender?
    @MadsD Pls, is there a way decals can be projected on surfaces like ue4 with osl shaders? Also parrallax mapping?
  • Amiminoru
    Options
    Offline / Send Message
    Amiminoru polycounter lvl 8
    melviso said:
    @Amiminoru This is excellent. Thanks for posting. Nice to see ue4 techniques in 3d modeling programs for offline rendering. Any chance u could pls share the material setup for eevee in Blender?


    Of course. Here is the scene in Blender.

    https://dropmefiles.com/WYpYg
  • melviso
    Options
    Offline / Send Message
    melviso polycounter lvl 10
    @Amiminoru Thanks. I can't find the height blend with vertex paint node using the color ramp in the shader editor. Can u pls post a screenshot of the material setup in the shader editor?
  • srsface
    Options
    Offline / Send Message
    srsface polycounter lvl 5
    Since parallax is basically just a UV warp it should be totally possible with OSL. In fact here seems to be a ready-made solution for that: https://www.racoon-artworks.de/?p=773
  • srsface
    Options
    Offline / Send Message
    srsface polycounter lvl 5
    EDIT: I actually posted this message long ago, it just needed to be verified for some reason (probably cos of the link) so now it's way late and I look like an idiot. :)

    To avoid having to do the material twice with a Shell material, OSL based shader networks in newer Max versions are supposed to work in both viewport and rendering and look (almost) the same. I haven't personally tried vertex painting with it however, but apparently you can access vertex colors with it via UVW channel 0. Otherwise it should have pretty much the same common math nodes as any shader editor.


  • melviso
    Options
    Offline / Send Message
    melviso polycounter lvl 10
Sign In or Register to comment.