The Stranger Character + UE4 Character Customization Shader

greentooth
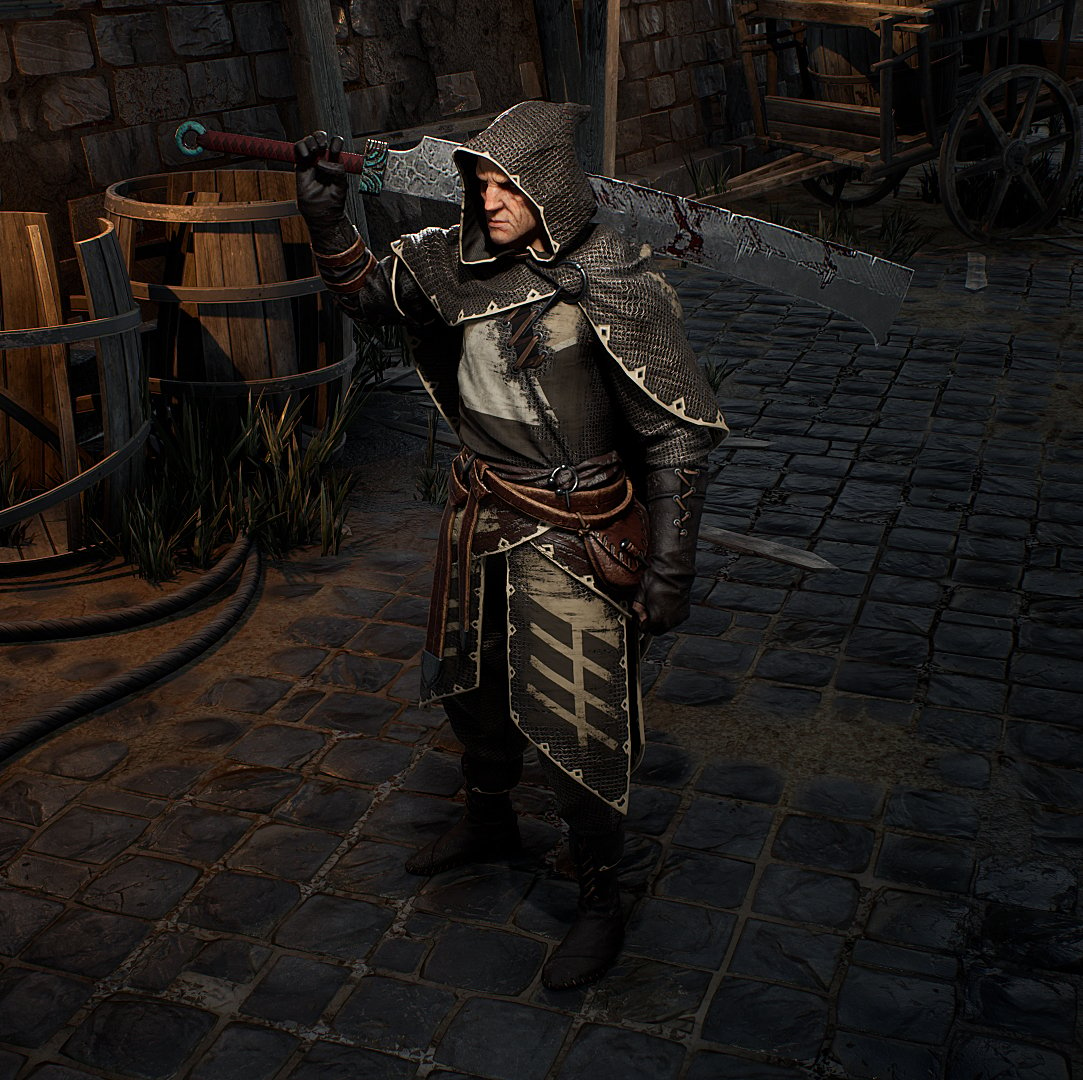
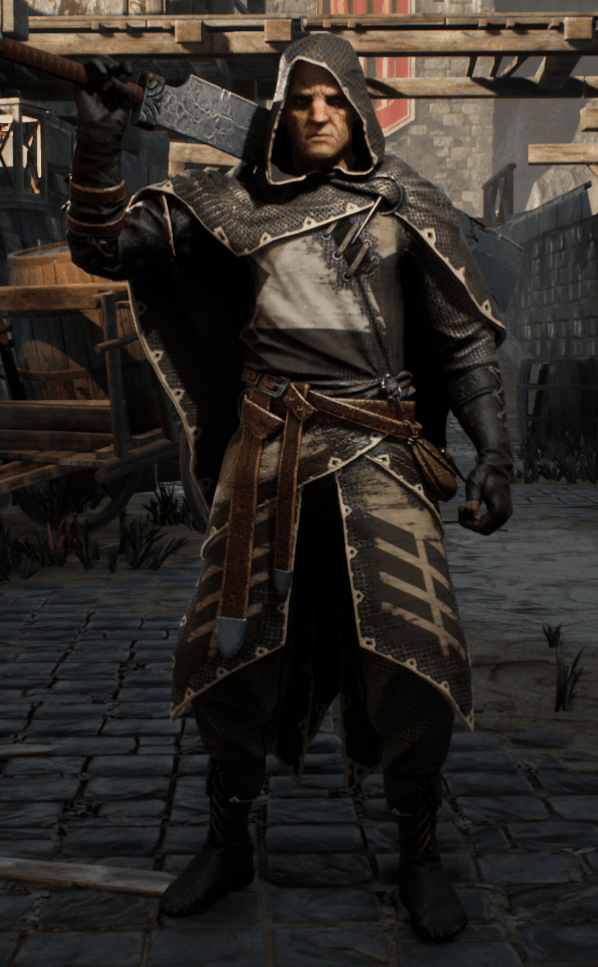
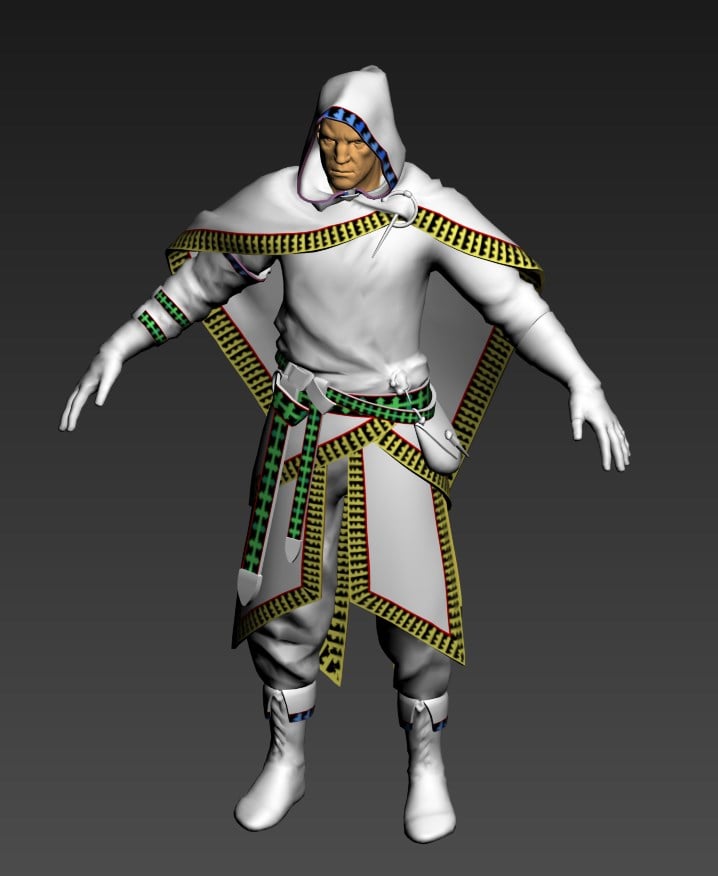
Hey, this is my latest Character:
The Stranger

This is a little demonstration of the Stranger in action, running around in UE4
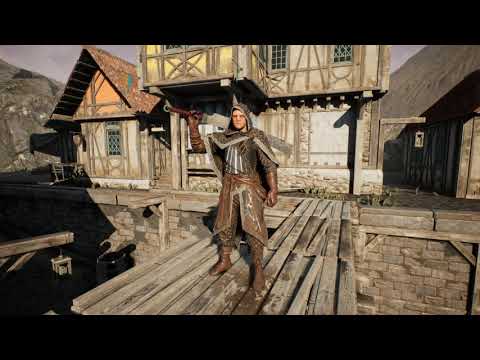 https://youtu.be/DBBQi_QoGcY
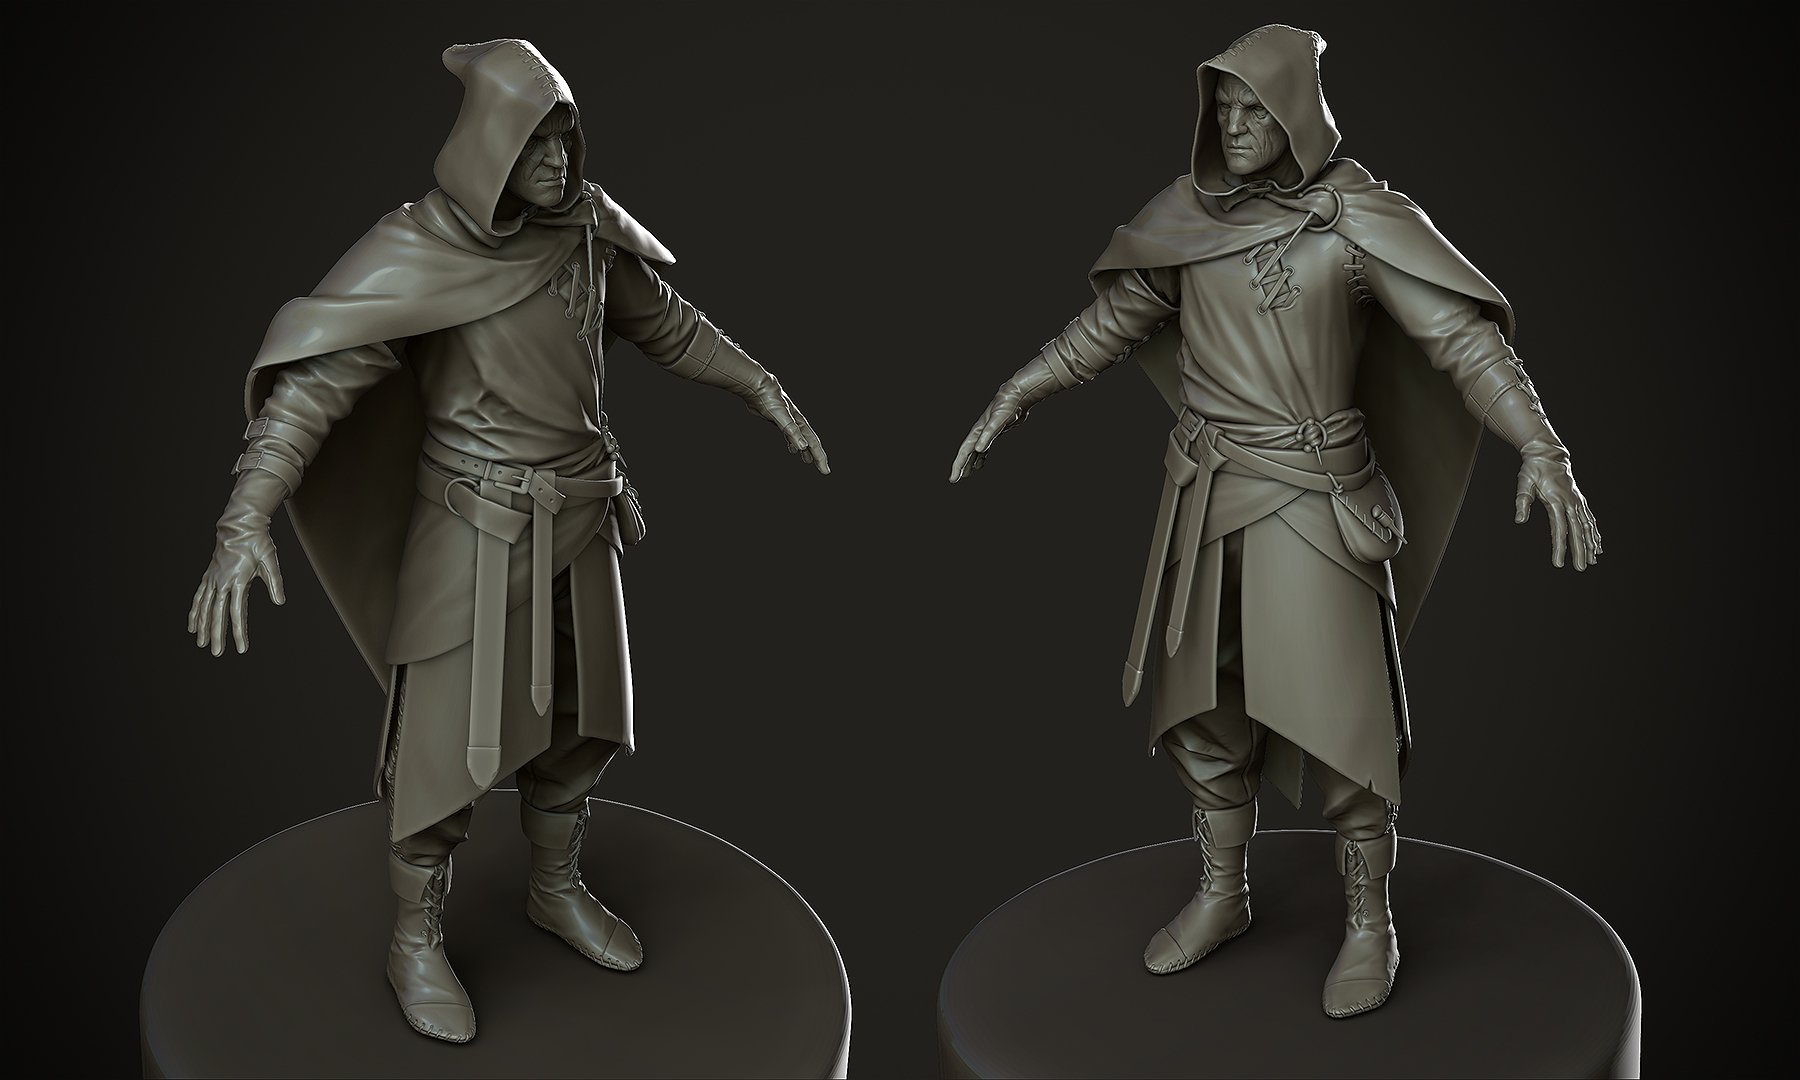

Okay so this time I wanted to go all out: a full character that could be part of a AAA-Game, including setup in UE4 with a basic movement system, swappable equipment & armor customization like in For Honor or Warframe.
To achieve this I built a custom Layered Shader in UE4 that I'm sharing with the community.
You can get the Armor Customization Shader here: https://gum.co/ZcrMO
Buuuuuut to achieve flexibility like this, your mesh needs to be set-up and planned in a certain way, so bfeore you go ahead and try to use the shader please read the following explenation of my character setup.
But first a big shoutout to Natashia Tjong who skinned this Character for me:
https://www.artstation.com/latiwings
And Denys Rutkovsky, I used his Medieval Environment for the background of this character.
https://www.artstation.com/rutkovsky
https://www.artstation.com/rutkovsky/store/xr3/fantasy-village-kit-ue4
Simplified my shader looks like this:

Basically it takes a base texture and blends 5 Layers of different materials ontop of the base,
to do this is uses a Mask texture that tells it where to blend each layer, additionally it also uses a 2nd & 3rd UV channel to add more flexibility to the way the different layers are blended into each other.
What does this actually look like in UE4? Like this:
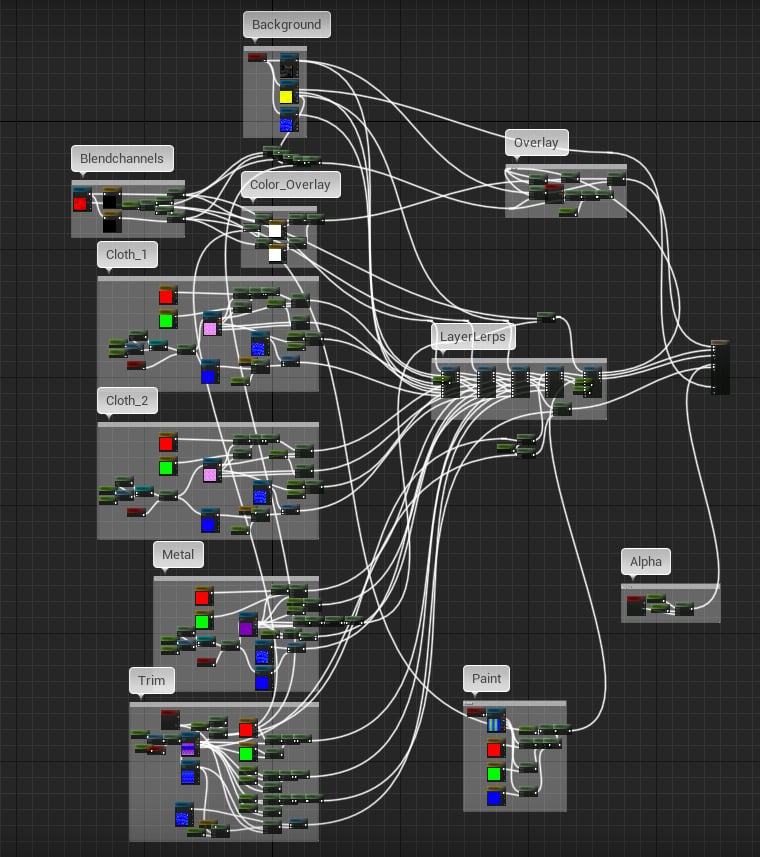
Yes that looks quite intimidating but you don't need to understand what all those nodes do, you just need to feed them the right mesh & texture information.
So let me illustrate how I created my character to work with this shader setup:

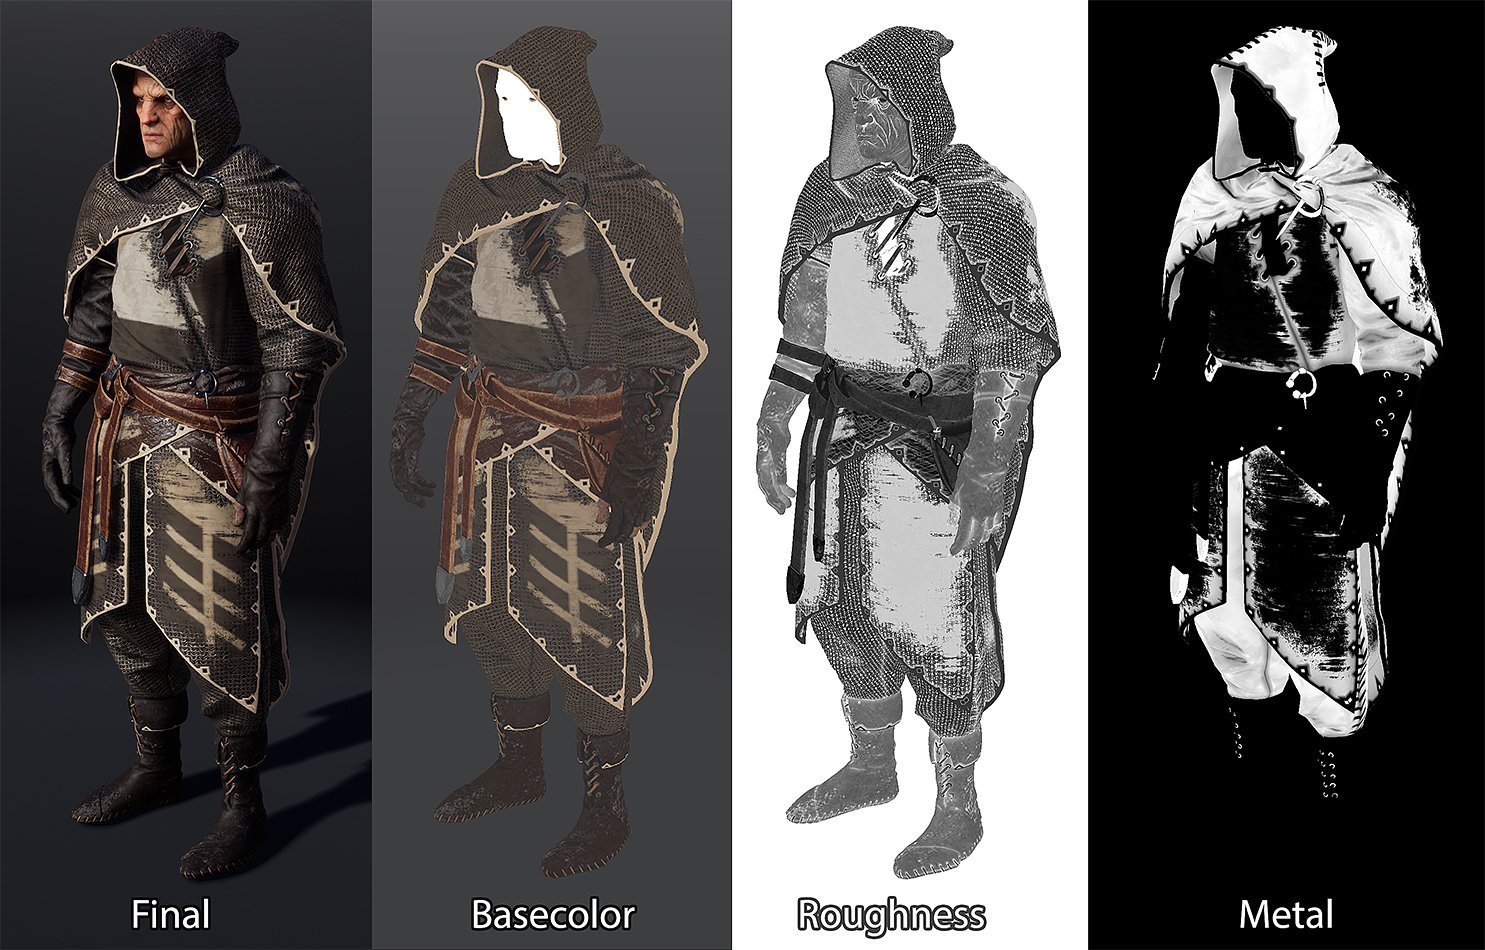
The Base Layer is quite simple, it includes:
Basecolor
Normal Map
Channel Packed AO, Roughness, Metalness
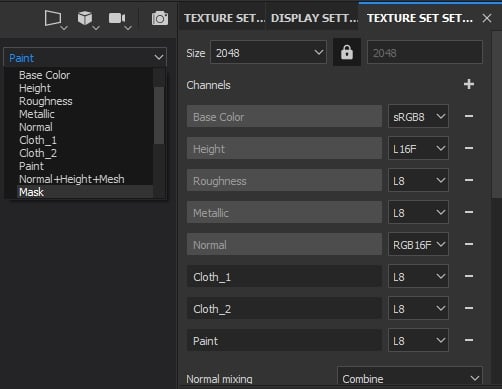
Channel Packed Masks for 2 Cloth layers & 1 Paint Layer
To be able to paint the additional Masks I added 3 Custom Channels in Substance Painter:
Lets take a look at where I painted the masks for the different layers on the Stranger Character:
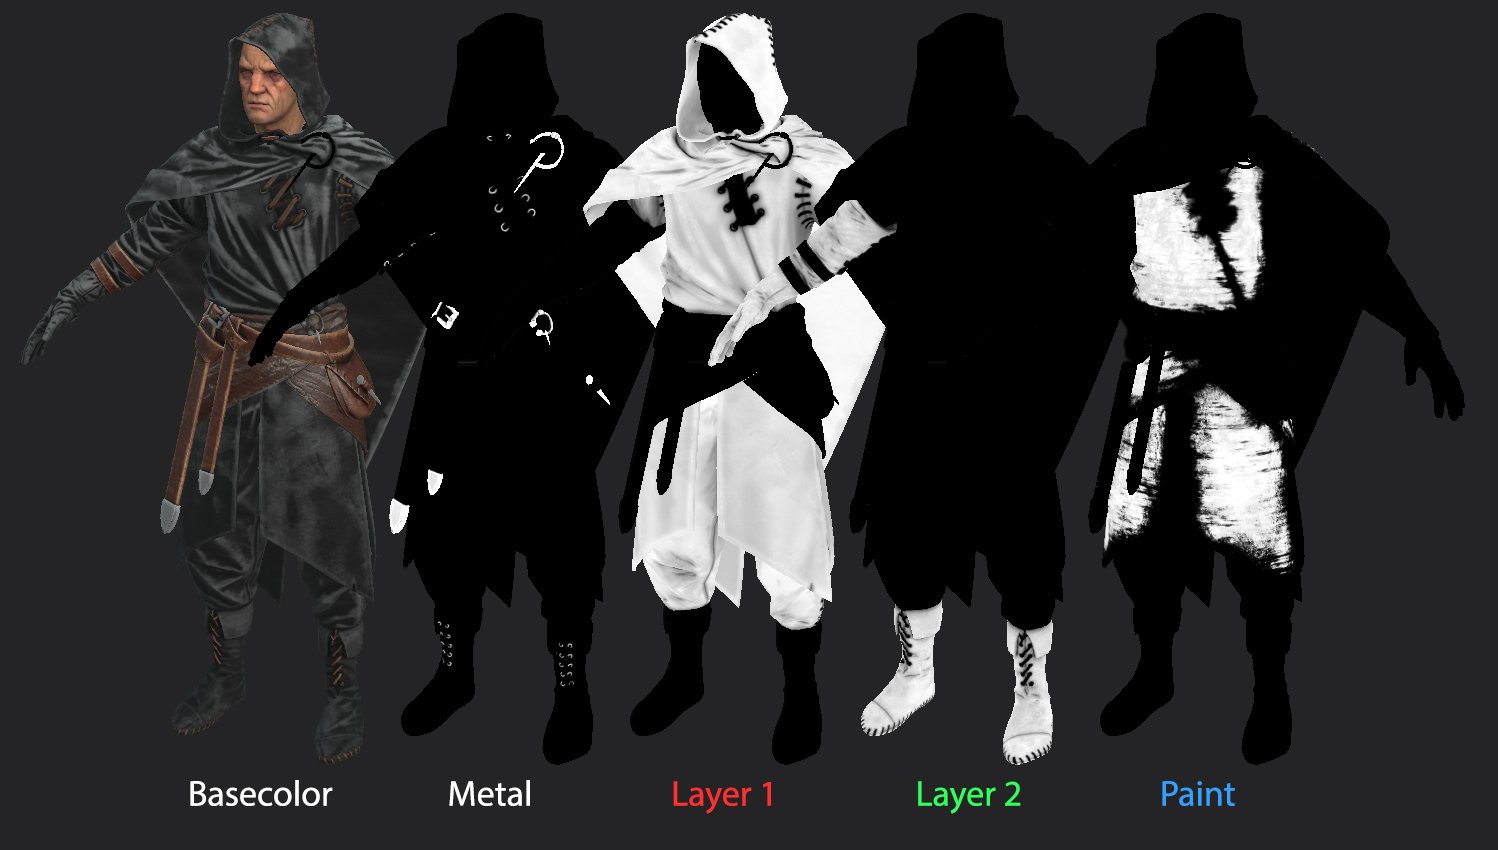
As you can see the Metal and the Cloth masks don't overlap each other, but the Paint Mask is overlapping some of the cloth.
Additionally I did not use full black/white layers for the Cloth. This is because I wanted to have some AO and Dirt shining through from the Basecolor.
The cloth layers use the Red & Green Channel as tint masks and the Blue channel for the roughness. So it looks something like this:
Red : Tint
Green : Tint
Blue : Roughness
I also created a Variable called "Leatherswitch", if it is set to 1 instead of the tintable textures it will use a Full RGB texture and take the rougness from its alpha channel.
The metal layer uses the metalness from the Base Layer as its mask. Additionally it uses another channel packed texture with this channel setup:
Red : Roughness
Green : Tint
Blue : Metalness
3. Trims
For the Trims at the edge of the clothing I used a different setup: It uses the meshes UV Channel 2 for blending and a horizontaly tiling texture.
To be able to preview the Trims on my mesh I created this handy debug texture:
If you look closely there is a little white dot at the top left corner of this texture, this is the Alpha Deadzone.
This is where all the UVs of your mesh need to be that won't have any Trims applied to them.
If you apply this texture to my mesh it looks like this:
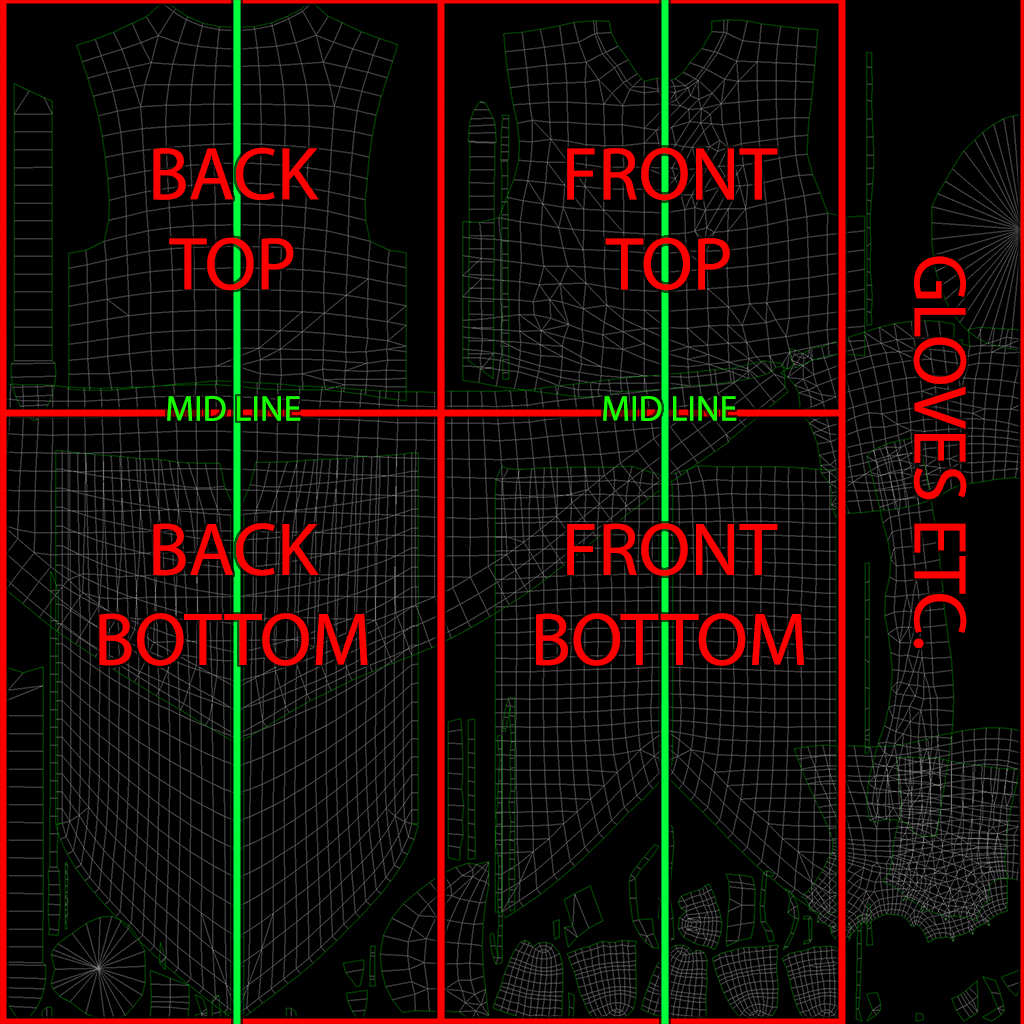
To achieve a good result when applying the trims it is important to plan the mesh with the trim locations in mind. This is helpful during the highpoly stage and invaluable during lowpoly to avoid reworking the mesh.
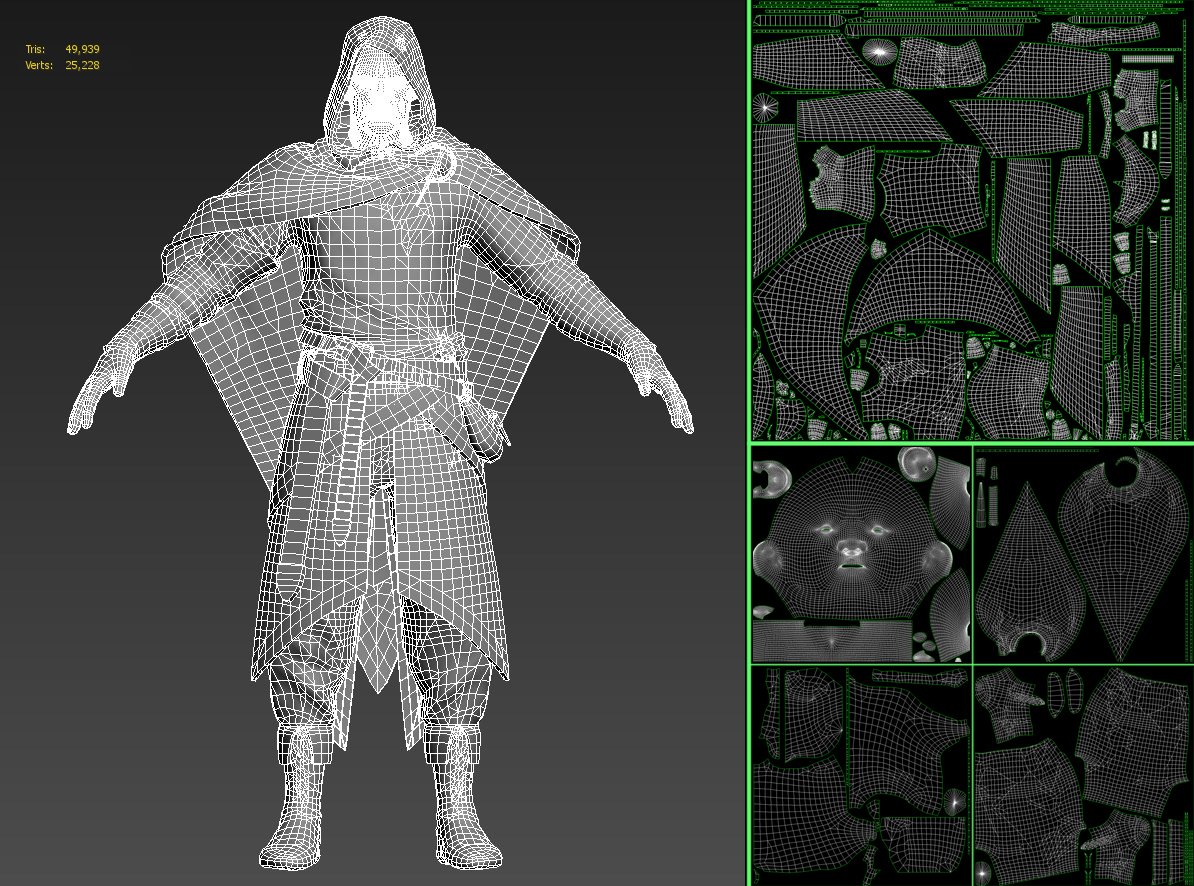
This is the wireframe of the Stranger Character:
If you look closely you will notice how I adjusted the edgeflow to conform to the trim shape so that I could easily cut the UVs for them.
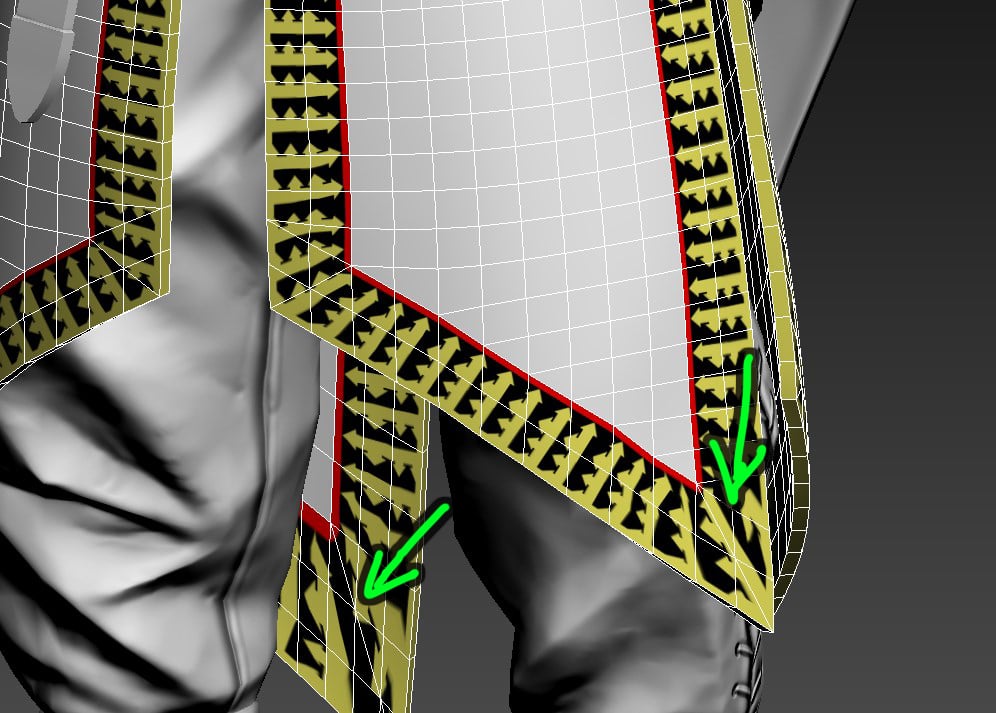
But not everything went smoothely, some design decision were suboptimal for future use I would like to note that any angles larger then 45 degrees will cause problems for the trim UVs, here are some problem areas of my mesh highlighted:
It uses the paint mask from the Base Layer and another channel packed texture for its colors.
In this case Red, Green & Blue are all Tintable so if you input a regular full color texture and apply leave the tint values default the shader will just display that texture as is.
The idea for these paint textures was for them to be sharable between different characters, so they use a 3rd UV set that can be individually adjusted to make the texture fit on any character.
The master layout for these textures looks like this:
But the shader has a couple more miscelanous features, for example both the Trim and Paint Layers have an opacity slider that allows them to be deactivated at any point during runtime. I used this to quickly preview different variations and debug the shader and textures.
There are tint inputs for the Basecolor and Vertex paint is used for 2 functions:
Blue controlls the color opacity of the Trims, it can be used to use the trim as normal decals, for the Stranger I used it to have normal decals on the belts.
Green is plugged into the opacity mask and can be used to hide or toggle parts of the mesh.
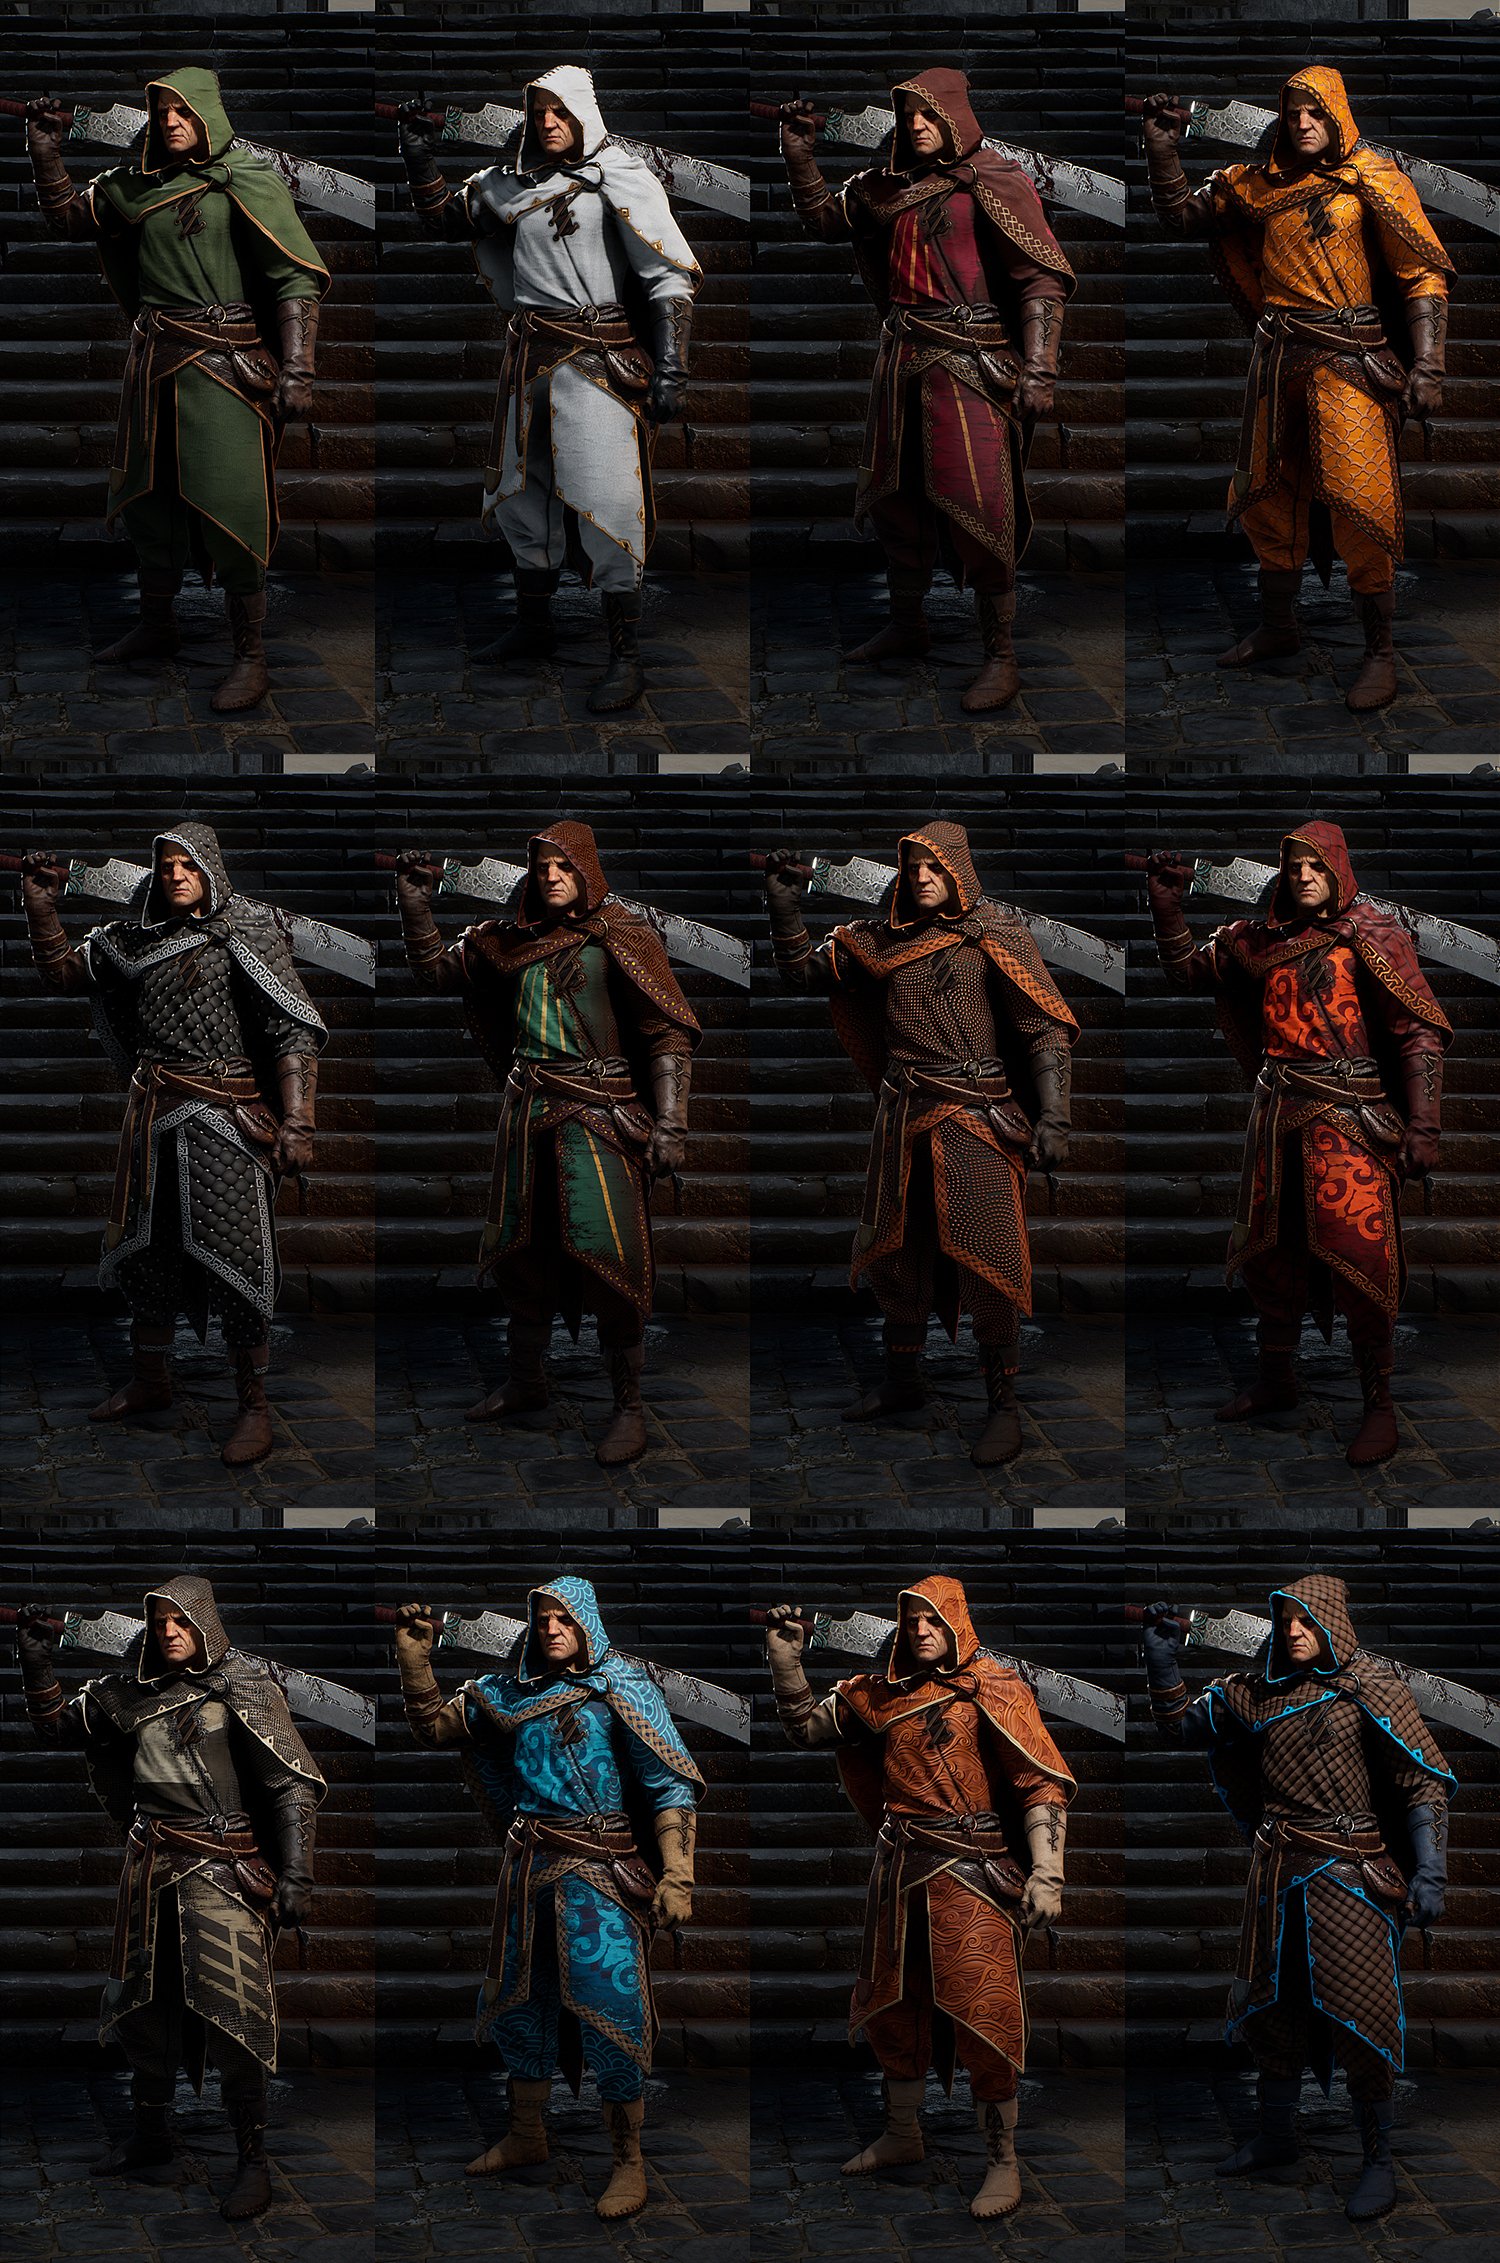
I created these 2 versions of the character just using those miscellaneous features. One could easily imagine them as a Basic & Prime Variant

If you like this character you can buy the whole thing including sourcefiles here:
https://gum.co/MXIZY
Alright sorry for the massive amount of text, I hope the function of this shader is understandable to everyone.
Ofcourse please let me know if you have any trouble using it and I will do my best to answer any questions in this thread.
The Stranger
This is a little demonstration of the Stranger in action, running around in UE4
https://youtu.be/DBBQi_QoGcYOkay so this time I wanted to go all out: a full character that could be part of a AAA-Game, including setup in UE4 with a basic movement system, swappable equipment & armor customization like in For Honor or Warframe.
To achieve this I built a custom Layered Shader in UE4 that I'm sharing with the community.
You can get the Armor Customization Shader here: https://gum.co/ZcrMO
Buuuuuut to achieve flexibility like this, your mesh needs to be set-up and planned in a certain way, so bfeore you go ahead and try to use the shader please read the following explenation of my character setup.
But first a big shoutout to Natashia Tjong who skinned this Character for me:
https://www.artstation.com/latiwings
And Denys Rutkovsky, I used his Medieval Environment for the background of this character.
https://www.artstation.com/rutkovsky
https://www.artstation.com/rutkovsky/store/xr3/fantasy-village-kit-ue4
How does the Armor Customization Shader work?
Simplified my shader looks like this:
Basically it takes a base texture and blends 5 Layers of different materials ontop of the base,
to do this is uses a Mask texture that tells it where to blend each layer, additionally it also uses a 2nd & 3rd UV channel to add more flexibility to the way the different layers are blended into each other.
What does this actually look like in UE4? Like this:
Yes that looks quite intimidating but you don't need to understand what all those nodes do, you just need to feed them the right mesh & texture information.
So let me illustrate how I created my character to work with this shader setup:
1. The Base Layer
The Base Layer is quite simple, it includes:
Basecolor
Normal Map
Channel Packed AO, Roughness, Metalness
Channel Packed Masks for 2 Cloth layers & 1 Paint Layer
To be able to paint the additional Masks I added 3 Custom Channels in Substance Painter:
Lets take a look at where I painted the masks for the different layers on the Stranger Character:
As you can see the Metal and the Cloth masks don't overlap each other, but the Paint Mask is overlapping some of the cloth.
Additionally I did not use full black/white layers for the Cloth. This is because I wanted to have some AO and Dirt shining through from the Basecolor.
2. Cloth & Metal Layers
To be able to input tintable Cloth Layers I created another Mask setup:The cloth layers use the Red & Green Channel as tint masks and the Blue channel for the roughness. So it looks something like this:
Red : Tint
Green : Tint
Blue : Roughness
I also created a Variable called "Leatherswitch", if it is set to 1 instead of the tintable textures it will use a Full RGB texture and take the rougness from its alpha channel.
The metal layer uses the metalness from the Base Layer as its mask. Additionally it uses another channel packed texture with this channel setup:
Red : Roughness
Green : Tint
Blue : Metalness
3. Trims
For the Trims at the edge of the clothing I used a different setup: It uses the meshes UV Channel 2 for blending and a horizontaly tiling texture.To be able to preview the Trims on my mesh I created this handy debug texture:
If you look closely there is a little white dot at the top left corner of this texture, this is the Alpha Deadzone.
This is where all the UVs of your mesh need to be that won't have any Trims applied to them.
If you apply this texture to my mesh it looks like this:
To achieve a good result when applying the trims it is important to plan the mesh with the trim locations in mind. This is helpful during the highpoly stage and invaluable during lowpoly to avoid reworking the mesh.
This is the wireframe of the Stranger Character:
If you look closely you will notice how I adjusted the edgeflow to conform to the trim shape so that I could easily cut the UVs for them.
But not everything went smoothely, some design decision were suboptimal for future use I would like to note that any angles larger then 45 degrees will cause problems for the trim UVs, here are some problem areas of my mesh highlighted:
4. Paint Decals
The last layer is the Paint Layer, it blends ontop of all other layers.It uses the paint mask from the Base Layer and another channel packed texture for its colors.
In this case Red, Green & Blue are all Tintable so if you input a regular full color texture and apply leave the tint values default the shader will just display that texture as is.
The idea for these paint textures was for them to be sharable between different characters, so they use a 3rd UV set that can be individually adjusted to make the texture fit on any character.
The master layout for these textures looks like this:
5. Other Shader Features
With all the above features applied you should be able to achieve a result like this:But the shader has a couple more miscelanous features, for example both the Trim and Paint Layers have an opacity slider that allows them to be deactivated at any point during runtime. I used this to quickly preview different variations and debug the shader and textures.
There are tint inputs for the Basecolor and Vertex paint is used for 2 functions:
Blue controlls the color opacity of the Trims, it can be used to use the trim as normal decals, for the Stranger I used it to have normal decals on the belts.
Green is plugged into the opacity mask and can be used to hide or toggle parts of the mesh.
I created these 2 versions of the character just using those miscellaneous features. One could easily imagine them as a Basic & Prime Variant
If you like this character you can buy the whole thing including sourcefiles here:
https://gum.co/MXIZY
Alright sorry for the massive amount of text, I hope the function of this shader is understandable to everyone.
Ofcourse please let me know if you have any trouble using it and I will do my best to answer any questions in this thread.
Replies
I used UE4s internal cloth simulation for this. I used a cloth LOD that has identical topology to the lowpoly mesh but without thickness.
I actually spent quite a bit of time iterating on this because it turns out there are a lot of hidden factors regarding cloth simulation and physics assets in UE4.
I will do a more detailed breakdown of how I achieved the cloth simulation after I get home from work. For now I'll just say that I use a different physics asset for each part of the cloth; the cape, the skirt & the belts.
Initially I had the 2 layers of the skirt use separate cloth LODs but they ended up clipping through each other a lot, so even though it looks less cool I had to combine them and have them use the same cloth LOD.
On another note, how well the cloth simulation works also depends a lot on having smooth animation transitions. if the animation transitions are too harsh the cloth will be exposed to unrealystic physics inputs and fly all over the place.
Edit: its actually super late and I'm going to put a bit more work into this breakdown so it will be some time later this weekend
That is all.
I've always been attracted to the idea of non destructive forms of shading, where maps can be editable in engine. Versus baking it all down in Painter.
Thank you for sharing your awesome work!
Now back to the case of Unreal Engine specifically. UE only generates tangents for the first uv channel, so if the normal is based on any uv channel other than index 0, what you say would definitely happen. But if its based on uv index 0, it shouldn't happen and rotated uvs should work correctly. To get rotated uvs to work with uv channel other than 0, you need to use the derive tangent basis node in the material and manually provide tangents.
but yes the UVs are rotated and it is a problem. Thats why I stressed that planning the mesh is very important, because in my case I didn't plan properly in this regard and I only noticed this problem after I finished the textures.
Ofcourse I could rotate and reproject the textures but admittedly I was too lazy to do that (and I hoped noone would notice)
cloth simulation breakdown
handling cloth simulation in UE4 is as much about planning as it is about debugging.I got lucky because the way I built my cloth meshes worked quite well with unreals cloth sim in the end.
getting there took a lot of itteration though.
If you are using a cloth mesh with thickness it is necessary to use a cloth LOD for simulation, otherwise the mesh will loose its thickness when simulated.
for the cloth LOD it is best to match the underlying mesh geomtry as closely as possible.
this will produce the most accurate and realistic looking cloth deformation.
ofcourse for lower character mesh LODs the cloth LODs will also need to be reduced to match the LOD topology or even simpler.
this is the cloth LOD I ended up using in the end:
there are a couple of important things to note here:
the 2 layers of the skirt are welded into 1 mesh, originally I tried simulating them seperately but the clipping was quite intense since cloth can't collide with each other.
this might have worked better if the distance between the 2 mesh layers would have been greater, but then the outer would always look like its floating quite high above the inner layer.
as you will come to see cloth simulation is a lot about making tradeoffs.
I added some cloth simulation for the pouch and the belts, those are on a seperate material from the rest of the cloth so they can be controlled indipendantly.
both of those could have been achieved with jiggle bones but doing it with clothsim was a lot easier.
also jiggle bones can't react to cloth so they would have always pushed the underlying cloth layers around, wich would lead to a lof of weird clipping, since cloth will start to react violently when its stuck between 2 collision primitives.
talking about primites...
Physics Asset handling
physics assets are the biggest pain point in UE4s cloth simulation.this is due to the subpar state of documentation from epics side. I can understand their dilemma in a way due to these systems being very complicated from a physics standpoint.
Initally my plan was to just use the characters physics asset for the cloth simulation as well. That is not possible as I came to understand through a lot of trial & error.
One important note: all of the following tips apply to UE4.22 the physics asset behavior is frequently being changed by epic and might be completely different in other versions of UE4
So what happens when you use your character collision for your cloth sim? Well it might work perfectly fine, or not at all.
I encountered some weird issues where certain collision volumes would be entirely ignored by the cloth.
Some times collision volumes would be ignored after a certain distance from the root and working when I moved them closer. By root I am referring to the root of the cloth which seems to be automatically calculated somehow.
Sometimes the weird behavior would dissapear after an engine restart and reappear later.
I have captured some of the weird behavior in this gif:
one of the bones causes the cloth to spasm violently while the other is behaving as expected.
so how to fix all these issues?
the most reliable way I found is to create a unique physics asset for every element of cloth simulation and reducing the used physics asset collision volumes as much as possible.
Cloth Simulation Configuration
okay the last and least important part are the values used for the cloth simulation settings.I recommend to leave most of those at the default values, even though they all have elaborate discriptions I found that modifying them has absolutely no impact on the behavior of the cloth.
For my cloth I only changed 3 values and regardless what type of cloth you create these values should be the only ones you need to modify:
the most important value is Solver Frequencey this value has the largest impact on the look of the cloth. at the same time it also controlls how precise the collision with the physics asset will be. In my epxerience lower values give the most natural looking cloth simulation result, but due to the collision being so vague a high solver frequency isrequired to eliminate clipping.
In the video of my character walking around you can see the cape clipping through the arm when I raise the sword, I then fix the clipping by doing a minor arm movement. This illustrates how easy cloth will clip through collisions with a low solver frequency.
on a final note I would like to give some advice regarding animations.
the more realistic your animations, the better the result of any cloth simulation will be. If limbs accelerate too fast, your cloth will fly and clip all over the place.
Also having sufficient animation blending time will help to mitigate cloth simulation problems.
Also some little tricks: using a preview animation on your character will help you debug simulation issues. but don't be tempted to change the playback speed, this will change the way your cloth is being simulated in unrealistic ways that are not indicative of the actual ingame behavoir.
this concludes my little cloth sim breakdown, I hope its helpful.
Love the breakdown and all the gifs