How to edit vertex normals for Anime / Toon shading in blender? (Arc System Works-Inspired)

null
Heya!, I've recently been very inspired by Arc System Work's 3D anime models, their work in Guilty Gear and Dragon Ball Fighter Z is absolutely amazing and they blur the line between 3D and 2D nearly seamlessly. So I've been trying to figure out how to recreate it, but I've hit a wall in the process.
I've understood everything they did with the UVs, the outlines, etc, but when they get to talk about the Vertex Normal editing, I understand the process behind it, but I don't understand how they got it to work that specific way, as seen here: https://youtu.be/yhGjCzxJV3E?t=1185 (video should start at 19:45 to show you what I mean).
I do understand that they basically moved every single vertex on the character's face to revert back the lighting where necessary to make it shade properly; what I'm not understanding is the process behind it: how they exactly did it so it snaps that way, what technique/knowledge/tool they used to make it so.
I've looked for addons for blender that would let me edit vertex normals, like Blend4Web, but I'm either doing it wrong, or it seems extremely difficult to know exactly where each and every vertex on the face must be pointed at to move them accordingly, individually.
I'm also aware that there's a data transfer modifier in blender that let's you copy normals from one object to another in blender, and you can use that in conjunction with this method; but again, I'm unaware of how to this exact method, where the lighting "snaps" to the correct shadowing, as the just mention method doesn't do that, or not to such an extent.
I've also looked into the software they're using, SoftImage, and apparently you can edit normals by vertex painting a normal direction copied from other normals or from a pre defined direction (I'm unsure what exactly is happening, but you can check it out for yourself: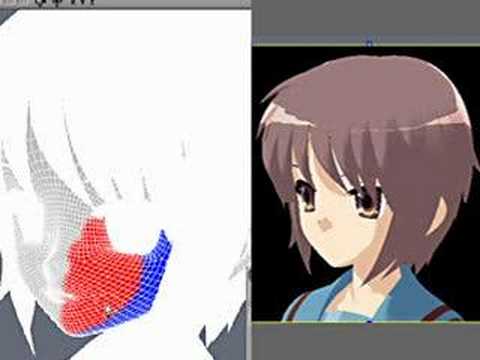 https://www.youtube.com/watch?v=YE-AnfhqZqg&feature=youtu.be&t=8 ) but I'm again unsure if this is the method they use, or if the shadow also snaps into place with this method, but it seemed like it might work for what I'm going for anyways, and it seems easier than moving every single vertex individually, which I'm all in for. The problem's that I've been looking for a similar method to that inside of blender, and I haven't been able to crack anything yet.
So what I'm basically asking here, is: how do I get normals to behave like Arc System Work's anime models in blender, or even maya? (must be able to be exported to Unity/UE4, meaning, realtime vertex normal editing, like they do) what addons/tools should I use, how should I set it up, what should I be looking for, and if anybody has any tips, tricks, workarounds that could get me running in the proper direction, it'd be immensely appreciated.
This is my try at it, and as you can see, it's not as perfect, nor does it "snap" properly either: https://gyazo.com/fdc6741cd4d8900182da7901a1891163 and here's how the vertices are setup: https://imgur.com/a/3fp3CVf (I'm aware that my normals are facing way further away from each other, but as you can see by the last panel, if they're not nearly parallel to each other, if you angle the light at a certain point, you can see it "breaking", but I don't know if that's a common behavior of it though, and I'm absolutely sure I'm doing something wrong, thus this thread haha.)
Thank you for your time, and I hope we can find a solution to this problem!
I've understood everything they did with the UVs, the outlines, etc, but when they get to talk about the Vertex Normal editing, I understand the process behind it, but I don't understand how they got it to work that specific way, as seen here:
https://youtu.be/yhGjCzxJV3E?t=1185 (video should start at 19:45 to show you what I mean). I do understand that they basically moved every single vertex on the character's face to revert back the lighting where necessary to make it shade properly; what I'm not understanding is the process behind it: how they exactly did it so it snaps that way, what technique/knowledge/tool they used to make it so.
I've looked for addons for blender that would let me edit vertex normals, like Blend4Web, but I'm either doing it wrong, or it seems extremely difficult to know exactly where each and every vertex on the face must be pointed at to move them accordingly, individually.
I'm also aware that there's a data transfer modifier in blender that let's you copy normals from one object to another in blender, and you can use that in conjunction with this method; but again, I'm unaware of how to this exact method, where the lighting "snaps" to the correct shadowing, as the just mention method doesn't do that, or not to such an extent.
I've also looked into the software they're using, SoftImage, and apparently you can edit normals by vertex painting a normal direction copied from other normals or from a pre defined direction (I'm unsure what exactly is happening, but you can check it out for yourself:
https://www.youtube.com/watch?v=YE-AnfhqZqg&feature=youtu.be&t=8 ) but I'm again unsure if this is the method they use, or if the shadow also snaps into place with this method, but it seemed like it might work for what I'm going for anyways, and it seems easier than moving every single vertex individually, which I'm all in for. The problem's that I've been looking for a similar method to that inside of blender, and I haven't been able to crack anything yet.So what I'm basically asking here, is: how do I get normals to behave like Arc System Work's anime models in blender, or even maya? (must be able to be exported to Unity/UE4, meaning, realtime vertex normal editing, like they do) what addons/tools should I use, how should I set it up, what should I be looking for, and if anybody has any tips, tricks, workarounds that could get me running in the proper direction, it'd be immensely appreciated.
This is my try at it, and as you can see, it's not as perfect, nor does it "snap" properly either: https://gyazo.com/fdc6741cd4d8900182da7901a1891163 and here's how the vertices are setup: https://imgur.com/a/3fp3CVf (I'm aware that my normals are facing way further away from each other, but as you can see by the last panel, if they're not nearly parallel to each other, if you angle the light at a certain point, you can see it "breaking", but I don't know if that's a common behavior of it though, and I'm absolutely sure I'm doing something wrong, thus this thread haha.)
Thank you for your time, and I hope we can find a solution to this problem!
Replies
Threshold is something completely different. There are three equally important aspects which work together to determine the final result:
- Normals
- Light Vector
- Threshold
The Normals define which direction a surface is pointing. If the surface normal is facing the light source then it will be lit, and if it’s facing more than 90 degrees (the "threshold") away from the light source then it will be unlit. For the Guilty Gear shader, vertex colors are used to offset that Threshold angle so that an artist can make an area of the mesh get darker more easily (for example, you could have it set so that painted faces will be considered unlit if their Normals are only facing 20 degrees away from the light source). In other words the Threshold determines how far away from a light direction a surface needs to be facing until it is considered to be occluded.The takeaway is that you're not "painting vertex colors as vertex normals". The vertex normals are their own separate thing. You need to tweak those, but you also need to set up your shader to use the threshold. If you need an example of the math for this (and even Blender's names for some of the operations), look into this post:
https://polycount.com/discussion/comment/2568138/#Comment_2568138
For Unity, you could look into a shader like this where that part of the work should already be set up for you.