The BRAWL² Tournament Challenge has been announced!
It starts May 12, and ends Oct 17. Let's see what you got!
https://polycount.com/discussion/237047/the-brawl²-tournament
It starts May 12, and ends Oct 17. Let's see what you got!
https://polycount.com/discussion/237047/the-brawl²-tournament
Edo-Japanese Scoped Long Rifle [ArtStation Challenge]

polycounter lvl 5
This was my initial concept I had for ArtStation Challenge. I am entering the 3D category and wanted to create my own concept. I had an idea of the 3 props I had to make being able to connect. So I started out with this design; An arquebus matchlock pistol, a cane sword that doubled as an extended barrel and rifle rest, and a medallion with a hidden spyglass that acted as a red-dot sight.

After getting the form the way I wanted from the grey scale, I began fleshing out the different parts of the transforming rifle. I began with the cane sword and had an idea of the sheath having a dragon spiraling down ending with a metal dragon head that also worked as a flash suppressor of sorts. I began receiving critiques of spicing it up a bit. So i added the traditional Katana grip and wrapping. But this began falling away from my idea of the wielder of this weapon. I had pictured an aloof assassin, and this was obviously not an inconspicuous cane sword. It really wasn't even a cane sword anymore.

Going back to the drawing bored, I decided to become inspired by the Zatoichi sword. Had a much more simple and hidden design and was more accurately described as a cane sword. Liking where the design was going, i decided to flesh out the pommel a bit more and was trying to figure out how the rifle rest would work practically. After exploring different ideas and receiving additional critiques, I realized that breaking the silhouette and form of the arquebus to accommodate the rifle rest was feeling too forced.

Going back to my original block out drawings and doing some additional research I found an alternative design that I was much more happy with. I kept the transforming long rifle idea but disposed of the gun rest and medallion red-dot sight. Instead I opted for a more traditional, and historically accurate, papier-mache telescope. The telescope really brought a more tactical and rifle feeling to the design that I was very excited about.

Following the steps that preceded, I began fleshing out the cane sword once again. This time I focused on going much more traditional and naturalistic. I found some references on bamboo cane swords and carved bamboo canes. One reference in-particular featured wrapped tassels that immediately caught my eye and really screamed "traveler" to me.

Getting to this point I decided to ask for additional critiques. Thanks to the guys in 3DFT, who gave some pretty insightful critique, advised me to design the piece together first; if they don't look like they go together, the whole thing falls apart. So that's exactly what I did. In the critique, they thought the bamboo sword stuck out the most and also thought an ivory matchlock would look really nice. So I went with the ivory matchlock and paired it with the yellow bamboo cane. I didn't quite like how the yellow was playing with the ivory so I went with a black bamboo cane. The black and white gave a very refined look to it, so i played off that fact. I was calling it a "simple elegance" since none of these objects were spectacularly ornamented, just enough to make it interesting. After photo-bashing an arquebus matchlock I found online, I began ornamenting it with the imperial seal. I evolved the story to be an imperial assassin, contracted to travel for the emperor on any foreign assassinations. I recreated the scope from a reference I found online and liked the pop of red that was on the scope housing. So I decided to incorporate red as a focal point to guide your eye through the piece. It is not depicted in the concept below, but the final model will include burning red twine that will help bridge the eye between the red tassel and red twine on the telescope.

After finalizing the design of the transformed rifle, I began on making orthographic breakdowns of the individual props. Once again, starting with the cane sword.

Moving on to the Telescope. I had to figure out how to attach the telescope onto the cane sword. I began researching different clips and found a terry clip. Though not historically accurate, I believed it wasn't out of the realm of possibility that an artisan would be able to create this. Additionally, I wanted to have a cross hair, so I came up with a simple solution...create a cap with a cross-hair. Rediculous I know, but I thought that to be the only reasonable solution. The user would, however, be able to take the cap on and off at their discretion and still hide it within the ornamental cap of the telescope. Gold leaf designs were recreated from the reference image.

Finally, the arquebus matchlock pistol. This was fairly easy as I already had high quality images of an arquebus from different angles. Just had to photo-bash the different elements together.

Overall I feel like this was a very successful design and enjoyed every minute of it. I'm very excited to get modeling! Thanks again to the people in 3DFT for the help and awesome critique!
After getting the form the way I wanted from the grey scale, I began fleshing out the different parts of the transforming rifle. I began with the cane sword and had an idea of the sheath having a dragon spiraling down ending with a metal dragon head that also worked as a flash suppressor of sorts. I began receiving critiques of spicing it up a bit. So i added the traditional Katana grip and wrapping. But this began falling away from my idea of the wielder of this weapon. I had pictured an aloof assassin, and this was obviously not an inconspicuous cane sword. It really wasn't even a cane sword anymore.
Going back to the drawing bored, I decided to become inspired by the Zatoichi sword. Had a much more simple and hidden design and was more accurately described as a cane sword. Liking where the design was going, i decided to flesh out the pommel a bit more and was trying to figure out how the rifle rest would work practically. After exploring different ideas and receiving additional critiques, I realized that breaking the silhouette and form of the arquebus to accommodate the rifle rest was feeling too forced.
Going back to my original block out drawings and doing some additional research I found an alternative design that I was much more happy with. I kept the transforming long rifle idea but disposed of the gun rest and medallion red-dot sight. Instead I opted for a more traditional, and historically accurate, papier-mache telescope. The telescope really brought a more tactical and rifle feeling to the design that I was very excited about.
Following the steps that preceded, I began fleshing out the cane sword once again. This time I focused on going much more traditional and naturalistic. I found some references on bamboo cane swords and carved bamboo canes. One reference in-particular featured wrapped tassels that immediately caught my eye and really screamed "traveler" to me.
Getting to this point I decided to ask for additional critiques. Thanks to the guys in 3DFT, who gave some pretty insightful critique, advised me to design the piece together first; if they don't look like they go together, the whole thing falls apart. So that's exactly what I did. In the critique, they thought the bamboo sword stuck out the most and also thought an ivory matchlock would look really nice. So I went with the ivory matchlock and paired it with the yellow bamboo cane. I didn't quite like how the yellow was playing with the ivory so I went with a black bamboo cane. The black and white gave a very refined look to it, so i played off that fact. I was calling it a "simple elegance" since none of these objects were spectacularly ornamented, just enough to make it interesting. After photo-bashing an arquebus matchlock I found online, I began ornamenting it with the imperial seal. I evolved the story to be an imperial assassin, contracted to travel for the emperor on any foreign assassinations. I recreated the scope from a reference I found online and liked the pop of red that was on the scope housing. So I decided to incorporate red as a focal point to guide your eye through the piece. It is not depicted in the concept below, but the final model will include burning red twine that will help bridge the eye between the red tassel and red twine on the telescope.
After finalizing the design of the transformed rifle, I began on making orthographic breakdowns of the individual props. Once again, starting with the cane sword.
Moving on to the Telescope. I had to figure out how to attach the telescope onto the cane sword. I began researching different clips and found a terry clip. Though not historically accurate, I believed it wasn't out of the realm of possibility that an artisan would be able to create this. Additionally, I wanted to have a cross hair, so I came up with a simple solution...create a cap with a cross-hair. Rediculous I know, but I thought that to be the only reasonable solution. The user would, however, be able to take the cap on and off at their discretion and still hide it within the ornamental cap of the telescope. Gold leaf designs were recreated from the reference image.
Finally, the arquebus matchlock pistol. This was fairly easy as I already had high quality images of an arquebus from different angles. Just had to photo-bash the different elements together.
Overall I feel like this was a very successful design and enjoyed every minute of it. I'm very excited to get modeling! Thanks again to the people in 3DFT for the help and awesome critique!
Replies
Beginning block-out and defining shapes
Telescope WIP
Trying to bounce between the three props so I dont fall behind on any one of them.
More blocking out
I'm continuing on with blocking out the general shapes. It's coming along.
Not showing the cane sword because it is just a cylinder right now haha
But I'm determined to get these 3 props knocked out!
As always, C&C is more than welcome
Gold Leaf Pattern
Went ahead and made a detailed stencil for the gold leaf that will eventually go on the telescope.
REFERENCE:
Gold Leaf Pattern (Texture Visualization)
Just getting a feel for the materials, colors, and what I want it to look like.
Some High Poly Work
Getting some high poly stuff done. Still need to work on the ivory handle a bit more before moving on to that, but these pieces were all ready to go.
More High Poly Work
As always, feel free to leave C&C below!
More High Poly Work #2
Just did some optimization to the topology and cleaned a few things up from some critique I received.
Matchlock Mechanism and Decoration
Finally modeled out the match arm and I'm pretty happy with how it turned out. Also made some time to model out the small imperial seals. Will probably begin work on the large seal on the handle tomorrow.
Final Stages of the Matchlock
I believe I am at a good stopping point for the high poly of the matchlock. Will come back later to add the tassel and fuse.
Base High Poly Props Almost Complete
Sorry this update took so long, the last week has been super busy. But i managed to squeeze a little bit of time in. Still need to add/fix/tweak a few things but the base HP are pretty much done. I still plan on taking these props into zbrush and sculpting some fine detail to really make it stand out.
Transforming Long Rifle:

Bamboo Cane Sword:

Paper-Mache Telescope:


"Small" Update - Tassel
So this may seem like a pretty small update, but let me tell ya, this was a pain haha
I went through many different iterations and ideas after some critiques and finally arrived at this.
I'm pretty happy with how it looks but we will see haha
Let me know what you think!
Bamboo Detail and Matchlock Engraving
Pulled these into ZBrush and managed to get some sculpting done with them. Pretty happy with the result.
Engraving Visualization
[This is for visualization purposes so disregard the scale of the barrel itself (mine is about 1/3 shorter).]
Looking back at the engraving, I'm not happy with it. So, I thought I would give myself a clear concept for both the design and textures.
How did you make all the fabric stripes ? Very good work by the way.
There might be an easier way than how I did it but,
1) I first created a Spline with the curvature I wanted.
2) Then I created a Cylinder with a PathDeform(WSM) modifier to follow the spline I had made.
3) After this step I go back to the cylinder and play with the diameter until I get the right thickness. At this step you can also go back to the spline vertexes and change the shape if needed.
4) After having the shape I want, I group the spline and cylinder together [THIS IS VERY IMPORTANT]. I then go to a top-orthographic view and adjust the pivot of the cylinder off-center, specifically where you would want the center of your tassel to be. I just eye-ball it but you could also use another cylinder as a guide.
5) After having the pivot off-center, with the grouping selected, go to Tools > Array. An Array panel will appear. Switch the Rotation row to Totals and under the Z column, change the value to 360. Array Dimensions should be set to 1D. At this stage, I don't worry about the count, I just want to make sure what I have yields the results I want. Clicking Preview will give you a look at what your tassel will look like before finalizing. No worries though, this is easily undo-able if you hit OK.
6) Now that I have correctly transformed my cylinder, I can now start adjusting the Count. While Preview is still active, adjust the Count. You will begin to see more cylinders being duplicated around the pivot you placed. Adjust the Count until you have the density you want. It's all dependent on the radius of your cylinder, but for baking purposes I made sure they had some space in-between them. Don't worry as much about the top of the tassel as the body, since the top will be covered by the "bulb".
7) So this is looking a bit too straight and narrow, to fix this, simply undo your rotation and adjust the pivot to the top of your cylinder. Then rotate slightly outward to give it a bit more volume.
9) Now that you have some directional variation, now is time for height variation. Tassels are generally pretty flat on the bottoms, but you need some variation to keep it interesting. This needs to be very subtle, not too tall or short. Keeping the pivot at the top of the tassel, move your camera around the piece selecting cylinders to either squash or stretch.
10) Lastly, you go back to the bottom-orthographic view and start cloning and rotating cylinders inward until you fill out your tassel. There's no specific way of doing this so just go at it and try to have as much variation as possible. It doesn't have to be packed, just enough to get the point across and to look believable from a distance.
DONE!
The top "bulb" section is practically the same process, just follow steps 1-6 with a spline or 4-6 with half a torus.
This was just my way of going at it and you may want a different look to your tassel, but this work flow allows for a lot of customization. Since we never collapsed the cylinders, you are free to manipulate the flow of individual strands as well as increase or decrease the radius of your cylinders to make the strands thinner or thicker.
Hope this helps!
Low Poly retopo complete!
Long time no see guys, had other work to do over the weekend but I still think I can make it to the finish line! Here are all 3 props retopo'd and ready for unwrapping.
The final poly/tri counts:
Prop Poly Count Tri Count
Scope 3,777 7,440
Matchlock 5,428 10,175
Sword 6,064 11,973
Long-Rifle 14,489 28,137
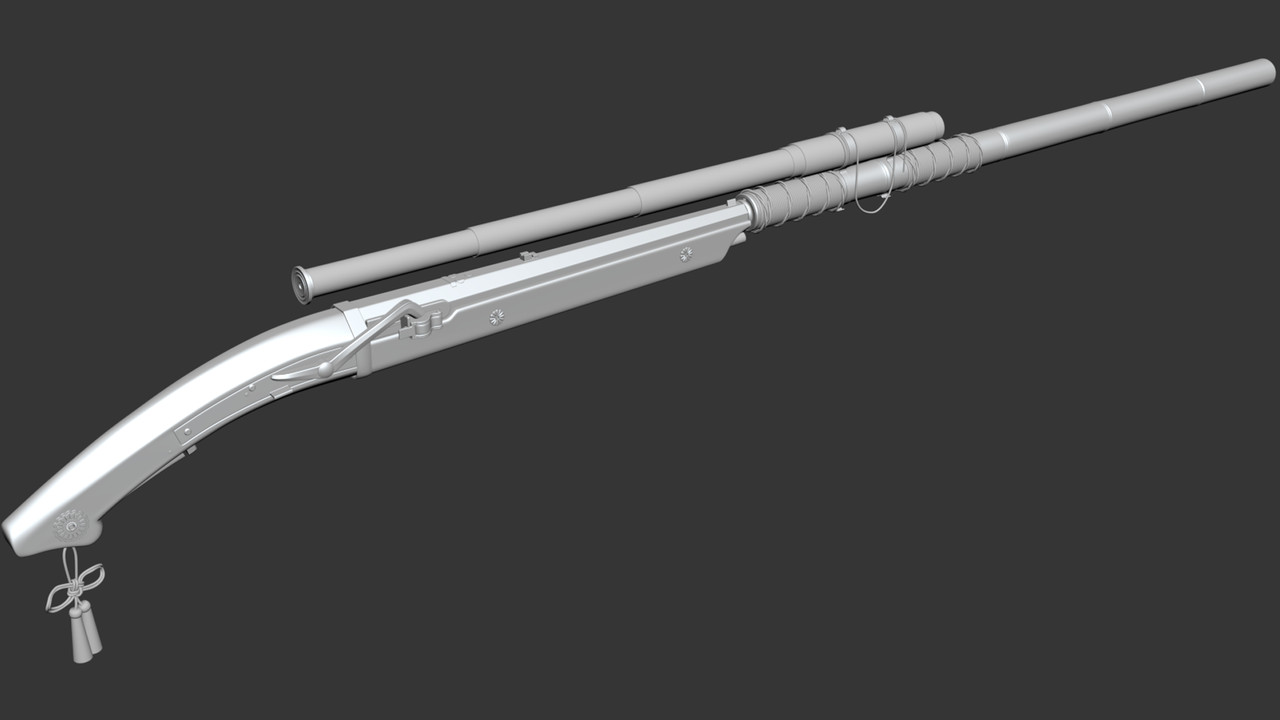
Combination Long Rifle "Whisper in the Wind"
The design is based off an original concept I had made for the challenge.
I love multipurpose weapons and things that lock together to create something new. Working on the Shogunate ArtStation Challenge, I thought it would be a fun idea to try and connect all 3 of my props together to create a single item/tool. After many concepts and iterations on the idea, I arrived at this final design. The sheath of the cane sword has an internal barrel that has a "key hole" locking mechanism that attaches to the end of the pistol. The scope can snap onto the "extended barrel" of the rifle with bronze terry clips as well as having a bronze cross hair that is concealed within the cap of the scope.
Poly/Tri Count:
Papier-mâché Telescope - 3,777 / 7,440
Ornate Arquebus Pistol - 5,428 / 10,175
Bamboo Zatoichi Cane Sword - 6,064 / 11,973
Combination Rifle - 14,489 / 28,137
Textures:
2:1; 3x 4096x2048
Ornate Arquebus Pistol
The ornamentation tells the story; the Emperor is protected by the Tokugawa as depicted by the imperial seal on the handle. The wielder, who is part of the Tokugawa clan, shields and protects the Emperor by gripping the handle. The Tokugawa seal engraved on the barrel is in front of the Imperial seal, representing the line of defense the Tokugawa holds for the Emperor as well as the military influence the clan possesses. The clouds on the barrel represents the higher power of the Emperor and how close the Emperor holds the Tokugawa to himself. Finally the cherry blossoms, representing the many journeys the Emperor sends the wielder on.
Poly/Tri Count: 5,428 / 10,175
Textures: 2:1; 1x 4096x2048
Bamboo Zatoichi Cane Sword
Poly/Tri Count: 6,064 / 11,973
Textures: 2:1; 1x 4096x2048
Papier-mâché Telescope
The design is based off of reference material authentic to the time period.
Poly/Tri Count: 3,777 / 7,440
Textures: 2:1; 4096x2048