Wakko's Poly Disaster
polycounter lvl 17
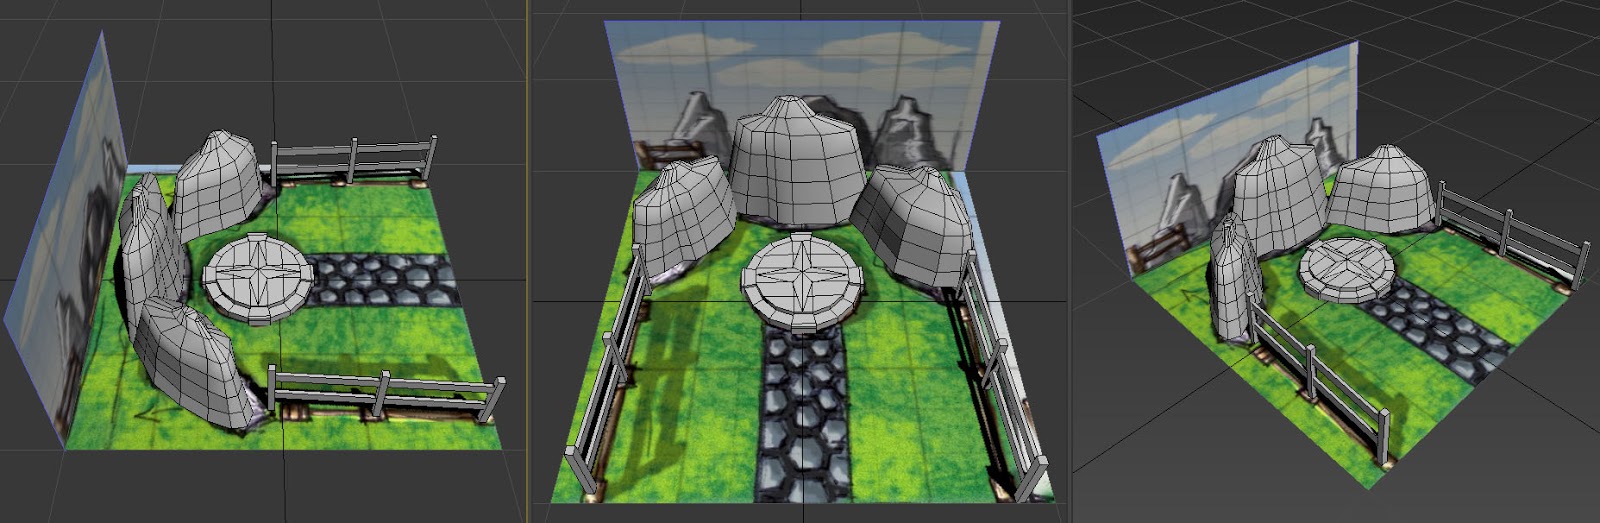
Here is a project I started over the summer and lost traction on. Its going to be a spawn point for new player characters.
Here is a quick sketch for a layout.

Figured I may try and use Sculptris and sculpt out the rock formations, and 3D Coat for re-topology and getting a normal map. I've only messed around with sculpting a few times before and I have never done re-topology or normal map making before. I picked up 3D Coat when it was on steam for cheep. Between using 3D Coat and Sculptris the few times that I have, I enjoy using Sculptris for sculpting more.
I am also not the greatest of texturers so it will be interesting to get a good gold texture down. Ultimately I wish to show this off using the Untiy3D engine.
Here is a block out from Studio Max with my sketch in as refernce.
Also I have the w.i.p. posted here to help me keep better track of what I do and how long its been since I have done the last thing! Whats the common internet etiquette for posting for posting these on the blog then re-linking them to this or any other site?
Thanks!
Crits \ Comments \ Jabbering welcome!
Here is a quick sketch for a layout.
Figured I may try and use Sculptris and sculpt out the rock formations, and 3D Coat for re-topology and getting a normal map. I've only messed around with sculpting a few times before and I have never done re-topology or normal map making before. I picked up 3D Coat when it was on steam for cheep. Between using 3D Coat and Sculptris the few times that I have, I enjoy using Sculptris for sculpting more.
I am also not the greatest of texturers so it will be interesting to get a good gold texture down. Ultimately I wish to show this off using the Untiy3D engine.
Here is a block out from Studio Max with my sketch in as refernce.
Also I have the w.i.p. posted here to help me keep better track of what I do and how long its been since I have done the last thing! Whats the common internet etiquette for posting for posting these on the blog then re-linking them to this or any other site?
Thanks!
Crits \ Comments \ Jabbering welcome!
Replies
Made some progress on the rock formations tonight. Started out in Studio Max with some simple geometry then added some displacement to get it looking more rock like.
Then imported it into Sculptris to add some more detail.
And a quick shot form max with the rock formations in place.
Next up is figuring out how to use 3D Coat to re-topo and bake a normal map. Any tips?
Crits \ Comments \ Jabbering welcome!
Did some thinking and even thought I want to get into sculpting more and retopo and learning that pipeline, this may not be the project for it. I think I may try and develop my texturing skills. My current texturing process is grab real life texture, make it tile-able and use that.
This model will be my gateway into creating a town. So buildings like an inn, town hall, small assets to place around town.
I had been playing this game called Wakfu over the summer and I enjoy the art style. I went around in game and grabbed some screen shots of rocky formations, grass and a fence as well as found some works online.
Got a simple formation done tonight to get some progress going again!
Crits \ Comments \ Wakka Wakka welcome!
basically whatever type of rock you choose you could add strata of some sort:
there's so much variety in how sedimentary rocks make different patterns, when i really wanted to learn how to make rocks better this was what helped me wrap my mind around the weird shapes. Keep it up!
also did u make this?
beautiful
Yeah I made that platform also over the summer on my Wakfu kick. I was also going to try and get that into Unity. But I was unsure if I should be setting up the grass cards in Studio Max Like in the screen shot or if I should do it in Unity. Slightly new to the game engine scene and what best work flows are to be used.
Moving along on this, creating different types of rocky tiles as well as the walkway path tiles.
Will have to unwrap and texture these up. Any tips for unwrapping?
Here is a shot of the layout in studio max.
And a shot from inside the Unity engine.
Crits \ Comments \ Wakka Wakka welcome!
I brought one of the rock objects into 3D Coat and learned how to use those unwrapping tools. Tried texturing in 3D coat as well, but didn't end up liking how sometimes the brush would paint and sometimes it wouldn't depending on the view angle,
Imported the object back into Studio Max and tweaked the Uv's a bit to clean them up. Painted the texture in photoshop and just jumped between programs to check progress.
Attempt 1 on hand painted rocks.
Here is the UV layout and the texture so far. The empty space is left over for when I get around to doing the ground tiles.
Crits \ Comments \ Wakka Wakka welcome!
round rocks like this would only be seen as pebbles in a stream or around water but usually rocks are quite hard edged
Did a couple more texture passes on the rock. My second attempt Started off hand painting then ended up using some photo manipulation. It looked better than my first attempt but I still wasn't thrilled with it.
Went back for a third attempt. Took some of the layers I was working with from the second round and brought them with me. I was much happier with this result.
Got kind of tired of working on rocks, so I started working on my ground textures. Went through a couple iterations of grass and dirt before I got to something I liked. Also unwrapped the walkway tiles and put a quick color base on that. Here is what it all looks like in Unity.
For the grass cards, do I lay those out in Studio max? Or is that something I do in Unity? I usually use the forest pro plug-in in studio max for our renderings. Is there something like that for Unity?
Here is a screenshot on how the scene is shaping up.
Crits \ Comments \ Cookies welcome!
Been playing with how to setup grass in unity. Made a couple of "minecraft" style blocks.
The one on the right I added the grass in Studio Max. I noticed that when you bring these in Unity only renders one sided polygons. I found a shader that turned these into two sided polygons, however it seems to render the back side in black. I like that the grass cards cast a shadow, but not a fan of how the back side of the grass is so dark.
The other block I created a small Unity terrain and, using the same grass cards from Studio Max, painted in the grass with Unity's terrain tools. I like how easy and full the grass now looks and how easy it is to add extra models. Also that I can make the grass animate slightly, but am not a fan of how there are no cast shadows and does not have much depth. I am also not sure of the poly count impact of this method as well. (not that I have any poly count issues in mind at this point.)
Maybe these are just issues with my noobness of Unity. Are either of these a good direction? Is there another direction I'm missing?
Put together the scene with the grass cards placed in Studio Max. Here is what it looks like in Unity so far.
It seems like some of the grass cards are casting shadows and some are not. I'll have to put the scene together with blocks using the Unity terrain for grass and see how that looks.
As always Crits \ Comments \ Cookies welcome!
As always Crits \ Comments \ Quesadillas welcome!
Started this head sometime last week. Haven't gotten the hang of sculpting so this is good old fashioned poly pushing.
Did a quick cylindrical unwrap of her head and textured. I find that the SSS material in Studio Max is pretty forgiving on the texture. Anyway to achieve this look in Unity3D?
Didn't add any detail to the ear since I'll be covering it up with hair.
Spent a good long time putting in hair guides and styling the hair. I am not a fan of the Hair and fur modifier in Max So I went the poly rout. I made a few different sized hair strips textured with an alpha. I then took those strips and used a path deform to get the hair in place. Then added more guides and strips to fill in where needed.
I had read that she voiced Supergirl in Superman: Unbound, and had thought about giving her a Supergirl outfit. After spending hours on her hair I had thought of another superhero to go with. I am a fan of the old Teen Titans animation from cartoon network and though Starfire might be a good fit here.
I think I would like to go with a re-design on her armor. I'm not the biggest fan of her other more swimsuit looking costumes.
As always Crits \ Comments \ Aardvarks welcome!
I am still having issues setting up grass. First up is the grass setup in Studio Max. The grass just looks weird and you cant tell that things are casting shadows down onto the grass.
Next up I spent a good amount of time attempting to use the Unity3D Terrain. First I tried setting up a mini Terrain for each block and found that when I copied a terrain any changes I made happened to both. So I had to start from scratch for each block, reset all the settings and re-import the detail meshes. After I got a couple setup I started duplicating those and snapping them into place. Well having all those terrains seemed to be a pretty big resource hog So I decided to go with one terrain for the whole location.
I like the volume that this shows off and how the fences and other objects shadows are visible on top of the grass. It still feels like its lacking some depth and some of the grass and flowers painted on the other side of the Terrain. So they are upside down going under the ground mesh.
Maybe there is another method to setting the grass up that I'm missing?
As always Crits \ Comments \ Aardvarks welcome!
Crits \ Comments \ Burritos welcome!
I think the wood fence posts are reading a little too flat. They may look better with some more baked in lighting with the textures.
Starting an Inn following the Hero Spawn Point. Started off creating exterior brick wall tiles for the first floor. Then created window and door cut outs and a corner section. Next I created wood floor tiles and tiles with edge trim to fill out the first floor.
After creating those I used assets from the spawn point to lay out a plot for the Inn. I will use the opportunity to create some bushes and trees for landscaping, and maybe a well.
And Finally the first floor exterior layout.
Next up is to create doors, windows, the first floor interior wall layout and trim.
Crits \ Comments \ Burritos welcome!
Crits \ Comments welcome!
Bit closer up on the floor.
Also got my first floor laid out. Pretty packed in with 4 guest rooms and a wash room. Sorry peeps, no showers here!
Probably get some of this textured up and figure out what all this baking normals is all about. Then move on to the second floor and get a roof on this sucker.
Crits \ Comments \ Dictations welcome!
I read an article a couple weeks back that a live action Teen Titans is possibly in the works. Thought I would try and refine this character some more. Started by tweaking some textures. Giving her a more orange hue to her skin and Redder hair as well as changing the eye color to green. I might push the orange a bit more in the skin.
Started unwrapping and textureing the outfit. First in Studio Max then I took it over to 3D Coat when I wasn't getting the results I was looking for. Gotta say 3D Coat makes unwrapping pretty simple! Currently I have only unwrapped the top in 3D Coat. I will most likely take the rest of the outfit there as well.
Mostly Blocking out colors for cloth and Metals and trying out some superhero hexagonal texture. I think I'll reduce the size of the hexagons.
Crits \ Comments \ Educational Guesses welcome!
I did have the chin area a bit too narrow. I also tweaked the mouth and a few verts that had inadvertently welded together when I added a symmetry modifier. And a shot with the current texture.
I cleaned up the UVW's and some of the face mapping. I still find the SSS shader in max to be incredibly forgiving on the texture.
Crits \ Comments \ Fig Newtons welcome!
I ended up wrapping the hexagon texture over another UV channel then baking it so I could use it in Photoshop as a layer. I also used this method to help get rid of UV seams. Current wire frames:
Currently rendering with mental ray using a SSS material for the skin, Arch and Design for the clothing and eyes, and standard material for the hair. I pushed the orange on the skin and gave the sclera a greenish hue to match the Starfire character more.
Tried getting the character into the Unity 5.0 beta to check out the materials and lighting. Heres how she looks in the engine:
Right now I'm using the standard shader and trying to make due with that. However the spec maps come off way too powerful, I assume spec goes in the Metallic slot. I think It looked better in the emission slot. I put the bump map into the Height map slot, but that just seems to stretch the texture weirdly when turned up. I popped the regular diffuse into the occlusion slot to darken up the texture a bit.
Might move on to rigging and get a decent illustration from this character. Any pointers on rigging that much hair, and make it work in engine?
Crits \ Comments \ Grievances welcome!
The 3D visual team at work has been pushing towards getting into more interactive projects. I have been leading the charge since I have always found interactive media interesting. Back in collage I took a few courses learning Macromedia's Director and learning the Lingo scripting language that went along. Of course it turns out that I should have taken Flash and ActionScript as that became more popular during that time. I did do a couple of project presentations, for work, where I picked up Flash and ActionScript a few years ago. And now Flash is fading away as well.
On to Unity3D and picking up c#. If my current trend holds these will also be gone within four years or so. (Fingers crossed, I hope not!) I have jumped into a few projects using Unity to try and get others at work interested in the tech and see the possibilities. One thing I was not sure I could pull off but greatly wanted, if these interactive projects get off there ground here at work, would be at least a rudimentary traffic system.
I started with a simple diamond interchange, as most of our projects deal with interchanges.
The car models are part of works library of models that I had to tweak so the tires would rotate while the cars were moving.
I started off getting a car to follow a waypoint system with much help from Christopher Cherubini's waypoint script on the unity forums. Even with the script explained in an amazing amount of detail I could get the car to go through a series of 8 waypoints, where at the end, it would then pick a random waypoint to travel to and continue randomly picking from there.
At a lan party a couple weeks ago I sat down with a programming buddy of mine, Jim Dunne, for about 12 hours straight hashing things out. First thing we did was just get the car traveling down a waypoint chain, and when it got to the end it teleported back to the beginning of the chain. From there we moved on to populating a set number of cars per chain and controlling speed limits based on passing through waypoints. The cars soon got the option to jump from one waypoint path to another. and then collision detection came into play. By about 430 am Sunday morning we came up with this.
Sorry for the awful camera controls! I cannot recall what every bit of code that Jim did to get to this point,but this was pretty awesome.
I spent the next couple days rigging up the rest of the cars, about 33, to go in as well as figure out how to randomly generate from the stash. Each car now has head lights and tail lights attached. (have not gotten around to getting lights to work)
Yay! Cars have a bit more randomness to color and type now! and the camera is now click to drag to look instead of stuck to mouse look.
From here I had started thinking about traffic control and getting lights to work. I took some of the waypoints and created a timer that worked like traffic lights do. Only in this instance green lights run for about 6 seconds and yellow lights for about 2.
Well I had a hard time figuring out where to go from from having the waypoints changing colors to actually getting the traffic to stop. So I ended up doing a bunch of visual upgrades to the scene. I started adding street lights and figuring out the best way to add the road grease and so on. At some point during this I had a thought that the cars detected each other, at least if there is a car in front of itself. So I had the intersection controller tell the waypoints that when they were red, they were cars. Had to do a bit more monkeying around with Jim's drive code, but I eventually got it to a point I'm pretty happy with.
I will probably do a bit more with this. Add to the landscape like some trees, a gas station, shopping strip. Would like to add in a night button to see how this performs with all the car lights and street lights and what not.
Any way here is the latest clean build and a few more screen shots.
Crits \ Comments \ High Fives welcome!
Still have to place lot lighting yet.
Currently I have spent the most time on the gas pump shelter. Also need light fixtures on the shelter itself.
The car wash and convenient store are still pretty rough. I'll start roughing in some interior bits and see how far I want to take them. Still trying to get the hand of materials in Unity. Have to play with texturing all around. No new build yet. I will put out a new one when I get the gas station to a more finished state.
Crits \ Comments \ Inquiry's welcome!
Fixed the hands that were bugging me. Although they had about the right shape they were a bit too low poly. Also fix some loops in the face as well as put in full eyes as opposed to a textured in eye. And finally got around to making her side pouch.
A shot of her on the platform in the Unity engine. Ill have to see if i can get my hands on any toon shaders for Unity.
Crits \ Comments \ Jellybeans welcome!
I just settled on using CAT, but had issues setting up independent rotations on the head and chest. If i clicked the option off in setup mode it looked fin until we went to animate mode, then the rig would just fold in on itself. I finally went through enough of the settings , a check box about additive to pose or something, that stopped the rig from doing that.
Once that was too my liking I finally got around to skinning. I think this is probably one of the more frustrating parts of character animation. I started off my 3D career rigging in Lightwave 3D, but we never got int to weights or skins or such. 3DS Max's auto skin setup was pretty bad. I ended up 100% weighting all verts to the pelvis then going bone by bone from there. I also tried a simple face rig and a simple bone chain for the hair as well.
If anyone has any good tutorials for skinning, please share!
Anyway, on to animation! I went in game and grabbed a few screen shots of my character in an idle pose. Found that the characters randomly settle into one of three poses.
Once in the pose the character had no other movement. So I posed her up and gave her a looping "breathe" animation for each pose. It is always a challenge to be more subtle and not have too much bouncing around. I grabbed some Gifs from Max for fun.
I brought the character into unity and setup the camera to match the game and gave it some interactivity to swing it around the character. I also learned a bit about using the Animator component and created a c# script to randomly switch between poses at random amounts of time. Anyone know how to embed a unity webgl thing? Anyway here is a >> LINK << to it.
There are a bunch of other emotes in the game, and I remember getting a few when I first started. I want to get as many of those into the mix and maybe get the sounds as well.
5/27/2016
Converted a engine and passenger car into a Star Wars worthy style train / tram.
Some in engine shots as well as the beginnings of how I want to light the scene:
On to finalizing the scene and character creation!
5/30/2016
Using an already created character as a base and creating more Star Wars type clothing.
Finalizing the character design and applying a very crude CAT Rig:
On to texture, posing and finishing the illustrations.
5/30/2016
T- 60 minutes to the deadline:
Getting the character in engine and posing:
5/30/2016
T- 20 minutes to the deadline:
Got two keyframes shot and a mini story to set them up.
Here we find our unlikely protagonist, a journalist catching the red eye tram to the space port heading off to Tatooine to write a "fluff piece on the benefits of moisture farming. A fluke turn of events has her writing a completely different story in a galaxy far, far away!
Shot 1:
Shot 2:
The end.
Crits / Comments welcome!