Home Technical Talk

Bake advice

solidshark91493
polycounter lvl 6
Offline / Send Message
solidshark91493 polycounter lvl 6
Hi, I was recommended by Eric Chadwick to post my weapon again because I'm determined to finish it but I'm stuck where I am. 

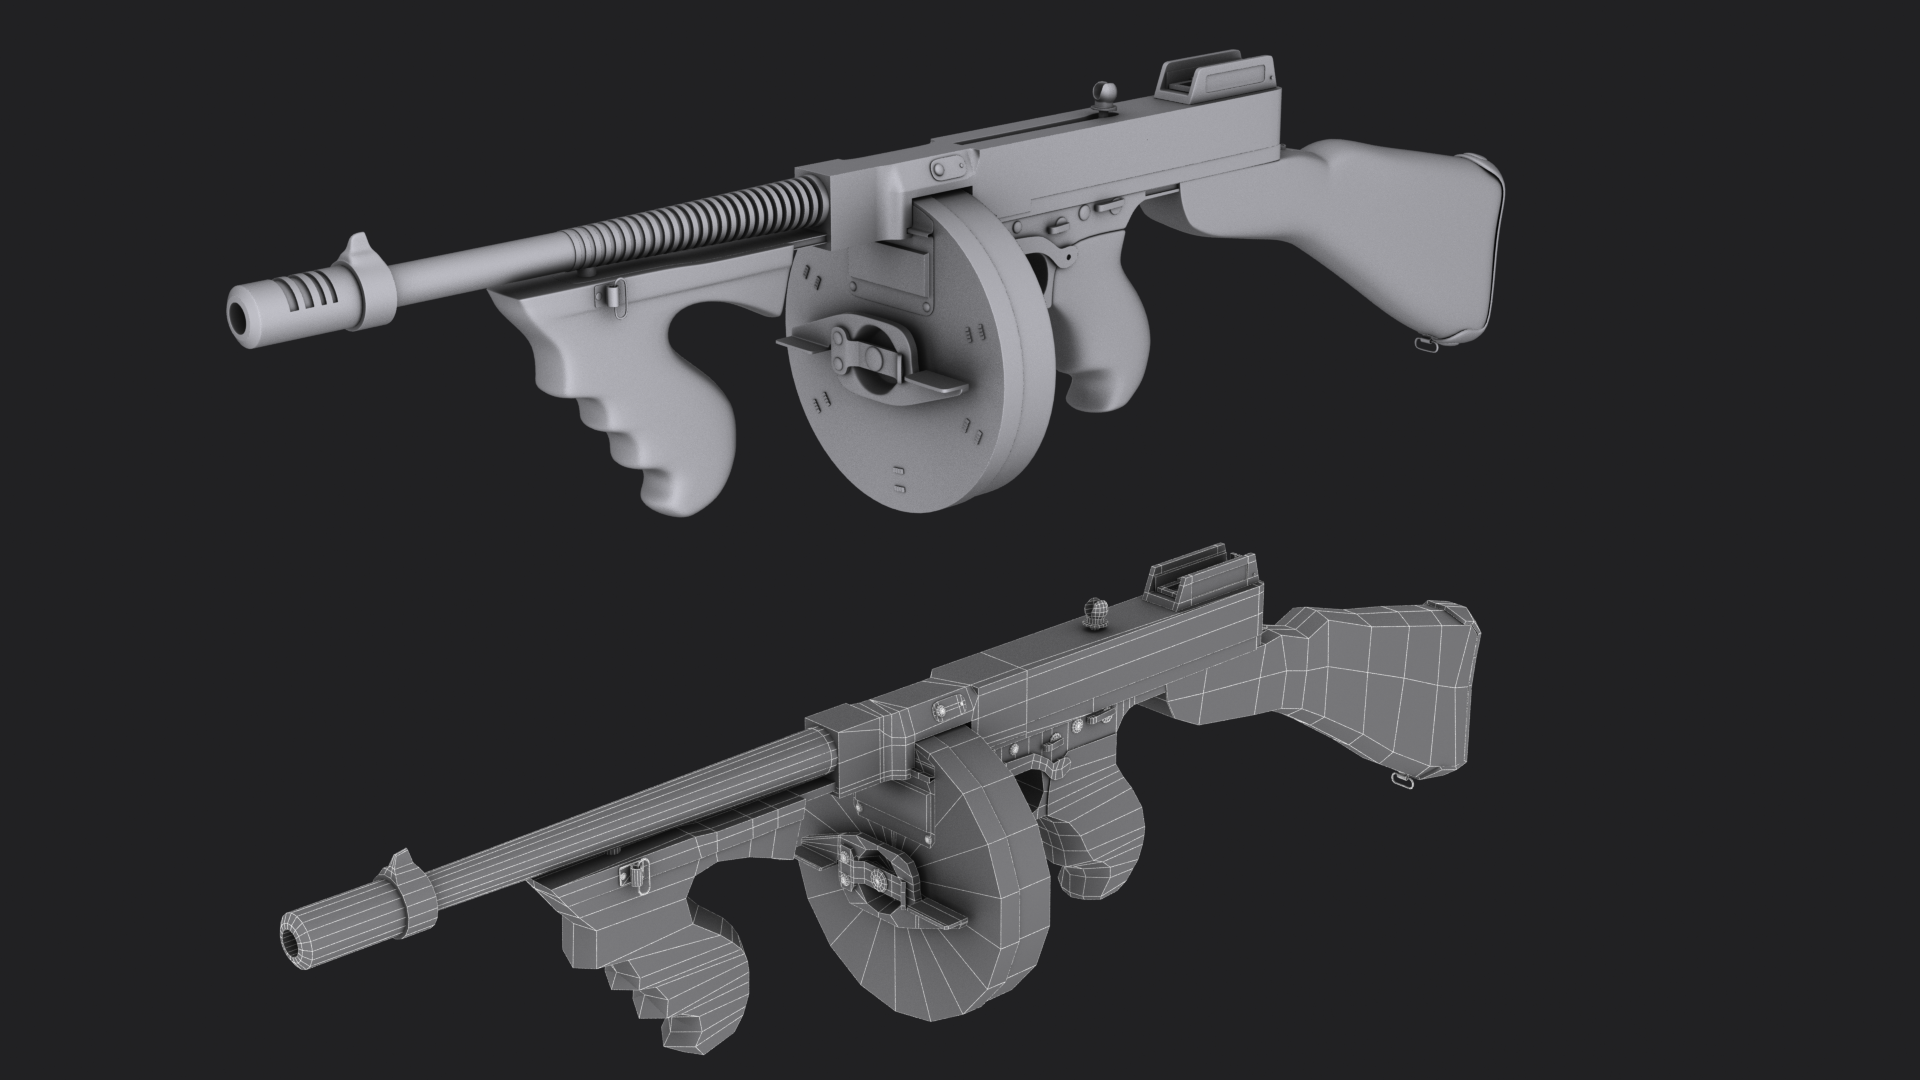
High poly is completed.
Low poly is completed. 

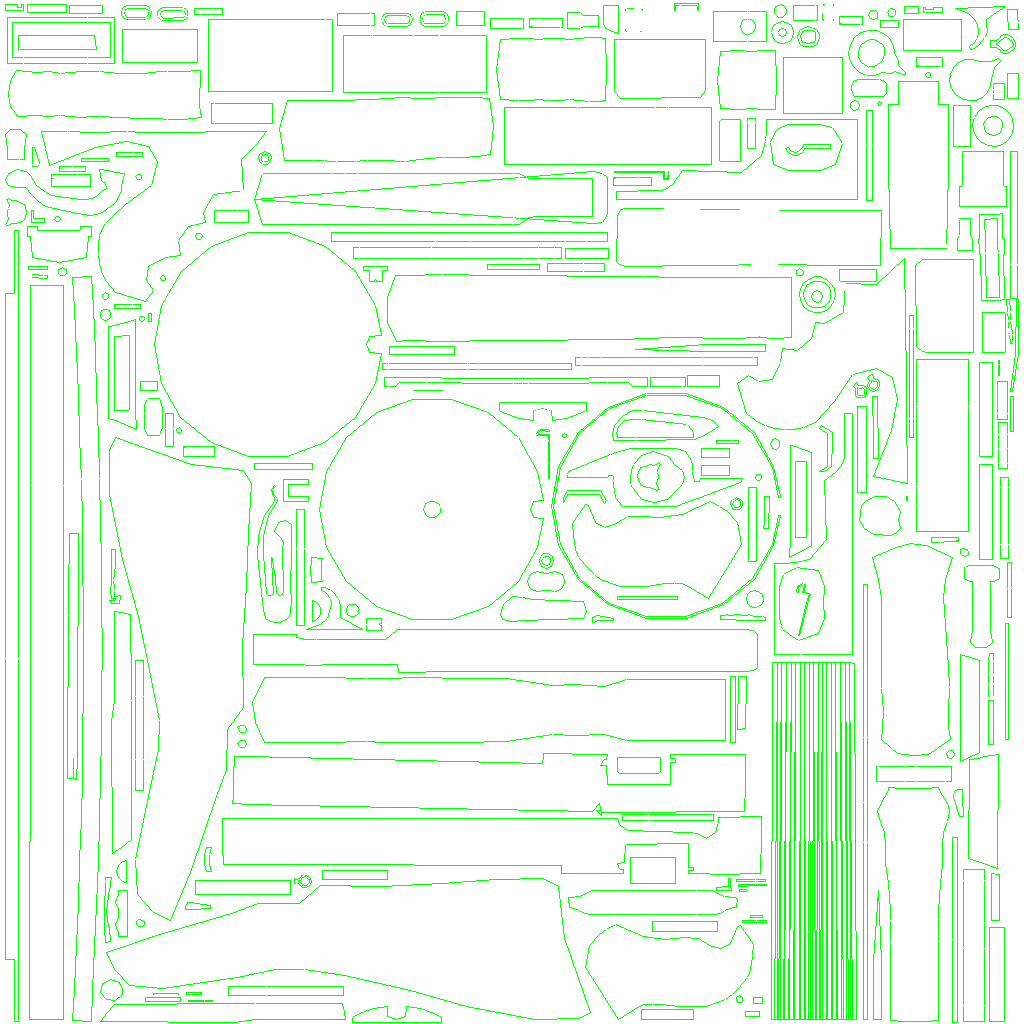
I have unwrapped the low poly to the best of my ability and tried to pack it. 

Things I  haven't been able to figure out / wrap my head around is:

1. Smoothing groups. yes or no?  Whats a general rule to set them correctly? I've looked through sticky posts and threads and I'm still pretty confused.

2. Not sure if my low poly is.. good enough? Or made properly.

3.  Is my unwrap okay? I don't know what makes a good unwrap. I assumed as tightly packed as possible to make the best use of the UV space. I also tried to make sure the parts were sized correctly. I forget what its called. But so that each piece is the size it should be on the UV map. I also have plenty of pieces that are re used so I could overlap them but I don't really know how to do it. Also trying to make things straight was a challenge at times.. some still isnt. 

4. Cage: Whats the best method to do this properly? 

5. Bake methods, I've tried to explode bake, which is easy enough. But if I lose the modifier to put it back together its a instant pain. A EAT3D tut I saw he did color baking, each intersecting part was colored different so it would bake by color and nothing would overlap.  Whats the best option for something with for example, my gun. It has 60 parts. 

6. Render settings. I've seen a few different ways of doing baking setup. Lights etc. So  any tips or advice is appreciated.

7. Lastly but slightly unrelated to baking, is what maps do you use for what? Theres so many different ones Id like to learn what they are all for. 

Okay so heres what he suggested I post:
High poly is on top, Wire frame low poly on bottom. 


And my Uv map for the low: 
Replies

  • Bek
    Options
    Offline / Send Message
    Bek interpolator
    1. Be more specific — what from this thread did you find confusing?
    2. Any deficiencies will become pretty obvious after a test bake, otherwise it's just experience/applied knowledge/knowing what works.
    3. It's not terrible, but there are some improvements you could make. To avoid aliasing, you should try to straighten pieces as much as possible without causing too much distortion. With large round thing pieces, like the trim of the drum mag, you should straighten that to save space and make packing easier and avoid hectic aliasing, though at the cost of some distortion. The term you're looking for with island relative size is 'texel density'. Overlapping can be done with snapping but it's likely easier to work with a mirror instance or some sort of cloned geometry, not sure what the Max terminology is. Just remember to offset the overlapped pieces by +1 in U or V so they're ignored when baking. (Or just bake without the mirrored pieces if possible)
    4. Some kind of 'push' method; that's all that should be needed.
    5. I believe the max term for that is Material ID baking..? Where parts are matched to other parts and ignore non-matching to avoid having to explode. Or explode by keyframes or something.
    6. no comment
    7. Specific examples? Googling them should answer this. The most commonly baked maps for game art are tangent space normal maps and ambient occlusion.
  • solidshark91493
    Options
    Offline / Send Message
    solidshark91493 polycounter lvl 6
    Bek said:
    1. Be more specific — what from this thread did you find confusing?
    2. Any deficiencies will become pretty obvious after a test bake, otherwise it's just experience/applied knowledge/knowing what works.
    3. It's not terrible, but there are some improvements you could make. To avoid aliasing, you should try to straighten pieces as much as possible without causing too much distortion. With large round thing pieces, like the trim of the drum mag, you should straighten that to save space and make packing easier and avoid hectic aliasing, though at the cost of some distortion. The term you're looking for with island relative size is 'texel density'. Overlapping can be done with snapping but it's likely easier to work with a mirror instance or some sort of cloned geometry, not sure what the Max terminology is. Just remember to offset the overlapped pieces by +1 in U or V so they're ignored when baking. (Or just bake without the mirrored pieces if possible)
    4. Some kind of 'push' method; that's all that should be needed.
    5. I believe the max term for that is Material ID baking..? Where parts are matched to other parts and ignore non-matching to avoid having to explode. Or explode by keyframes or something.
    6. no comment
    7. Specific examples? Googling them should answer this. The most commonly baked maps for game art are tangent space normal maps and ambient occlusion.
    1. I just dont quite understand what to do, like. Hard edges, if you split your uv's at hard edges wont you have like 400 pieces? And how do you know if youve done it right? I guess I need a simpletons version of how to do it. I want to understand it but I just dont yet. D:
    2. I can try a test bake here in a bit.
    3. Improvements? such as? And yes! texel density. 
    4. Fair enough.
    5. Yes, that. I might try that. 
    6. I think just a skylight, and I think it only needs that for.. one map. A light map or something.
    7. I can do that. 

    Thanks for the help so far, So what do you think I should do from here?
  • JedTheKrampus
    Options
    Offline / Send Message
    JedTheKrampus polycounter lvl 8
    You don't split your UVs at hard edges, you (optionally, where it makes the lowpoly look more like the highpoly) make hard edges where there are UV splits. If you put a hard edge anywhere but a UV split, you'll get a rendering artifact along that edge.
  • solidshark91493
    Options
    Offline / Send Message
    solidshark91493 polycounter lvl 6
    You don't split your UVs at hard edges, you (optionally, where it makes the lowpoly look more like the highpoly) make hard edges where there are UV splits. If you put a hard edge anywhere but a UV split, you'll get a rendering artifact along that edge.
    Hm, have an example of a "do" vs a "dont"?
    I might after this (or maybe during) try to make a simpler object to better understand the process. 

    I did a test bake. I did the material ID bake. Set each piece to its own color in the material ID on the high and on the low so they matched. Then set a cage, reset it. And pushed it out a bit. Then did a bake. I did a normal map, a diffuse, and a light map. (These were the ones the old tutorial I watched did).
    Heres the results. 

    Normal ( I think it looks really weird and off compared to the others..) 


    Light map:


    Diffuse:


    So, whats a good way to attack this? I think the cage isnt set right on a few parts. But idk.
  • Scruples
    Options
    Offline / Send Message
    Scruples polycounter lvl 10
    Your normal map is faceted all over the place and you have some ray misses, ray misses are fixed easily enough (adjust your cage). But that faceting...check to make sure your smoothing groups are set properly (only on uv edges).
  • solidshark91493
    Options
    Offline / Send Message
    solidshark91493 polycounter lvl 6
    >.> Grr. On the low poly correct? is there an easy way to go about it? Like I said Idk how to set them properly as you can see. D:
    Thanks again for everyones help. Its a learning curve and its steep for me. 

    Edit: While I waited for replies I decided to try something, while it may not be the correct way, I think it provided excellent results!
    I went to the low poly, (my groups were gone and it had 30+ groups on it) Selected the polys, and auto smoothed it. Then reset the cage again just in case. And re baked. Heres the result:

    Normal:


    Light map:


    Diffuse: 

  • Shrike
    Options
    Offline / Send Message
    Shrike interpolator
    Have you auto smoothed the individual UV islands or the whole mesh ? 
    Also just slap it onto your 3d model and see how it looks ? That should always be the first step after checking the texture itself for obvious errors. (theres btw a split onto the back side of the grip? that should not be there - somewhere right middle, blue) 
    Just look at it on the mesh and you'll see, and go through errors step by step.

    Btw some things are way too low poly, like the magazine, stock etc, that won't look good.
    Just taking the same mesh as for your highpoly is not the way to go, it will contain unneccesary loops but be too lowpoly in general to look best. Make sure your silhouette is flawless even without a normal map for best results.
  • ekul
    Options
    Offline / Send Message
    You should definitely have a read through the threads on normal maps and baking written by Earthquake, found here in Tech Talk. Also get TexTools if you don't have it already, it's a free Max texturing plugin that has an automatic UV splits to smoothing groups generator which will help take the guesswork out of it for you while you learn.

    UVs were a very steep learning curve for me too and the thing that helped me was not overthinking them (and making full-use of a checker map to check for distortion). Look at your object and pick out the flat surfaces, these can be handled by a quick planar map. Straighten these as needed. For more organic or rounded forms, unwrap them as a whole with a projection map for example and have a look at where the distortion is worst. If the distortion can't be remedied by tweaking edges in the UV editor then add a seam were appropriate, i.e. somewhere that isn't obvious to the viewer and that rids the UV islands of distortion.

    I'm not that experienced but like I said I've had trouble with UVs as well and these points helped me.
  • solidshark91493
    Options
    Offline / Send Message
    solidshark91493 polycounter lvl 6
    Shrike said:
    Have you auto smoothed the individual UV islands or the whole mesh ? 
    Also just slap it onto your 3d model and see how it looks ? That should always be the first step after checking the texture itself for obvious errors. (theres btw a split onto the back side of the grip? that should not be there - somewhere right middle, blue) 
    Just look at it on the mesh and you'll see, and go through errors step by step.

    Btw some things are way too low poly, like the magazine, stock etc, that won't look good.
    Just taking the same mesh as for your highpoly is not the way to go, it will contain unneccesary loops but be too lowpoly in general to look best. Make sure your silhouette is flawless even without a normal map for best results.
    I auto smoothed the entire thing. 
    Ill post a image or two with this normal map on it (since I dont know where the light map goes and the diffuse is kinda useless atm)
    Split Im not sure on, I can take a look. I need to go through the cage errors yes. 

    I followed a tutorial forever ago to make the gun. I took the high poly and removed all edge loops, then welded as many verts as possible to lower the poly count. This might not be the best practice but its what it told me to do. So Im not sure how to go about it. 
  • solidshark91493
    Options
    Offline / Send Message
    solidshark91493 polycounter lvl 6

    ekul said:
    You should definitely have a read through the threads on normal maps and baking written by Earthquake, found here in Tech Talk. Also get TexTools if you don't have it already, it's a free Max texturing plugin that has an automatic UV splits to smoothing groups generator which will help take the guesswork out of it for you while you learn.

    UVs were a very steep learning curve for me too and the thing that helped me was not overthinking them (and making full-use of a checker map to check for distortion). Look at your object and pick out the flat surfaces, these can be handled by a quick planar map. Straighten these as needed. For more organic or rounded forms, unwrap them as a whole with a projection map for example and have a look at where the distortion is worst. If the distortion can't be remedied by tweaking edges in the UV editor then add a seam were appropriate, i.e. somewhere that isn't obvious to the viewer and that rids the UV islands of distortion.

    I'm not that experienced but like I said I've had trouble with UVs as well and these points helped me.
    I will read through those again and try to wrap (ha) my head around the concepts. I cant get textools as my version of max is 2016, and as far as I could find textools stopped being updated after 2010. I do have a checker map texture to use for texel density and position on the UV map. 

    All info and advice is appreciated! :D
  • hmm_rock
    Options
    Offline / Send Message
    hmm_rock polycounter lvl 10
    I will read through those again and try to wrap (ha) my head around the concepts. I cant get textools as my version of max is 2016, and as far as I could find textools stopped being updated after 2010. I do have a checker map texture to use for texel density and position on the UV map. 

    All info and advice is appreciated! :D
    Looks like its supported for "3dsMax 9 and up" try here maybe? Just drag and drop the file into the viewport.  http://renderhjs.net/textools/

  • huffer
    Options
    Offline / Send Message
    huffer interpolator
    Yeah, textools works for 3dsmax 2015 and 2016. You could also take a look at Advanced UV Normalizer from polytools, very useful for setting texel density.
  • Eric Chadwick
    Options
    Offline / Send Message
    I've tried to organize the normal map baking process, here on the wiki. Hopefully this helps with your research of the threads that were mentioned above.
    http://wiki.polycount.com/wiki/Texture_Baking
  • solidshark91493
    Options
    Offline / Send Message
    solidshark91493 polycounter lvl 6
    I've tried to organize the normal map baking process, here on the wiki. Hopefully this helps with your research of the threads that were mentioned above.
    http://wiki.polycount.com/wiki/Texture_Baking
    Ok you rule! Ill look through all of that and work from there. Maybe move it from here to a different section after that since thats not what this section is for right. 

    Also Ill try textools :D Thanks everyone.
  • Eric Chadwick
    Options
    Offline / Send Message
    This thread is in Technical Talk, which is the right place for technical questions. If you want to post 3d artwork for critique, then 3d Showcase would be better. 
Sign In or Register to comment.