N-Gons and bevels/chamfers with circular holes
Good day everyone,
so, I'm not that new to 3D modeling and 3dsmax, but some questions arose while following along a rather non-enlightening tutorial about modeling an Ingram Mac10 (random part: http://www.youtube.com/watch?v=MkAKJsEIKFU
It includes some holes and bevels and especially when creating those, the instructor is throwing n-gons wherever they fit for sake of a clean mesh as he says. As I learned it, "a clean" mesh is considered one nicely and evenly constructed of quads. Of course just not caring about this makes modeling a bit easier.
Now how important is this really? Does it suffice to just care about quads when one might want to bevel an edge later on or animate (/deform) the model?
Triangles would not be any better than n-gons in this regard, right?
What is considered the "professional way"?
Another big question is about circular holes. Instead of just jamming some splines together and convert them to poly, which results in nicely round circular holes, but also in many ngons - I tried to aim for better topology.
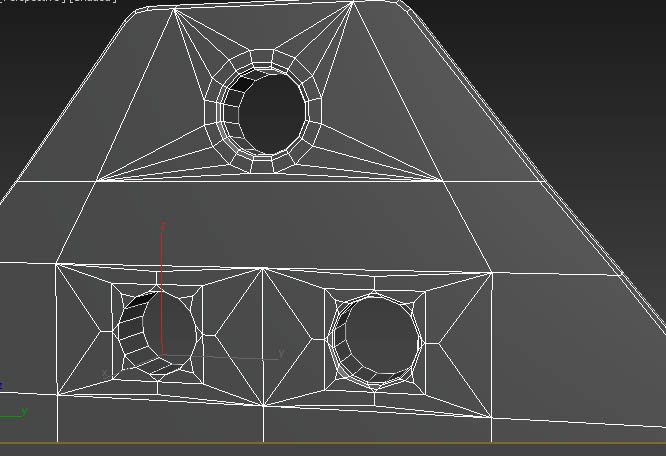
This is what I came up with and similar to other approaches I have seen concerning circular holes. The top one - the lower ones show a different approach.
Both ways however bring a certain issue with them:
Chamfering the holes' edges does not yield good results - is a turbosmooth the only hope?
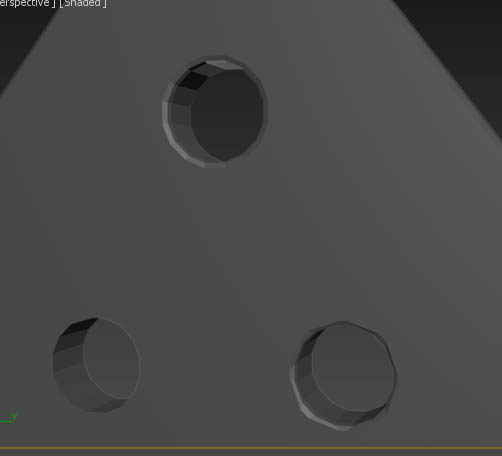
Could maybe smoothing groups get it to look somewhat better. I know that for the actual contour the hole would need more vertices to its edge.
I have seen this way: [ame=" https://www.youtube.com/watch?v=KfTsFEWbQyY"]Circular holes in 3ds max without turbo smooth - YouTube[/ame]
But it's based on n-gons again.
What is your way/a proven way to go about those holes?
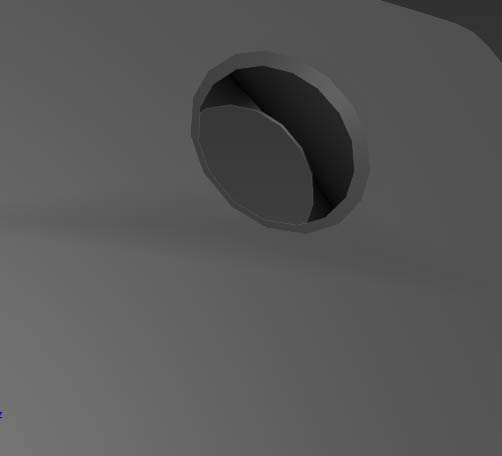
Also, there's some smoothing issue on the backside of the top hole's area - why could that be?
I'd be glad if someone could share his or her knowledge about these matters!
Thank you for reading.
so, I'm not that new to 3D modeling and 3dsmax, but some questions arose while following along a rather non-enlightening tutorial about modeling an Ingram Mac10 (random part: http://www.youtube.com/watch?v=MkAKJsEIKFU
It includes some holes and bevels and especially when creating those, the instructor is throwing n-gons wherever they fit for sake of a clean mesh as he says. As I learned it, "a clean" mesh is considered one nicely and evenly constructed of quads. Of course just not caring about this makes modeling a bit easier.
Now how important is this really? Does it suffice to just care about quads when one might want to bevel an edge later on or animate (/deform) the model?
Triangles would not be any better than n-gons in this regard, right?
What is considered the "professional way"?
Another big question is about circular holes. Instead of just jamming some splines together and convert them to poly, which results in nicely round circular holes, but also in many ngons - I tried to aim for better topology.
This is what I came up with and similar to other approaches I have seen concerning circular holes. The top one - the lower ones show a different approach.
Both ways however bring a certain issue with them:
Chamfering the holes' edges does not yield good results - is a turbosmooth the only hope?
Could maybe smoothing groups get it to look somewhat better. I know that for the actual contour the hole would need more vertices to its edge.
I have seen this way: [ame="
https://www.youtube.com/watch?v=KfTsFEWbQyY"]Circular holes in 3ds max without turbo smooth - YouTube[/ame]But it's based on n-gons again.
What is your way/a proven way to go about those holes?
Also, there's some smoothing issue on the backside of the top hole's area - why could that be?
I'd be glad if someone could share his or her knowledge about these matters!
Thank you for reading.
Replies
For 'clean' meshes: Doesn't really mean anything. N-gons are for working. Triangulation has to happen at some stage; if you're baking a normal map you do so before that, otherwise it will get triangulated when it gets taken into whatever engine you use. Triangulating a mesh while you work will only make editing the mesh more tedious.
Converting splines to polygons to make holes... wha?
If you're working on a flat surface it's pretty easy to create a hole, if you have a 2x2 grid of quads you can connect the outer corner verts to the middle vert (creating diagonal lines making an X) and then bevel the middle vert.
Like this:
As for the specific topology, keep it simple. The top version you have is fine as far as I can see, although for a sub-d mesh you've overcomplicated it and used too many segments for the hole. To quote Perna:
As for beveling, you can do so to get a rounder corner. I'd recommend having double edge loops around the hole though to preserve the flatness of the rest of the mesh.
As for the last image it just looks like tight triangulation on a non-planar (not flat) surface.
For your second (lower) holes, they're pretty wonky. You've got weird useless verts on a planar face and generally odd geo that won't subdivide well.
I get the basic drift now and will try to hone this quote in the future.
However - how would you put a hole into a place, where there are either multiple polys already or as in my case a quad that is not square.
I created a square plane for the hole and put it into the basemesh, bridging the edges after deleting the original polygon. I guess this produces a chaotic edgeflow. Is there a better way?
It produces a non-uniform smoothing however, which I would deal with by manually editing the smoothing groups of the affected faces.
Turbosmooth counts as sub-dividing, right? Are there different kinds of sub-d?
Does it work just as well, when the mesh is not all quads?
Where is it ok to even use it, polycountwise? I don't know about what's considered high or low poly for what application - what should I consider?
A turbosmooth-problem:
I don't know how else I should manage the topology with the hole in the middle, if those two buttstock pieces are meant to be attached to the backpiece.
Another noobie-question:
How do I just mirror this element (is an element the same as a sub-object?) without the extra work of detaching, mirror and reattach? Mirror modifier will mirror the whole object. I'd like to just put in a numerical value to scale it along the appropriate axis by -1, like I learned in blender. But I cannot find how to do this in Max.
About quads again:
I understand that eventually everything needs to be triangles, i.e. gets converted automatically. However, working with sub-div or for a deforming animation, isn't it best to work with just quads? I don't know about the logic behind the scenes enough yet. Say I'd want to let the barrel of Elmar Fudd's shotgun be deformed by a sphere pushing through it, because Bugs Bunny put some obstructing rabbitpoopellets in there - wouldn't this need a very even and clean topology?
For who's so inclined, I'd be very thankful if you could take a look at the max project file and check the model for stupid noob-mistakes or similar shortcomings that could be eradicated. Any tips are very welcome!
Download Max project file (2015), 2MB
(Please "unhide all"!)
For a highpoly it doesn't really matter. The square around the hole is unecessary but it's not exactly 'wrong'. There's also no need to connect those parts so completely with the rest of the mesh. Look at how n-gons behave when you've got subdivision (turbosmooth) applied. That should give you an idea of when geometry causes problems. On planar surfaces you can get away with anything really, so feel free to terminate loops etc.
2nd image:
Not really sure what's going on here. Upload larger images if you can, try imgur.com for an easy/fast image host. Perhaps you're confused between two concepts. The smoothing of a mesh (Vertex normals, also called hard edges, smoothing groups) is only relevant to the lowpoly. The highpoly is all one smoothing group (averaged normals) and gets its smoothness (or rather, its sharpness) from it's high amount of polygons. You might find it useful to look through highpoly wireframe refences on the net, not as an absolute guide of what meshes should 'look' like, but just to get a general idea of what works. Check out the asset giveaway thread and for specific sub-d examples, Perna's image folder.
Yes turbosmooth is sub-d, and yes there are different 'types', which to my understanding is different mathematical ways of calculating the subdivision. Regular sub-d is turbosmooth. There is also a (different/better) method called Catmull-Clark subdivision, also called Pixar or Psub, and Open SubDiv in newer versions of 3ds max I think).
Okay so I guess you're not fully aware of the highpoly / lowpoly distinction and what does what job. There are some really good videos made by polycounters that go through the whole process to create an asset, and this is probably the best way to understand the workflow. Here are three videos that cover the process, definitely skip through them when you have time:
Hans Palm's shotgun tutorial
Joseph Harford's Tracker Knife tutorial
Ben Bolton's weapon creation demo
N-Gons are generally fine for the highpoly. For the lowpoly they will have to be triangulated, usually automatically, on export. Don't worry about any hard 'rules' you might read about on the internet related to triangles/quads/n-gons, just play around and see what works.
Highpoly models are used to bake information from (or in offline rendering where performance isn't a huge issue). These are detailed and dense meshes. The lowpoly is what is sent to a game engine, and should be efficiently made (but don't worry too much about efficiency when you're still figuring the basics out, it's pretty common for people to be overly concerned with optimisations that don't really matter. Outdated information inspires a fair bit of this imo).
3rd and 4th images:
Again hard to see but it looks like you're unaware how subdivision is applied. Geometry needs supporting geometry to hold its shape. As shapes get more complicated adding support becomes more complicated (particularly with curved surfaces, where adding extra support ruins the original curvature). Perhaps play around with VERY simple shapes, like a cube, and see how it behaves under turbosmooth. How does it change when you add a loop through each axis? What about three loops? Here's an older example that shows how extra loops affect a plane when subdivided.
And yes, when working with sub-d you don't often triangulate because quads and ngons are easy to work with and sub-d cages have no specific geometry requirements. As you note if everything was triangulated working with it would be difficult.
Also if you want to share a file use a format that is package agnostic like .OBJ
I have changed the image hoster and could now show the images in their correct size, have a look.
I understood the basic concept of smoothing (smoothing groups, smooth modifier) and smoothing by subdivision (turbosmooth, meshsmooth). Question is: If I have a low poly mesh which is looking fine as is, but needs a really round, i.e. high poly hole, is it alright to just smooth out, that is give more polies, to that part with the hole? In terms of later compatibility, deformation etc. Or is it better to go all smooth and do the extra work of adding the supporting edges where needed?
Thanks for you elaboration, you are right, I have to try around more and I will look at those references you named.
With the larger images you now should be able to see that turbosmooth-problem with the buttstockpiece - I added supporting edges, but seem to have made some mistake in the inner area.
2. image: I put in the part with the hole, then welded it to the original mesh. The part is the same I'm now trying to mirror individually for the other side, see last image with the red-coloured element.
You are of course very right to point out the format and I did not upload as .max out of ignorance, but rather so the modifier stacks would not collapse and still be editable to see, if a turbosmooth is right and what might be changed to make it better, as I specifically have problems with this technique right now.
I'll go take a look at those tutorials you kindly linked now,
thanks for those!
What do you mean by lowpoly the mesh that gets sent to the real-time engine (what's referred to as the lowpoly) or the sub-d cage (the mesh that you add supporting loops/geo to to hold its shape when subdivided, commonly called the highpoly or sub-d cage)?
If the former, lowpoly meshes use just as much geometry as is necessary to convey the shape they need to. Also if you're doing the highpoly/lowpoly + normal map workflow you shouldn't worry about the smoothing groups of your lowpoly until you begin unwrapping the lowpoly UV's, as your UV's have a significant affect on where hard edges (or 'smoothing groups') should go. When you're ready to worry about that part of the process read this sticky in tech talk.
If the latter, highpoly meshes aren't generally restricted in how much geo you can use, but in many cases it is better to use as little geometry as possible to make further editing simple.
One other thing: bevels/chamfers shouldn't be used to add supporting geometry for a sub-d cage. Why not? Because that's a destructive workflow and makes it impossible to reduce your highpoly to your lowpoly. Instead you run edge loops which are easy to adjust, edit, remove... unlike bevels. For baking a normal map (something to worry about later on) you also need to exaggerate the roundness of corners so the information reads better. Basically don't make any of your edges super sharp because they won't translate well later on.
Can't really help you with the mirror stuff as I don't use max. I also can't open .max files.
Although you say not to make edges super sharp, so maybe I should do a whole mesh subdivide after all.
Thanks for the link, I'll definitely checked this out. I have already watched that G56 "tutorial" and it was really interesting, one step further to understand the high/low-poly and normal map baking process. So, basically, for generating the block out or even high poly version I don't need to worry about connected parts?
Maybe it's a little far off for me to think about this, but of course that knowledge would be viable even now, to guide my learning process more effectively.
Do I get it right, that a sub-d cage is the same as the base model, just subdivided? Or is it like a proxy (like in Maya), that is like a smoothed version existant on another level at the same time as the original. Because as I'm doing it now, subdivided, i.e. turbosmoothed is not reverseable, that is destructive, right?
Although: Chamfering the edges for edge loops seemed to work fine, when I used quad-chamfer for the edges, which gave 2 edges around the original edge and by choice no actual rounding of the edge.
I don't want to overdo it with thanking, but I'm truly grateful for the time you already spent to help me out so elaborately. I'm looking forward to one day have gained enough knowledge to follow suit and help out those who are in need.
I have exported the mesh as an .obj, if you want to take a look.
http://www.mediafire.com/view/6k4i7x32y14b3i9/thenoob_mac10.obj
The grip has some strange shading issues.
I have also included the non-subdivided version of the buttstock, because of the problems with it's smoothed version.
Quick, squeezed in question: Why did you chose Modo over other packages? What do you think in terms of working in a commercial context, where as I guess, teams would want people proficient in the standard packages? Would they be likely to say: Alright, you know this package, gonna be childsplay to just use that knowledge in the software we use.?
The typical workflow goes like this:
Create a junk blockout that's super basic and is just so you get the proportions of your model right before you really start.
Next the highpoly will be made
Once that's done the (non-subdivided) highpoly will be duplicated. All the edge loops will be removed and the mesh will be further optimised, then that is your lowpoly.
before exporting the highpoly you'll actually apply the subdivison (subd is just toggled on/off while you're working, not actually applied)
Then you unwrap, bake, texture, etc.
In the G56 tutorial by Ben Bolton he shows an alternative method (which I quite like and want to use more) that goes like:
Create a detailed blockout (sometimes called a mid-poly)
Duplicate that and add loops / details to make the highpoly
Duplicate the blockout again and optimise to make your lowpoly.
The benefit of this is that it skips the tedious task or reducing your highpoly to your lowpoly. A possible downside is that you end up committing to more geometry than you otherwise might in your highpoly.
If there's a chamfer that doesn't actually round the corner but just adds loops that's fine, but from my experience of modo's version of that it's only useful in super basic situations.
I tried max first. I tried modo later. I prefer modo. Some jobs will require a specific program for their pipeline but my understanding is that most (don't quote me on that) allow you to use any equivalent package. You'll see a lot of indie devs (Almost Human, Frictional Games) use modo because aside from being pretty badass it's also much more affordable than max. Max is still probably the safest option though, and you have the benefit of having a higher amount of supporting content (tutorials, scripts, plugins). Each has their pros and cons so definitely give different apps a go when you've got the basics down + free time.
As for your mesh, it's a pretty big mess. All part of the learning process though. I'd recommend trying something very simple to test your understanding. Try making the following mesh. If you find you can make the highpoly easily, then try to make the lowpoly (from the high by removing loops etc). Try making the mesh again with the Midpoly workflow if you like.
if you get stuck I'll upload an .obj and you can see how I did it.
I would like to see your .obj, please upload!
On the right is the edited low poly, so basically I could have saved my base low poly before adding the supporting edge rings and go with this, instead of re-doing it by working the high poly to low poly?
I think I'm still missing parts of the process, the typical workflow you described.
Do I get it right:
I make a junkmesh to block out.
Then a nice high poly, where a hole or added cylinder on top of a surface is actually welded to it etc, but individual parts may remain, like lower and upper receiver of a rifle.
These parts will also be worked with a subdivision-modifier or the like, to get cylinders round etc. which means added edges for support.
The non-subdivided part, that does not have supporting edges, but sharp ones and where the cylinders only have 8 sides for example, is used for low poly - indentations etc. might be removed because they will be added by the normal map. Also the low poly is one mesh - previously intersecting parts are reworked so they form one continuous shape by welding vertices.
One should work from high to low, because otherwise the contour might be off and the like, right? Low to high off course seems more natural, just like in drawing, one starts with blocking roughly and getting more precise with shapes over time, resulting in a detailed model and at the same time providing the low-poly version right at the start.
Oh, I did not think my model would be that bad. I hope you imported all as triangles instead of polygons like I exported, because that might account for it. Otherwise: What needs to change about it?
I'll definitely try Modo out at a time, but for now will concentrate on really getting those principles down. At least the change from Maya already felt great, Maya did not seem to want me make polymodels, it felt very clunky.
Yep. Blocking things out (in the linear workflow) is mostly about getting the proportions right, so you don't end up halfway though a model only to realise you have to redo it because the barrel is half the size of the bullet or something.
Not always it can go either way. Generally yes though. You can have floating or de-attached pieces in the one mesh, but as that thread explains there are reasons for/against doing so.
It looks like you've applied subdivison on parts of the mesh that had bad topology which caused a lot of errors. You only collapse (not sure if that's the right max terminology for applying the subdivision) when you need the extra geometry or you're going to export the high. Working on the highpoly is all about manipulating the (relatively low amount) or geometry and previewing the results by toggling subdivision.
Here's my obj.
The main differences are:
Your supporting edges are much tighter, and thus the edges are much sharper. You'll find out later when it comes to baking a normal map you have to have much smoother edges than an object has in real-life, as the information has to translate to the normal map. You also have to exaggerate the smoothness further to avoid edges looking terribly aliased at a distance.
I also used double loops (see the gif I linked earlier generally a good practice to preserve flatness of an area and uniformity of edge widths) and less geomtry on the inset hole.
I have looked at your .obj and those two supporting edges are something I'll keep in mind and try around with.
However, your mesh seems to be messed up by some importing-issue, have a look:
As you can see, the inward hole is missing. I looked into it and it seems that there are issues with the faces, all are duplicated somehow and some are covering up the hole.
Also, using MeshSmooth looks okay, while Turbosmooth, which I used for my model, yields an unsightly result.
Just to rule out an error on import, does the model look like this in Modo when you open it?
Because I cannot see those errors you are speaking of.
You referred to a sticky in post #6 which seems down. Have you got an alternative?
Also: Is this whole process of high/low-poly and normalmap-baking also important for movie/animation-production? My guess is they use a lot of actual high-poly models.
Oh, sorry about the terminology. Collapsing a stack just meant applying the subdivision.
To export the model as it is meant to look and in .obj, I of course had to collapse. That is why I included the low-poly version of the buttstock.
I also forgot when exporting my mesh to delete the second item, which is why you're seeing duplicates (normally I use an export script that only exports what's visible, regular export exports everything. My bad! Here's the proper version.
Also fixed the link in post #6, was a bad link on my part.
And this is what I see when I first import your mesh. Have you tried importing the obj you exported to see what it looks like? My guess is you've exported the handle with turbosmooth activated and that's applied the operation (since .obj won't contain any max specific information like a modifier stack)
Of course I imported the obj myself to check, but it did not give me those truly messed up results like you get to see in Modo.
However, I hope it was due to accidently not properly applying the modifiers like you said. I have now tried another way, please see if that changes anything for you:
Mac 10 OBJ
I applied all modifiers (meshsmooth/turbosmooth) that generate subdivisions, so I get the final high-poly Mesh which I exported.
I guess I've not yet grasped the concept of the sub-d cage modeling, unless it's the same as having an On/Off-Switch for added subdivision (the supporting edge loops) however stay.
I'll go look into some more info about that and watch the other videos you recommended.
Here's the OBJ, all smoothing-modifiers removed instead of applied before exporting.
I'm not sure if you consider any of this finished, but basically it looks like most areas have no supporting loops/geometry to support the subdivison. But I suppose you were starting this with not much knowledge of the difference between high/low poly models. Now hopefully it's more obvious what you need to do to follow the high > low > bake workflow, and with the help of those tutorials you should be posting your first complete model on here in no time. Just remember to take things slow, start off with simple things until you have the whole process down, and then trying something challenging. Otherwise (imo) you'll end up wasting time on a bigger project that's doomed from the start — which can be a good learning experience, but if you can avoid the time-waste aspect all the better.
If you want to have a nice flow, you need to spend time watching wireframes of people who themselves have spent time watching successful others.
It's not something that is in vogue for me right now as i have no need to do it anymore, but have the habit of collecting images from the internet that display wireframed meshes and mimic the forms contained in them until mastered.
I have learned quite a bit and now have a clearer target to direct my learning process.
You are very right, starting simple, working one's way towards more complex shape sounds much more reasonable.
So, I'm looking forwards to posting complete models for critique soon.
Thanks also to peanut, that's a welcome reminder and hint.