Turtle Animation
polycounter lvl 9
Hi there,
I am currently in my final year at Staffordshire University studying Computer Games Design. This year one of my modules is to complete a project on whatever I want to do i.e. create a character model, an environment for a game, an animation etc. I have chosen to create an animation telling the story of a brave little turtle making his way across an overgrown garden, battling the elements to get to the love of his life. I have created this thread so that I can show you all what I am doing and if you have any advice or want to comment on what I am doing then that would be greatly appreciated.
The Story
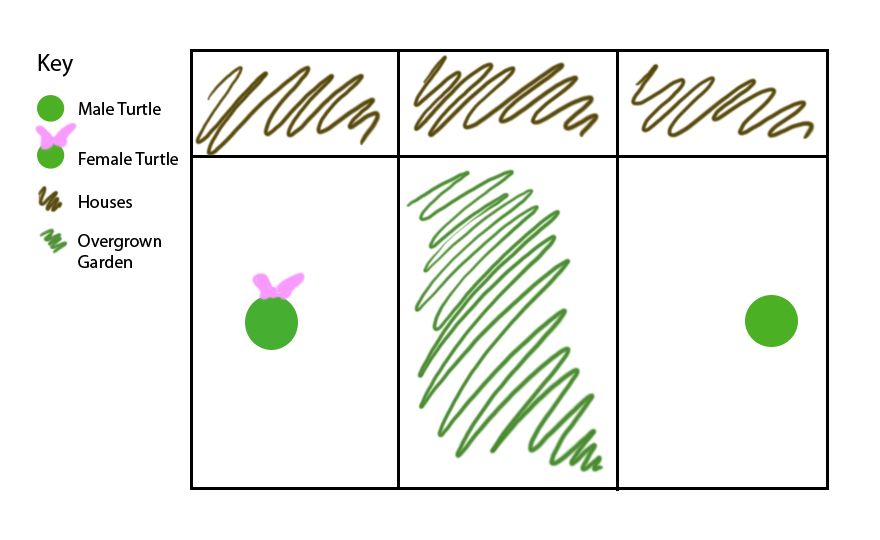
The story is of a male turtle living in one garden who decides to make the epic journey to see his love in another garden. However, an overgrown and abandoned garden separates the two and he must battle his way through it to get to her. He must also brave the elements i.e. wind, rain etc. to get there. Im not sure at the moment how long this will take him, obviously I want to exaggerate the pace that a turtle walks but Im not sure how far I should take it. For example should it be a few days and show the change between day and night or should I go further and show the changing of seasons?
Below is a diagram of where the male turtle is and the female turtle is:
The Characters
I have been looking at a few different models for this animation and have found the perfect model for the turtle, which would need altering for me to be able use it, for example I want my turtle to walk on four legs instead of two. This model is actually scarily similar to how I wanted my turtle to look when I first thought of this animation.
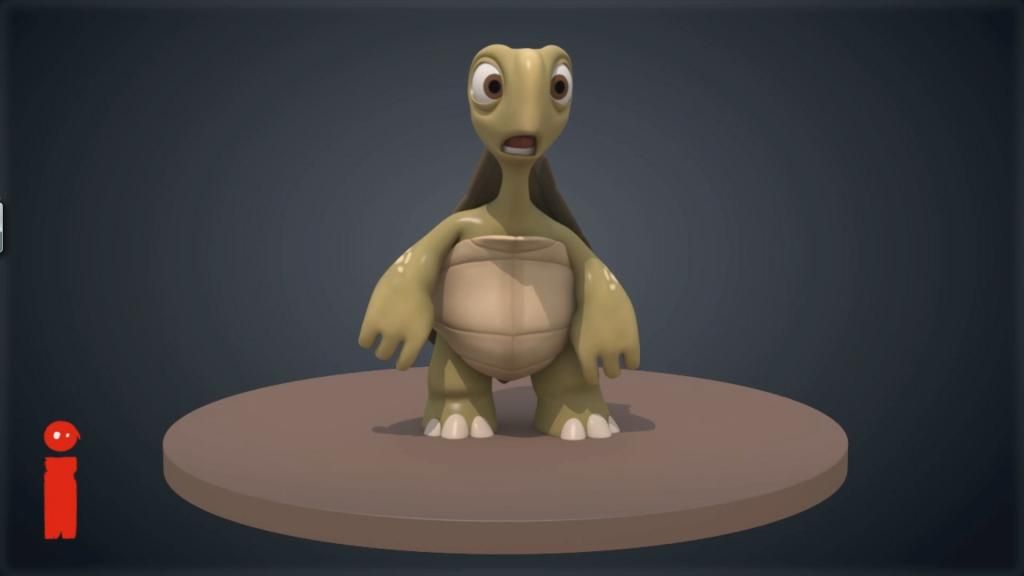
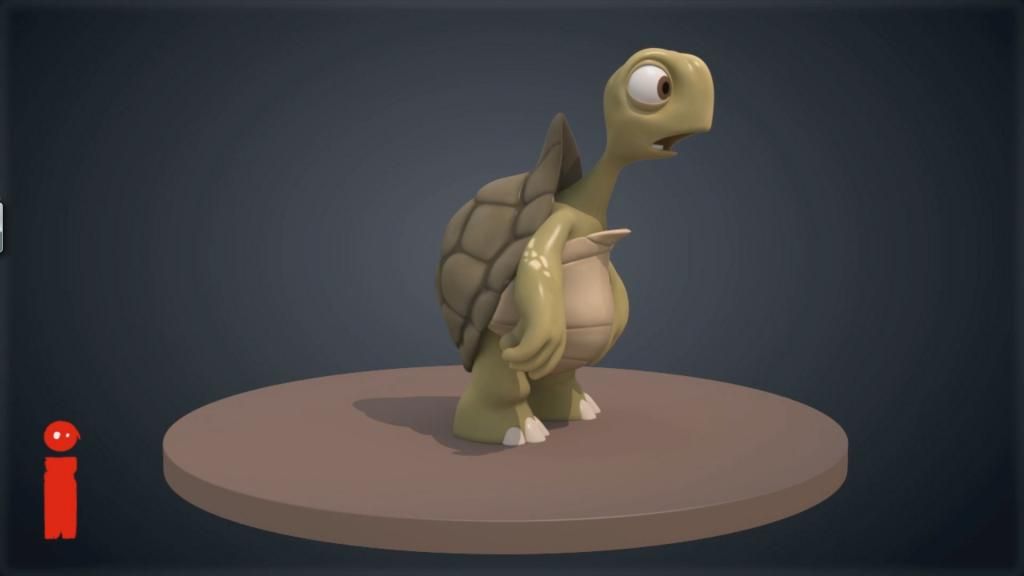
Unfortunately only students who are enrolled on courses at ianimate.net can use these models and therefore I have to find another one or model the character myself, which I am not opposed to doing but because of time constraints I would have preferred to use a model that has already been created.
I am currently in my final year at Staffordshire University studying Computer Games Design. This year one of my modules is to complete a project on whatever I want to do i.e. create a character model, an environment for a game, an animation etc. I have chosen to create an animation telling the story of a brave little turtle making his way across an overgrown garden, battling the elements to get to the love of his life. I have created this thread so that I can show you all what I am doing and if you have any advice or want to comment on what I am doing then that would be greatly appreciated.
The Story
The story is of a male turtle living in one garden who decides to make the epic journey to see his love in another garden. However, an overgrown and abandoned garden separates the two and he must battle his way through it to get to her. He must also brave the elements i.e. wind, rain etc. to get there. Im not sure at the moment how long this will take him, obviously I want to exaggerate the pace that a turtle walks but Im not sure how far I should take it. For example should it be a few days and show the change between day and night or should I go further and show the changing of seasons?
Below is a diagram of where the male turtle is and the female turtle is:
The Characters
I have been looking at a few different models for this animation and have found the perfect model for the turtle, which would need altering for me to be able use it, for example I want my turtle to walk on four legs instead of two. This model is actually scarily similar to how I wanted my turtle to look when I first thought of this animation.
Unfortunately only students who are enrolled on courses at ianimate.net can use these models and therefore I have to find another one or model the character myself, which I am not opposed to doing but because of time constraints I would have preferred to use a model that has already been created.
Replies
http://bmaras.deviantart.com/art/Turtle-Model-Sheet-258412096
So I want my character to be loosely based on a three toed box turtle. Below is a moodboard of the turtle to help me when creating my character.
I have also collected some images of turtles in animations. I have included sea turtles as well land turtles because of the textures and details on the shells, especially Crush from finding Nemo.
I had a few issues with the back leg of the turtle because I wasnt sure what to do about the placement of the knee and how the leg is positioned in comparison with the shell. I think that while trying to make this decision and looking at the image below of the anatomy of the turtle it just confused me even more.
It wasnt until Shaun (fusedgore) had sent me the image (see below) of the tortoise he had modelled in ZBrush that I realised how I could solve the problem. I also want to take this opportunity to thank Shaun for the offer of using the tortoise model in my animation but I felt that it didnt fit in with the style of my animation and it will probably also benefit me more by modelling my own character.
After creating the basic shape of the turtle I then created a skin from the ZSpheres and used Dynamesh to add in details such as the shape of the head and the eyebrows. From this I used ZRemesher to create the base mesh.
To make up the shell I created two subtools, one for the top of the shell (carapace) and one for the bottom (plastron), by creating a mask on the base mesh and using extract.
I then started to shape the carapace and realised that it was made up of tris as well as polys which created unwanted pinching on the edge of the shell. I used ZRemesher on the carapace to see if it would fix the problems of the tris, which it did.
I then went on to sculpt in some details of the turtle. At this point it is low poly so that I can adjust the shape of things easily.
at the backmost end of the skull, like this it looks like its gonna break off
and i would thicken the lower jaw more too
after i cannot do anything more on the current subdiv level i subdivide further and continue until i cant go any further again. like this you get a feeling on what is possible within a certain pointcount and how far you have to subdivide to achieve things.
like a this level you can work a lot on the carapace (right word?) still and define its hexagonal fields nicely. also basics like the prpoportions of the feet (backfeet are thicker than front ones) can be adjusted and so on. on the next level you can focus on "lips" nails, eyelids and rough scales, next detail scales, wrinkles and so on
the most important thing is have fun doing it an dont let the time consumption discourage you, you will automatically get faster the more you work with the program and things really pay off
Thank you for the comments. I have taken them on board and have been speaking to my lecturers who have also suggested some changes. I'm not entirely sure how I'm going to rig this little guy yet but I'm constantly thinking about it so hopefully I can figure that out soon.
This is just a little update to show you some of the changes I have made. I've made his face rounder, pulled the Carapace down and the Plastron up a bit round the neck so that the shell fits him properly and I've adjusted his legs a bit as well. I'm just waiting for some books I have ordered to be delivered so that I can look at the best way to model his face in order to convey emotion in the animation, so while I wait for that I'm going to concentrate on the detail on the shell because I am now happy with the shape of it.
http://vimeo.com/108518689
I then masked out each section of the shell and used the stencil to add the detail of the alpha.
I then exported each section of the turtle i.e. body, carapace and plastron, and imported them into Maya. I created the low poly of the turtle using the modelling toolkit and making the imports from ZBrush a live surface to model on top of. I first created the low poly for the carapace and plastron in different Maya files because I considered these the easiest to create, due to the fact that they do not need any loops for animation.
I then moved onto the rest of the body. I decided to include the eyelids as part of the body mesh, rather than separate them from it, because when I animate the eyelids the edge of the brows will be able to move with them in order to create a more believable animation.
I started to create a mask around the eyes and eyelids making sure that I had a sufficient number loops for animation.
I was quickly able to create the rest of the head and body for the turtle. One of my lecturers suggested that I just create the geometry for the head, legs and tail and to the leave the body that is under the shell because we wont be able to see it.
The Final Low Poly Turtle
looking forward to the bake!
I actually started the rig three times over before creating a rig that I felt was suitable for the model and the animations that I wanted.
For the feet I created a Reverse Foot Lock so that I can have more control over the foot than I would do without it.
I also added in a tongue and created joints to control it.
I then added controls to the rig.
Here is a labelled version of the controls:
I then skinned the model and started to create Blend Shapes for the facial expressions. I created Blend Shapes for the mouth including a smile and sad face, for the eyelids including a blink and squint for both eyes, for the cheeks lifting up, as well as Blend Shapes for the eyebrows, which included six Blend Shapes for one eyebrow these were the inner brow up and down, mid brow up and down, as well as the outer brow up and down. These were then copied to the other eyebrow, using the Mirror Blend Shapes Mel script from animationmenthods.com.
I then created an interface for the Blend Shapes, using the GUI Control Generator script from animationmethods.com, so that it will be easy to control the expressions when animating.
Throughout the whole rigging process I used scripts to make things easier and quicker. The scripts that I used were the Rig Control Generator, the GUI Control Generator, Mirror Blend Shapes Script, and the Fix Joint Orientation script, all of which are available at www.animationmethods.com under the scripts tab.
I also painted the turtle model in ZBrush using Polypaint and created the texture and normal maps, which I edited slightly in Photoshop to fix things. I needed to create the eyes as well as a good texture for them, so that they look good. I had found this image by Michael Strombeck on creating the eyes for Mike Wazowski from Monsters Inc. and I really loved the effect that it created and so wanted to try it myself.
In order to create the texture for the iris I followed this tutorial by Stephanie Valentin.
[ame="
I then had to create a render of my model for GradEx, which basically showcases my final year work. For this I spoke to the technician about what renderer I should use and he suggested using Arnold because it produces great results and the university has licenses for it.
This was the result:
I have tried and failed many times get normal maps rendering through arnold.
I use standard settings out of xnormal, bake a map and plug it in as a tangent space normal to the aistandard. I swich r and g in the arnold parameters as i've read elsewhere after that.
never seem to get a visible result though., I 'd love to know how you did it
This is the normal map for the skin, which still needs a bit of tidying up around the eyes:
These are the settings that I used, using the aistandard material.
The only thing that I can think of that I know I changed that affected the normal map was in the Arnold settings of the bump map, I unticked Flip R Channel and Flip G Channel.
I have just checked the shell settings and found that it had Swap Tangents ticked, I unticked it and it rendered the normal map on the shell without a problem.
I'm not sure if that helps but I hope it does.
will double thank you if i get it working
cheers mate
oskar
Sorry for all of the images!
Below is a link to the animation so far. I know what I want to change and what improvements I can make to the animation, camera positions etc. Please watch it and tell me what you like, dislike, what improvements I could make etc.
It all helps
https://youtu.be/-kCP3tJ0tVs
Thanks
I have finished my animation for my degree and thought that I would share it with you, seeing as you have been helping me from the beginning. I just want to say that I have loved working on this project and even though I had trouble with some aspects of it, particularly rendering, I am happy with the result so far.
I will be carrying on with this to improve it because at the moment it is not to the standard that I want it to be at, because of the deadline I had and other issues, but I'm going to have a break from it for a few weeks and then start working on it again.
Thank you for your feedback throughout the project and as always I welcome any feedback that you have regarding the final piece.
[ame]
Thanks again,
Tora
Great work, you should be happy that you can do all of the steps from uv unwrapping to rigging to concept and everything in between.
Cheers
It's hard to judge without any audio, but I'd say overhaul the piece seems a bit long. You could probably cut the middle part of him slowly walking by half.
If you still wanted to keep the "feeling" of it taking the poor guy forever to get to her, you can add in some fun little things like a timelapse of the sun rising and setting as you see him moving, clouds moving quickly etc.. Or it could be as simple as the sun lighting and direction changing in each camera cut, perhaps it's night time by the frame he reaches her with alot of bounce lighting from the moon so it's not scary dark, with the crickets chirping o'course)
A variation in the background/fence work could help a little bit in capturing the frame of mind where things are spatially located. IE maybe he's in a yard where the fence is painted white, maybe he moves past a tireswing or soccer ball in one of the other yards, etc. Something to show him crossing multiple yards, as it's hard to tell as a viewer when everything is the same brown fence.
You may want to highlight through animation how he's drawn to the female turtle a bit more too, having a little more fun with that (hearts rising, turtle winking as she blushes, etc.) will make the middle part of the video seem a little bit more like a mission he's dead set upon.
And of course having some audio will help drastically in the overall feeling of length, and make this piece really come alive.
Just my two cents on how you might be able to better the narrative overall.
oooooooooooh and I just looked at your storyboard, looks like you already had all of the ideas.
Love the turtles, keep it up!
kkep it up man!
Just some stuff to think about.
Animating quads is murder. I love the cat rig procedural walks for animals and especially insects. The walk steps are too small giving an aged impression rather than a slow one. When we smile our cheeks puff out some. Try not to do cam cuts over 180 degrees so as not to loose the audience (dunno if that was in the last one). The shell cant flex with the legs its rigid and looks a little weird atm. Did you use displacement maps to help speed everything up. If I had to do hipoly that is what I would do.
Well done!
Thanks for all the feedback I have added your suggestions to my list of improvements, most of which are similar, which is great
I realised yesterday that I hadn't actually shared with you how I made the grass/environment or discussed the many problems that I had with the rendering.
To create the grass I used paint effects in Maya to paint out a small patch, I then edited the turbulence in the options so that it was animated to blow in the wind.
I then exported the grass as an Arnold StandIn which exported every frame of the grass as a single file (there were 600 frames so 600 files), in my scene file I created an Arnold StandIn using the grass files which provided a bounding box in the viewport, but rendered the grass in the render window.
This way I didn't destroy my computer trying to work with millions of polys of grass.
I also used a lot references when creating my animation because I split it up into 17 parts in order to deal with the changes I would make to the animation.
Although what I personally didn't like was that the turtle didn't feel very dynamic (turtles are boring enough in real life), the animation was alright but a lot of precious render time and viewers' attention span were wasted on unnecessary expressions and the turtle's long journey to the female. Nevertheless, well done. We like to see complete projects