Home 3D Art Showcase & Critiques

Prop practice

polycounter lvl 7
Offline / Send Message
Synen polycounter lvl 7
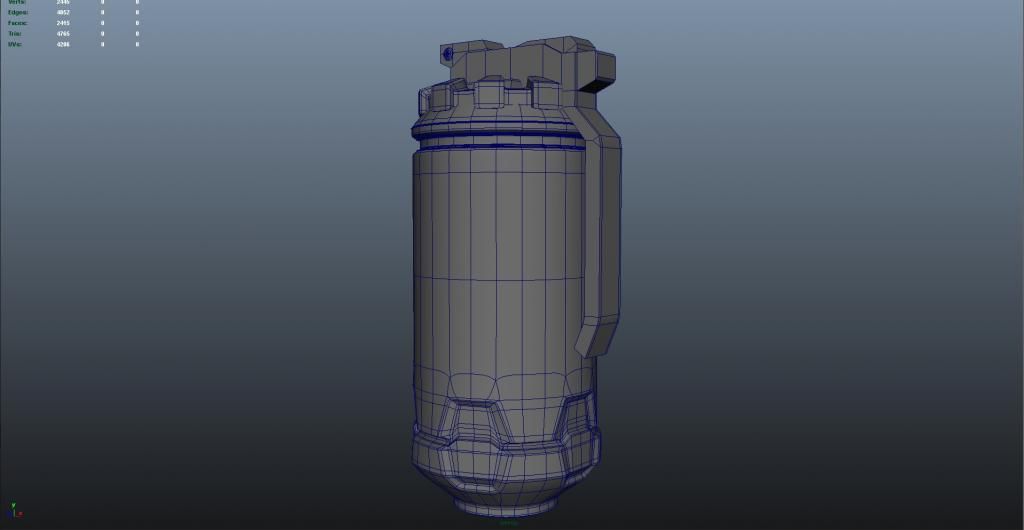
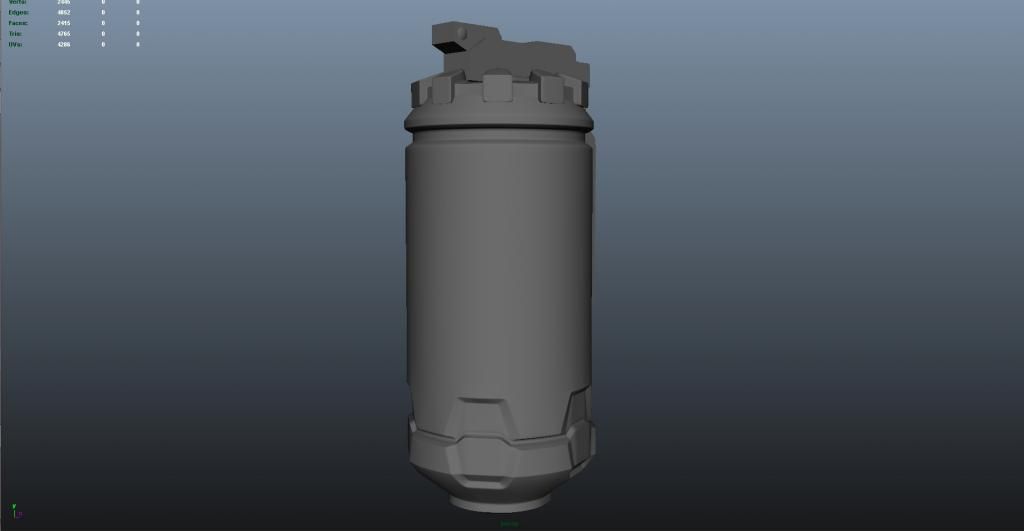
Hey guys back working on a new model, saw this image from the Hard Surface challenge and wanted to give this a shot. Working on the grenade prop from Elysium. I want to push this and working on baking this down to low res.
elysium___grenade_by_benmauro-d6t57c8.jpg

Gren2jpg.jpg

Gren1.jpg[/URL

Replies

  • ScottHoneycutt
    Options
    Offline / Send Message
    ScottHoneycutt polycounter lvl 14
    Looks good so far. You might want to show some viewport 2.0 AO and blinn highlights in the posts so we can see it better. When I work in Maya I often will work as you are now, but then turn these things on just for posts on Polycount.
  • Synen
    Options
    Offline / Send Message
    Synen polycounter lvl 7
    Yeah I can definitely do that, didn't even think of that thanks man.
  • AlexRodriguez
    Options
    Offline / Send Message
    AlexRodriguez polycounter lvl 6
    @Synen Nice start on the model you have a few things wrong, the top with the humps which kind of looks like a cap you can twist is all one unified pieced you have it as a floater. It seems out of place floating as apposed to unified

    The very bottom your humps are going inward when they should be going outwards, the top most one ones are going inwards yes but not the bottom. Then lastly the red area where it indented in is to harsh it a little less and subtle

    Anyways great thing to practice feel free to post this in the weekly for more feedback.


    Here my model I did very long ago

    4HPgzVA.jpg
  • Synen
    Options
    Offline / Send Message
    Synen polycounter lvl 7
    O wow I did notice that, for the top part it looked like it was a separate piece. I didn't know it was all one piece.

    and for the bottom part couldn't tell if the bumps on the bottom were going slightly less inward than the top ones.

    thanks for the C&C
  • Joost
    Options
    Offline / Send Message
    Joost polycount sponsor
    Seems like you've attached some parts which would be separate elements in real life/ in the concept. Kind of making it harder for yourself for no reason. Good start though.
  • Synen
    Options
    Offline / Send Message
    Synen polycounter lvl 7
    I'm back on working on this project after catching the Destiny bug, but while working on it im starting to get some pinching at the bottom where the arches are starting and wanted to see if someone could help me. As always C&C are welcome.

    gren3.jpg

    gren4.jpg

    gren5.jpg
  • ScottHoneycutt
    Options
    Offline / Send Message
    ScottHoneycutt polycounter lvl 14
    Have you seen this:
    http://imgur.com/a/dEWXP

    Either way what you need is to give the geometry some room to breathe. If you have the edge loop behavior make an abrupt shift like that, you will get those pinches. This example especially shows what I mean:

    http://i.imgur.com/J36Rs.png

    The change in direction needs some space or protection so to speak. We can't really see the issue from this far away angle btw.
  • spectre1130
    Options
    Offline / Send Message
    spectre1130 polycounter lvl 6
    Cylinders with bevels and such are tough. You can't run any edges straight up as they'll reinforce the vertical loops and you'll get a non smooth cylinder. I was going to try a paint over to suggest some alternate edge flow, but can't seem to really see which edge flows where at this angle. I'm no expert, but upload a better angle shot so we can see which way those support edges run and I'll see if I can help. I just got done with a HP that is mostly cylinders with extrusions and such.
  • Pookhan
    Options
    Offline / Send Message
    Pookhan polycounter lvl 13
    Your model looks a bit taller/narrower than the concept. You could reduce the height by moving all the verts from the bottom half upwards to make it a bit shorter.
  • Synen
    Options
    Offline / Send Message
    Synen polycounter lvl 7
    Cool thanks for the feedback, Ill get another screenshot of it up later tonight, I was able to get rid of some of the pinching by putting less stress on some of the spots by spacing out the support edges, thank you @scottMichaelH for links

    @spectre1130 - that been my biggest and interesting challenge with this project trying to keep it smooth but have the detail that at the bottom grenade.

    @Pookhan - I was going basely off the concept art tying to line it up but I can def see it now that it looks taller than what it should.
  • Synen
    Options
    Offline / Send Message
    Synen polycounter lvl 7
    Ok here the up close shot of the bottom area

    gren7.jpg

    gren6.jpg
  • spectre1130
    Options
    Offline / Send Message
    spectre1130 polycounter lvl 6
    Okay so I did a paint over. Just one possible solution. might work, might not.

    Orange- probably a must to run a support edge here as when you subD, the top edge that starts that inner bevel is pulling with nothing to protect it.

    Blue-Might need a edge here like this to lock down the corner in conjunction with orange. This a tough one on a cylinder like this.

    Red-remove this edge if you do run that blue support.

    You might need to remodel that if the pinch still is kicking your butt. Maybe starting with an inset first might have made it easier to support those corners and terminate the edges in an easier fashion.

    Give it a shot.

    Damian

    iQO0bLG.png
  • jordanpascal
    Options
    Offline / Send Message
    looking forward to seeing the final topology, I think you've got most of it down but I do agree with @spectre1130 . looking really good so far!
  • Synen
    Options
    Offline / Send Message
    Synen polycounter lvl 7
    @Spectre1130 - Thanks for the help again man.

    So after adding the edges, it def help remove most of the pinching. Now I think I am almost done with this model. Prob next thing for me to work on this UV the make a low poly to bake this down to. C&C as always, thanks

    gren10.jpg

    gren9.jpg

    gren11.jpg
  • Bartalon
    Options
    Offline / Send Message
    Bartalon polycounter lvl 12
    When it comes down to it, if you expect to have a lot of detail (extrusions, supporting loops, etc) on a curved surface, you are going to need a denser base mesh. Don't try to cram all your modifications onto a 16 sided cylinder. In some situations you will need to bump up your starting edge count to 24, 32, or even more depending on what you're doing. A higher edge count will reduce the distance that your edges move due to subdivision averaging, resulting in less noticeable pinching in areas that change topological direction.

    Here's an old picture of mine to illustrate a basic example:

    Reinforcement.PNG

    On the left, I extruded a square inward and added support loops to keep it a square shape. In Smooth Preview, you can clearly see pinching due to the extra support loops added which interfere with the cylinder's otherwise perfectly distanced edges.

    On the right, I first subdivided the cylinder twice (in your case you don't necessarily have to subdivide, you could start with a cylinder with double the edge count) THEN I extruded the square inward. Even with Smooth Preview, the pinching is barely visible if not at all.

    It might seem like a pain in the ass to have a dense mesh, but if you approach your model intelligently it shouldn't be a big deal. Try to split your object into pieces the same way it would be if it were manufactured in the real world.
  • Synen
    Options
    Offline / Send Message
    Synen polycounter lvl 7
    @Bartalon - Hey thanks for the tips man. For this project I started with a plane and made the groove shapes in then after getting the look down, dupe it couple of times the merge and threw a bend deformer on to give it is cylinder look since trying to cut on a cylinder is just hell haha.

    Then I gotta question is the bottom groove piece and the upper groove two separate objects then? Its really hard to tell from the concept
  • Bartalon
    Options
    Offline / Send Message
    Bartalon polycounter lvl 12
    Yeah, even if you do the bend technique the idea is still the same.

    The concept is a bit muddy but when I modeled that particular piece I did treat it as two separate pieces.
  • sziada
    Options
    Offline / Send Message
    sziada polycounter lvl 11
    too long and thin, if you look at the concept its much shorter and has a bigger radius.
  • Synen
    Options
    Offline / Send Message
    Synen polycounter lvl 7
    Starting to get back on working and finishing this project. started on texturing, got the base down
    gren12.jpg
  • Dethling
    Options
    Offline / Send Message
    Dethling polycounter lvl 11
    If you use the "bend methode" maybe it's better idea to apply the turbosmooth before the bend, this should reduce the "spikee corners"
  • Synen
    Options
    Offline / Send Message
    Synen polycounter lvl 7
    So I think can call this one finished, def learned alot while working on this, also decided to give a PBR painter a shot to see what this PBR rave is all about.

    Final.jpg
Sign In or Register to comment.