The BRAWL² Tournament Challenge has been announced!
It starts May 12, and ends Oct 17. Let's see what you got!
https://polycount.com/discussion/237047/the-brawl²-tournament
It starts May 12, and ends Oct 17. Let's see what you got!
https://polycount.com/discussion/237047/the-brawl²-tournament
[3ds Max] Rigging Issues and Rendering Questions
polycounter lvl 11
Hey everyone, I have a plethora of issues / questions regarding 3ds Max. To make for easier reading, each question is numbered before going into more depth.
1) Is there any way to change geometry after already skinning a model for a CAT rig? Aka. Why is this happening to my model?!
I've just finished rigging what is one of my first character models and everything up to this point has been smooth -- more or less. While it took a bit longer than I would have liked, I feel like the results are turning out well. However, one thing bugged me:
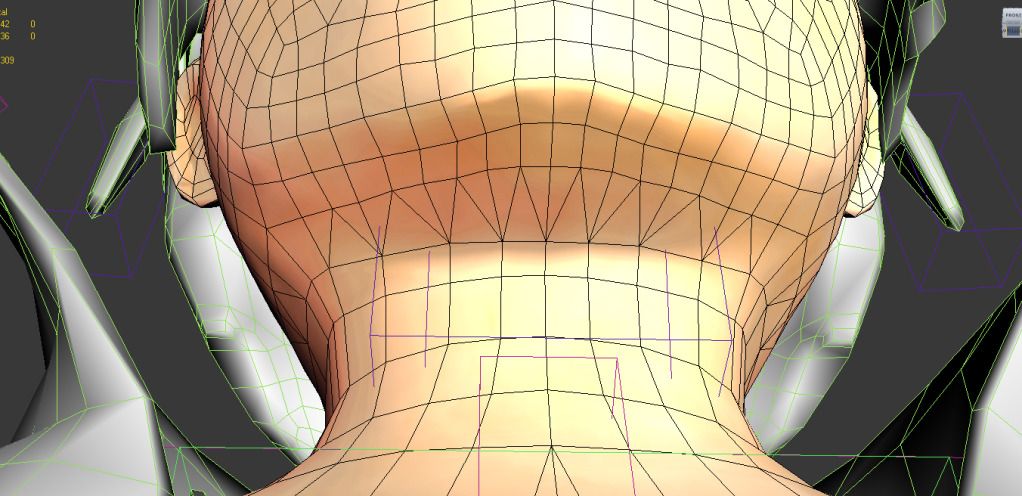
For whatever reason I thought to make the geometry like that! This caused a few problems during animation obviously, so I intended to change it and reapply the skin. This is what it looked like after I changed the geometry:
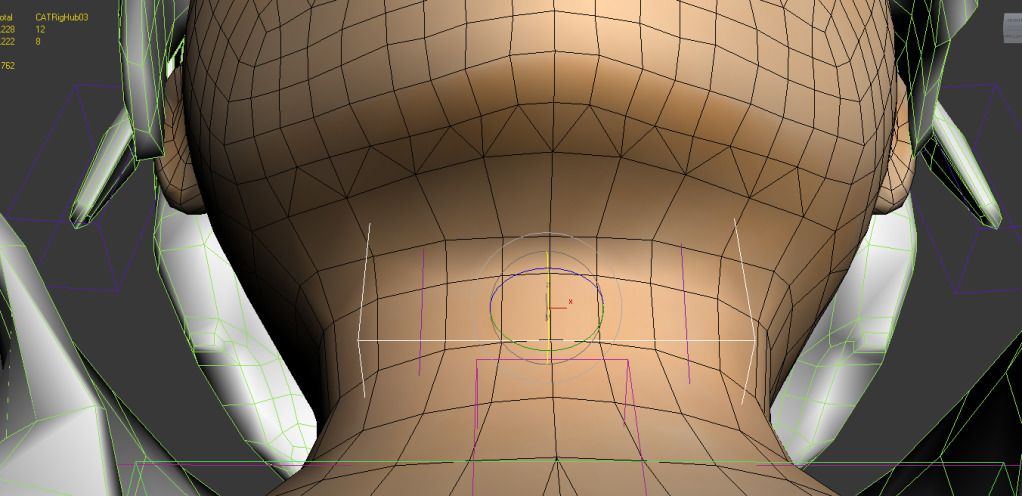
Now, I'm still not sure if the above geometry is a good idea -- but that's besides the point (anybody with suggestions, though, feel free to throw them out there!) The bigger issue here is what happened after attempting to move the head's associated CAT bone:
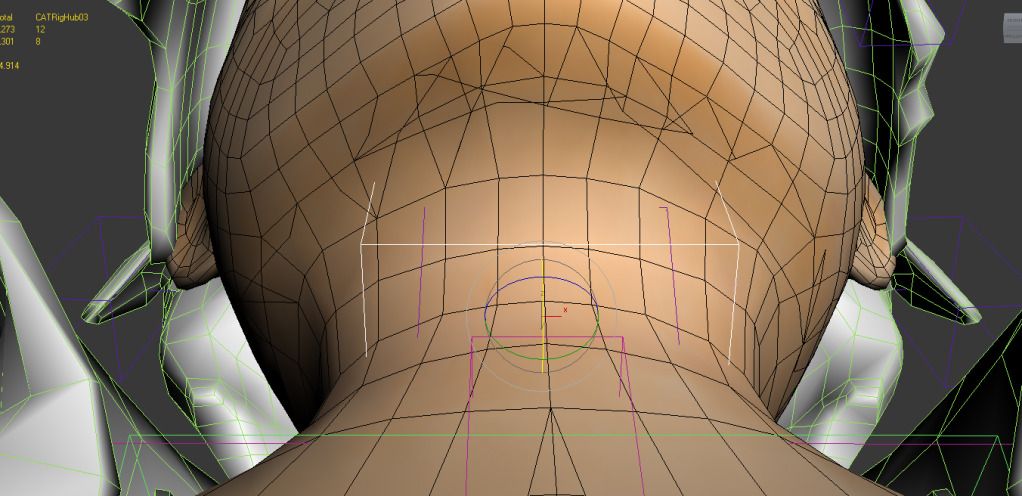
As you can see, some strange polygon artifacts are created upon movement! Since the polygon count increases after moving the head-hub, I can definitely confirm that these are new polys being created. What exactly is causing this? Is there any way to change the geometry after already skinning and rigging a model? Thankfully I've been saving backups extremely frequently so it's not a big deal if that side-effect isn't reversible, but I'd certainly like to know what I did wrong. For the record, my process simply involved making a new edit poly, changing the geometry and then creating another skin modifier to reapply any changed necessary to the weights.
2) When it comes to rendering cartoon-styled renders in 3ds max, how do you render your models?
I've been looking around for any good information when it comes to rendering in 3ds max and how to do lighting with ramp shaders in 3ds Max. Unfortunately, many of the alternatives seem to be using real-time direct X viewports such as Xolliul / 3 Point Studios / TF2 style rendering. This look fine, but it sounds like it's impossible for direct X materials to appear in the 3ds max renderer. Does anybody have any good suggestions / resources for rendering a scene in 3ds Max with ramp shaders or special lighting conditions? Or even (at this point) creating my own shader that can deal with 3ds Max's rendering system? I've heard mixed opinions about 3ds Max's rendering, so perhaps I should use UDK instead. :P
3) When rendering out a "beauty pass", is it better to render out each element as an individual pass or let 3ds max handle everything?
This is kind of an extension of the above question, but I think it's different enough that it qualifies for it's own section.
Thanks for reading. Any suggestions / answers would be nice.")
1) Is there any way to change geometry after already skinning a model for a CAT rig? Aka. Why is this happening to my model?!
I've just finished rigging what is one of my first character models and everything up to this point has been smooth -- more or less. While it took a bit longer than I would have liked, I feel like the results are turning out well. However, one thing bugged me:
For whatever reason I thought to make the geometry like that! This caused a few problems during animation obviously, so I intended to change it and reapply the skin. This is what it looked like after I changed the geometry:
Now, I'm still not sure if the above geometry is a good idea -- but that's besides the point (anybody with suggestions, though, feel free to throw them out there!) The bigger issue here is what happened after attempting to move the head's associated CAT bone:
As you can see, some strange polygon artifacts are created upon movement! Since the polygon count increases after moving the head-hub, I can definitely confirm that these are new polys being created. What exactly is causing this? Is there any way to change the geometry after already skinning and rigging a model? Thankfully I've been saving backups extremely frequently so it's not a big deal if that side-effect isn't reversible, but I'd certainly like to know what I did wrong. For the record, my process simply involved making a new edit poly, changing the geometry and then creating another skin modifier to reapply any changed necessary to the weights.
2) When it comes to rendering cartoon-styled renders in 3ds max, how do you render your models?
I've been looking around for any good information when it comes to rendering in 3ds max and how to do lighting with ramp shaders in 3ds Max. Unfortunately, many of the alternatives seem to be using real-time direct X viewports such as Xolliul / 3 Point Studios / TF2 style rendering. This look fine, but it sounds like it's impossible for direct X materials to appear in the 3ds max renderer. Does anybody have any good suggestions / resources for rendering a scene in 3ds Max with ramp shaders or special lighting conditions? Or even (at this point) creating my own shader that can deal with 3ds Max's rendering system? I've heard mixed opinions about 3ds Max's rendering, so perhaps I should use UDK instead. :P
3) When rendering out a "beauty pass", is it better to render out each element as an individual pass or let 3ds max handle everything?
This is kind of an extension of the above question, but I think it's different enough that it qualifies for it's own section.
Thanks for reading. Any suggestions / answers would be nice.
Replies
2. You can "render" the viewport, using the Make Preview tool.
http://docs.autodesk.com/3DSMAX/15/ENU/3ds-Max-Help/files/GUID-02B83BCD-6621-4F0F-878B-9781A07C996E.htm
Or you can use something like the Ink and Paint material for the scanline (and other) renderers.
http://wiki.polycount.com/Model%20Presentation (see Pete Draper's tutorial)
It really depends on what effects you need to have in your render. Viewport is better for emulating what a game looks like. But scanline/mental ray/vray/etc. are more flexible and feature-rich (more work too).
3. Passes are better, because it saves a lot of time to adjust things in Photoshop, rather than re-rendering the whole scene again and again as you tweak small values.
To get around this what you do is leave your old mesh skinned to the bones, copy it, remove skin, make your changes, then Skin Wrap it to the original mesh and covert it to Skin and delete the original mesh.
Skin Wrap takes the nearest vertex on the target mesh and uses that weight instead of relaying on vertex numbers. You might want to animate the model a bit and play with the sliders to get the best deformation possible before converting it to skin but that's the best way to handle geometry changes.
2-3 I don't have time to dig into, sorry, only had a few min.