The BRAWL² Tournament Challenge has been announced!
It starts May 12, and ends Oct 17. Let's see what you got!
https://polycount.com/discussion/237047/the-brawl²-tournament
It starts May 12, and ends Oct 17. Let's see what you got!
https://polycount.com/discussion/237047/the-brawl²-tournament
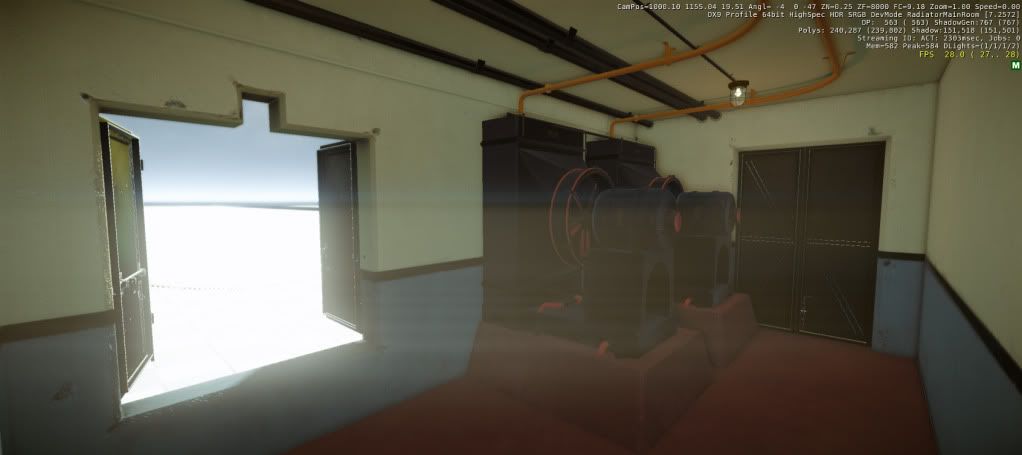
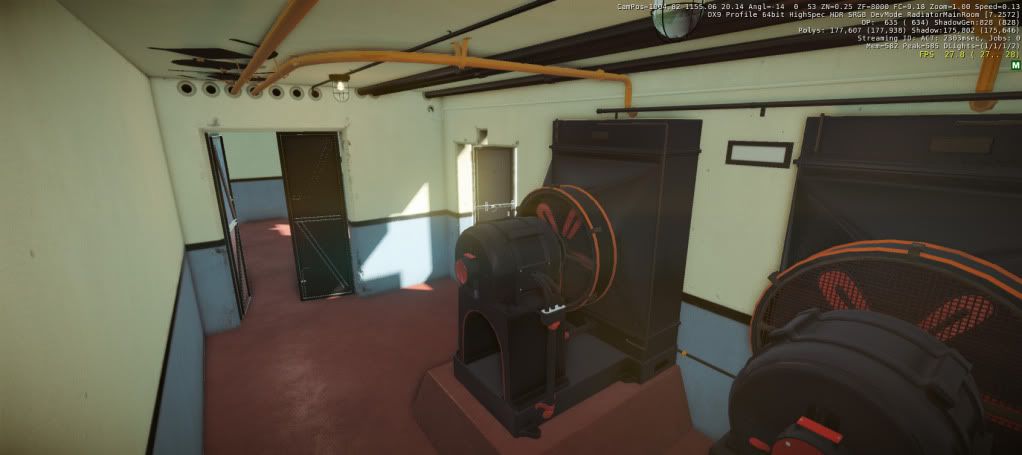
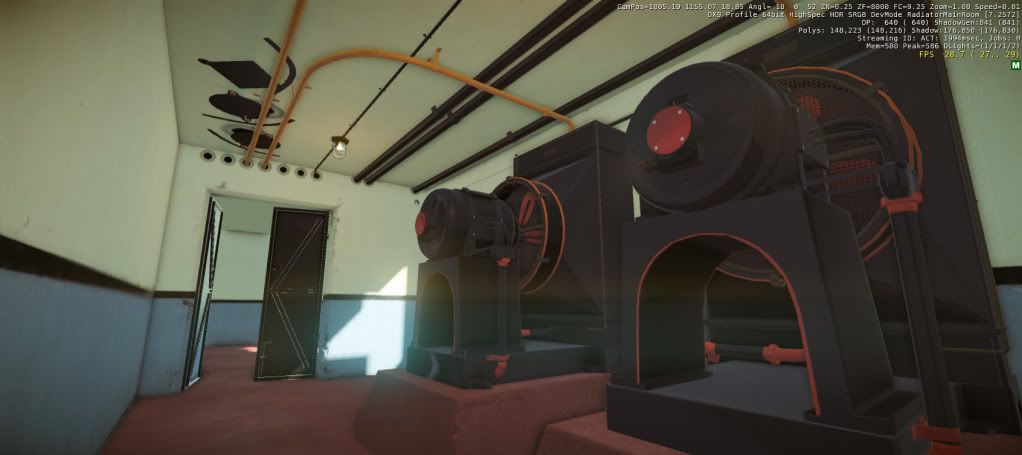
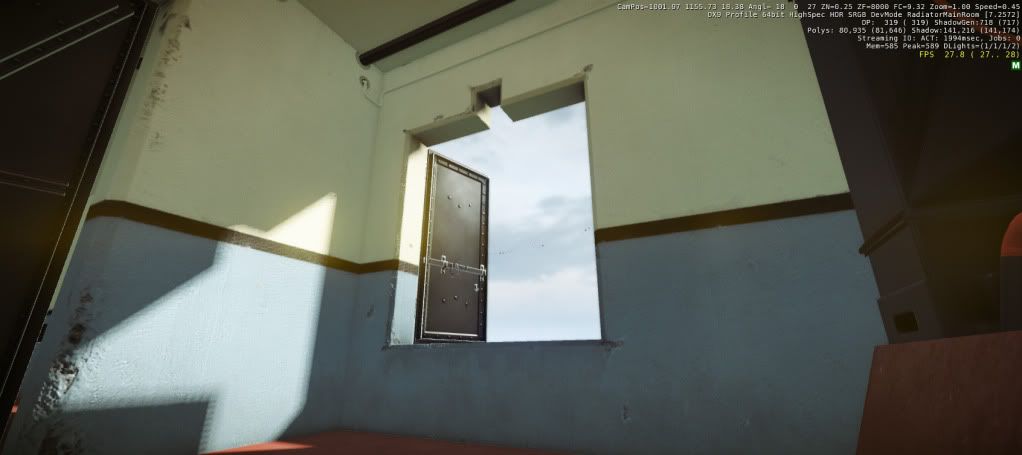
Radiator Room [CE3]

polycounter lvl 13
Hello guys,
I'm creating this environment (http://www.nonplused.org/panos/fort_mac/html/04.html) for an free indie game using the free ce3sdk. I'm stuck and I suck at texturing the assets of the environment.
I really need your tips/crits/advice because I really want to improve my weakness(I can't even match the lighting and color of the wall from the reference :poly127:). Textures are WIP
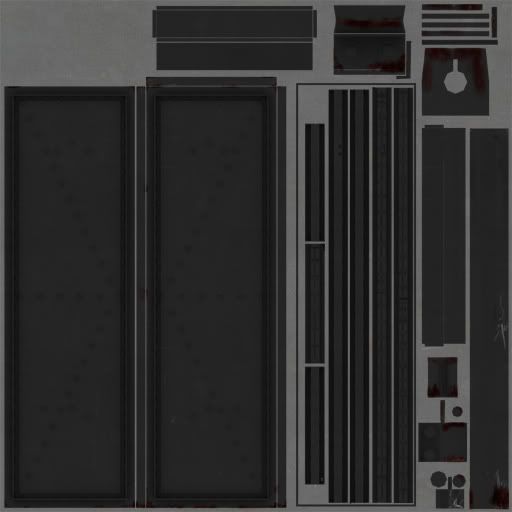
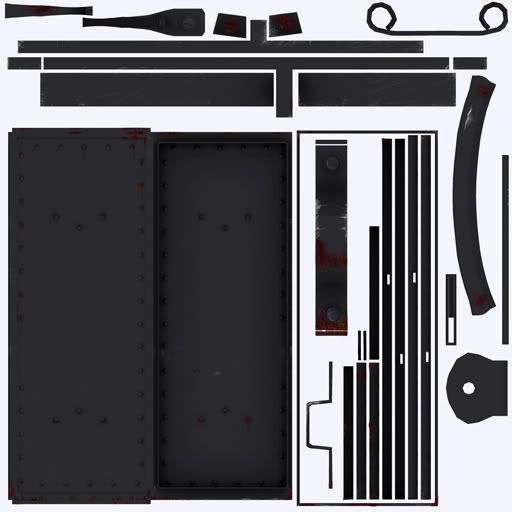
Here are the texture sheets:
I'm creating this environment (http://www.nonplused.org/panos/fort_mac/html/04.html) for an free indie game using the free ce3sdk. I'm stuck and I suck at texturing the assets of the environment.
I really need your tips/crits/advice because I really want to improve my weakness(I can't even match the lighting and color of the wall from the reference :poly127:). Textures are WIP
Here are the texture sheets:
Replies
Sorry for the Photo-Barrage
For the color of the walls, I'm pretty sure they are just an off-white, and a lot of their coloring is coming from the lighting - natural white light from the window and a pretty strong orange bulb on the ceiling. In your scene the bulb does not appear to be giving off any light.
Keep it up!
yup I have some spec maps but it is the grayscaled version of the diffuse, leveled and painted the recessed part of the model. One of my problems is the dark metal material because the texture details really don't show much.
I'll try adjusting the strength of the lights so it will be noticeable.
Thanks for the crit.
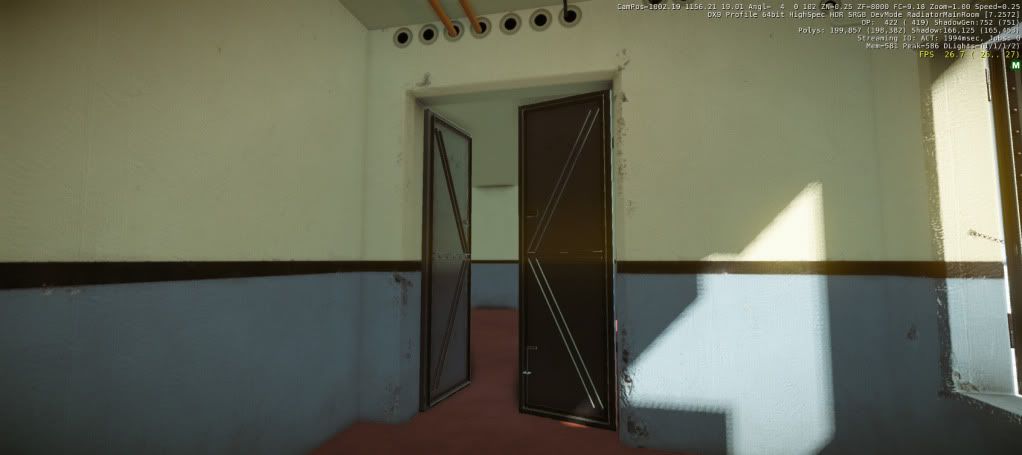
I re-textured the door and the hatch.
Flats:
Door Diffuse and Spec
Hatch Diffuse and Spec
I tweak the lighting a bit by adding more power to the orange lights.
Once again I need your crits in my texturing because as you can see I really suck at it.
kind of a tiny image, but it gets the point across. your walls are going to be dirty, and the metal on those doors will be rusted. you have a good start, you just need to push it further. good luck!
that's just the way I feel after I saw epic environments here in polycount, anyway thanks for encouraging me to post more
@ duoxan
hmm yes I'll try to stray out from the reference because it looks kinda bland and empty. I'm considering adding more grime and dirt to the environment. thank you for the tips
@Computron
If that's the case then crysis 2 did a good job fooling me (in a good way) by believing that it has GI in the interior levels :icon3:. I'll experiment using that technique and apply it in my environment. thanks for the info.
I used the visarea/portal to recreate the lighting of the environment. I also retextured the modular walls.
need crits again for the textures, thanks.
Bump up the contrast in the shadows and re-textured the walls again. This environment needs to be clean (but not super clean).
Even if you decide to dirt it up some more or not it needs more props, if you don't know what to do with the texturing right now, start on some props and come back to the texturing when you got more of a feel for the scene.
Also the doors and pumps are creating a lot of void space at the moment, which is making your image quite boring to look at.
Since I'm planning to deviate from the reference, I did a little research about the things that I can put in the scene and also why I put it in there.
Thermometer thingy: I've research a little about radiators and its main purpose is to cool or heat something. So I think it is logical to put an industrial thermometer in between the radiators.
(the reference looks destroyed but I'll make it clean)
Emergency Light: I'm assuming that the door below it is an exit so I think it is logical to put an emergency light because you don't want to bump those engines when blackout strikes
Blackboard: I believe that the operations of the engine will change depends on the season... hmmm maybe if it is summer, the engine might need to operate longer. So I think it is more easier to use a blackboard than to print new schedules.
Light switch:
Fire Extinguishers: who knows what could happen? I'm having a hard time if I will choose the brass over the red one because the strong saturated red color might draw the eyes away from the radiator engines.
Label "Fire Extinguisher": just to indicate that "this space is reserved for the fire extinguisher".
Sign: I place this important sign in front of the window hatch so that the sun light can help emphasized it.
Electrical Outlet: a simple decal that can be place everywhere.
Toolbox w/ wrench: the engine is full of bolts, so someone needs a wrench to fix it
Box trash: If you can read the reference the box is for a spark plug. I'm going to change it into a "fuse box" since the room beside the radiator room is the "power room".
Electric Box: I think it is more logical to put this on the power room but I'm running out of ideas in what to put on that wall.
Hope I make sense.
____
I would love to hear your comment/crits to improve my thought process so I can improve my planning in my next project.
@myles
I picture the engine as the final boss of my texturing adventures
Before I attempt to texture the engine I must texture all the assets correctly since I can apply all the knowledge I've learned texturing the other assets to the engine.
I hoped that I nailed the material correctly need crits about it.
btw here's the high poly
yup forgot to invert the normals inside marmoset, thanks.
I've been practicing texturing lately and redone some textures of the assets.
Here's some textured assets:
Electric Box
Texture: 1024x1024
Switch
Texture: 256x256
Toolbox
Texture: 512x512
Wrench
Agreed, you should try and keep the texel density consistent.
The electric box looks really nice
At first I have a fear of putting seams across the long part of the wrench.
might want some tips/crit before I texture it again.
If you want to see my workflow i can show you a few tips and methods via screen sharing that would probably help you alot just PM me if you need to and i can get you up to speed!
It always interests me to see exactly how someone is using their geo / how they are controlling topology.
Your materials read very well!
@ScottPetty
Thank you for the offer I'll try to contact you by PM
Still practicing texturing here some updates:
Old Style Fire Extinguisher
Texture: 1024x1024
Warning Board/Sign
Texture: 512x512
Industrial Thermometer (Sorry if the background is too dark)
Texture: 512x512
I reuv'ed and retextured the wrench because the texel density is off. (thanks chrisradsby and Stromberg90)
Wrench
Texture: 512x512
HP's
Emergency Light (Texture: 512x512)
The glass shader might improve inside the sdk, looks like plastic at the moment :poly127:.
Fuse (Texture: 512x512)
Socket (Texture: 512x512)
No need for wires screenshot for this one, just imagine two planes
Crits are still welcomed.
Lights (Glass might improve inside sdk)
Sign
Radiator
In-Game
Before I call this environment done, I would love to hear your crits first.
Thanks
if you need to know how to get higher red grabs out take a look here:
http://www.crydev.net/viewtopic.php?f=326&t=72419
I think the mats you have in here look great, any chance you could post up some of the setups for your mats in the SDK?
Think it looks really cool mate, potentially a little too clean for a radiator room imo.
thanks for the link, it helped me to take high res shots
____
I didn't notice that photobucket were shrinking down my screenshots, happens to be that the free accounts have dimension limit :poly141:. I changed to dropbox for uploading my stuffs.
Added some subtle decals for finishing touches.
Thanks for the comment/crits guys I learned a lot creating this environment. I'm excited to start my next environment project.
-pt1-
Here's a brief rundown, experiences and mistakes I've encountered when I was creating this environment.
This is my first project using cryengine and I've learned lots of things, I've been dreaming to create this kind of documentations so that you guys can give me crits about my current workflow in environment creations.
So this environment began when I got the go signal to create the radiator room of fort mac arthur for the project. I chose this reference (http://www.nonplused.org/panos/fort_mac/html/04.html) because I wanted to start small to improve my weakness, the dreaded "TEXTURING" and learning the engine.
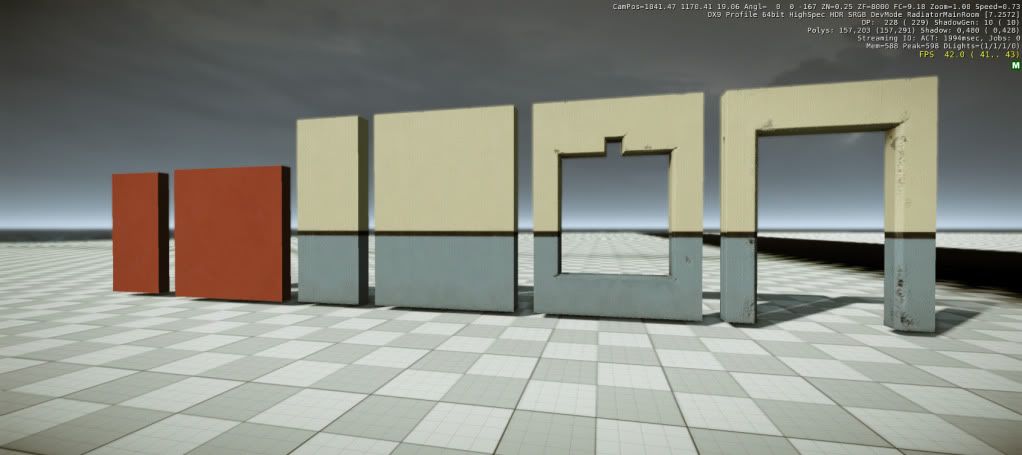
I carefully analyzed and planned the reference with modularity in mind to look for pieces that can be reused to create a whole new environment using the same assets.
I took a screenshot and divided it inside photoshop by colors. Same Color = Same Asset.
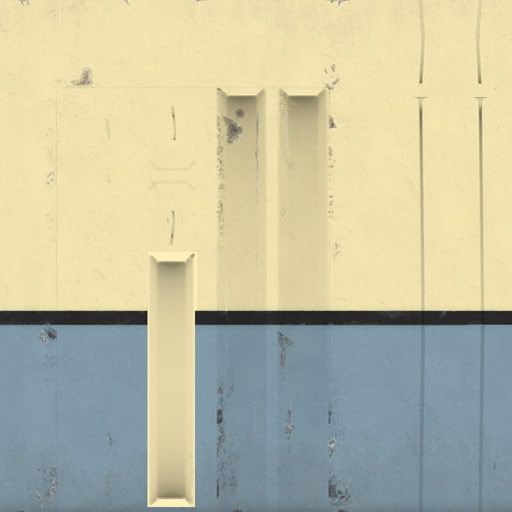
After planning the divisions of the pieces I created a blockout inside 3dsmax. The scale I used is 180 cm for the player.
and imported it inside the sdk to check if the scale and feel of the environment is correct:
When I was planning the modularity, the only thing in my mind is the proper scale of the scene I was kinda wrong because I didn't think about wise texturing method (I'll explain later).
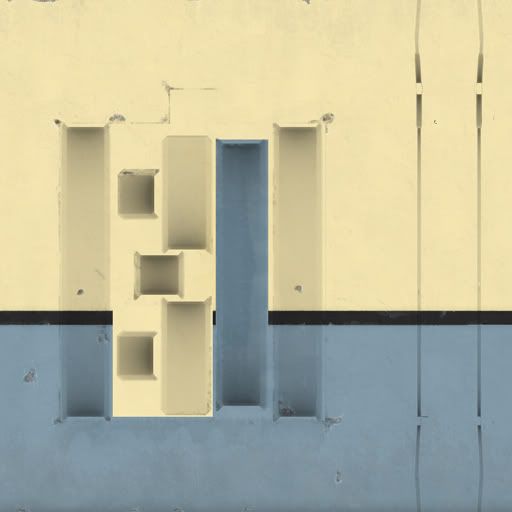
After the blockout, I started creating the props:
Starting from High poly
to low poly w/ baked texture (AO,Normal map, select map, basic diffuse map)
*the smoothing errors are the result of xnormal map bakes rendered inside 3dsmax using nitrous viewport.*
One thing I want to share is my workflow on creating hp/lp modular walls. I learned this technique when I was creating my last project before this. I was having a problem removing the seams and lining up the texture. What I did is to make the hp's border edges wider than the lp:
The seam problem is caused by the high poly smoothing of the edges if the projection occurs on a flat surface the baked textures will have no seams. After the seam removal the lining of the texture details was my next problem. The mistake I was talking about before was I didn't create the wall pieces square in dimension (192Wx256H instead of 256Wx256H), making a gap in the UV's if I use the quick planar map, this will make the tiling textures and details normal map create unwanted seams. I used the proper Planar Projection instead of the quick one. The UV's will be stretched a bit but It will be unnoticeable:
Here's the modular pieces' dimension:
I've imported the assets inside the sdk this is the iterations I've made:
1.) Too clean I know
2.) Imported the modular pipes. I think the non-uniform scaling can only be used for small assets like the pipes because whenever I non-uniformly scaled an asset it breaks up the physics proxy.
3.) Imported all the initial assets inside the scene.
4.) Iteration on wall textures.
5.) Another Iteration on textures.
-continue pt 2-
6.) A major iteration on textures based from the helpful constructive crit of BuLL (thanks!). I learned to focus more on the subtle details the reference has to offer. I thought the walls are just a rough slab of painted concrete but by further examining it the walls have subtle brick patterns!.
This is the iteration I've used the portal/visareas techniques where I faked the light bounces using small and negative lights. My initial thought about the realtime GI TOD system of CE3 was a one stop shop lighting solution.
Here's a screen of the lighting placement:
Some people's crits told me that the reference itself is too empty and boring so I decided to stray away from it and add more assets inside the scene. Here's the planning part of it:
Back to Hp/LP modeling and more serious texturing practice.
The things I've learned so far in texturing this environment:
1.) Study the reference thoroughly.
2.) Never underestimate the power of a specular and gloss map because it can make or break the material.
3.) Lighting and position of the object can dictate the needed resolution and details of the texture.
4.) Always localize wear/damage details. Only put wear or scratches where it is logical to occur.
5.) Always bake texture maps in high resolution then shrink down the final texture maps to the desired resolution.
6.) Always keep in mind equal distribution of texel density.
7.) Always save because photoshop doesn't have a built-in backup system
and lastly
Organize using good naming convention and named folders because my asset listing is a disaster.
After texturing the assets and setting up the materials I've added some decals to finish the environment:
Things I've wanted to implement is to put some dust particles, use the blend shader and vertex painting.
Sorry If there are some grammatical errors, English is not my native language.
Thanks for reading I love sharing my experiences in order for other people to avoid the problems I've encountered.
It's quite evident to me that you've been using the ever important skill of observation, and reference. Some of the most realistic overall looking stuff I've seen in a while.