Home 3D Art Showcase & Critiques

Horror Doctor

ChristianB
polycounter lvl 11
Offline / Send Message
ChristianB polycounter lvl 11
I was asked by a friend to create his character 3d for a Game he is making for his Final Major Project at Uni, so with his consent I have been given premission to post my progress on here to recieve crit as I go.

At this point in time I am currently working on the head scuplt, this the concept he has provided me with:
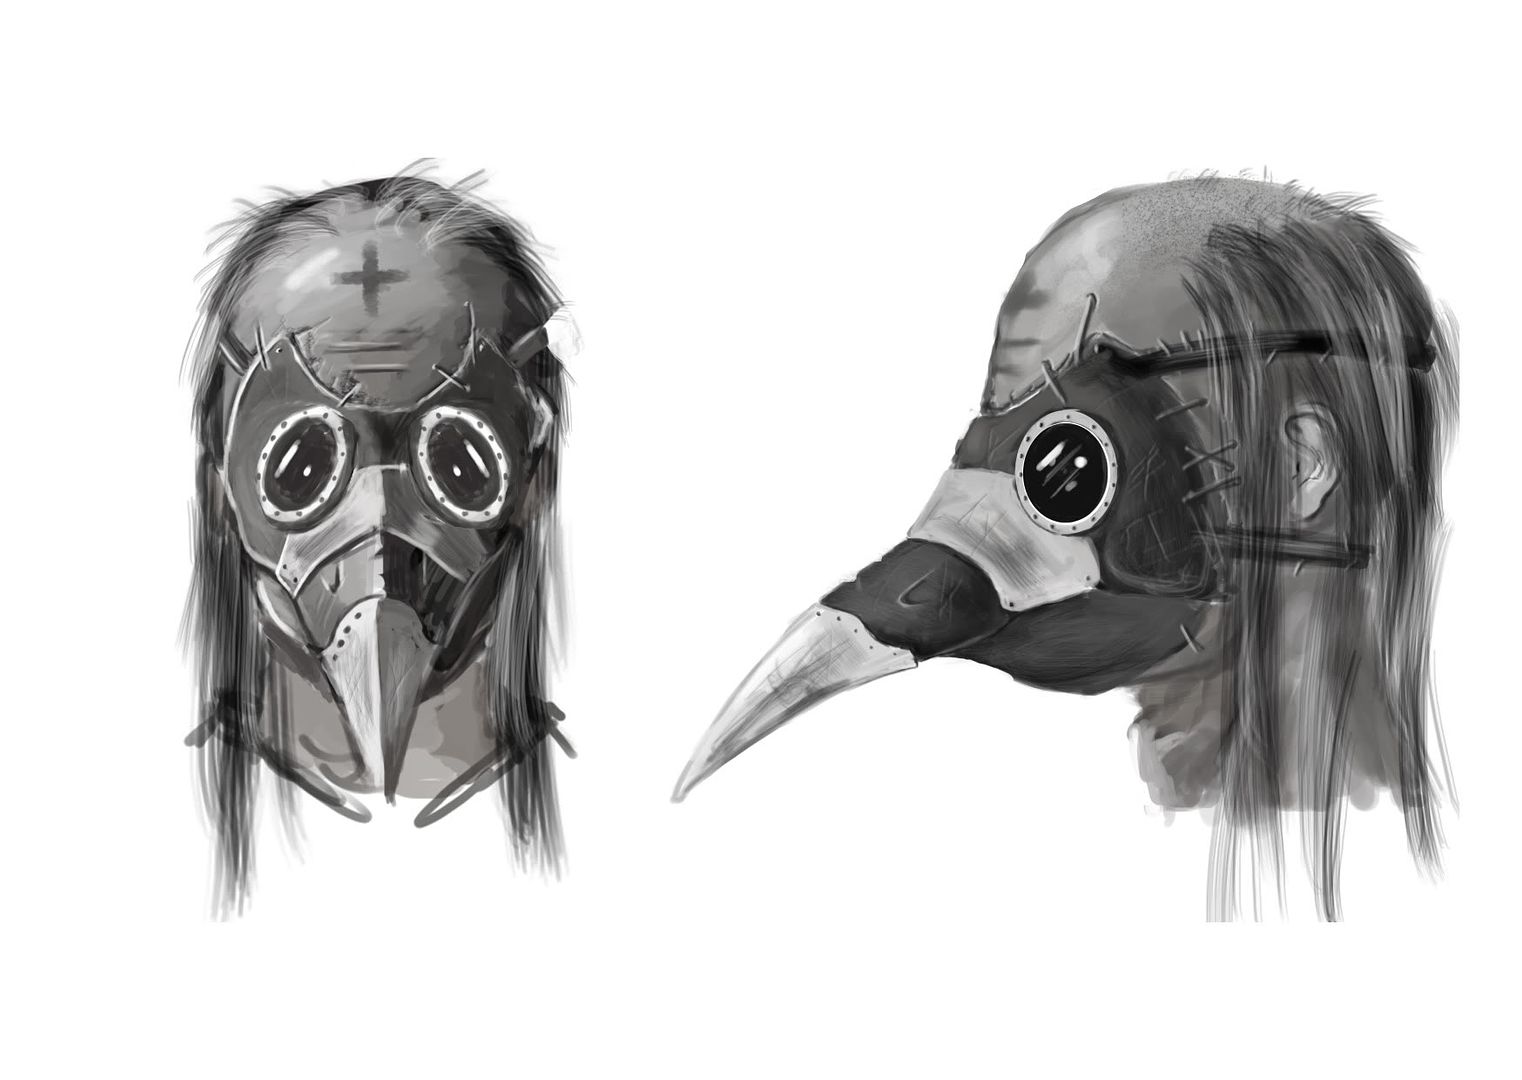
docturnaroundhead.jpg

and here my progress so far with the scuplt
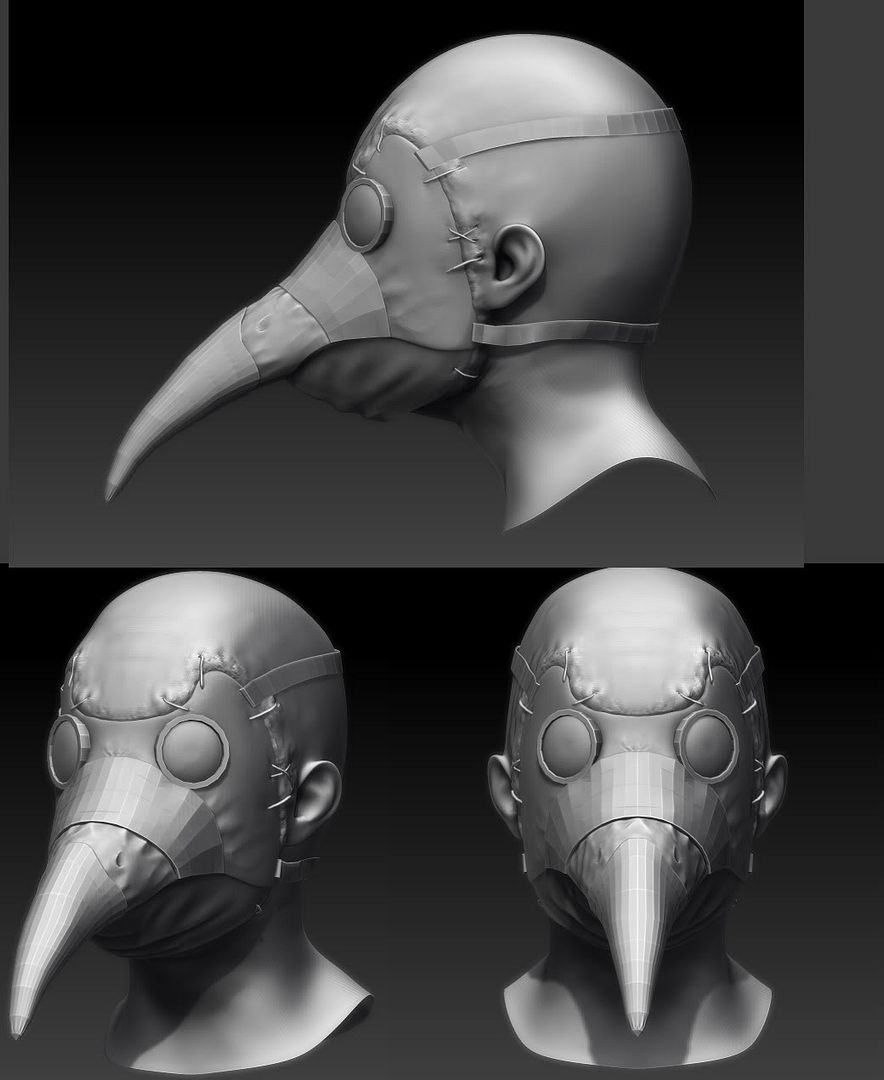
Untitled-3.jpg

Replies

  • ChristianB
    Options
    Offline / Send Message
    ChristianB polycounter lvl 11
    So I worked on the bust more and did the base mesh and baked down but i havent got round to tidying it atm,

    head3.jpg

    I still need to add hair to the bust also one problem people might be able to help with, I mirrored my UV's and im using the offset feature within max to project the other side but iv ran into a snag, at the neck base and around the back of the head the seam grows and is also not set right here is a quick render

    head1.jpg

    if you look at the neck you can see what i mean, and here is a screenshot of my UVs

    head2.jpg

    If anyone knows how to fix this i will love you long time
  • toxic_h2o
    Options
    Offline / Send Message
    toxic_h2o polycounter lvl 8
    Looking good, you might want to go back and work on the position of the ears, the look really low and pushed forward on the skull. Also it might be kewl to add an ear defect like this.

    cauliflower_ear-772.jpg
    cauliflower ear
  • mospheric
    Options
    Offline / Send Message
    mospheric polycounter lvl 11
    I think the ears are too low and a bit small. Look at the profile of the concept, then the profile of the high poly.

    As for your seam issue, the only advice I can give is to not mirror the UVs if you are baking normals. I try to bake normals with unique UVs.
  • Wonkey
    Options
    Offline / Send Message
    Wonkey polycounter lvl 10
    Ok, first, your biggest problem is you went a little wrong on how maps tile, they tile like the top number example, NOT the bottom numbers.

    czsbD.jpg

    When you are baking normals, you want them to be perfectly on top of each other, then you offset them by one (if you need explaination on that, let us know)
    Yes there will be a seam, just not as bad as you have now. This should get you moving again.
  • ChristianB
    Options
    Offline / Send Message
    ChristianB polycounter lvl 11
    so i tired the fix suggested and it fixed the non lining up but also presented a new problem of a massive noticable seam, but this was in max

    BjZmq.jpg

    So I tested it in UDK instead as thats what engine the character is gonna be for and this happened and i have never seen or have any idea why its doing this

    wtf.jpg
  • cdevens
    Options
    Offline / Send Message
    cdevens polycounter lvl 7
    Do you have a second UV channel set up for your lightmap?
  • fei-rukawa
    Options
    Offline / Send Message
    In UDK maybe you can try to invert the green channel of your normal map, also, IMO it's always a good idea to try to hide seams in less visible places, avoid symmetrical uvs if you can...
    Else if you really have to, you can do as wonkey said, also make sure you don't have hard edges, and put your seams where your mesh is not flat.
  • ChristianB
    Options
    Offline / Send Message
    ChristianB polycounter lvl 11
    sooo i fixed quite a few things, i fx the UDK holeness and also the normal seam, it would appear compressing the normal map created the horribad seam so here is the results of pissing around with it

    faceeeee.jpg
  • ChristianB
    Options
    Offline / Send Message
    ChristianB polycounter lvl 11
    just noticed my other images didnt post -.- anyhow, i fixed the seam/mirror issue and here is a screengrab of it in UDK

    face2.jpg

    I would fix the ear but concepter seemed fine with it so im gonna keep it in mind and also gonna make sure when it comes to working on the body im gonna post WIP stuff on here so i can fix as i go.

    I still need to setup shaders for the metal and glass eyes soo yay more research ^_^ if anyone knows any good tuts for those shaders would be a nice help, also its lacking a spec map
  • konstruct
    Options
    Offline / Send Message
    konstruct polycounter lvl 18
    make sure you balance out all those warm tones with some cool ones-

    for good metal/glass your going to need to utilize a cube map-
    I havent watched this , but its probably an ight place to start
  • Dashtoronto
    Options
    Offline / Send Message
    toxic_h2o wrote: »
    Looking good, you might want to go back and work on the position of the ears, the look really low and pushed forward on the skull. Also it might be kewl to add an ear defect like this.

    cauliflower_ear-772.jpg
    cauliflower ear

    Toxic_h2o,

    You have the front of that guy's face? i want to see what his face looks like
  • Norron
  • Ravanna
    Options
    Offline / Send Message
    y'alright CB ;) will love to see the spec/material effect on it, should bring out the normal map more. Agreed on the colour, add some blues to balance out the muddy warm colours, specular will probably do that too.

    As for the method of the UV mirroring, i was like :poly142: wut, but then u know i suck at UDK.
  • ChristianB
    Options
    Offline / Send Message
    ChristianB polycounter lvl 11
    Hey Rav :), ill play around with bring out the normals more and ill post the results on the next update

    I changed up the diffuse to steer it away from warmness and also played around with hair, I discovered today that I havent really played with hair much O.o no idea how iv avoided it tbh, so its like a hugggge relearning process I put the hair alphas on a 256x256 map, here is a screengrab from udk

    face.jpg
  • Vailias
    Options
    Offline / Send Message
    Vailias polycounter lvl 18
    @Wonkey: What you've said isn't entirely true.

    Textures in most engines default to tiling, but can be set to mirrored tiling easily, or even to just repeat the edge pixels only. UDK handles this on a per edge basis.

    So that setup for the UV's would be fine with the texture set to mirror. The trick would be to ensure those center seam UV's are exactly on the border of 0 or 1 respectively.
  • ChristianB
    Options
    Offline / Send Message
    ChristianB polycounter lvl 11
    so was handed the concept for this body today and here it is and my progress with zbrush

    wip2.jpg

    Untitled-1.jpg

    Im using the machinist as my main point of reference
  • Steve Schulze
    Options
    Offline / Send Message
    Steve Schulze polycounter lvl 18
    Your anatomy is a bit of a mess here. If you're running with pictures of The Bale in the Machinist, then you need to take a closer look at them - the shape of the rib cage and the muscles stretched over it.
  • ChristianB
    Options
    Offline / Send Message
    ChristianB polycounter lvl 11
    changed things up a bit

    Untitled-2-2.jpg

    my main ref is this image of him

    BALE%20-%20THE%20MACHINIST.jpg
  • PaulP
    Options
    Offline / Send Message
    PaulP polycounter lvl 9
    Seems like an interesting project, I like your friends concept art, although I'm sure I've seen that beaked head design before in a movie or something... but anyway!

    I think it's worth checking out some medical pictures of rib cages, the shape at the bottom is a lot more of a smooth curve. You could even just have a feel of your own ribs and you'll see what I mean.
  • AzzaMat
    Options
    Offline / Send Message
    AzzaMat polycounter lvl 9
    Its looking gd dude but try removing the lowest ribs, I think thats whats putting the anatomy off. If you look at the reference you can see the ditance from the bottom of the rib to the top of the pelvis / belt line is greater than the sculpts, if you remove the last rib section it should even out the distance and give the rib cage a more rounded look, you should blatently get some bones sticking out as well, kind of like an extreme rib fracture =P
  • mospheric
    Options
    Offline / Send Message
    mospheric polycounter lvl 11
    SCB wrote: »
    Seems like an interesting project, I like your friends concept art, although I'm sure I've seen that beaked head design before in a movie or something... but anyway!

    It's a real mask from the 1600s. Plague doctors used to wear them and put scented plants down the hollowed out beak to mask the stench of death.
  • PaulP
    Options
    Offline / Send Message
    PaulP polycounter lvl 9
    Haha lovely! No-wonder that's been used in horror movies!
  • Steve Schulze
    Options
    Offline / Send Message
    Steve Schulze polycounter lvl 18
    You might be better to go with this photo. The weird lighting in the one you've got there is kind of confusing the anatomy a bit. There are a few others from different angles available if you do a Google search for The Machinist.
    stickman.jpg
    You could cross reference it with some pictures of people with anorexia or marasmus to get a clearer idea of the sorts of forms you should be going for.
  • ChristianB
    Options
    Offline / Send Message
    ChristianB polycounter lvl 11
    Hey guys would of posted updates as I worked by the computers at my uni have imagehosting sites block =/ but here was the end product of the body in zbrush

    bodyzbrush.jpg

    and here is the lowpoly ready for unwrap/bakey goodness

    bodywires.jpg

    Btw if anyone is intrested you can find my concept artist DA account here: http://devil-glonk.deviantart.com/

    p.s. thanks for all the feedback so far guys its be amazing and very helpful :)
  • ChristianB
    Options
    Offline / Send Message
    ChristianB polycounter lvl 11
    did the legs/feet today, me and concepter decided it would look more creepy with out shoes, prob end up alphaing the rope hanging from the front

    lehs.jpg

    here is the retop of the pants, still need to do the feet yet, will be working on that and the coat tomorrow.

    legwire.jpg
  • ChristianB
    Options
    Offline / Send Message
    ChristianB polycounter lvl 11
    Here's a quick updated UDK screengrab:

    Untitled-2-3.jpg

    just did a quick skin/pose, still lots to do, still need spec map alpha maps, coat, objects, seam fixing, diffuse tweeking and shaders.
  • ChristianB
    Options
    Offline / Send Message
    ChristianB polycounter lvl 11
    here is a quick update on progress, i have had to put this character on hold for a while because of other work, he is still lacking spec maps ect

    5535kz.jpg
  • LRoy
    Options
    Offline / Send Message
    LRoy polycounter lvl 13
    I think the skin could use some work. It looks like one uniform color all over. There should be warm/cool spots depending on how close the bone is to the skin. Try to look at some more reference
  • Fuse
    Options
    Offline / Send Message
    Fuse polycounter lvl 18
    I think you should take a step back and carefully study the anatomy. Working from photo reference is good only when you understand the structure under the skin. Right now you are being mislead by the forms on the anorexic and emaciated photos by recreating folds and ripples where you think you see them instead of creating a feeling of stretched skin, rib cage etc.

    Anatomy is a tricky thing that if you don't get right, you can't quite move on.
  • ChristianB
    Options
    Offline / Send Message
    ChristianB polycounter lvl 11
    really good crit guys ^_^ keep it coming, this model has turned into a huge experiment of combinded techs im unfamiliar with, when my work schedule lesses up after xmas i really wanna revist a lot of this and your all helping when it comes to revisiting it.

    one thing I know i hugey need to improve on is my texture work
Sign In or Register to comment.