UDK Blurry Normals. Help!
Hey guys,
I'm having a really annoying problem with UDK and normals.
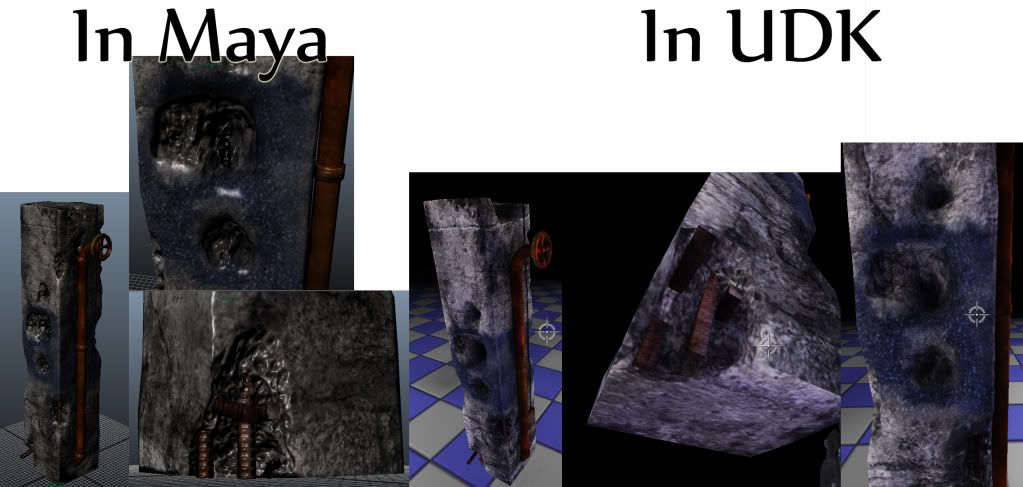
I've made a high res mesh and baked normals to a low res, made textures and exported the model using actor x as normal. Everything looks really good in Maya.
However when I put everything into UDK the normal map just isn't coming though near as much as it should be doing. Everything is at 2048 texture size. I've tried multiplying the normals, setting the LOD to -1, different compressions, etc - still no luck!
It's really annoying because it looks so good in Maya, but really blurry in UDK. Does anyone know how to make the normals actually look the way their meant to?
I'm having a really annoying problem with UDK and normals.
I've made a high res mesh and baked normals to a low res, made textures and exported the model using actor x as normal. Everything looks really good in Maya.
However when I put everything into UDK the normal map just isn't coming though near as much as it should be doing. Everything is at 2048 texture size. I've tried multiplying the normals, setting the LOD to -1, different compressions, etc - still no luck!
It's really annoying because it looks so good in Maya, but really blurry in UDK. Does anyone know how to make the normals actually look the way their meant to?
Replies
And after you try that, if that doesn't work, try changing the texture group to UI, and TC_UncompressedNormals.
Let us know what works for you!
Thanks for your reply's - really appreciate the help.
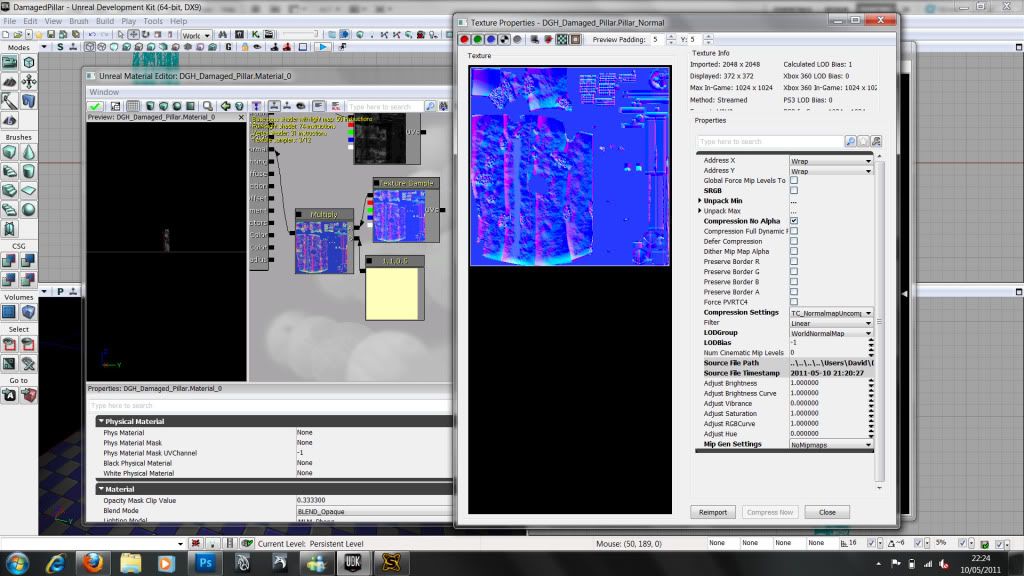
I've done the things you said but unfortuantly it doesn't seem to be fixing it, I've included the screenshots below. The normal map kind of seems to come through a bit better without the diffuse, but still not to the degree that it does in Maya.
This is really weird as well because we were told by our tutors that things usually look really poor in Maya as it's renderer isn't very good
One thing to note however is that the normals seemed to show up a bit better in the material editor previewer before when I was trying to fix this, however when looked at during the game they reverted back to how they are.
This is really annoying because Ive never had this problem before with normal maps, and i've looked at the default UDK materials which seem to have strong normal maps and can't see anything else their doing differently :S
Yeah I have 2 pointlights in the scene, the viewport is set to lit as well :P
i dont think that would really make a difference, that just allows for more detail, so you'll have the small cracks n things really showing which i dont think is the case here.
do you think you can give us the normal map to take a look at?
Yep. Give us the normal map per favore...
And just throwing this tut out there, IN CASE it has something to do with vertex lighting issues...which is totally different from normals but, ya know, someone might see this and it helps..
http://www.chrisalbeluhn.com/UT3_Asset_Lighting_Tweaking_Tutorial.html
I've uploaded the normal map to Photobucket, so I've had to convert it to a jpeg for that, but the file type I'm using in udk is a tga.
I know there's some orangey yellow 'bad bits' on it but I'm not worried about trying to remove these until the normal maps comes through properly - I did remove them originally but it still didn't work!
The normal map blue channel looks really strong in the node editor, but I'm pretty sure it'll be correct if you plug it straight in without multiplying it by anything.
no point haveing so many pixels when your not using them.
haha yeah I did realise that once I'd unwrapped it, ironically I wanted to have it all done really well for tomorrow (end of year interview at university) just to show the tutors, so I didn't bother/have time to re map it xD
I've plugged it in before without multiplying it but it still doesn't show up, I'm really confused as to why it shows up well in maya and not udk!
This. Don't mess with your blue channel!
If you want to enhance the normal map effect then multiply it 1,5/1,5/1
here's what it really comes down to. a bad sculpt will produce a bad normal map. a lot of your normal detail is just static noise and there are a few areas that are very extreme. so you'll end up overpowering the holes in the normal, and overpowering the edges if you multiply it.
plain and simple.. the normal map needs more detail to capture from. increasing the intensity will not help. my suggestion, as much as it may suck.. is to just redo the sculpt. or adjust it. you can go in photoshop and add other overlays in the texture and convert those into normals to overlay as well.. but your normal map just isnt cutting it.
i just ran the blue channel of your normal map through the xnormal filter for photoshop, and the result actually came out better than the original map. the details were more apparent, and i didnt have to multiply the intensity at all.
Yeah I've removed the multiply now after you guys told me off for it :P Saw it in one of the default materials and I've used it before on some stuff and it seems to work, although I understand the normal map should really be better enough to not need it xD
A good idea and it does kind of make a bit more of the detail come out, but not much of an improvement really.
Wow yeah I can really see the difference with that. I'll try to have a go with it in xnormal and photoshop.
Big news today though, kind of xD
Had the end of year interview at university for my second year and saw my tutor Aaron (Razorb on here :P). We talked about the model, as I've been asking him about it too, and decided I'm being a bit too fussy really: The normals seem to look fine from a fairly normal distance away for a videogame and it's only really up close it diminishes.
I'm gonna have a little try and getting it working correctly, but I've also been warned not to get tunnel vision on getting the normals perfect on the one asset :P
He suggested doing a lightmap for it, and I've done that. Again it kind of looks a bit different, but then some wierd black spots show up - proberbly a mistake in my lightmap.
However I've just come across something interesting:
Under World Properties > Lightmass, if I click the checkbox so "Force No Precomputed Lighting" is on then the normals show up exactly as in Maya. Of course the problem with this is its not suitable for a game xD
Thanks again for all the help guys, I'll try the xNormal Blue channel in photoshop, hopefully it'll work, looks like it should xD