Scifi Missile Launcher Tank [image heavy]
polycounter lvl 16
So i've been working on this project for some time although with considerable interruption due to other stuff poping up. Anyway I think it's time to show what I have so far and start a thread about it.
So my goal is a new portfolio piece and a another opportunity to learn about hard surface modeling.
I got inspired by the following concept from Red Faction. Its an heavy missile launcher tank.
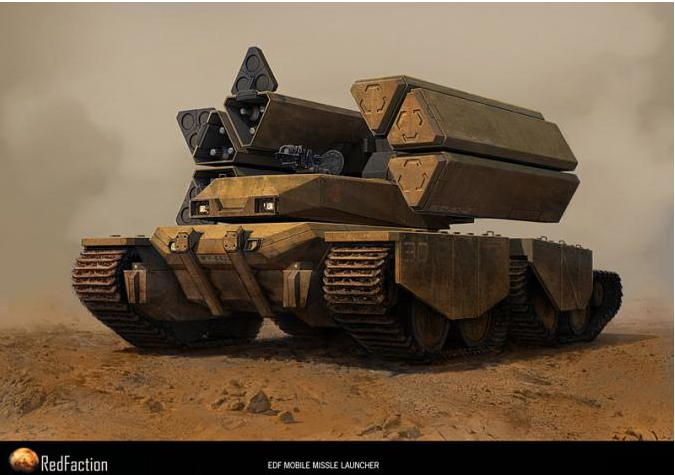
I was really impressed by the design of the launcher pods and the look of the front of the main body. Also two-tracked vehicles are quite awesome.
Besides the great aspects of the concept that I've pointed out, I wasn't fully happy with other parts of the depicted vehicle (e.g. design of the turret with the lights, look of the tracks etc.) And as the concept is just a front view it was inevitable to think of own design elements for the back and top areas. So finally I decided to take the elements I like about the concept and merge them with my own design ideas.
So here we go with a first stage concept:
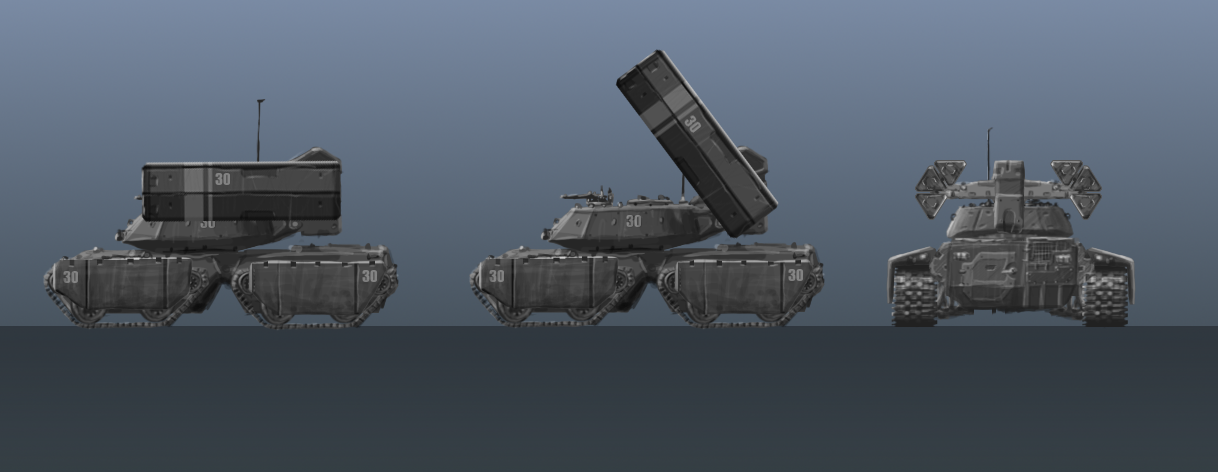
For further references I took pics of real tanks to get some inspiration. And did various overpaints of the model.
The main goal was to create a vehicle that clearly is part of a scifi setting. At the same time the design elements should look functional. The overall construction should give the impression that it can work in real life. Although if I had to decide between coolness vs. realism the later played a minor role.
And here we go with the model:
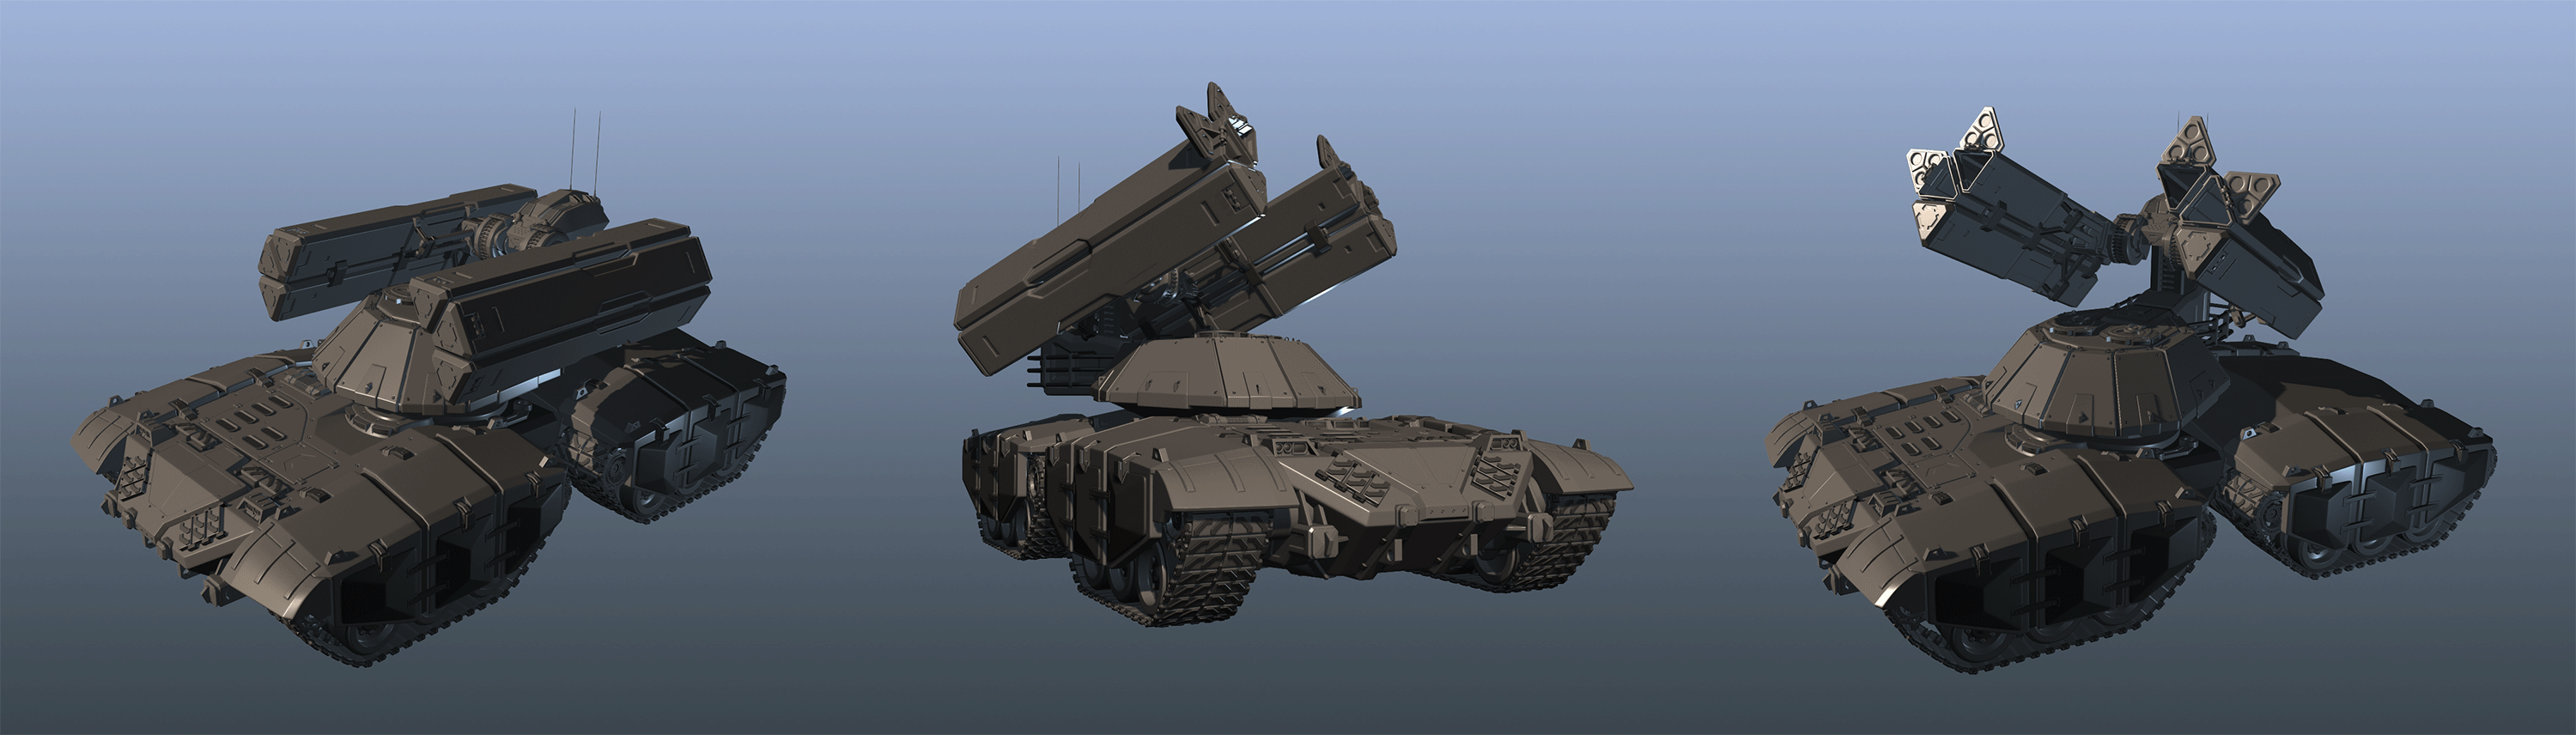
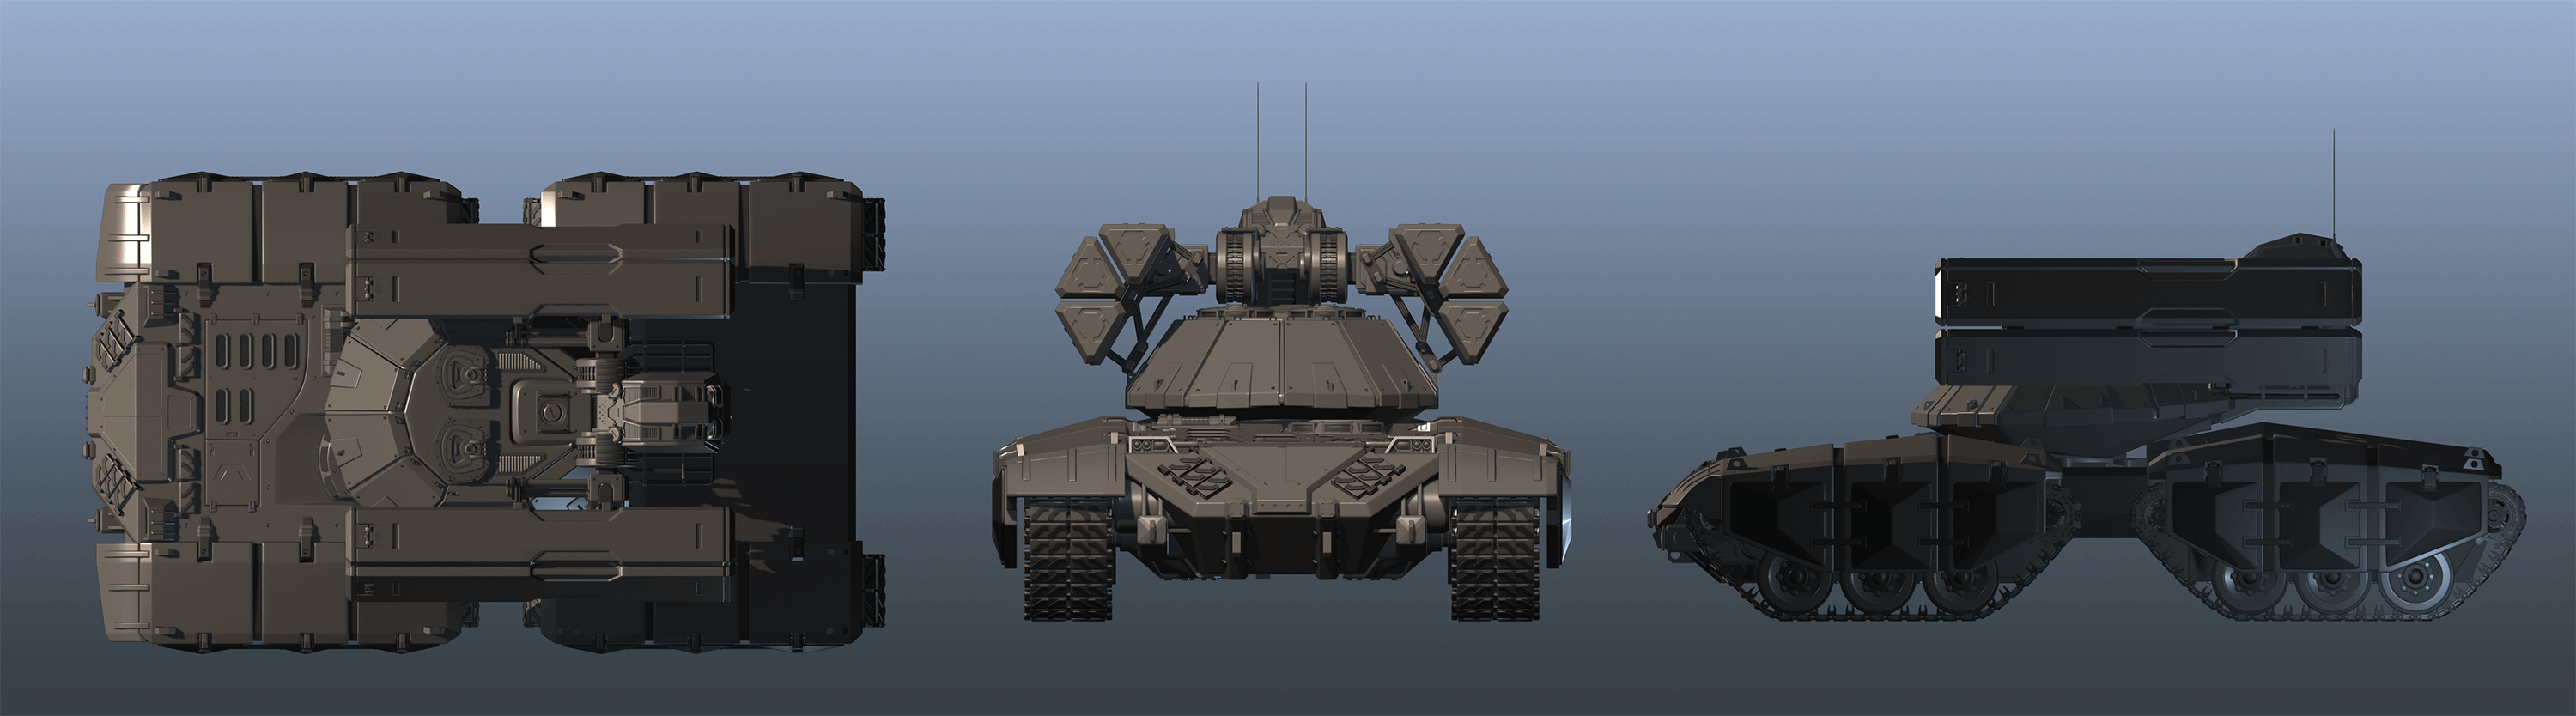
Up to now I've finished the front part, the turret with missile pods and support elements and I pretty much consider them done. There are some areas that that will need furtcher attention e.g. top of the turret is missign some periscope, some smoke grenades. I also want to add some organic detail in form of a camouflage net / planes or backpacks that will be placed in the cage behind the turret.
Some more information about the modelling process:
I've started doing everything as subdivs whoch worked great for the first elements. But as the complexity of the model increased i experienced serious slow downs with using subd objects even when only displaying the base meshes. I guess maya 8.0 has some serious issues with highly complex subdivs - I don't know.
Anyway, by converting the the subdivs to raw poylgon objects I got rid of the slow downs. So I continued by modelling an element as an subdiv but before duplicating or including it into the model I converted it to a polygon object.
Of course I kept the original subdiv mesh for later changes. As a result I only will be able to show subdiv-wires for single parts of the tank because the model in its current state is only consists of those converted polygon objects.
As I stated I've worked on the project for quite a while and during that time a learnt quite a bit about high poly modelling. So many of the early parts are not that perfectly executed. For example I just recently started to use floaters when I picked up the project a few days ago. So the details on the front are mostly floeating geometry while many details on the turret and missile pods are modelled from a single object.
Whats mainly left to do is the back part, missiles and the camouflage net, I've already talked about.
My next steps will be some paintovers for the back area to try out different designs and to see if they work.
I'm planning to do a lowpoly and bakes and of course texturing (oh how I long for this)
I hope you like it. Any comments or ideas are appreciated. Although please note that major rework for the finished parts is not so much of an option.
So my goal is a new portfolio piece and a another opportunity to learn about hard surface modeling.
I got inspired by the following concept from Red Faction. Its an heavy missile launcher tank.
I was really impressed by the design of the launcher pods and the look of the front of the main body. Also two-tracked vehicles are quite awesome.
Besides the great aspects of the concept that I've pointed out, I wasn't fully happy with other parts of the depicted vehicle (e.g. design of the turret with the lights, look of the tracks etc.) And as the concept is just a front view it was inevitable to think of own design elements for the back and top areas. So finally I decided to take the elements I like about the concept and merge them with my own design ideas.
So here we go with a first stage concept:
For further references I took pics of real tanks to get some inspiration. And did various overpaints of the model.
The main goal was to create a vehicle that clearly is part of a scifi setting. At the same time the design elements should look functional. The overall construction should give the impression that it can work in real life. Although if I had to decide between coolness vs. realism the later played a minor role.
And here we go with the model:
Up to now I've finished the front part, the turret with missile pods and support elements and I pretty much consider them done. There are some areas that that will need furtcher attention e.g. top of the turret is missign some periscope, some smoke grenades. I also want to add some organic detail in form of a camouflage net / planes or backpacks that will be placed in the cage behind the turret.
Some more information about the modelling process:
I've started doing everything as subdivs whoch worked great for the first elements. But as the complexity of the model increased i experienced serious slow downs with using subd objects even when only displaying the base meshes. I guess maya 8.0 has some serious issues with highly complex subdivs - I don't know.
Anyway, by converting the the subdivs to raw poylgon objects I got rid of the slow downs. So I continued by modelling an element as an subdiv but before duplicating or including it into the model I converted it to a polygon object.
Of course I kept the original subdiv mesh for later changes. As a result I only will be able to show subdiv-wires for single parts of the tank because the model in its current state is only consists of those converted polygon objects.
As I stated I've worked on the project for quite a while and during that time a learnt quite a bit about high poly modelling. So many of the early parts are not that perfectly executed. For example I just recently started to use floaters when I picked up the project a few days ago. So the details on the front are mostly floeating geometry while many details on the turret and missile pods are modelled from a single object.
Whats mainly left to do is the back part, missiles and the camouflage net, I've already talked about.
My next steps will be some paintovers for the back area to try out different designs and to see if they work.
I'm planning to do a lowpoly and bakes and of course texturing (oh how I long for this)
I hope you like it. Any comments or ideas are appreciated. Although please note that major rework for the finished parts is not so much of an option.
Replies
minor things about it: drivers hatch. looks like the turret needs to be traversed to
the side for the driver to get out, which is not very practical.
you've also added lifting eyes everywhere, for the armour panels, which is a nice touch.
you should also add 4 large lifting lugs on the hull, and 3 on the turret, for maintenance.
like this:
looks like you'll need a crane to do pretty much any maintenance on
this behemoth. maybe you could make a variant of this thing with a crane, spare missiles and a small machine gun for close-in defense.
you should also think about how the missile pods are reloaded. maybe lifting lugs there as well.
I especially love the open missile pod shot. Would be cool to see a rocket or two stored inside before they are fired.
Those treads are sexy as well.
@ waedoe:
Regarding the size of the vehicle I don't have precise numbers but judging from the hatches you have mentioned the length is about 18 times of the hatch diameter. So depending of on the hatch size (I would expect about 70 - 80 cm the whole tank comes at a length of about 13 - 14 m, a width 6 - 7 m and a height of 5 - 6 m (without antennas) With those values in mind I don't think the hatches are too small.
But you are right. I should have added a human silhouette to give some info about the size of the tank. I will do so in the next shots.
@dejawolf:
Thanks for your suggestions. I definitely will add some lifting lugs on the turret. Concerning the pods. I had placed some lifting lugs on them but got the impression that I was about to over-using this design element. So I threw them out. As a reload mechanism I expect the thing to work similar to the MLRS system. But the lifting of the missiles would be done by the ammo supply unit.
As the vehicle can not carry any spare missles it's required to be supplied by a seperate logistic unit. For reloading the pods remain on the turret and get refilled. so they can be used several times. New missiles are inserted via the front opening.The supplying unit would need to have some sort of lift. Because I don't think there is enough room in the missle pods to have a crane or cable winch (like depicted in the picture of the MLRS) to lift the new missiles.
I also had the idea to use the back part of the vehicle as a place for spare missiles with proper reload mechanism. But I think it's obvious that there is just not enough room for carrying a full payload of those in the back part. But the idea is nevertheless very interesting, especially the reload mechanisms would be quite a challenge.
It would be an interesting task to do this supply unit. As well as I always think of a version as a main battle tank. But first things first: I'll go with finishing this piece and then it's time to think about serveral variants, lice a supply unit or main battle tank.
To the drivers hatch: Yes thats a problem. In one of the first drafts I had the drivers located in the front part, not covered by the turret. But this solution didn't really work. It looked vulnerable. I wanted the driver to be placed behind the engine for additional protection and underneath the turret.
So I see your point here but I don't have a clue how to solve the issue. I could elevate the turret but this would open up areas without proper defense.
I've been looking at the merkava MBT. The driver is also situated below the turret. It seems to have the same problem. Can't imagine a human getting out of the hatch without the turret moving sideways. SO yeah I'm aware but a little clueless about the issue. If you have an idea let me know.
@ Charlie:
Thanks for your kind words. There definitely will be missiles for the pods. If thought of smaller one like depicted in the concept: 3 for each pod. So in total 18 missiles. Also I want to do a bigger version where one missle fills one pod with total number of 6 large intercontinental missiles (maybe nuclear warheads or whatever) for the vehicle.
on the merkava, the driver is actually on the side of the engine, like this:
you can see the drivers hatch sticking up there.
here's a CAD of the merkava powerpack:
the transmission in the front extends to each of the drive sprockets.
in most modern tanks, the armour actually consists of a lot of air, called "spaced armour" the purpose of all this air is to give a penetrator room to fragment before hitting the backing armour plate, thus drastically reducing its penetrating power.
also, the steel plate thickness equivalent to an engine is actually relatively thin.
the merkava engine for example, would have a protection equivalent to a 23cm thick monoblock steel wall. comparatively, some of the most modern 120mm penetrators can cut through a 90cm thick solid block of hardened steel.
anyways, i'm sure you can safely move the drivers hatch forward, and "add" that extra armour in front of the driver. the reason the drivers hatch on the merkava is so far back is to increase the angle of the front hull glacis on the tank, which increases the protection while keeping the same weight. traditionally, angling a steel plate at 60 degrees doubles the protection, and angling it at 75 degrees quadruples the protection.
a point i'd like to make, although its probably useless now that you've gotten this far, armouring artillery to fight tanks is a bit wasteful.
usually they are armoured to withstand scout element weapons, like autocannons and small arms. if you look at the MLRS, there's virtually no armour on it, compared to a tank which can have over 2 meter thick armour walls on it.
This looks slick as hell, although the joints that hold the rocket pods on seem awfully flimsy, I'd work to beef them up. Consider that they're going to be load bearing and will have to absorb any recoil not ablated by opening the rear of the pods. Do you have the rear parts of the pods set up to open?
Overall you've got a lot of tasty details here, good work so far
thanks for your explanation. I wasn't aware that an engine isn't such a good deflector of kinetic force. Well actually it is, but I wasn't aware that modern sabots have such a tremendous piercing capability.
If I understand your response correctly then the reason for the merkava driver being located close to the turret is, that this allows the top of the tank hull to be aligned more horizontaly and thus giving additional protection.
What I don't understand is, why isn't this possible with the driver being located in the front. The only reason I can think of is that the hull may not provide enough space in the front areas if its shaped for maximum armor protection. Other than that your facts about "spaced armour" do apply as well.
So I will see what I can do to get the hatch little bit away from the turret. That way it will hopefully provide enough space to enter the vehicle without redesiging major parts of the front. Other than that I'd step away from placing the hatch directly to the front. I had dione this in a previous version and it wasn't that cool. I'll post some shots tonight how about the different positions.
Regarding your point of over armoring the vehicle: You' re absolutely right and thank you for pointing it out. I have thought about this as well during research. Although it is nonsense to have an artillery with such a high load of armor it would take away alot of the coolness and design elements. So in this case it was never an option for me to take the realism road. Doing that would probably lead me to a paper thin wheeled vehicle, which I hadn't in mind.
@ ghostscape:
Thank you I'm glad you like it. Another person that clearly spots the flaws the model has. I was hoping that it wouldn't be noticed but as you've spotted it, it should be changed. Just a few words about this:
Indeed the support for the missilepods is really flimsy. But besides the supporting elements being a little too thin I see the problem that the pods are only supported at their rearmost third. This leads to the problem that the raising (is it rising or raising? - no clue) mechanism needs to pull an enourmous weight all the time, no matter if the pods are in standy or fire position. Additionally the the mechanism needs to hold the missile pods while the vehicle is moving. Vibration caused by movement will further increase the lead the mechanism has to bear.
So long story short: I have thought about this isue but couldn't come uop with asatisfying solution. My first idea was to add an additional hydraulic support element. This has to be placed at the side of the turret and takes away some of the load. I just tried this out with a quick blockout a few weeks ago. I must admit I didn't spend much time on this so of course I wasn't confident with the results. But I will give it another try to improve the model.
About the backward opening of the pods: I got me there. I was a lazy bastard and just took the cover from the front without the ability to open. For justifying my lazyness I argued the following: The missiles could be fired out of the pods with a small initial blast. With closed ends on the pods you wouldn't need so much blast to get them out. After leaving the pod they would initiate their main engine.
I imagine this to have the following advantages: reduced back-blast in the surrounding of the vehicle and less visual signatur when fireing the missiles.
I just stating this because I want to make clear that I had something in mind with the way the model is constructed.
But this doesn't change the fact that someone would expect the pods to open on the backside. As a model has to be self-explanatory I will adress this issue.
You can't give 4 pages of explanations to a gamer why it must / can be built the way it is.
@Snake doctor
yes indeed. After finishing I think of getting it into UDK. And hopefully get those tracks with animated. The tracks it self will be a moving texture. I believe thats how they do tank tracks at the moment. The ugly part will be the connectors. I want to keep the silhouette of those but it will be difficult. But those problems I will face later.
So my todo-List for this evening:
Getting the hatch to work properly.
Adding an opening on the back of the pods.
Blocking out some solutions for further support elements for the pods.
Thanks to all of you.
Also, something that I just noticed that doesn't seem to be factored in here (although it wasn't in the final version of RFG), but was in the original concept, is the fact that the double tread setup was designed so the entire vehicle could be articulated at the middle. I'm not sure if you care about that or not, but its something to consider.
also, as far as deja's comment on armoring artillery to fight tanks as being wasteful, that's true in a real-world scenario, but in a videogame where you want to put the player balls-deep in the action, armoring most vehicles is pretty essential. It would look weird to be driving around a high-hitpoint MRLS-type vehicle that is clearly unarmored, and for general purpose (or open-world), you typically want the player up close to the action (although change of pace gameplay with long-range artillery is cool, too).
As the hatch is now quite close to the angular intrusion on the hull I had to change the basic shape. The first hatch was rounded. An angular shape integrated much better than the old form.
Also I tested some layouts for an hydraulic support for the pods. Unfortunately I'm running into nearly the same problems I already encountered before. Although I've found a setup taht doesn't kill the silhouette when in fireing position, this setup only allows an elevation angle of 36 degrees. This is apparently not sufficient. An elevation angle of at least 45 degrees is needed if not 50 - 60.
So I'm still trying to find out what works. I have to do more research on hydraulic systems. Any ideas are welcome.
i thought a bit about the armouring of artillery, and remembered this:
its a russian indirect-fire assault thingie, with a range of about 3.5km.
its armoured like a tank, because of the short range to the enemy it operates within.
the merkava armour, i made this to illustrate what i meant about the angle of the armour increasing as the hatch is moved backwards:
in the top picture, the drivers hatch is moved forward, and so the angle is smaller.
on the bottom, the hatch is moved further back, and so the angle increases, and the thickness of the armour can be reduced.
The only thing I would suggest is a pintle-mounted belfted MG next to one of the top hatches to deal with pesky infantry that get too close. Practically every AFV I've ever seen has a "piss off" gun.
Thank you for posting this great tank. I have never seen it before but I think the construction and placement of the missile system gave me a nice idea how to solve issue with proper hydraulical support of the missile pods.
During the weekend I'll try a solution where the hydraulic element is located at the center of the turret reaches into the turret. This way it can be quite large without killing the overall look of the vehicle. A sufficient elevation angle should be achievable and technically the construction makes some sense. At least it sounds much better than everything I was able to come up with.
@ GarageBay9:
Thank you for you feedback. You are right about the MG. At first I wanted to avoid doing such a thing because it means a bit of work, especially when designed and executed properly. But I think it will be worth it so I'll give it a shot.
Some update on my progress:
Last night I did one of the missiles I intend to create. While the missile is mostly ready I still need to do a frame where three missiles can be stored. The whole frame can then be loaded into the missile pods.
Tonight I will take crae of said frame and do the second missile. The second one will be quite large, such that only one missile fits into each pod.
Sorry for not posting any new pictures for today. I'll post some shots when I've finished the frame and the second missile.
I've finished two types of missiles. First type is a unguided rocket comparable to a MLRS round. Second one is a long range cruise-missile inspried by a tomahawk. Not that creative on my side but maybe I'll change them while I go on. Also the launch-pods can now be opened on the backside.
The third image shows the two types of missiles and how they are supposed to fit into their launch tubes. The wings and stabelizers are supposed to hinge after the missiles have left the launch tube.
Personally I like the first type the most. The launch-tube layout on the launchers is more appealing to me. Let me know what you think. Maybe I could combine both types into a mixed payload. I haven't tried this out yet.
The last shot shows the new elevation-mechanism. First I'm not happy with the construction I've figured out. From all solutions I came up with it is the best one, as it doesn't disrupt the silhouette that much. But appart from that the current construction is not really looking cool. Especially when the pods have a high elevation angle it starts to look very flimsy.
Some information about how I think the thing is supposed to work: The hydraulic reaches into the turret but is seperated from the interior by a shaft. This shaft is located between both seats. The hydraulic has its pivot fixed to the top of the turret. So when its pushing up to support the elevation of the pods, it is able to execute a slight but necessary rotation.
Please note that I have removed some parts of the strut elements from the pods. They were rushed in the first place and I'm about to do something that appears to be stronger. The old pieces were too thin to give plausible hold to the launch-pods.
Also: Added an support element on the side of the turret such that the non-elevated missile pods can rest uppon those. So any vibration due to movement of the vehicle is absorbed.
My next steps:
Machine Gun:
I'll leave this for the end when everything else is finished. I can't think of a cool design right now I don't want to do some crap I have to rework a few times.
Elevation mechanism on top of the turret:
Either throw it out completely and switch back to what I had earlier (ignoring realism on this topic) or start to make it look cool and appealing.
Turret:
Adding an persicope and other vision-equipment as well as a bunch of smoke grenades.
Concept:
Do some overpaints for the backside.
Thanks for your kind words. I'm glad you like what I have so far.
Btw: Makkon your drawings are great. The engineer-cat and Darth-Owl and so many others are just great.
To the tools I'm using:
For all the modeling I've used Maya 8.0. Subdiv handeling is somewhat crapy I think. I heard this is fixed and improved in the newer versions. At the moment I have the impression that I should have used silo for the subdiv. Anyway due to those difficulties in Maya 8.0 with handeling larger amounts of subdivs (or be it me missing something) I just smooth the polycages I've modeled. By keeping the history I can always swith back to the polycage. So although this is anoying at times it works for me to avoid the issues I've discribed earlier.
Other tools I'm planning to use:
Later on I'll do a lowpoly (again in maya) and bake normalmaps and occlusion in Xnormal as well as an prt-p map (got some nice results with those at work).
After this it's texturing time: Starting in 3D Coat for seamless camouflage and some shading and continueing in PS.
In the end I want to get this thing first into UDK and maybe later into sandbox. I hope that I get the tracks to do their animation. I know how I will animate those in maya but I don't have much experience in udk nor sandbox. We will see.
Unfortunately I was busy during the last week so not much progress. I've decided to go on with the back part of the tank. This gives me some more time to get a decision on what to do with the turret.
I spend the last evenings with some scribbles for the back part of the tank. I was pretty short on time so they are really rough. I hope they give an idea on what I'm going at.
Peronally I would go for number 5 which is a mix between number 2 and 3. Let me know what you think. Any suggestions are welcome.
I probably could / should spend more time on coming up with diferent layouts because I think there are many designs that I've not covered with those few scribbles. I stopped here because the result seems promising to me.
As for which concept to choose. I'd opt for number 1 - the only reason being, the tank right now is very symmetrical, i think 1 would help break that up a bit and create some contrast.
However, I'm sure which ever you choose will still look good.
I like the door and grates on 2 the most, the angle of the door from 4, and I think 2's ridge is a bit cluttered. Also prefer the (]:X:[) from 4 over the three small gates from 2.
Looking good keep it up.
So your responses made it even harder for me to decide what to go for. As most were not in favor of the one I was about to pick. So basicly I took another round scribbling and trying things out. I picked the first 5 scribbles and basicly reduced them to their most important design features and thereby erasing the stuff that I didn't like. Also it was said that some of the design were far to noisy in terms of details and readability which I totally agree with. I think the reason for this were the tools and steel-cables I scribbled between the major panels and stuff. So I thought to get rid of those for now because for now it's more important to concetrate on the layout. Tools can be added, moved, scaled or removed when the basic layout is modeled.
I tried to combine those reduced version with each other. Finally I just went on trying some more or less new things.
So what we have here are 6 additional scribbles. Please note that number 6 is basicly number 5 from the first session but without cables, tools and other crap.
All 6 scribbles use the same design of th rear-area (hatch and vent) because I'm pretty sure to go for this one.
A final decision on which design to pick is scheduled for tomorrow.
Here is the high poly:
Further detail shots of the highpoly:
http://aaarts.files.wordpress.com/2011/04/highpoly3.png
http://aaarts.files.wordpress.com/2011/04/highpoly4.png
http://aaarts.files.wordpress.com/2011/04/highpoly5.png (closed hatch)
http://aaarts.files.wordpress.com/2011/04/highpoly6.png (machine gun)
Here comes the lowpoly with wires (34.000 triangles):
Additional detail shots with wires:
http://aaarts.files.wordpress.com/2011/04/lowpoly3_wire.png (interior)
http://aaarts.files.wordpress.com/2011/04/lowpoly4_wire.png
http://aaarts.files.wordpress.com/2011/04/lowpoly5_wire.png
http://aaarts.files.wordpress.com/2011/04/lowpoly6_wire.png
http://aaarts.files.wordpress.com/2011/04/lowpoly7_wire.png (interior consoles)
http://aaarts.files.wordpress.com/2011/04/lowpoly8_wire.png (wheels and suspension
Some statements to what I've learned so far:
The biggest lesson I learned just recently when doing the lowpoly. As stated in verious other threads and in the polycount wiki (I think) it really seems best to do a lowpoly - highpoly approach.
Many elements I did in my highpoly were really hard to translate into the lowpoly. So If I had done a proper and more acurate lowpoly in the first place a lot of work and some changes on the highpoly could have been avoided. Of course this requieres propper planning and a clear concept which I only partly had. Much elements of the highpoly developed on the move.
When I started the project I estimated a polycount of 20.000 tris maximum. With the highpoly at hand I wasn't able to fit the low into this budget. Of course there are various areas were some polycount reduction could be done but I doubt I will be able to get below 30.000 and I'm not sure If this reduction would be worth it.
I already did some test bakes on various parts of the tank. Most of them didn't turn out that nice. I experienced some strange shading errors (sorry no pics from those) SO I had a close look to other threads dealing with similar projects. One thing that was stated several times was that all Edges marking uv-shell-borders should be (or maybe can be) hard edges. I tried this out and it seem to work ok. But I don't understand why this is important. Maybe some of the more experienced people could give me a hint about this.
In the lowpoly I tried to combine and merge as much as it seemed reasonable. So larger parts are not floating geometry but merged into bigger objects.
Anyway. Let me know what you think about everything. The highpoly is pretty much finished besides a few minor tweaks for better suiting my lowpoly. So chances are small that I make bigger changes on it.
The lowpoly is up to discussion. Although I've already mapped each part I want to be sure to have a low poly that will bake properly.
With the textures I was initially aiming for a 2048 map with a seperate texture for the tracks. At the moment I'm pretty skeptic that this will be enough. So I'm thinking about a 4096. But I know this is a huge amount of texture space. So I will decide this after the first complete bakes. From the size of the vehicle I gues a 4096 could be justified when you consider that charakters come with a budget of 2048. I don't know. I'm curious what you guys think about this.
Quite some time has passed since last update. I was busy doing the bakes for the tank and I can tell you it was a hell of a ride.
From earlier projects and reading on polycount I thought I had at least a tiny bit of a clue about baking normalmaps. But when I was baking maps for this I ran into various issues. So all in all it took me several attempts until the results were halfway promising.
I had to change some geometry, adding control edges here and there and redo some uvs.
The bake is far from perfect. There are various areas that need some cleanup.
Anyway I learnt a lot due to those failed attempts of baking. It turned out that the bakes of previous project went easier either by coincidence or due to the fact that the modells themselfs were rather simple assets compared to this tank.
Please don't be bothered by the very dark interior. The occlusion bake went insane in this spot. I'll fix this as I go on with texturing. Also the tracks are not finally baked. At the moment the seem too thin.
Besides: While doing the shot above I noticed that the position of the missilepod-hatch also looks quite nice with the setup displayed above. Now I'm unsure what looks cooler? Some opinions are appreciated.
I did some camouflage patterns. Lets hear some opinions on those!
Suggestions and crits are welcome.
plus no dirt/grunge makes it look made outta plastic
6 sort of reminds me of Red Alert for whatever reason. lol.
I will give the pixelpattern a little more attention and shrink it a little and do some tweaks here and there. Concerning the comouflage color I'll decide to night wihch paintjob to take.
@ Alec: Thanks for your hint. I'll change the high-contrast patterns to see how they work out with lower contrasts. SO with that in mind contrast like in 1,2,3,5 seem to work out.
Also I will not have the camo pattern all over the place. Have avarious areas in mind where I will break things up with bare material without pattern.
@ darkstar:
Thanks for your reply. You may be right that the amount of detail on the turret mecanism is a little too much compared to other parts of the tank but I'm affraid I won't go back all the way changing highpoly and lowpoly to address this. Anyway. I'll see what I can do to compensate the detail density in this area by maybe not using camo-patterns in this spot to keep it readable as much as possible. This won't fix the issue of the flimsy looking mechanism. And others stated this before. Actually I did try to adress this issue earlier but couldn't come up with a design that was satisfying for me.
be careful with the "tech" camo as well, the reason why crytek went with thier hexagon camo on everything was because the squared nature of the cyber-like camoflage makes it look like artefacts in game like low-res texture pop and such, becomes noisey and distracting. just something to think about
The highpoly shots only use two different maya blinn materials. the darker material has just dark grey color and standard spcular values of the maya blinn material.
The brighter material is much stronger with the specular: Eccentricity = 0.13 speular roll off = 1.0 and whithe specular color. The rest is only two pointlights. Primary light has a warm color, secondary is placedas some sort of backlight wioth a blue color.
@ lost artist & peanut:
Thank you. I'm happy you like it.
The problem with the tech camo is a valid point. As you pointed out the main problem with the tech-camo is that it makes everything hard to read. Surface details only read well in close range. From a distance every thing gets undefined.
I think the tech camo patterns are increasing this problem, as it uses straight lines and those are already present on the surface geometry.
So my final thought was to get rid of tech camo and do a organic standard camo, as this seemed the best compromise between camoflage and surface readability.
Basicly I finished textures with this organic camo pattern, but was too lazy to post screens.
I really have to get back to this thing once I find the time.
Your idea with more tringale shaped camo patterns is really worth a try. I will check this out once I get back to this.
The texture needs finishing touches and it could use a well made pedestral. I'll definitely return to this tank to give it the finish it deserves.
tthanks for your responses and for reviving this whole thing.
- remapping of the whole asset
Although I had a nearly finished texture I wasn't pleased with what I had. The main reason was a lack of texture resolution. One 2048 texture for the whole tank and interior section was not enough to provide enough visual quality to justify the high polycount. As the assets is meant to be viewed from close distances (e.g. a player walking arround the vehicle) a 2048 didn't cut it. On the other hand using a 4096 texture seemed too much. So I decided to change the mapping and use two materials, one for the turret, missile pods, tank-threads (inlcusing wheels and thread armor) and one material for the main body. The interior section would take another material but is not included in the actual version. So at the moment I have use two 2048 texture-sets for the tank [Diffuse, Spec/gloss, Normal]- changing the threads
After playiing valcyria chronicles (awesome game btw) I saw that their tanks have their threads supported with actual geometry instead of just alpha-material. So I decided to go that road and have the threads with pure geometry. I simplification of the threads (less chainlinks, larger shapes) were needed to avoid a further rise of the polycount.- changing color-sheme
I tried a more geometric camo pattern and this really works well on the tank. While pixel are far too noisy and provide too much small detail / contrasts to make the details readable, a geometric pattern gives a nice scifi look without distracting too much.- first test for the pedestral
I really want to show how those threads roll over some debris, stones sandy hills or what ever. Not sure how much detail should gi into the pedestral I don't want to distract too much from the asset. Tank pose and pedestral are very sloppy thrown together.Enough talk: Here are some pictures. 35500 tris
After completing a pedestral for the tank my marmoset decided to refuse to render the scene-setup with three meshes & materials and caused some really weird render-errors. :poly127:
"So what?" I said and threw the whole bunch into udk and cryengine. Both worked fine. But as I'm still not familiar eneugh with both engines to adjust the postprocessing chain I finally decided to just stick with marmoset-renders with only the tank.
The only thing I will do with this model is to put it in sketchfab or p3d and see how it performs.
Anyway here are the turntable and the final shots:
[ame="
Great Job!
@ michaelElphick:
You have a valid point here. I thought about this when doing the textures but I wanted to avoid to have the tracks covered in mudd all over the place. So I decided to leave it with only minor mudd-stains.
But your are right depending on the terrain the assets would be used on additional mudd on the tracks would help to improve the look.