Home 3D Art Showcase & Critiques

Block in Diablo scene

polycounter lvl 13
Offline / Send Message
jordan.kocon polycounter lvl 13
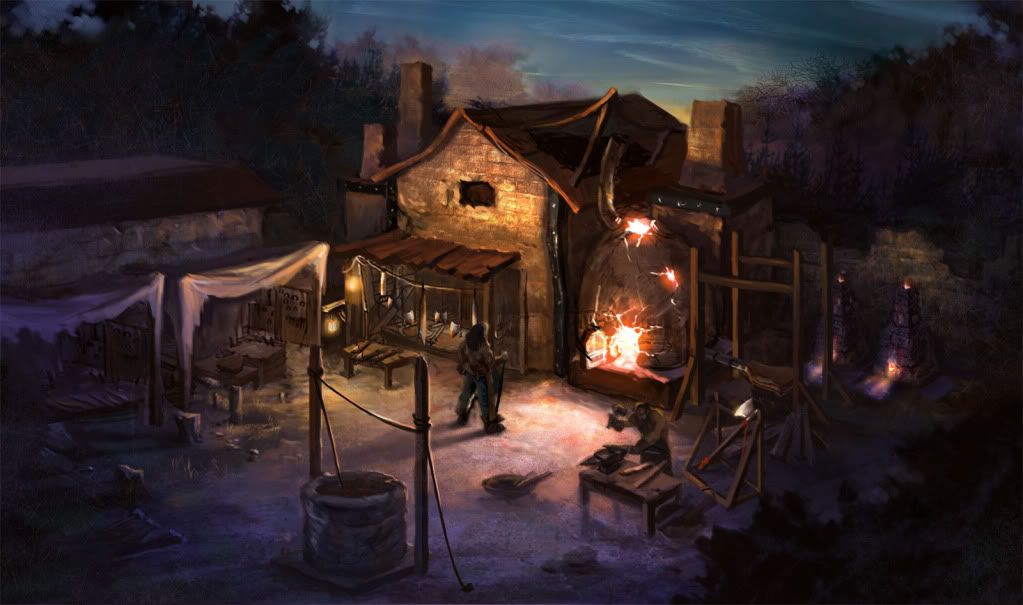
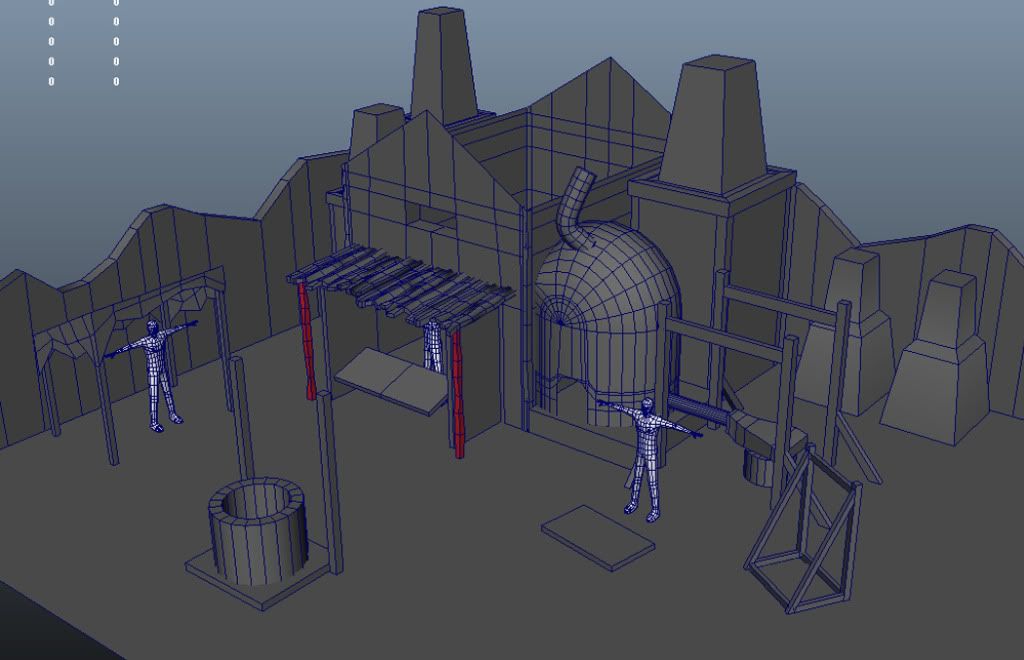
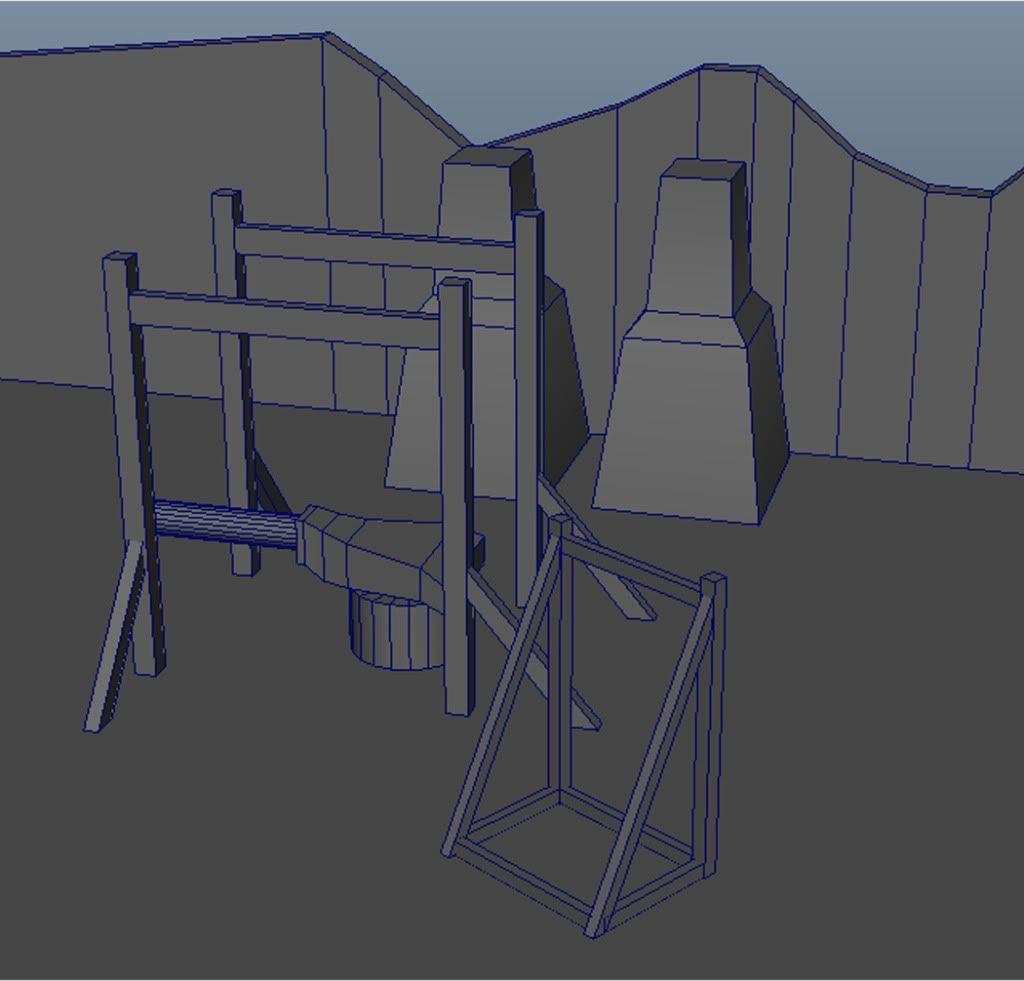
Hey all, so this is my second crack at an environment (still working on my first). I'm doing this as my first demo reel piece in school, will be starting full steam ahead on it in about 2 weeks after the holidays. I was hoping to get some feedback on my proportions, and low poly block in's. The main object I'm unsure about is the little awning sticking off the building. I'm wondering if I approached it right, or if it should be one piece of geometry with transparency maps.

ss9-hires.jpg
blockin1.jpg
blockin3.jpg
blockin4.jpg
blockin2.jpg

Replies

  • DDuckworth
    Options
    Offline / Send Message
    DDuckworth polycounter lvl 6
    For the awning you shouldn't use transparency maps, anything that has thickness greater than paper or fencing or similar shouldn't use transparency maps. Imagine if you took your hand and placed it on a flat plane with a transparency map, turn it to the side and what do you have? Nothing. Therefore for the awnings which are rather thick you will need actual geometry. However the roof is fairly simple and really won't take that many polys. I also read a thread about how polycount isn't as important as everyone thinks it is.

    As far as what you've got so far things are looking alright, for the corners of the store/building you don't need the extra geometry, it's too thin anyways. That can all be in the texture and with a normal map you can show the creases between the braces and the wall.
  • jordan.kocon
    Options
    Offline / Send Message
    jordan.kocon polycounter lvl 13
    Thanks for the tips DDuckworth :) I understand how transparency maps work on paper thin surfaces, I thought you could somehow use them on objects with thickness, there is my confusion. I'm going to make the roof very low poly, and I was planning on making the awning a little higher, as the player will be closer to it. It's good to know I can spend a few more polys on it than just a single box.
  • Darkmaster
    Options
    Offline / Send Message
    Darkmaster polycounter lvl 11
    I am going to have to disagree with Duckworth on this one. Especially with a Diablo style camera, the player will never see those polygons that are underneath the awning. In addition, the alpha effect with be much more effective if you simply use a plane to achieve that tattered and torn look for your scene. I could stand to be corrected on this, but I have never seen a game use anything other than a plane for this particular instance.

    Other than that, this scene is coming along. The only other thing that really stuck out to me is that you have a cylinder in your scene that is easily pushing twenty divisions. Once again, there is a surprising amount of simplicity with Diablo props, and with the third person style camera you do not really want to push the divisions past 10 for small pipes like the one I am referring to. Keep posting, and I can't wait to see some paint on this scene.
  • DDuckworth
    Options
    Offline / Send Message
    DDuckworth polycounter lvl 6
    Darkmaster I agree with you if he is only going to be using the Diablo styled camera, one that I am very familiar with as it is one of my favorite games, but it still needs at least the basic hangover rather than just 100% flat plane. I was thinking he was going to be showing this scene from all angles since it is a school project and just graduating school myself I know how it can be.
  • jordan.kocon
    Options
    Offline / Send Message
    jordan.kocon polycounter lvl 13
    Thanks for the comments guys. DDuckworth is correct, I will be showing it from all angles, and while it's a Diablo scene, I'm going for a recreation/beauty shot of the scene. With that said I will definitely be exploring both ways of making the awning and post both WIP up here. As for the cylinder with 20 subdivisions, I definitely missed that, I try to make everything like that 10 or less, thanks for pointing it out.
  • jordan.kocon
    Options
    Offline / Send Message
    jordan.kocon polycounter lvl 13
    So quick update, wondering if this is where I should be at for a low poly weapon. It isn't a hero weapon, just one of the various weapons to be at the blacksmithing shop.

    axe-1.jpg
  • tda
    Options
    Offline / Send Message
    tda polycounter lvl 16
    A lot of the proportions seem a bit off compared to their counterparts in the reference, also the positioning of a lot of things seems somewhat off as well. You can help yourself out here by taking the concept and drawing over it with perspective construction lines, then making a viewport or a camera in your scene match that perspective. Once you have that, you could even set the concept as a background and have the perfect size/position reference.

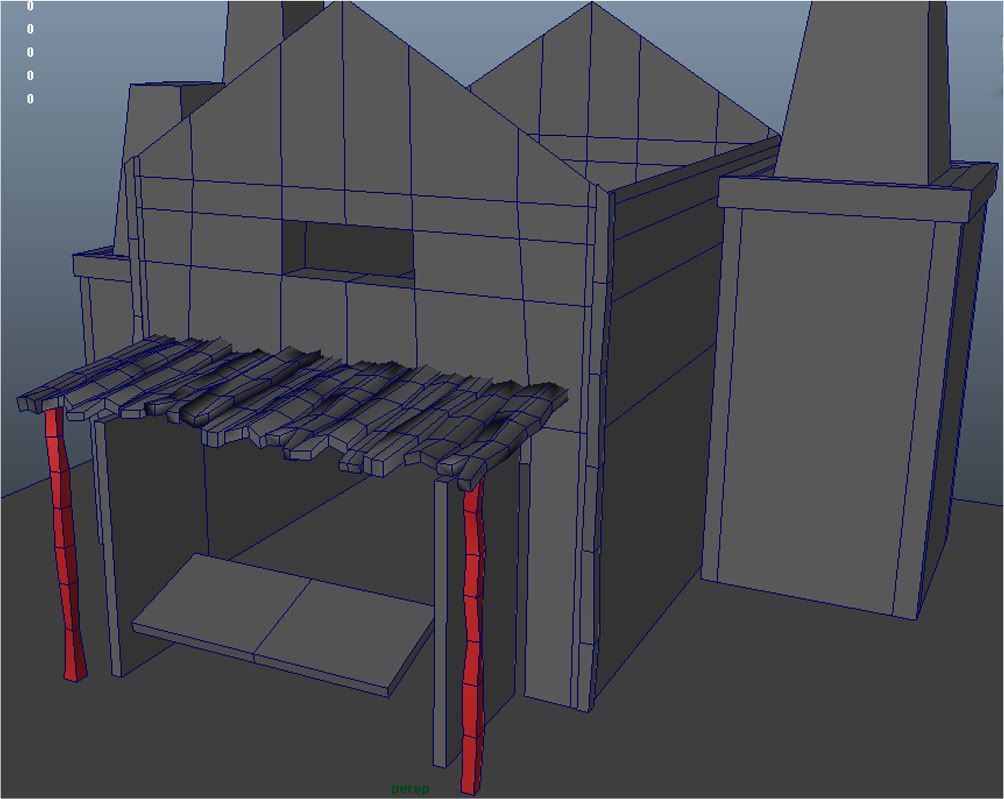
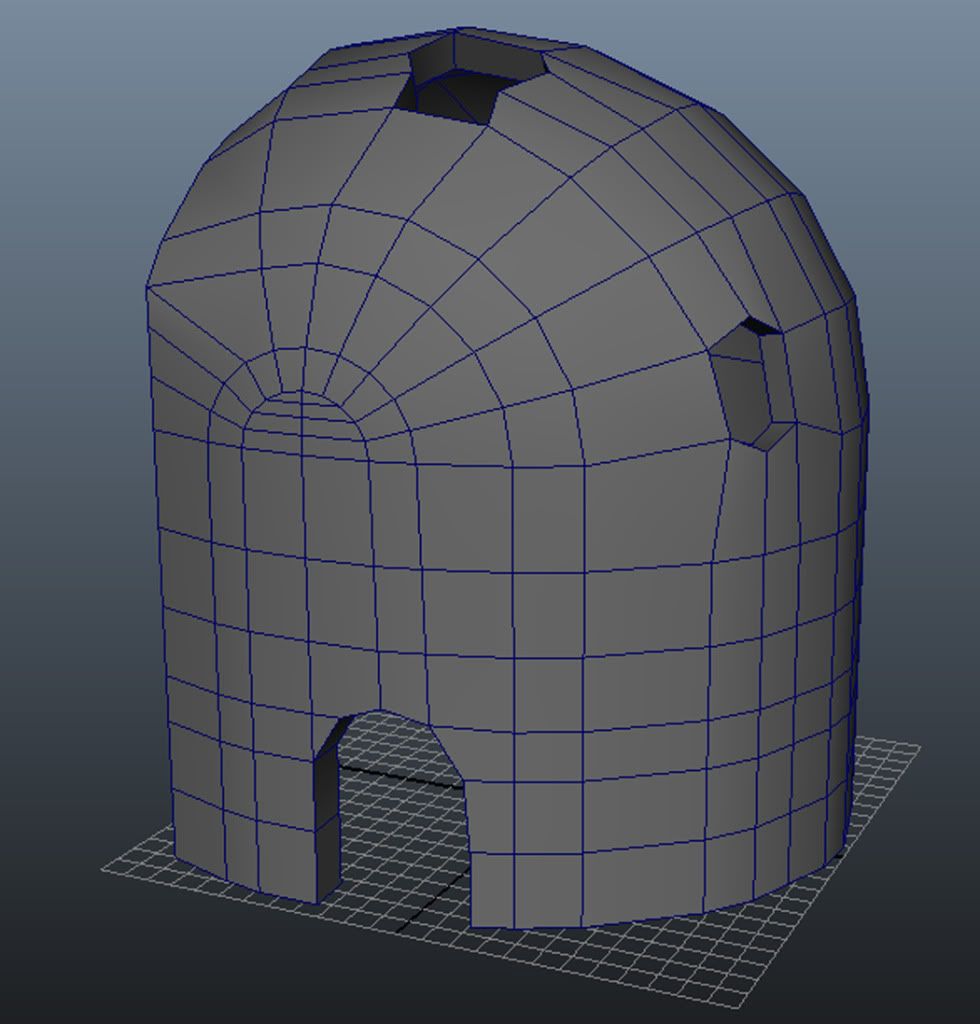
    Other than that, i agree that alphas are a bad idea. For the sake of saving a few polygons it's totally not worth it when you consider the average power of a PC these days. With that said though, there's definitely room for a lot of optimisation in your assets, especially in said overhang of the shop and the big stone oven. Remember that your tris only really need to describe the silhouette, anything else is essentially wastage. In a top down scene, this leaves a lot of room for optimisation.

    edit : Same thing about polycrunching applies to this axe too, especially considering it's just a bit of the scenery there's a lot of wastage. I did a quick drawover to show you what i mean. Red is suggestions for new topology, green is cut these loops completely. The shape also seems a bit off as well.
    axe2k.jpg
  • jordan.kocon
    Options
    Offline / Send Message
    jordan.kocon polycounter lvl 13
    Thanks for the help tda! I know my proportions are off, I'm definitely still working on those. I guess the main thing I'm really hoping to find out though is if my poly count and approach to level building is correct. I'll try the perspective Idea tho :)
  • DDuckworth
    Options
    Offline / Send Message
    DDuckworth polycounter lvl 6
    Hey again Jordan, I was thinking a lot the same as tda however I have a problem with some of his green lines, I was about to do the redlining but then i scrolled down and saw he already handled that haha. The only green line I would get rid of would be the bottom one on the handle, i say bottom because assuming an axe was being held up it would be bottom, hope you get my meaning. As for the polycount of it 600 is okay but it will be far less when you do the merging of verts to get the topology suggested by tda. Also keep in mind I am saying 600 because tri's are what matter most, that is what all models are when imported to game engines. One last thing i've noticed is you have some "normal" issues, this is to do with hard and soft edges. Within maya you want your edges to be hard if they are sharp edges, and soft if they need to be nice and smooth. If you try to soften a hard edge it will go all wonky and make black funky lines like you have on the front roof part of the shop as well as on the handle of the axe. Select the edges on the axe that need to be hard and choose Normal->Harden Edge and then soften all of the rounded edges. I hope that makes sense, if you don't get it I can do an illustration for ya.
  • jordan.kocon
    Options
    Offline / Send Message
    jordan.kocon polycounter lvl 13
    Ok, I didn't see tda's edit when I responded, thanks a ton for the drawing! I like your edge flow on the blade a lot more than mine, the reasoning behind mine is because I was trying NOT to get any triangles as that is what we have been taught in my school, quads only. It is very good to know that I can use triangles like this, and I'll repost the updated axe to see if I'm doing it right.

    @DDuckworth Yes I totally get what you're saying. And I forgot to soften/harden my normals before I posted this, I'll do that on my repost
  • jordan.kocon
    Options
    Offline / Send Message
    jordan.kocon polycounter lvl 13
    Ok, an update, is this the right approach?

    axe-2.jpg
  • DDuckworth
    Options
    Offline / Send Message
    DDuckworth polycounter lvl 6
    Yeah i've found school doesn't always know what they are talking about, you have to take it with a grain of salt, tri's are fine because they will always be tri's anyways, you just don't see it that way. what the school is trying to keep you away from is nGons, which are more than 4 sided polygons, these are never acceptable and need to be avoided at all costs, never have ngons.

    As for this you are on the right track! Keep up with the good work!
  • vahl
    Options
    Offline / Send Message
    vahl polycounter lvl 18
    try to avoid poles like that this is pretty bad topology and usually creates huge smoothing errors
  • achillesian
    Options
    Offline / Send Message
    vahl wrote: »
    try to avoid poles like that this is pretty bad topology and usually creates huge smoothing errors

    From a Diablo style perspective smoothing errors will be unnoticeable and it doesn't have moving parts, so I think the poles are okay. But I'm a newb.
  • tda
    Options
    Offline / Send Message
    tda polycounter lvl 16
    Vahl's comment is valid imo, its good practice to follow good modelling guidelines no matter what you're making. Just tweaking out some edges would get rid of those poles and it'd still keep the same polycount.

    The point i was trying to get across in my earlier drawover was more that there was a lot room for optimisation rather than advice on topology, infact the topology in what i drew was really sloppy. If its topology advice you're after here's a better example of the kind of poly flow you could aim for dude, clean(er) and low density. I'm no expert though, there's probably a better solution.

    axebetter.jpg

    Btw, your teacher was probably teaching you to stick to quads because while everything gets triangulated when it's imported into a game engine, quads are much easier to work with when modelling (edgeloops/rings etc). Tris also cause pinching when you subdivide which leads to ugly smoothing errors, and he might have been referring to that. Plenty of reasons. For something like this though where you're aiming for the lowest polycount possible, tris aren't really an issue.
  • jordan.kocon
    Options
    Offline / Send Message
    jordan.kocon polycounter lvl 13
    Ok, ya I was kind of just taking your first topology and replicating it and not really optimizing it on my own. The info about triangles is great to know tho! I have one nooby question though, what are 'poles'? Thanks for all the responses :)
  • DDuckworth
    Options
    Offline / Send Message
    DDuckworth polycounter lvl 6
    poles are when you have many edges converging into one vertice, basically when all of the lines go to one point
  • jordan.kocon
    Options
    Offline / Send Message
    jordan.kocon polycounter lvl 13
    Ok, so Im back from Christmas and just starting to go full steam ahead on this. Here is a wireframe update of where I'm at, and a quick marmoset render of how its looking.

    wireframe1.jpg
    wipRender.jpg
  • Builder_Anthony
    Ahh back again good good.
  • jordan.kocon
    Options
    Offline / Send Message
    jordan.kocon polycounter lvl 13
    Alright here is what I would call the first major update. I'm wondering how I am doing in terms of polys and detail. I feel as though most of what is shown here is ready to be unwrapped and texture, though I could be wrong. Can anyone offer hints onto what I should keep modeling/working on and what is ready to be unwrapped? Thanks in advance :)

    wire4.jpg
    wire1-1.jpg
    wire3.jpg
    wire2-1.jpg
  • Micah
    Options
    Offline / Send Message
    Micah polygon
    Well for a low poy scene you seem to have alot of higher poly bits going on (handels on the door, wire/rope infront of the black smith selling area and the spiked rivets? on the outside of the door way) You also seem to have some cuts going through the bench and table that dont seem to add to the shape of it.

    On the door are those door hinges modeled into the door? if so i would make that a seperate model which would save you more triss. Im sure if you look around you'll find some other things aswell.

    ohh and a small thing... you wouldn't be able to close your door.

    Hope I hellped out a bit, keep up the work!
  • jordan.kocon
    Options
    Offline / Send Message
    jordan.kocon polycounter lvl 13
    @Micah thanks for the tips! I will be reducing the rivets to simple squares, only made of 10 triangles and just normal map the screw sticking in/out. As for the rope I couldn't really make it any low poly without losing its organic feel, but I'll see what I can do! The hinges are indeed modeled on, I'll remove them and clean up tris where I can. I modeled the door in kind of a strange manner, but I'm aware it can't actually close. In the final render the door will be swung quite open though, and I don't think it will be a noticeable fault.
  • DDuckworth
    Options
    Offline / Send Message
    DDuckworth polycounter lvl 6
    Okay Jordon I have a lot of info for ya, to begin with your wireframes

    wireframe1.jpg
    On this one I placed in red all of the lines you can get rid of/merge and green for where they can/should be. This is a little bit of over-optomizing since that building is very low already but that's due to simplicity, and there is no need to have extra poly's here and there because as the scene fills up it will start to get pretty high. I didn't do EVERYTHING you should do but hopefully you can see where you can merge things from this guide.

    First up the roof flap needs thickness, as a rule of thumb that i use, if it's not as thin as paper, and you will see it from the side, never use a single plane of thickness, all items need some thickness to look correct unless you will just never see the side of them, and even then for things like fences it is still somewhat obvious that it's only a plane.

    Then there are the green lines coming out of the right and left of the window hole, you don't need that extra ring around the house at the top before it reaches the crest because you only need poly's at edges where things change. since it's not changing from the ring below the edge of the top to the top, you can merge directly to that corner. I know that might be hard to understand but it's the best I can think to describe it.

    The rest of the lines I feel are fairly easy to follow, let me know if you have any questions.

    wire21.jpg

    Same thing for this one, you don't need edges where the edge doesn't change so you can merge over to the upper one (or lower one as I suggested in this case, doesn't matter) since the edge remains flat. These seem pretty easy to follow as well I hope, i left out the red lines on the outer large green lines because it just made a mess, but you'll be merging the points around that little triangle to the corner of the doorframe.

    wire4.jpg

    Another issue is one i've mentioned before is your soft edges, it seems you are setting almost everything to "Edges -> soften normals" which is not good for hard edged objects, you'll need to selectively choose what is hard and what is not. However for preview shots it's probably best you just leave them hard and then soften all of the correct edges once you finish. I usually soften/harden as I go but i sometimes have to end up redoing them so i'm not sure of my own workflow on that one yet.

    Finally is the marmoset render, I am really hoping (fingers crossed) that you can tell that the marmoset render looks HORRIBLE. this is simply because I am assuming you exported the model into an OBJ and imported into marmoset, this doesn't always work well and the geniuses over at 8monkeylabs included an exporter for marmoset with the files. The guide to install the exporter from maya to get it into marmoset and have it look correct is in the marmoset folder, usually located C://Program Files (x86 if you are on 64 bit windows)/Marmoset Toolbag and the file is Toolbag User Manual.

    The instructions are on page 8 and i have copied the installation instructions here -

    1. Copy the appropriate .mll for your version of Maya into your Maya installed
    directory, into bin\plug-ins\.
    a. Sample file path: C:\Program Files\Autodesk\Maya2010\bin\plug-ins\
    2. Copy the stooge.mel script file into any suitable script folder, ideally My
    Documents\maya\scripts\.
    3. Open Maya. Go to the plugin window (Window->Setting/Preferences->Plug-in
    Manager). Search for the "stoogeExport" plugin, and check both the "Loaded" and
    "Auto-Load" checkboxes

    Just as an example here is what an object brought into marmoset will usually look like without anything on it, the only thing on this object is a normal map, but it should all be nice, white, smooth, and not have crazy colors and artifacts like in your render. I have struggled with the same problem before so I hope this has been a huge help to you!

    Good Luck! - Derrick

    EveRender4.jpg
  • jordan.kocon
    Options
    Offline / Send Message
    jordan.kocon polycounter lvl 13
    Wow Derrick, where to begin. Well first off, thanks an insane amount for all the tips! I understand what youre saying, well 99% of it. I'm just in class right now, but tonight I'll definitely post some work in progress for you to check out. As for topology, I've recently done some work on the main smithy, I'll have to go back and check it out and see if I still have the cleanups left to do that you pointed out. I mainly warped the hole in the front to add interest (at the expense of adding polygons). As for the table I will take out those edge loops, I had them on because I twisted the sides a tiny bit, but I'm seeing now the amount was so minimal it wasn't worth the extra poly count. The adjustments on the roof boards all make sense as well. My kiln right now is a bit of a gong show, I talked to my teacher (who works for EA) and he told me to model in the cracks, so the poly count went slightly berserk, I'll make sure to post a few good wireframe pics of that later tonight and you can give me an opinion before I unwrap it. As for the normals I guess I'll just harden everything? Then soften what needs to be softened at the end. Finally, thanks a lot for the marmoset tip, I really had no idea about that :S Right now I'm just using marmoset because I like it for quickly previewing my textures and setting up quick renders, I plan to do my final scene in either UDK, softimage or both.

    Thanks again dude! The help is greatly appreciated, and I will most definitely apply all of it, or as much as possible to my scene!

    - Jordan
  • jordan.kocon
    Options
    Offline / Send Message
    jordan.kocon polycounter lvl 13
    Alright here is an update on the wireframe. I think I got most of the fixes in, the one thing I'm unsure about is the kiln, the topology became quite excessive, but I've been told that it's fine. Due to time constraints I must start unwrapping this and getting going on the texturing. However there is still time to add in any last minute changes in the topology.

    Also DDuckworth, my maya crashes when I try exporting this scene when using the stooge exporter, but I can export objects made in a new scene just fine. Any idea what could be in my scene that would be corrupting it?

    wire2-2.jpg
    wire1-3.jpg
    wire4-1.jpg
    wire3-1.jpg
  • jordan.kocon
    Options
    Offline / Send Message
    jordan.kocon polycounter lvl 13
    An update for tonight, everything shown here is unwrapped (whatever is missing is because it hasn't been unwrapped).

    Untitled-1-1.jpg
  • DDuckworth
    Options
    Offline / Send Message
    DDuckworth polycounter lvl 6
    About warping the window I think it was a good idea and no worries about the polycost, you are still very low on the overall scale for a scene, i'm trying to help you cut poly's here and there so that you can afford to do things such as model the cracks on the kiln :) so that when it gets a little crazy it's okay. You do have a lot of extra poly's in there that are okay but not optomized, i did another paintover for you.

    wire31.jpgon the far right where I've drawn the green off of the topology is where you can use that extra loop to add more roundness to your kiln, right now it's pretty blocky but that's because you are keeping it so low poly, anytime you have extra loops that trail off you can merge them, and/or use them to add more smoothness to your model. So if a line is sitting flat on a plane then just push it out to fill in that roundness, usually if an edge is sitting on a flat plane it's probably being wasted :)

    that marmoset looks MUCH better! As for the crashing issue I'm not sure, sometimes the things you do in maya can get so convoluted I don't even know. The possible solutions would be to open the outliner, select everything in the scene by doing a click then shift click on the bottom object, and delete->delete by type-> history. i created a shelf button that i click quite often because it's very important to clear history on many objects so that freezes and crashes and oddities don't occur. Then after you've deleted history take everything out of groups by selecting the group then clicking edit-> ungroup groups can often cause odd things when exporting to engines or using external scripts. Especially groups that were created automatically by merging and separating groups of geometry.

    If none of that works you can always just select every visible object in your scene, then click "Export Selected" and export it to a new file, this will get rid of any unseen things that may be causing problems usually.

    Let me know if any of this fixes the problem! Good luck texturing
  • jordan.kocon
    Options
    Offline / Send Message
    jordan.kocon polycounter lvl 13
    The kiln feels chunky now, but I think once I soften the normals that should fix that. The changes you made are easy enough to do as well, as I have left this till last to unwrap. The 2 vertical lines on the very left though, right beside the door are there because there is another crack that you cannot see (due to the angle the door is open at). As for marmoset I think it was because certain things were unwrapped and others weren't? I'm not sure, but Im modeling in maya and unwrapping in soft, and exporting between, and this time I tried filling my scene only with unwrapped objects and it worked fine. Anyways, thanks a bunch for the draw over on the kiln :) I'll implement those right away. then finish unwrapping and be on my way with texturing. Now I just have to find a ton of good wood textures, so if anyone has some suggestions for sites (beside cg textures) that would be awesome :)
  • DDuckworth
    Options
    Offline / Send Message
    DDuckworth polycounter lvl 6
    Yeah man no problem, it's fun to help out a student now that i'm no longer one :). With marmoset and using OBJ's i've found it's sketchy if you are coming from maya, sometimes i'll exort and get those horrible things and then i'll just reexport the same scene without making any changes and it will be fixed, it seems more like a hit and miss thing rather than a UV problem, I'm not sure it cares at all about items being UVed since when using the stooge exporter things always come out perfectly unwrapped or not.

    As far as sites i've always wondered myself if there were any good ones like that, I haven't really found any, one good secondary though that I can semi rely on is deviantArt, they have a resources->stock images-> textures category and lots of people upload custom sets of textures there, it's very hit and miss but you can often find very unique pieces there that your classmates will certainly not be using. Oh also a good google search tip is when searching images for texture resources, go to search tools "Largest" or "Larger Than" and set a size for the minimum image that comes up, this will save you tons of time when going through images. Sometimes I revert to the awful bing if i find a photo I really like that is too small because when you search a word like wood, then find a picture you like and it's only 200x200, you can click "find similar images" which will then load up every copy of the same image of all of the different sizes bing can find, and this has made me sigh in relief more than once. Hope that helps!
  • jordan.kocon
    Options
    Offline / Send Message
    jordan.kocon polycounter lvl 13
    Alright, it's been a while since I posted any WIP and I do apologize to those who gave C&C, I did listen and here is the update :) I lost a lot of steam on this project when it came time to light it as I've never lit anything like this before and had a hell of a time! I'm still working on tweaking things like the spec on the side of the building, but I think I am almost done with this piece. Also I have noticed my renders when I upload them are darker than on my pc. Any help is still greatly appreciated!!

    render3.jpg
    render1-1.jpg
    render2-1.jpg

    - Jordan
  • DDuckworth
    Options
    Offline / Send Message
    DDuckworth polycounter lvl 6
    Hey Jordan, That first render with the closeup of your weapons looks really nice, many of the other textures are blurry for the most part on buildings, i'm guessing due to a lack of reusing texture space. You still have those normal issues on the building around the top of the window where you didn't harden your edges. Overall it came out okay, I think the furnace is a little too bright but I understand why you did it. Good job for a first project!
  • jordan.kocon
    Options
    Offline / Send Message
    jordan.kocon polycounter lvl 13
    @DDuckworth Thanks for the quick reply as always! I forgot to harden those edges, I'll give that a try and see if it works. As for the kiln being super bright, its like that for 2 reasons. One being because I'm trying to get that sense of in the concept. The second being this is the best I've been able to get it with how much I know mental ray at the moment :P
  • Rick_D
    Options
    Offline / Send Message
    Rick_D polycounter lvl 12
    ah rendering in maya: making your work look like shit since 1875

    i would rather just grab my work and stick it in cryengine or something nice and quick to export stuff into.

    unless of course your school wants you to learn to make renders for a game course. in which case i would question that somewhat.

    also, you are currently spending a lot of polies on things that really don't need it, i think you are missing the essence of a low poly scene - and while we don't really have to worry about polies so much these days, i think it's still vital to be able to spend your polies as wisely as possible. a clean mesh equals a clean heart. or something.

    i think duckworth is giving you some fantastic crits and you need to step back and really analyze your project once you're done with it. rip it apart and remove edge loops, collapse and weld things, try and optimise it as much as you possibly can, and then go a step further.

    don't worry about destroying your work and don't worry about your current piece not being the greatest thing you've ever made, as long as you can learn something from it at the end you've won half the battle.
  • jordan.kocon
    Options
    Offline / Send Message
    jordan.kocon polycounter lvl 13
    Hey Rick_D. I'm actually rendering in Softimage, but basically the same as maya I'm sure. I tried getting it into UDK but I couldn't get it to look right. Still trying to learn the engine, but having a hell of a time (maybe I'll get my next scene into it). I definitely learned a ton from doing this scene and all of DDuckworh's feedback, and the scene I'm working on right now is going much smoother, and there is a lot more thought put towards modularity.

    lowRes.jpg
Sign In or Register to comment.