Documentation: Damage Screen Collection for Unreal Engine
polycounter lvl 6
Available on Fab
Contents:
1. Overview
2. Initial Setup
3. Settings & Features
3.1. Common Settings
3.1.1. Damage Input
3.1.2. General Settings
3.2. Material Specific Settings
3.2.1. Blood Screen
3.2.2. Shattered Screen
3.2.3. Frozen Screen
3.2.4. Muddy Screen
3.2.5. Wet Screen
3.2.6. Dusty Screen
3.2.7. Burnt Screen
You can now control the Damage Screen Post Process Materials via your blueprint.
"get Damage Parameter from MPC": If the box is checked, the material will get the damage value from the Material Parameter Collection called "MPC_Damage", which needs to be integrated into your character blueprint in order for it to work (see 2. Initial Setup).
If the box is unchecked, another parameter will appear, called "Damage Parameter". Here, you can set the damage value manually in the Material Instance.
As briefly mentioned above, "use Damage Parameter 01-07" can be changed, to define which of the Damage Parameters in MPC_Damage will have an effect on which of the damage screen types.
3.1.2. General Settings
"Screen Aligned UVs": When checked, the UVs for the Textures used, are fixed on the Y axis. When unchecked, they scale with the screen on both axes.
"Better Blending": Since the different damage screen effects overlay each other, it can happen that some become less visible when another effect covers them. This option was added to ensure that all effects are fully visible at all times.
When the option is enabled, it dynamically reduces the opacity of the material, when the damage value of all damage parameters combined, is more than 100.
When the box is checked, another slider will appear, called "(Better Blending) never reduce opacity more than X%". This is the maximum percentage, the opacity of the post process material will be reduced.
Debug Options
"Check Aspect Ratio" activates a texture overlay in the viewport, displaying the three supported aspect ratios: 3:4, 16:9 & 21:9. The Blood Screen will also work for different aspect ratios, but is not optimized for them.
"Print Damage Value on Screen" will display the current damage value the material reads, in the top left corner of the viewport.
General Settings
"Blood Color": Controls the overall color of the blood screen
"Distortion Intensity": Controls the amount of screen distortion the blood effects cause.
"Screen Tint Intensity": There is a radial gradient that tints the screen based on the damage amount. This setting controls how strong this gradient is.
more under 3.1.2. General Settings
Active Effects
The Blood Screen is composed of four separate effects, which are blended together. They can all be toggled separately. The four effects are: "Blood Smear", "Blood Splatter", "Veins" & "Animated Drops".
Animated Drops
The Animated Drops run from the top to the bottom of the screen.
"Drops Opacity": Controls their opacity.
"Flow Speed": Controls their speed.
"Drops Edge Hardness": Controls how hard or soft their edges are.
Blood Smear
"Smear Opacity": Controls the overall opacity of the blood smear.
Blood Splatter
"Splatter Opacity": Controls the opacity of the blood splatters.
"Splatter Edge Hardness": Controls how hard or soft the edges of the blood splatters are.
Veins
"Veins Opacity": Controls the opacity of the veins.
"Veins Edge Hardness": Controls how hard or soft the edges of the veins are.
3.2.2. Shattered Screen
General Settings
"First Crack Damage Level" & "Last Crack Damage Level" The value of the damage parameter, at which the first and last crack will appear.
"Distortion Intensity": Adjusts the amount of screen distortion the glass fragments cause.
"Fake Reflection Opacity": There is a fake reflection added to the material, to make it appear more glass-like. This value controls its opacity.
"Cracks Color": tints the cracks
"Cracks Edge Pronunciation": tints only the edge of the cracks, to make them look sharper & more visible.
more under 3.1.2. General Settings
3.2.3. Frozen Screen
Active Effects
The Frozen Screen is composed of three separate effects, which are blended together. They can all be toggled separately. The effects are: "Ice", "Snow" & "Snowflakes".
Ice
"Ice Distortion": Controls the amount of distortion the ice causes.
"Ice Highlights Opacity": Adds highlights to the ice.
"Ice Highlits Tint": Controls the color of the ice highlights.
Snow
"Snow Opacity": Controls the opacity of the snow.
"Snow Tint": Controls the color of the snow.
Snowflakes
"Snowflakes Opacity": Controls the opacity of the snowflakes.
3.2.4. Muddy Screen
General Settings
"Mud Color": Controls the color of the mud & dirt
"Distortion Intensity": Controls the amount of screen distortion the mud splatters cause.
"Screen Tint Intensity": There is a radial gradient that tints the screen based on the damage amount. This setting controls how strong this gradient is.
more under 3.1.2. General Settings
Active Effects
The Muddy Screen is composed of three separate effects, which are blended together. They can all be toggled separately. The effects are: "Dried Dirt", "Large Splashes" & "Small Splashes".
Dried Dirt
"Dried Dirt Opacity": Controls the overall opacity of the dried dirt.
Large Splashes
"Large Splashes Opacity": Controls the overall opacity of the large splashes.
"Large Splashes Edge Hardness": Controls how hard or soft the edges of the large mud splashes are.
Small Splashes
"Small Splashes Opacity": Controls the overall opacity of the small splashes.
3.2.5. Wet Screen
General Settings
"Water Tint": Controls the overall color of the water.
more under 3.1.2. General Settings
Active Effects
The Wet Screen is composed of three separate effects, which are blended together. They can all be toggled separately. The effects are: "Separated Drops", "Water T1" & "Flowing Water".
Separated Drops
"Separated Drops Opacity": Controls the overall opacity of the separated water drops.
Water T1
"Water T1 Opacity": Controls the overall opacity of the water type 1.
Flowing Water
"Flowing Water Opacity": Controls the overall opacity of the flowing water.
"Flow Speed": Controls the speed of the animation of the flowing water.
3.2.6. Dusty Screen
Active Effects
The Dusty Screen is composed of three separate effects, which are blended together. They can all be toggled separately. The effects are: "Animated Particles", "Cobwebs" & "Dust".
Animated Particles
"Particles Color": Controls the color of the animated particles.
"Particles Movement Speed": Controls the speed at which the animated particles move across the screen.
"Particles Opacity": Controls the overall opacity of the animated particles.
Cobwebs
"Cobwebs Color": Controls the overall color of the cobwebs.
"Web 01-10": Each web can be toggled separately with these checkboxes.
"(Web 01-10) Start Blending at Damage Value:": Controls at which damage value the related web starts to appear.
"Web 01-10 Blend Speed": Controls the damage range the webs take to blend in (higher numbers mean smaller range / faster blending)
"Web 01-10 Opacity": Controls the opacity for each web.
Dust
"Dust Fine/Medium/Coarse Color": Controls the color of each dust texture.
"Dust Fine/Medium/Coarse Opacity": Controls the opacity of each dust texture.
3.2.7. Burnt Screen
Soot
"Soot Color": Controls the color of the soot.
"Soot 01-04 Opacity": Controls the opacity of each soot texture.
Videos
Blood Screen - Settings Overview
Shattered Screen - Settings Overview
Frozen Screen - Settings Overview
Muddy Screen - Settings Overview
Wet Screen - Settings Overview
Dusty Screen - Settings Overview
Burnt Screen - Settings Overview
Showcase Separate
Showcase Combined
"Better Blending" Example
Contents:
1. Overview
2. Initial Setup
3. Settings & Features
3.1. Common Settings
3.1.1. Damage Input
3.1.2. General Settings
3.2. Material Specific Settings
3.2.1. Blood Screen
3.2.2. Shattered Screen
3.2.3. Frozen Screen
3.2.4. Muddy Screen
3.2.5. Wet Screen
3.2.6. Dusty Screen
3.2.7. Burnt Screen
1. Overview
"Damage Screen Collection" is an all-in-one solution to integrate damage screens into your Unreal Engine game, using Post Process Materials. It includes a Blood Screen, Shattered Screen, Frozen Screen, Muddy Screen, Wet Screen, Dusty Screen and Burnt Screen.2. Initial Setup
- In your level, create a Post Process Volume.
- In the Post Process Volume, enable "Infinite Extend (Unbound)".
- Then (also in the Post Process Volume), go to "Rendering Features" > "Post Process Materials", or type in "Materials" in the search bar.
- Click on the "+" icon next to "Array".
- In the appearing dropdown menu, select "Asset reference".
- Then drag and drop one of the Damage Screens from Content > DamageScreen > Materials > MaterialInstances into the slot or select it via the dropdown menu.
- Repeat step 4-6 for each Damage Screen Effect you want to use.
The result should look like this: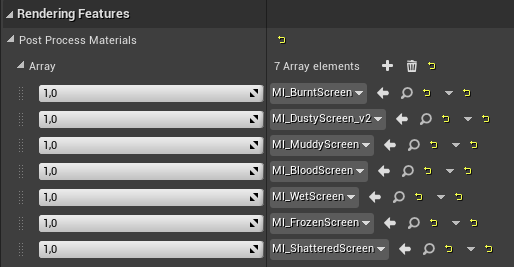
- The order in which the Material Instances are added to the Post Process Volume has an effect on the overall look of the damage screen, when more than one damage screen type is active. The recommended order is 1. BurntScreen, 2. DustyScreen, 3. MuddyScreen, 4. BloodScreen, 5. WetScreen, 6. FrozenScreen, 7. ShatteredScreen.
- In your character blueprint, create a new "Set Scalar Parameter Value" node for each damage screen effect you want to use.
- Under "Collection", select "MPC_ScreenDamage".
- Under "Parameter Name", select the damage parameter each effect uses. By default, this is "Damage Parameter 01" for the Blood Screen, "Damage Parameter 02" for the Shattered Screen, "Damage Parameter 03" for the Frozen Screen, "Damage Parameter 04" for the Muddy Screen, "Damage Parameter 05" for the Wet Screen, "Damage Parameter 06" for the Dusty Screen and "Damage Parameter 07" for the Burnt Screen.
Which damage parameter each effect uses can be switched up in the related material instance:
- Plug the damage variable into the "Parameter Value" input.
The variable needs to output a float value between 0 and 100.
You can now control the Damage Screen Post Process Materials via your blueprint.
3. Settings & Features
3.1. Common Settings
3.1.1. Damage Input"get Damage Parameter from MPC": If the box is checked, the material will get the damage value from the Material Parameter Collection called "MPC_Damage", which needs to be integrated into your character blueprint in order for it to work (see 2. Initial Setup).
If the box is unchecked, another parameter will appear, called "Damage Parameter". Here, you can set the damage value manually in the Material Instance.
As briefly mentioned above, "use Damage Parameter 01-07" can be changed, to define which of the Damage Parameters in MPC_Damage will have an effect on which of the damage screen types.
3.1.2. General Settings
"Screen Aligned UVs": When checked, the UVs for the Textures used, are fixed on the Y axis. When unchecked, they scale with the screen on both axes.
"Better Blending": Since the different damage screen effects overlay each other, it can happen that some become less visible when another effect covers them. This option was added to ensure that all effects are fully visible at all times.
When the option is enabled, it dynamically reduces the opacity of the material, when the damage value of all damage parameters combined, is more than 100.
When the box is checked, another slider will appear, called "(Better Blending) never reduce opacity more than X%". This is the maximum percentage, the opacity of the post process material will be reduced.
3.2. Material Specific Settings
3.2.1. Blood ScreenDebug Options
"Check Aspect Ratio" activates a texture overlay in the viewport, displaying the three supported aspect ratios: 3:4, 16:9 & 21:9. The Blood Screen will also work for different aspect ratios, but is not optimized for them.
"Print Damage Value on Screen" will display the current damage value the material reads, in the top left corner of the viewport.
General Settings
"Blood Color": Controls the overall color of the blood screen
"Distortion Intensity": Controls the amount of screen distortion the blood effects cause.
"Screen Tint Intensity": There is a radial gradient that tints the screen based on the damage amount. This setting controls how strong this gradient is.
more under 3.1.2. General Settings
Active Effects
The Blood Screen is composed of four separate effects, which are blended together. They can all be toggled separately. The four effects are: "Blood Smear", "Blood Splatter", "Veins" & "Animated Drops".
Animated Drops
The Animated Drops run from the top to the bottom of the screen.
"Drops Opacity": Controls their opacity.
"Flow Speed": Controls their speed.
"Drops Edge Hardness": Controls how hard or soft their edges are.
Blood Smear
"Smear Opacity": Controls the overall opacity of the blood smear.
Blood Splatter
"Splatter Opacity": Controls the opacity of the blood splatters.
"Splatter Edge Hardness": Controls how hard or soft the edges of the blood splatters are.
Veins
"Veins Opacity": Controls the opacity of the veins.
"Veins Edge Hardness": Controls how hard or soft the edges of the veins are.
3.2.2. Shattered Screen
General Settings
"First Crack Damage Level" & "Last Crack Damage Level" The value of the damage parameter, at which the first and last crack will appear.
"Distortion Intensity": Adjusts the amount of screen distortion the glass fragments cause.
"Fake Reflection Opacity": There is a fake reflection added to the material, to make it appear more glass-like. This value controls its opacity.
"Cracks Color": tints the cracks
"Cracks Edge Pronunciation": tints only the edge of the cracks, to make them look sharper & more visible.
more under 3.1.2. General Settings
3.2.3. Frozen Screen
Active Effects
The Frozen Screen is composed of three separate effects, which are blended together. They can all be toggled separately. The effects are: "Ice", "Snow" & "Snowflakes".
Ice
"Ice Distortion": Controls the amount of distortion the ice causes.
"Ice Highlights Opacity": Adds highlights to the ice.
"Ice Highlits Tint": Controls the color of the ice highlights.
Snow
"Snow Opacity": Controls the opacity of the snow.
"Snow Tint": Controls the color of the snow.
Snowflakes
"Snowflakes Opacity": Controls the opacity of the snowflakes.
3.2.4. Muddy Screen
General Settings
"Mud Color": Controls the color of the mud & dirt
"Distortion Intensity": Controls the amount of screen distortion the mud splatters cause.
"Screen Tint Intensity": There is a radial gradient that tints the screen based on the damage amount. This setting controls how strong this gradient is.
more under 3.1.2. General Settings
Active Effects
The Muddy Screen is composed of three separate effects, which are blended together. They can all be toggled separately. The effects are: "Dried Dirt", "Large Splashes" & "Small Splashes".
Dried Dirt
"Dried Dirt Opacity": Controls the overall opacity of the dried dirt.
Large Splashes
"Large Splashes Opacity": Controls the overall opacity of the large splashes.
"Large Splashes Edge Hardness": Controls how hard or soft the edges of the large mud splashes are.
Small Splashes
"Small Splashes Opacity": Controls the overall opacity of the small splashes.
3.2.5. Wet Screen
General Settings
"Water Tint": Controls the overall color of the water.
more under 3.1.2. General Settings
Active Effects
The Wet Screen is composed of three separate effects, which are blended together. They can all be toggled separately. The effects are: "Separated Drops", "Water T1" & "Flowing Water".
Separated Drops
"Separated Drops Opacity": Controls the overall opacity of the separated water drops.
Water T1
"Water T1 Opacity": Controls the overall opacity of the water type 1.
Flowing Water
"Flowing Water Opacity": Controls the overall opacity of the flowing water.
"Flow Speed": Controls the speed of the animation of the flowing water.
3.2.6. Dusty Screen
Active Effects
The Dusty Screen is composed of three separate effects, which are blended together. They can all be toggled separately. The effects are: "Animated Particles", "Cobwebs" & "Dust".
Animated Particles
"Particles Color": Controls the color of the animated particles.
"Particles Movement Speed": Controls the speed at which the animated particles move across the screen.
"Particles Opacity": Controls the overall opacity of the animated particles.
Cobwebs
"Cobwebs Color": Controls the overall color of the cobwebs.
"Web 01-10": Each web can be toggled separately with these checkboxes.
"(Web 01-10) Start Blending at Damage Value:": Controls at which damage value the related web starts to appear.
"Web 01-10 Blend Speed": Controls the damage range the webs take to blend in (higher numbers mean smaller range / faster blending)
"Web 01-10 Opacity": Controls the opacity for each web.
Dust
"Dust Fine/Medium/Coarse Color": Controls the color of each dust texture.
"Dust Fine/Medium/Coarse Opacity": Controls the opacity of each dust texture.
3.2.7. Burnt Screen
Soot
"Soot Color": Controls the color of the soot.
"Soot 01-04 Opacity": Controls the opacity of each soot texture.
Videos
Blood Screen - Settings Overview
Shattered Screen - Settings Overview
Frozen Screen - Settings Overview
Muddy Screen - Settings Overview
Wet Screen - Settings Overview
Dusty Screen - Settings Overview
Burnt Screen - Settings Overview
Showcase Separate
Showcase Combined
"Better Blending" Example