The BRAWL² Tournament Challenge has been announced!
It starts May 12, and ends Oct 17. Let's see what you got!
https://polycount.com/discussion/237047/the-brawl²-tournament
It starts May 12, and ends Oct 17. Let's see what you got!
https://polycount.com/discussion/237047/the-brawl²-tournament
Cloth Experiments

node
Hi All!
Wanting to log my project journey here for this character build. I'll be using a scene from SM Entertainment's FILM : KAI as my concept. Below are some screenshots from the scene I am referring to, as well as a link to the original video for better reference. And of course, credit for this content goes to its rightful owners.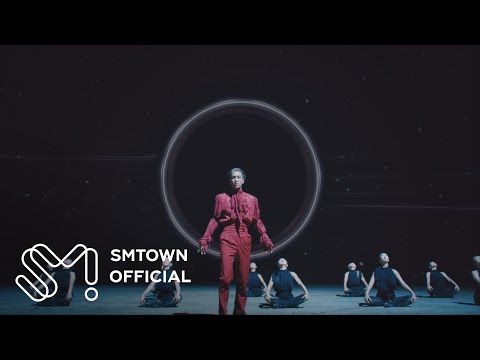 https://www.youtube.com/watch?v=VjjKbrFJoxY (4:09 - 4:58)

I've begun some work already, mostly planning my time and collecting reference. For this project, I wanted to push myself with the cloth. The shirt is super-complex in terms of form, the material it's made from makes it heavily influenced by the movement and pose of the figure, while gravity is going to have less influence due to the lightweight nature of the fabric.
Garments with these dramatic folds need really clean UVs so that the thread texture of the shirt isn't going to be interrupted by the large shapes and unwrapping garments I've sculpted has always been a bit of a struggle for me, so I wanted to experiment with a new approach. For this build, I want to try doing almost all the high poly creation for the garments in Marvellous Designer. Because garments in this program are made by first making a 2D pattern, it produces very clean UVs, but sculpting over these loses them, so keeping the entire high poly production here, I can salvage these. This also then allows me to use Marvellous Designer's retopology tools, which are really handy for garments, even more so with those with many deep folds, where a quad draw tool might not be able to reach.
I wanted to pose this character, but trying to cloth sim over a pose (especially one with tight angles where fabric would normally get trapped against the body) is rarely successfully, as the program isn't able to understand the form, and therefor know where collsions should take place.
To work around this, I took one of the avatars from Marvellous and rigged it in mixamo, taking this into maya and animating a very simple A-pose to pose sequence, where the tighter details (like the fingers gripping) happen right at the end, to hopefully show up on the simulated cloth.
I'm currently building up the garments in Marvellous, and I'm having trouble with with thin ties that tighten around the sleeves. I tried using layers to establish that the tie loops sit over the ties that sit over the sleeve, but the simulation didn't seem to understand this. I switched to GPU simulation and tried using the 'Superimpose over' function instead, but again the tie is clipping through the sleeves and loops. If anyone has any idea how I might work around this without taking the garment into zbrush, please do let me know.

I'll be posting more updates on this project soon") )
)
Wanting to log my project journey here for this character build. I'll be using a scene from SM Entertainment's FILM : KAI as my concept. Below are some screenshots from the scene I am referring to, as well as a link to the original video for better reference. And of course, credit for this content goes to its rightful owners.
https://www.youtube.com/watch?v=VjjKbrFJoxY (4:09 - 4:58)I've begun some work already, mostly planning my time and collecting reference. For this project, I wanted to push myself with the cloth. The shirt is super-complex in terms of form, the material it's made from makes it heavily influenced by the movement and pose of the figure, while gravity is going to have less influence due to the lightweight nature of the fabric.
Garments with these dramatic folds need really clean UVs so that the thread texture of the shirt isn't going to be interrupted by the large shapes and unwrapping garments I've sculpted has always been a bit of a struggle for me, so I wanted to experiment with a new approach. For this build, I want to try doing almost all the high poly creation for the garments in Marvellous Designer. Because garments in this program are made by first making a 2D pattern, it produces very clean UVs, but sculpting over these loses them, so keeping the entire high poly production here, I can salvage these. This also then allows me to use Marvellous Designer's retopology tools, which are really handy for garments, even more so with those with many deep folds, where a quad draw tool might not be able to reach.
I wanted to pose this character, but trying to cloth sim over a pose (especially one with tight angles where fabric would normally get trapped against the body) is rarely successfully, as the program isn't able to understand the form, and therefor know where collsions should take place.
To work around this, I took one of the avatars from Marvellous and rigged it in mixamo, taking this into maya and animating a very simple A-pose to pose sequence, where the tighter details (like the fingers gripping) happen right at the end, to hopefully show up on the simulated cloth.
I'm currently building up the garments in Marvellous, and I'm having trouble with with thin ties that tighten around the sleeves. I tried using layers to establish that the tie loops sit over the ties that sit over the sleeve, but the simulation didn't seem to understand this. I switched to GPU simulation and tried using the 'Superimpose over' function instead, but again the tie is clipping through the sleeves and loops. If anyone has any idea how I might work around this without taking the garment into zbrush, please do let me know.
I'll be posting more updates on this project soon
Replies
I finalised the garments in Marvelous, and my animation worked! I couldn't use the final few frames as the hand colliding with the chest cause some really weird deformation of the shirt, but the frame I did end up using will work just as well.
My next step was to use Marvelous Designer's retop tool, making sure to create enough geometry to capture the broader shapes of the folds.
I pulled both the high and low poly version into maya to check their alignment, UV unwrap the low and split the garments up into pieces for baking. Baking by mesh name to avoid the sleeves baking onto the shirt bodice and trousers was the original route I took, but this way I couldn't create custom Max Frontal and Back Distances for each piece, so I begun splitting it up and bake testing until I was seeing as few artefacts as possible. I did also attempt to use a cage file on the shirt bodice, but it didn't seem to have any effect on the bake (perhaps I did something wrong?).
Once the baking process was complete, I exported the maps and combined them all together in Clip Studio (similar to Photoshop), to fit them back into more organised and optimised texture sets. The I imported them back into painter and applied them.
Some areas were really difficult to remove artefacts from, such as in this deep fold in the left sleeve. In areas like this where adjusting frontal and rear distances just isn't cutting it and the affected area is relatively flat, I pull the normal maps in Clip Studio and make small adjustments to remove the artefact.
Progress has been a little slow over the past week, I was really struggling with the bake
I hope I can get a lot more done this week, see you soon!
I wanted to get this into engine ASAP and got distracted with some set dressing using Megascans assets. I also set up a mirror to work with in this scene. You can probably also tell the left sleeve is looking a bit off, I'm still working on the transparency to get it working with a normal map. Let me know what you think!
Original for reference - credit to original owners ℗ SM ENTERTAINMENT