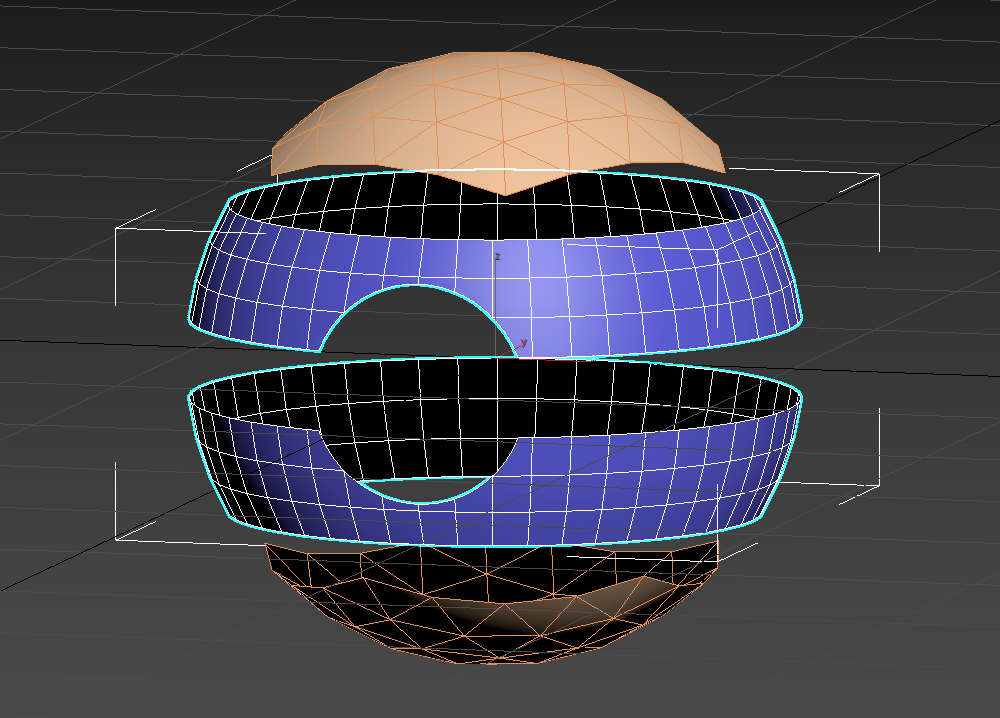
I'm just getting into 3d and I'm trying to make a thing with proper topology.
So I'm following this Pokéball tutorial (https://www.youtube.com/watch?v=PPq0QF2vbBg) and I noticed comments under the video about bad topology, so I thought I'd try to tackle learning that part early. I had this "clever" idea to cut off the messy top off the standard sphere and replace it with a geophere (they are more UV friendly, right?), while keeping the smooth edges of the middle pokeball line, but I have no idea how I'd merge them together properly.
I might just have the wrong idea altogether, I don't know.
I was also thinking that cutting a circular hole with a cylinder boolean like in the video might be a problem? Since those curves aren't proper edges between vertices? Now, with the way he made it in the video it didn't seem like the topology had any implication on any UV mapping, because he just generated some materials and applied them to the objects. But I wanna try to "handpaint" it and do some funky designs with the geometry so I wanna make sure I learn proper topology early if I can to make the UV stuff less difficult. I did a little 3d before summer and UV mapping was pretty terrible to try to get right, since my mesh was a mess and I didn't find any good way to cut it.
Anyways, here's that pokeball:

So right now I'm wondering about a few specific things:
1: How/if I can merge these shapes and bridge the gap between the middle and top parts.
2: If the cylinder boolean is a bad way to do this, and how it might be done better.
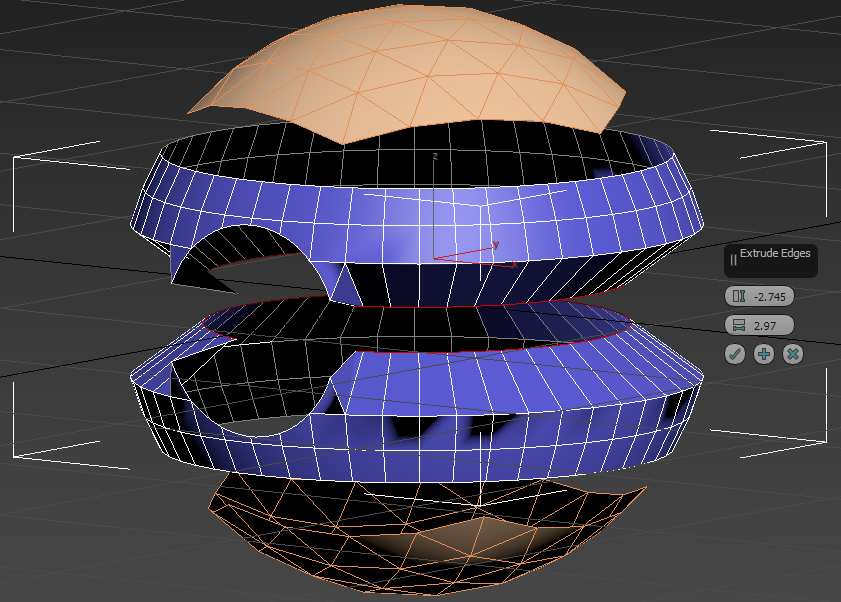
3: How to extrude the center inward to make the inner section without it doing this...

I thought I could make it just extrude a new set of polys from the edge, but instead it just shrunk the diameter of it. I can't seem to figure out how to do it properly. Maybe I should just make a new sphere and shrink the middle section, but I'm not sure if that would mess with the overall sphere-shape.
I'm very much a noob in this so any advice would be very appreciated, whether it's specifically about how to do this or maybe I'm starting out on the wrong foot altogether it would all be very helpful. I'm also noob to this forum, so if I've committed any posting sins please let me know.
I might just have the wrong idea altogether, I don't know.
I was also thinking that cutting a circular hole with a cylinder boolean like in the video might be a problem? Since those curves aren't proper edges between vertices? Now, with the way he made it in the video it didn't seem like the topology had any implication on any UV mapping, because he just generated some materials and applied them to the objects. But I wanna try to "handpaint" it and do some funky designs with the geometry so I wanna make sure I learn proper topology early if I can to make the UV stuff less difficult. I did a little 3d before summer and UV mapping was pretty terrible to try to get right, since my mesh was a mess and I didn't find any good way to cut it.
Anyways, here's that pokeball:

So right now I'm wondering about a few specific things:
1: How/if I can merge these shapes and bridge the gap between the middle and top parts.
2: If the cylinder boolean is a bad way to do this, and how it might be done better.
3: How to extrude the center inward to make the inner section without it doing this...

I thought I could make it just extrude a new set of polys from the edge, but instead it just shrunk the diameter of it. I can't seem to figure out how to do it properly. Maybe I should just make a new sphere and shrink the middle section, but I'm not sure if that would mess with the overall sphere-shape.
I'm very much a noob in this so any advice would be very appreciated, whether it's specifically about how to do this or maybe I'm starting out on the wrong foot altogether it would all be very helpful. I'm also noob to this forum, so if I've committed any posting sins please let me know.

Replies
uved:
Simple UV's, using a basic camera projection and then just unfolding them.
Good luck!
I'm in the process of trying to follow your steps and I found this tutorial (https://blog.turbosquid.com/2013/11/06/making-a-quad-sphere/) to help me with the subdivision of the cube into a spheroid (I've never done it before) and I got to step 3 which looks like what you have in your step 2. After that I made a new standard sphere and scaled it to the same size as the quad sphere so I think I've got step 3 down if I understood it correctly.
But I'm not sure how to proceed with the transferring of the vertices.
I tried to google that too but found nothing that applied, so I was wondering if you could explain that part or link a guide or something?
I was also wondering if you had any recommendations for quality 3d basics guides to study after this? I really wanna learn to make handpainted stylized objects and weapons and armor and such. And I've been thinking I wanna make a little world in Unity I can put stuff into and I'll be able to actually see how stuff looks in a game, do you think that's feasible? I learned some basic programming last year and I was thinking a simple walking simulator to walk around a level with some objects might be possible.
Or maybe I'm overextending here, I dunno. I'm barely getting into making a pokeball :P
Since you are using 3dsmax, you can drop a "Spherify" modifier on top of your stack and crank it to 100. That will round out your quadsphere without all of the other steps that are implied but not specifically listed.
So your stack would look something like this:
spherify
Turbosmooth
Unwrap UVW
Box
I unwrap before I apply turbosmooth because it's easier to get a tennis ball unwrap:
This gives you two strips of UV's that pack nicely onto a texture sheet and if you do it at the box stage it transfers up the stack so you aren't having to mess with a bunch of edges and polygons that relax weird. It all stays nice a straight with a little bit of stretching.
Note1: All of the edit poly operations (steps 5-8) can be done in a single edit poly modifier, I did it in separate modifiers because it was easier to screenshot.
Note2: The last three steps (10-12) are only needed if you plan on making it sub-d modeling friendly.
The first thing that comes to mind is Ben Mathis' older character creation tutorials.
http://www.poopinmymouth.com/tutorials/
His second character tutorial uses an app called Bodypaint3d, to paint textures in 3d basically.
If you do not have access to this tool, you can replace it with Quixel painter/Mudbox/Zbrush etc.
Bodypaint is pretty cool, so if you can get it i'd say try to get access to it. Its very similar to photoshop, with its brushes and layering system.
Quixel, obviously works together with photoshop so that might be cool.
While I have used mudbox in the past for painting maps I found i got some random colour bleeding artefacts, but overall it should be pretty straigt forward.
Never used Zbrush for texturing/polypainting... but you can definitely use it to do the same stuff as well.
If you do not have access to any 3d painting tools, there is always Photoshop.
Photoshop has some 3d cabalities as well, havent been a big fan of it personally.
Ben Mathis has another tutorial where he does all of his texturing in photoshop in 2d, so that might help as well.
If you are new to texturing/shading/colours/etc. Id suggest trying to get the basics down of colour theory.
https://androidarts.com/art_tut.htm < pretty usefull information here.
Look at me linking all these old school tuts and guides... I feel old T_T haha
I'll continue trying to finish it then
I think I did something wrong with the last Turbosmooth though, the edges went quite round
nvm increased turbosmooth iterations to 2
also how do I scale the inner part properly? It's not anchored to its center but rather its bottom
I realize now I might've converted to editable poly wrongly after setting up the initial tennisball unwrap.
If you want a more in-depth solution, read up on Pelt mapping
http://help.autodesk.com/view/3DSMAX/2018/ENU/?guid=GUID-1F284219-C6BB-4505-A2F4-BE3B7AA7D047
For the scaling, check out these tools
http://help.autodesk.com/view/3DSMAX/2018/ENU/?guid=GUID-ECF9F94C-C2A6-4153-ADF8-AFA0D3181B58
I don't know whether I'm just hopelessly bad at this or if there's anything to salvage, should I make changes to the cut or should I try texturing it from here? I guess I could blend out the edges but still, I dunno if it's gonna look any good.
Regarding what Wiki said about the centering, I started by setting the box at 0,0,0 in all the coordinates, but it was anchored from the bottom at the start. Is there a setting to anchor it from the center?
In unwrap you don't "cut" you break edges. I think the shortcut is B, but maybe that is just what I set it to... You can also get to it from the Tools Drop Down menu.
The whole point of unwrapping it at the box stage is so you don't have to hassle with uv's at this stage, now that you've collapsed it with turbosmooth applied you are kind of stuck.
It's time to start double clicking some of the seams and stitch those shells together.
OR...
Explode unwrap based on smoothing groups, angle or material ID.
OR...
Planar map the whole thing, select the edges you want to turn into seams, break, relax and straighten.
OR...
Redo it from scratch, it doesn't take that long and for sure you'll be faster this time around, plus practice makes, something something...