The BRAWL² Tournament Challenge has been announced!
It starts May 12, and ends Oct 17. Let's see what you got!
https://polycount.com/discussion/237047/the-brawl²-tournament
It starts May 12, and ends Oct 17. Let's see what you got!
https://polycount.com/discussion/237047/the-brawl²-tournament
Hard Edges, UV Seams, Smoothing Groups, Cages & Baking Trouble.
polycounter lvl 7
Hey guys, yet another person here who is struggling with understanding baking and modelling principles, and how to get good results. I have spent the day today experimenting with many different methods and settings, all with varied results. A result I am 100% happy with is still eluding me, and I hope some of you may be able to help me analyze the issues, and correct them.
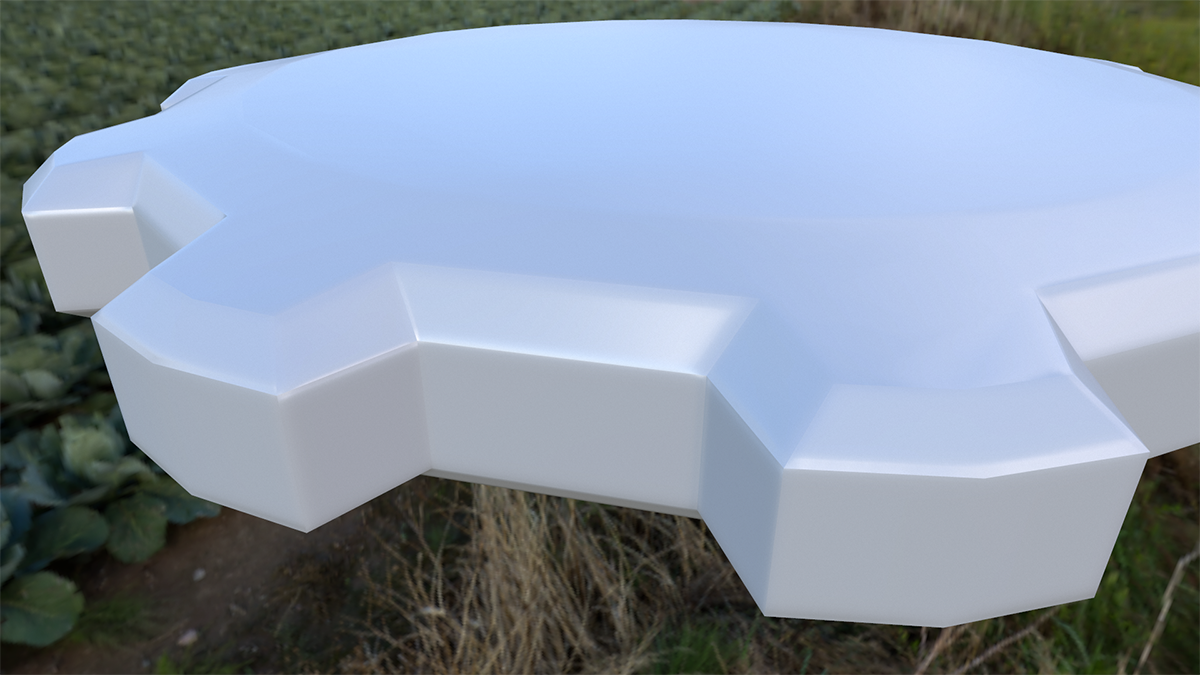
First off, let me show you the asset I have been fiddling with. It is a simple gear-like object. High poly version below:

Here is the low poly. Matches very closely to the high poly. No crazy differences, and it has been uv'ed:

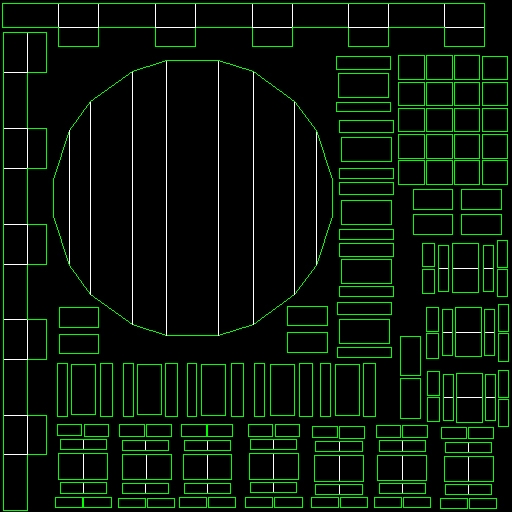
Here are the UV's. Many of the edges have been straigthened, to combat aliasing. This does cause distortion, but I'd rather have that than unclean edges:
Lastly, the cage. Encompasses the high and low poly. Visible as transparent below:

So, on with the experiments! I will now list the different test bakes I made, and share with you the results. The tests have been done to test all the different methods, techniques and tips that I have gathered on this forum, as well as other places.
All of the baking has been done in Xnormal, since it is the baking software that I am most comfortable with.
Test 2:

Baking with cage, where the low poly normals have been averaged. Very Poor result:
Test 3:

Baked without cage. Low poly normals split by uvs. Okay result, but with more complex models, errors can occur - like the black line seam, which I got when testing these bakes on a simple box. The big issue I'm having here is that the shading is so strange along the seams. I simply don't understand how to rectify this.
Test 4:
Test 5:
Test 6:

Baking with cage. Low Poly Normals split by UV's. Best result I have been able to achieve.
So, with all the experimenting, I feel like I have learnt quite a bit, but it still isn't good enough. I can't seem to find a way to stop the shading from going all haywire by the edges. If any of you could help me figure out how I could fix it, and make it look something like this:

Here I've baked just like in test 6, and you can see the shading along the edges is much better, and I don't understand why.
Thanks for reading, I hope some of you guys can help me out. I'd very much appreciate some help.
Will check this post again tomorrow, since it's getting late where I live.
First off, let me show you the asset I have been fiddling with. It is a simple gear-like object. High poly version below:
Here is the low poly. Matches very closely to the high poly. No crazy differences, and it has been uv'ed:
Here are the UV's. Many of the edges have been straigthened, to combat aliasing. This does cause distortion, but I'd rather have that than unclean edges:
Lastly, the cage. Encompasses the high and low poly. Visible as transparent below:
So, on with the experiments! I will now list the different test bakes I made, and share with you the results. The tests have been done to test all the different methods, techniques and tips that I have gathered on this forum, as well as other places.
All of the baking has been done in Xnormal, since it is the baking software that I am most comfortable with.
Test 2:
Test 3:
Baked without cage. Low poly normals split by uvs. Okay result, but with more complex models, errors can occur - like the black line seam, which I got when testing these bakes on a simple box. The big issue I'm having here is that the shading is so strange along the seams. I simply don't understand how to rectify this.
Test 4:
 Cageless bake. Low poly normals averaged. Very poor result. Result not much different from test 2.
Test 5:
Baking with cage, low poly normals split by UV's, low poly triangulated. Caused some issues for me, but seems to be the best thing to do in most cases.
Test 6:
Baking with cage. Low Poly Normals split by UV's. Best result I have been able to achieve.
So, with all the experimenting, I feel like I have learnt quite a bit, but it still isn't good enough. I can't seem to find a way to stop the shading from going all haywire by the edges. If any of you could help me figure out how I could fix it, and make it look something like this:
Here I've baked just like in test 6, and you can see the shading along the edges is much better, and I don't understand why.
Thanks for reading, I hope some of you guys can help me out. I'd very much appreciate some help.
Will check this post again tomorrow, since it's getting late where I live.
Replies
So you always want to triangulate and for something like this you want to bake with a cage.
Not the cause of your issue but I don't get the UV choices, ie: why you have split the face of that shape where you have. You will have crazy seams to deal with in the non baked textures.

I would have gone after it this way:
What's your target destination? UE4? If so, have you tried a synched-single smoothing group bake?
If not, do your shell seams match your smoothing groups?
Also, I agree with m4dcow about the UVs
Another thing is the sharpness of your edges. Your high-res mesh has sharp, hard chamfers whereas the cube bake you're trying to replicate has rounded, soft bevels.
EDIT:
Sorry OP, I'm having a nightmare trying to embed my images. I see you've embedded from imgur. I've tried it from both imgur and photobucket with no luck, and now the Edit Post option is completely bugged. Have you just copy/pasted the imgur embed code straight into your post?
JEDTHEKRAMPUS
I don't actually know. I am just exporting from 3dsMax as an OBJ with texture coords, normals and smoothing groups checked, and just putting it into Xnormal. If you could elaborate on how to do it and test with it, I would be very thankful!
M4DCOW
Okay, I will make sure to do this in the future. In this case though, my results only seem to get worse when I do it, but I will keep it in mind.
In response to your second paragraph, from what I have understood, if there's a hard edge, you should put a seam on it and put a seperate smoothing group on it. This does create a lot of seams though, which as you say can make it hard to texture. I will make a separate test with UV's as you suggest.
BEK
Thank you, I will try it out and see if the result's get better. I do remember reading that you should actually make edges softer than they actually should be, in order for it read better from a distance. I will try softening the edges of the high poly.
MUSASHIDAN
I have no target destination in mind. I only really view what I make in marmoset. I am unsure what is meant by a synched-single smoothing group bake. If you mean whether or not I have tried baking with all normals unified/1 smoothing group for everything, the answer is yes, and the results of doing that is shown in tests 2 and 4. If that isn't what you are mentioning, I would love if you could elaborate on what it is, and how to do it!
With regards to the "if not, do your shell seams match your smoothing groups"? I am using this is about whether or not the normals are split by the uv islands, then yes, they are.
In regard to the sharpness of the edges, I will take that into consideration like you and BEK have suggested!
I do have substance painter and substance designer, and could try to make some test bakes with them and see if they help the issue. I simply don't understand how you can get such a good result with a single smoothing group. In my test 2 and 4 it ends up looking abysmal. Maybe it's because of the UV's. I will try with your export settings and UV's, and see if the result ends up better. I will also try baking with fbx instead of obj, maybe it makes a difference.
---------------------***---------------------
So, here are the latest tests I have done.
Test 1, done in response to M4DCOW. UV's below, as you suggested:
Here I have laid out the UV's as you suggested, and normals are split by said UV's. Low poly triangulated as well. I get better results at the top corner's, which is great, but now because the edges aren't straigthened, black spots occur, and the triangulation is messing up the shading of the flat surface. The shading is still broken where the top connects with the middle segment of the cog. Baked with cage.
Test 2, also in response to M4DCOW, here I am doing exactly the same, except I have unify'ed all the normals (1 smoothing group):
Only seems to make it worse.
Am going to post this reply now, so you guys have atleast something to work with. I will get back to testing right away and post later with my findings. Thanks again for reading and chiming in!
*EDIT* sorry about the reply ending up here! I don't know why, but I'm sure it's super confusing. Sorry all
@jarjaniks
Here's what I mean by a synced tangent space workflow. Hopefully the pictures are clear. Bear in mind that I
only spent about 15-20min on this from modeling to baking.
When the tangent basis is synced(Mikktspace in this case) then the target software computes the tangents and
bi-normals itself. The resulting normal map will have steeper gradients to compensate for the single smoothing group
over sharp angles, but allows a very straightforward workflow with less Geo and less worrying about UV-splits to
smoothing groups. But it will only work if the baking and destination software tangent basis is using the same
space, hence they are synced.
MUSASHIDAN Will try baking in substance painter with your specs. Will try with my own, as well as UV's like yours. I still find myself unable to understand these tangent basis and "mikktspace". I simply don't know what I have to do. It seem's like my understanding of hard edges having to be split by normals and uvs is completely wrong. I feel like I am losing my mind.
Alright, here is my test using your method. Used exact same export settings. 1 smoothing group, checked compute tangent option in substance painter:
Result in substance:
Is there simple no way to not have the seams show up in the normal map? How come your top edge is smoothing with no problems?
Hard edges being split by UV shells is also the right way to go. It has been the method that's been used
for a long time. Don't get disheartened. It is a complex subject with many variables. Just keep on doing
test bakes until you get it right.
The synced workflow is just a more modern, less painful way of baking normal maps. It still needs a few
of those variables in place to work, but it is a step forward in the technology/methodology.
As it stands, not all software is synced, some use Mikktspace, others don't. But long before Mikktspace,
different software has always used a slightly different basis. Sometimes it's as simple as flipping the green
channel, sometimes it's more involved. So, for instance, SD/SP/UE4/Xnormal all use Mikkt so the results will
always transfer perfectly provided you have followed the steps.
If you follow these simple steps (plus images above) you should get a decent result.
UV with as many or as few seams as you like(don't worry about splitting your UVs/hard edges)
Set all your faces to the same smoothing group(sometimes you may want to set hard edges on UV shell borders)
Export your .fbx with smoothing groups/triangulate checked, and tangents and bi-normals unchecked
Import into SP and make sure to check 'compute tangent space per fragment'
Bake you NM in SP, increasing the search distance if necessary.
The great thing about SP is that you get to see your results instantly
Depending on the mesh(es) to be baked you could also import a cage to SP
Did 3 more tests, and I still feel at a loss with regards to understanding how UV's seams, normals and "to cage or not to cage" fit together...
Test 1:
Done in substance painter, with a low poly cube that had its normals split by UV's. Just as good as when I did it in Xnormal
Test 2:
Also done in substance painter, but this time with 1 smoothing group. Looks just as good as in test 1.
But if i replicate test 2 in Xnormal, I get something that looks godawful:
And I am still unable to get rid of the shading seam in the case beneath, when the cube in test 1 & 2 does a fantastic job at the shading, even though there is a seam:
*flips desk*
Have the same problem a long time. Still not resolved.
UV borders set to Hard.
(SP--Substance Painter)
From SP
http://prntscr.com/d7pdhv
SP bake settings
http://prntscr.com/d7pegj
The same result with\without cage, distances etc.
Project config--tried Compute tangent space per fragment--almost no affect...
UV seams from SP are visible in Marmoset with a different tanget space options (3d max, Mikkt etc).
From Maya
http://prntscr.com/d7pdsh
http://prntscr.com/d7phty
Triangulated inside in Maya
Scale auto, FBX plugin 2014\2015. No anim etc.
Tried Tangents & Binormals...
I can bake in Maya...But--a more important problem--when I use SP materials which change an orig normal map, SP make changes to this map with this ugly seams efect.
Tried Quixel--looks fine.
Where is problem? Please help.
This is a lot of headache.
There is no fix, it's a normal map limitation in Max/xNormal/Substance Painter. Maya just does this thing better. It might be because of the way it's applying the blur filter on the image, I had some better results with Mightybake, which also has a blur filter.
The seam will barely be noticeable anyway. If you want to avoid that kind of seam - do not use hard edges, but bevels.
In general remember that with a correct workflow, there is no need to use any hard edges whatsoever in order get accurate shading. Of course they are helpful to ease out texture compression, but not necessary for a mathematically accurate result.
Also if you do use hard edges (to help with texture compression, and/or to help with the overall shading of the model), and your workflow is mathematically accurate (which is now a widely occurrence as opposed to just a few years ago), remember that there is absolutely NO need to make all your UV borders hard. This misconception (a brute-force shortcut really) has been around for years and the result is that pretty much every baking related thread is plagued by it now. The rule is that IF you use a hard edge somewhere, THEN this edge has to also to be a place where UVs are split. Nothing more, nothing less.
But people work with SP without this problem.
(like musashidan polygon January 11 )
pior
Added the files.
Loaded the saved fbx file with attached the normal before.
Reloading doesn't help. This the 2nd problem that I have a long time.
(in other programs the same normal map looks fine.) Tried Unweighted normals in the Mesh controls etc.--doesn't help. As I remember test meshes in Maya 2015 was fine. But I don't like it.
http://prntscr.com/d7zbat
Soft from Maya
http://prntscr.com/d7zz87
Hard from Maya (almost the same + a bad shading effect on the top of the surface. Need a bevel I supose.)
http://prntscr.com/d800jd
The geometry is a simple cylinder model (lp (hardened), hp, nmaps) ---
(hp has some defect on the bottom. ignore it, pls)
You could try this :
Which would get you this :
https://drive.google.com/file/d/0B3tXoYtBEtrTY21jOEhsRjF3X2c/view?usp=sharing
For these two tests I scaled up your models to something that works well with my default work environment, and also weighted the normals on the low (which is something I do on all my bakes).
Maybe somebody know why I have this problem-------
-------
Loaded the saved fbx file with attached the normal before.
Reloading doesn't help. This the 2nd problem that I have a long time.
(in other programs the same normal map looks fine.) Tried Unweighted normals in the Mesh controls etc.--doesn't help. As I remember test meshes in Maya 2015 was fine. But I don't like it.
http://prntscr.com/d7zbat
-------
Allso---
pior --- Are you bake your nmap in xN?
There is no such thing as a Maya or Xnormal being "better" or "worse" than the other. It all depends on what is expected by your target environment. I bake in Xnormal, because it fully supports Mikkt, which is what I use in both Toolbag and Unreal.
Also, I am not suggesting to bevel everything. As a matter of fact ... you would rarely end up with such "extreme" simple cylinders on a complex model. On a complex model you would get a variety of angled edges, rounded corners, and so on. So while the cylinder test is useful to test some aspects of the pipeline, it is probably not really representative of an practical asset. The cog example from earlier is more appropriate.
Are you bake it in xN or Maya, or SP?
I bake in Xnormal, because I never needed anything else and because it is guaranteed to generate normalmaps that are perfectly mikkt compliant. SP probably does it too, but I personally have no need to bake in it. I do not use Maya.
I understand. But I get best besults in Maya. And SP give ugly seams. No choice.
Thanks anyway.
In other words : you have to precisely explain what the final context of your model will be. Unreal, Unity, and so on.
Sorry, missed your message a little bit.