Dissertation Work - DX11 Tessellation, Character Model
polycounter lvl 12
Hello all, I am currently working on the final part of my degree and in an effort to push my learning curve further before I finish my work I thought I would keep a thread on here to show what I am doing and get some feed back for improvements and the alike.
So what am I doing (or at least attempting to do)? - My aim for my dissertation is to produce a character, display it using tessellation and displacement mapping and have that mesh morph from one look to another; all in UDK, on one mesh, in real time. I also intend to produce a reformed workflow; creating characters for tessellation and displacement maps.
So far my research is pretty much done and I have carried out some tests to implement my idea (see link below). I am currently making my model and would like some advice and of course criticisms regarding what ever I post up such as the base mesh below")
My case study: [ame=" http://www.youtube.com/watch?v=kgt02wqT2do"]http://www.youtube.com/watch?v=kgt02wqT2do[/ame] < apologies it not a perfect example of my work, but it gets the idea across (hopefully). Essentially the Samaritan.
The base mesh: This is only an hours work; looking rather squashed in places and the symmetry has given it a pointy head. Allot of the work will be done in Zbrush (I find it easier working in that way) however I have tried to ensure the facial loops are in the right places and will aid me in sculpting rather than hindering.
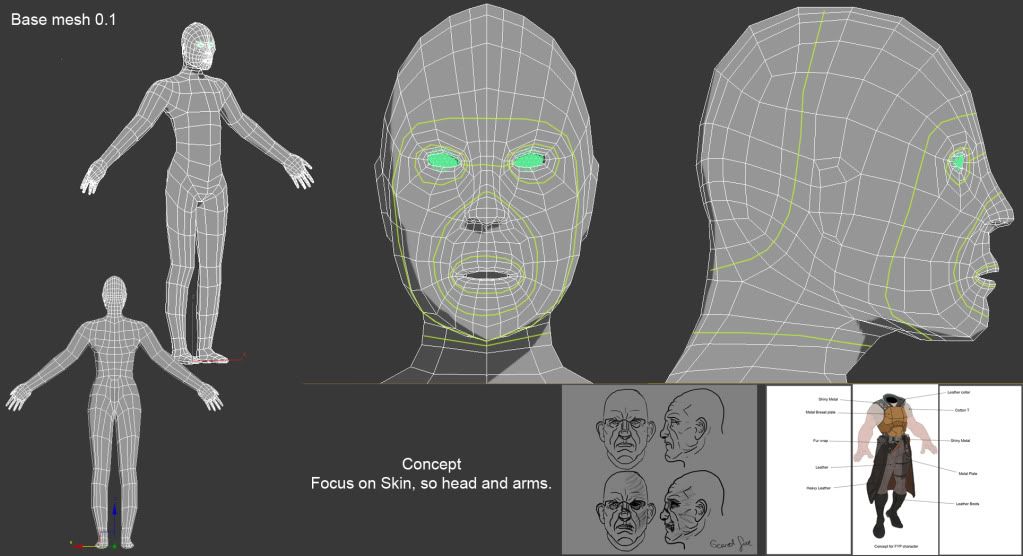
The concept I have come up with (I use "I" loosely as it is a mish-mash of concept art from Bioware's the Old Republic) is a soldier type. My focus is on the skin and arms as this will be easiest for me to alter. I did some draw overs for the face and altered the look to give an idea how it would change and for what reason...
I won't plaster up a load on concept stuff here, but to see what I am waffling about below click on this link (it will take you to a website that I dump stuff on for my own needs).
http://danielwebster3d.wordpress.com/spare-of-the-moment-quick-projects/concept-page/
Face one: Armour Plating. The idea being similar to that of the "Samaritan", that he could activate an armour skin mode. Though I want to so some originality with this idea so...
Face Two: Battle Scarring. A triggered event (i.e an explosion) would shred and burn the face skin and clothes.
Face Three: Disease. Some sort of toxin is released and causes the skin of the trooper to blister and dehydrate.
Still a bit of tweaking to do on the base mesh, next step will be to form the body in Zbursh (nothing major just to get the form) and then bring it back to 3ds Max to create the clothes.
Like I said before, If anyone has any suggestions or comments please just say (Or else I will proclaim myself the greatest modeller that ever lived as nothing I will of done will have been critiqued :poly142:)
So what am I doing (or at least attempting to do)? - My aim for my dissertation is to produce a character, display it using tessellation and displacement mapping and have that mesh morph from one look to another; all in UDK, on one mesh, in real time. I also intend to produce a reformed workflow; creating characters for tessellation and displacement maps.
So far my research is pretty much done and I have carried out some tests to implement my idea (see link below). I am currently making my model and would like some advice and of course criticisms regarding what ever I post up such as the base mesh below
My case study: [ame="
http://www.youtube.com/watch?v=kgt02wqT2do"]http://www.youtube.com/watch?v=kgt02wqT2do[/ame] < apologies it not a perfect example of my work, but it gets the idea across (hopefully). Essentially the Samaritan.The base mesh: This is only an hours work; looking rather squashed in places and the symmetry has given it a pointy head. Allot of the work will be done in Zbrush (I find it easier working in that way) however I have tried to ensure the facial loops are in the right places and will aid me in sculpting rather than hindering.
The concept I have come up with (I use "I" loosely as it is a mish-mash of concept art from Bioware's the Old Republic) is a soldier type. My focus is on the skin and arms as this will be easiest for me to alter. I did some draw overs for the face and altered the look to give an idea how it would change and for what reason...
I won't plaster up a load on concept stuff here, but to see what I am waffling about below click on this link (it will take you to a website that I dump stuff on for my own needs).
http://danielwebster3d.wordpress.com/spare-of-the-moment-quick-projects/concept-page/
Face one: Armour Plating. The idea being similar to that of the "Samaritan", that he could activate an armour skin mode. Though I want to so some originality with this idea so...
Face Two: Battle Scarring. A triggered event (i.e an explosion) would shred and burn the face skin and clothes.
Face Three: Disease. Some sort of toxin is released and causes the skin of the trooper to blister and dehydrate.
Still a bit of tweaking to do on the base mesh, next step will be to form the body in Zbursh (nothing major just to get the form) and then bring it back to 3ds Max to create the clothes.
Like I said before, If anyone has any suggestions or comments please just say
Replies
Is this somthing that you more intrested in tech-wise or art-wise?
Right now you topology leaves much to be desired. Check out the PC wiki for more: http://wiki.polycount.com/CategoryTopology
Next, your proportions are a lil off. Though the head is what needs the most work. Find a real life reference of somebody and stick with it. Such as a model from 3dsk or somewhere. Really study them. The face is super complex. If your looking for good information check out the books by Philippe some of the best stuff is from him.
keep at it! your going to learn allot from this project!:thumbup:
I am approaching this project with the aim to improve my artistic quality, though the tech side does interest me allot too. I guess I see this project as the amalgamation of all I have worked at for the past 3 years - slowly improving on an area each week. With any luck and the next 8 sleepless weeks, I hope to prove I have some talent for being a character artist and produce something quite cool for people to see.
Thanks for the quick response too, your advice has been taken on board
I have had a crack again on the mesh, this time only focusing on the head. There are a couple of areas that maybe need some more attention to the flow and the ears are dense though give no real shape (maybe too big?) - my intention being to sculpt in the deformation rather than play around with it in 3ds max. The symmetry used also creates some pinching especially on the nose but this is eaisly tended with the use of soft selection relaxing in 3ds max or indeed the smooth tool in Zbrush.
There is allot of work to be done to this mesh in sculpt and 3ds max to bring out the features and correct the geometry (the rounding of the surface), like the neck for example.
Here is an update dump of my work:
Super contrast (sorry about that)
Leg movement:
Took it further: trying to find balance and a more uniform design for the character:
And the bit where I am now:
Gave the upper arm the same black material as the legs. Introduced the large gauntlets.
- so sorry for the image dump!
Im looking for some feedback on the model and also id anyone has some advice on have to enhance the design be it model or texture. I think it's too rusty atm - but im not sure what I should do next to improve that.
Thanks for your time
- Thankyou for the feed back. I'll post up my changes when I can.
Paint over: (Thanks to Greg for this)
Chopepd it up and applied some of the ideas to my model:
Looked at too adding plates for the armour to break it up and making it look less like it was all manufactured from single pieces. Also some lighting for the character.
Took it a bit further added an inner helmet light on the face and finished adding the plating. Did a paint over for the lights.
Thanks for looking
Thought that some of this might be good inspiration for your hard surface stuff and for proportions etc.
Hope this helps:
They are very typical space marines but there is some nice HS examples especially from bulgarov in there. Its worth taking a look at Jes Goowin as well for workshops take on the space marine.
Realise that yours is a miner dude but some of it might be nice to take a look at.
Keep at it. :poly142:
I quit like the rounder plates on the armour though I might go back to corners if it looks too soft.
Normal Mode:
"Morphed" Mode:
The hands look very soft, so I'll probably just drop the iteration drop after texturing in Zb to export the harder edges.
You will note that I have not textured all of it this is because this is just an update and because some of the UV space like the arms for example share the same texture space on the lowpoly.
**update**
**update**
some feed back I did get were that the hands were too big. I intend to fix that once the maps are made then I'll just scale them down a touch.
Lots of work to still be done.
Thanks for looking.
Thanks for looking
I have set about in UDK preparing the model for morphing later on. Though the focus atm fixing some issues with the texture. I even did a quick test with the head to apply the tessellation.
(test tessellation - it doesn't do anything yet, though for my own benefit im showing I have it applied to just the head.)
no texture or normal:
with texture and normal:
no texture or normal:
with texture and normal:
I need to go about fixing up the texture, a few issue to sort out like the skin saturation and the missing textures on the suit. I have yet to roll out some AO or cavity maps but they will be done soon.
Thanks for glancing slightly
It rolls through some shaders in max - sorry about that!
[ame="
I'd also like to mention that he realy walks very casualy with this heavy plating on him. It would be nice to see that the heavy metal pieces actually make an impact and put a little bit more 'weight' into his movements.
I like the sound of this, did you have anything in mind for me to aim/ compare too?
Thanks for the feedback
Displacement 1:
Displacement 2:
These both have normal maps on them too, or else thee wouldn't be all the little detail. So far im pleased with how this is turning out I have managed to make the face morph from one face to another using only one mesh in real time. I need to polish him up a fair bit for presentation and write up the results from my research. Hopefully I will get an anim set in too
I'll do a video to show what actually going on soon.
Thanks for looking
-post over, back to work.