WIP - Pooltable

hey guys
just looking for some for advice on how else i can improve
the model is for simple marble game that i am making.
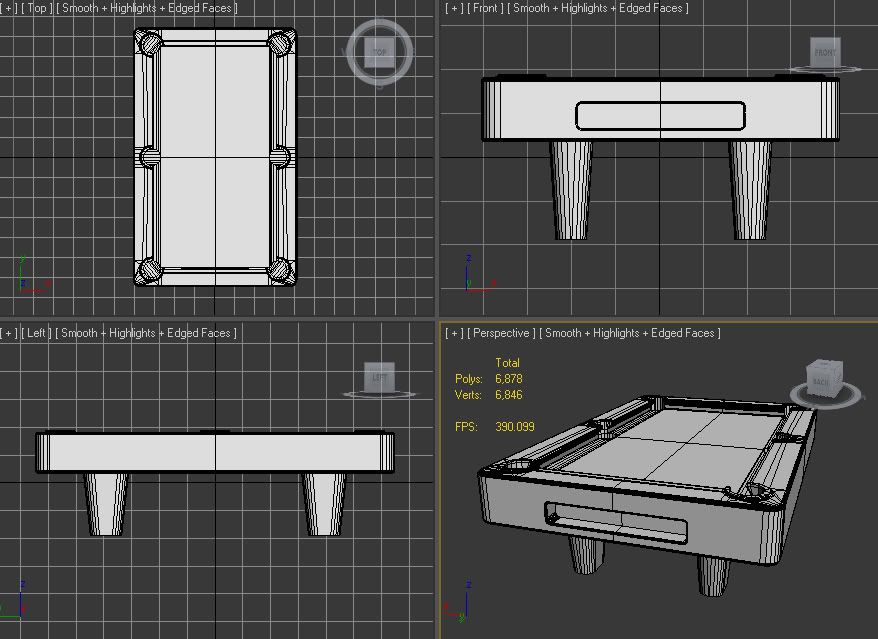
im also looking for advice on how to start unwrapping it...
just looking for some for advice on how else i can improve
the model is for simple marble game that i am making.
im also looking for advice on how to start unwrapping it...
Replies
I mean. those are some huge ass holes in the table. damn son.
If your are planning on having such a high poly model you should add a strip of metal around the outside edge of the top.
As for unwrapping, I would unwrap each part that is its own material together, and separate anything with a natural seam... although, if the texture isn't going to be very detailed, then you can probably stack a lot of the uvs into things that have the same material... and even if it is somewhat detailed you can still mirror a shit ton. But that kinda depends on your texture limits and how much detail you want in the model.
*Nipples = The parts of the railing that is over the side pockets
im making a simple marble game, where you are a ball, and in this section of the map, other balls will try and hit you into the pockets, and with the pockets being unusually large it will make the game a tad harder.
in terms of unwrapping i might only have one texture of 1024x1024 for this object.
any other advice?
when i think about it, the bigger holes will work for its purpose, because its a marble madness game, and in this portion of the map other balls will try and hit you into the holes...
so i guess it works for this purpose
on unwrapping - ive started to unwrap it by putting a cylindrical uvw map on the holes and ive been doing planes for everything else, except for the leg, which is a box.
my teacher told me i should just do a box for the main section of the table, is there any better ways to do this?
ummm texture budget will probably be one texture of 1024x1024 for the pool table.
would it help if i posted my unwrap so far?
Yeah sure, it would always help. Try to consider these things:
- What platform is it for and how big can your texture be? (you've already figured that one out)
- Which parts will be closer to the player? Things that will be seen up close need more detail, both the geometry and the texture. Things that will never be seen might not even need to be modelled, and if you absolutely have to you can just unwrap it on top of another polygon, no need to give it exclusive texture space. Also, keeping an uniform pixel density (as in keeping every UV island in the same proportion to one another as the polys are in the model itself) is important, but allow yourself to change things here and there according to these needs. You don't want the face of your model to have the same density as the bottom of their feet.
- What parts absolutely need exclusive detail? Whenever you can unwrap similar parts on top of one another, unless specific detail is needed, but even then you can utilize your texture space in clever ways. See here how Jon-Troy Nickel used a small portion of what would otherwise be wasted space to make an eye variation and break symmetry.
That said, here are a couple of suggestions off the top of my head. You could planar map each side and then pair them accordingly to save space. Another suggestion is maping the four corners and then grouping all four together, which would save you even more space, but would get you "symmetry lines" right in the middle of all 4 faces. It's all a matter of how much detail you need to give it and where it needs to be the most.
im just unwrapping on corner of it...
this is the unwrap
Edit: Seem to be working now. :thumbup:
i've run in and just put a few place holders in
i just put a skylight in with cast shadows on, but the renders seem really bright to me.
any suggestions?
Actually if it's an asset for a game I'd forget rendering altogether and try to make it look good on the viewport, realtime, it looks much more authentic.
using an engine called unity. i havent got it into game yet, hopefully i get that done tomorrow.
a couple of questions:
how do i go about baking an AO map onto the texture?
and
how do i set up omni lights to get a nice render?
ive tried messing around with a couple omni lights here and there but cant get it right...
pardon the pun, but can anyone shed some light on lighting =P
here's the checker render
ill probably have to unwrap the legs again =(
As for the ambient occlusion, I think there are several different ways. I usually just select mental ray as the rendered, then go to render to texture ("0" key), select the object, select "Ambient Oclusion (MR)" from the map list, set map size and output folder and that's it, no need to create lights or anything.
The tutorial below goes through a more complicated route and honestly the results don't look any better than what I get to justify the added complexity, but maybe I'm doing something wrong and just don't know.
http://www.game-artist.net/forums/vbarticles.php?do=article&articleid=37
now im having trouble with lighting.. =S
how do i achieve realistic lighting?
the scene is of a bar/pub.
similar to these:
i dont want my scene to be that bright, but how do i fake bouncing light so that you can see the bottom part of the pool table?
currently its just running a single spot light...
first you could make a lot of low intensity lights near the ground, but it won't look too good and it'd cost a lot of time
second you could just add a bit of ambient light in your render settings, would give the same amount of color everywhere
third you could add a skylight(on a low intensity), would work a bit like the ambient light, except creases and corners would be darker, like this
fourth and most realistically, you could simulate actual light bounces.
but for now (at least during the WIP stage) you could probably get away with just ambient or skylight
its looks really bright and doesnt look very good when it has a textured applied. it looks really good when its just a grey texture.
how do i go about adding and ambient light in render settings?
Agreed. Actually I can't believe I didn't notice it before. The whole table could probably be scaled up on Z, the main section of the table looks a lot sturdier on the reference picture.
ill post up a another WIP with the changes
i was working from a few reference images. when i showed my teacher a shot of one of my very first models he said that the main body was too chunky. so i scaled that down a bit
how do i go about simulating light bounces???
http://i.ehow.com/images/a04/or/0t/refelt-pool-table-bumpers-800X800.jpg
You can't tell in that image, but the felt also runs under neath the lip of the rails as well. Like so:
http://cdn-viper.demandvideo.com/media/acb9bb79-0806-4a6c-b9b2-e98c369da6eb/jpeg/bb522b5e-5d0c-4ea7-96da-efeadc0a9e87_2.jpg
That table is way too short off the ground at the moment, unless you meant it to be that way. Don't forget the diamonds too. You could even add some light white hand chalk marks on the felt too, nothing too drastic though.
Other things you might add: If it's going to be a small table like the way you have it, you could make it a quarter table and add the device where you put the coins in like in your reference pic. Also having some blue chalk sitting on the table would be a nice touch.
been working a fair bit on it
toned down the brightness of the wood
made the legs a tad longer
also made the felt go up the table more
still need to work on the textures, especially around the pockets.
can anyone give some more advice on lighting the scene?
one thing i do need to fix up is the bump map
when i was doing place holder textures i also did a place holder bump map. and i have yet to replace it...
I do flyers for the pool league I'm in so it was helpful to build a table in 3d to render how ever I wanted, check out the pockets on mine and how open they are. Also, pay attention to how how the rails are off of the playing surface, yours are way too high. The part I've highlighted that says "seperate piece" is a lip of a cylinder that fits into a hole there, making the pocket, so you don't want to have it was one piece the way you do now. You can see it in your reference pic too.
Also check out how the felt wraps up and around the rails
Might want to rethink the area where you have the balls off the table sitting. Typically there is an indention there that the balls sit in so they don't slide all around like they do now.
Get those diamonds on there too!
Might be beneficial to head to a pool hall yourself, play for an hour, take some pics, and really pay attention to what a table looks like. Keep it up!
i know there hasnt been any posts in this thread for a while, so here is a progress shot from what he table looks like in game.
the scene is of a bar/pool hall
its a basic marble game where you control the ball and navigate through the level.
any crits on the pool table or the level in general would be awesome
cheers guys
Also madartist I'm not sure if I'm understanding what you mean by seam on the rails, but they're a seperate peice of the table and have their own peice of felt from the table. Gabbaii does seem to have some harsh shading here, but it could be toned down some.
Hope that helps.