Home 3D Art Showcase & Critiques

Environment W.I.P

polycounter lvl 9
Offline / Send Message
Orgoth02 polycounter lvl 9
Hey All,

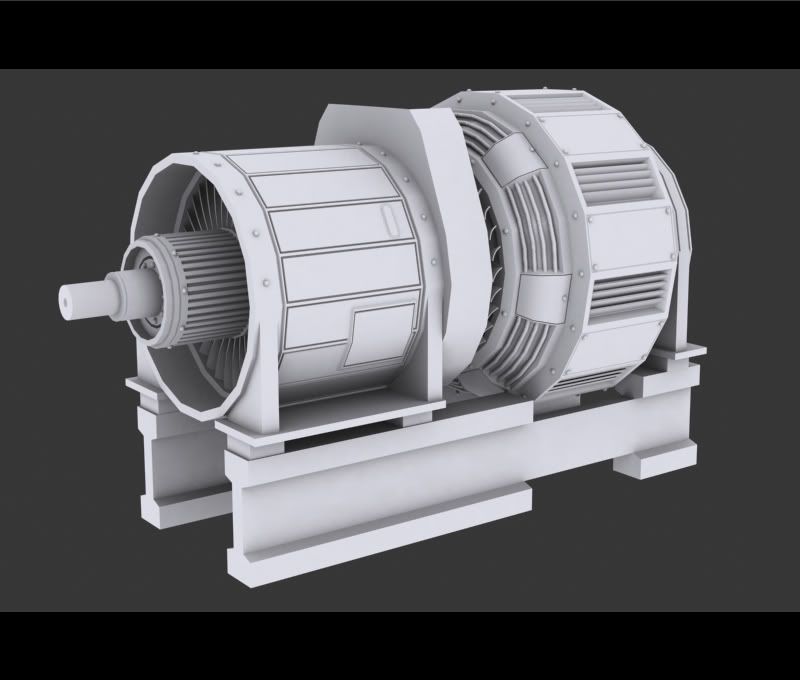
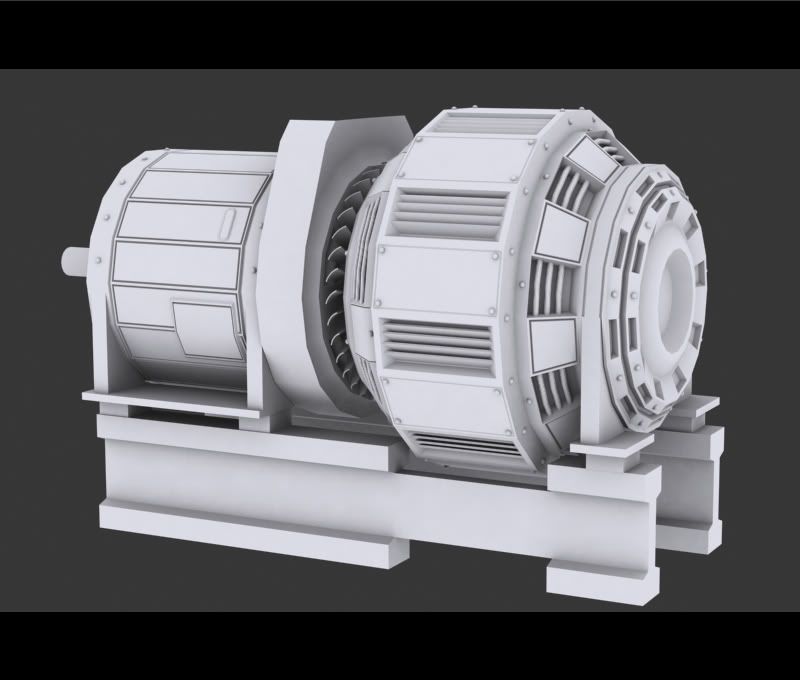
This is my first time posting on Polycount and I am glad to be a part of it's community. I have been doing alot of lowpoly stuff with the current project at my work and I wanted to get back into the highpoly scene. Here is some of the reference that I am using and a few renders of my progress so far. Let me know what you guys thank C&C are encouraged. Lots more to to do...back to work.

reference01.jpg

reference02.jpg

reference03.jpg

thread01.jpg

thread02.jpg

thread03.jpg

thread04.jpg

thread05.jpg

Replies

  • Tadao215
    Options
    Offline / Send Message
    Tadao215 polycounter lvl 13
    looks very good i like it :)
  • DInusty
    Options
    Offline / Send Message
    DInusty polycounter lvl 17
    lookin good. keep at it!
  • Pope Adam
    Options
    Offline / Send Message
    Pope Adam polycounter lvl 11
    Very well done sir, I'm really liking the textures.

    I believe I might see a seam in the very bottom screen shot. The horizontal tube, on the end facing the viewer. Easy fix though.

    May I recommend painting in a bit more wear and tear in areas that would help explain where this object was interacted with? Brushed up against? Dirt kicked on to from the floor? - as of now the grunge is rather evenly dispursed, with no areas specifically affected more than other areas.

    Looks very solid though, and very believable. Rock on.
    ADM
  • PixelMasher
    Options
    Offline / Send Message
    PixelMasher veteran polycounter
    this should turn out awesome given the great ref pics. for the metal its looking a bit muddy brown style which is harder to avoid when it comes to rusty metal. I would take out some of the color and let a color spec drive the deeper browns and reds. also there is a seam like adam said on the end piece, i would put that seam where the natural one is one loop back from it.

    also, the sitckers behind the metal bar thinger dont make too much sense, you could add that bump into the normal and have the sticker on top like it was laid on after the object was constructed. its minor but it jumped out at me as kinda weird. oh and maybe some more segs to the round ring pieces they look a little chunky.

    cool dude, i cant wait to see some more texture work :)
  • back-slash
    Options
    Offline / Send Message
    back-slash polycounter lvl 15
    Looking good.. as far as the texture goes don't you think something that contains radioactive material would be in a little better shape ;)
  • Mark Dygert
    Options
    Offline / Send Message
    Yea that should turn out great, you're off to a great start!

    Be careful not to over do it on the scratched visual noise, sometimes crap-ifying everything can bite you in the ass and make a mess. I think you're close to making a mess.
    Leaving some areas slightly less untouched could really help sell the rusty broken bits since it provides something to contrast against. It will also help little details like the stickers and white writing stand out a bit more.

    Making something dirty and dinged up can be more about what colors you use, than how many scratches you add.

    Crapastic01.jpg
    Pardon the horribly rushed paint over but it can help to work with blocks of color and try to make some details pop out but holding back and pushing some of the visual noise into restrained areas. Right now the decals are just reading as visual crap but you can use them to really add detail to some of the big blank areas.
  • Orgoth02
    Options
    Offline / Send Message
    Orgoth02 polycounter lvl 9
    Awesome comments by all so far. I am going to go back and re-thinking about using that diamond shaped sign. I see the problem that you are talking about PixelMasher about the sign. Although metel bar is actuall geomemtry infront of it, it make it look weird. As for as the scratches and the and the main tank texture is concerned. I find that simple rust texture are extremely boring and don't tell a story, but I do agree with you Vig that there is a fine balacne between looking good and looking to busy. I am still experimenting with it.

    All around once again, very good point and all have been taken seriouly. Thanks guys I should have some updated stuff on this soon.
  • Orgoth02
    Options
    Offline / Send Message
    Orgoth02 polycounter lvl 9
    I made some adjustment to the main tank's texture like you guys suggested, and I think that it feel a lot better. I feel that it has better contrast and it doesen't feel so muddy and just overall make more sense. What do you guys think?

    thread04-1.jpg
  • Pope Adam
    Options
    Offline / Send Message
    Pope Adam polycounter lvl 11
    awesome improvements, on the right track now sir!@ I like the desaturation in the color.

    time to finish this bastard!
    cheers
  • EvilPixills
    Options
    Offline / Send Message
    EvilPixills polygon
    I'm loving it man. Nice improvement. Keep up the good work.
  • Orgoth02
    Options
    Offline / Send Message
    Orgoth02 polycounter lvl 9
    EvilPixills- Thanks, do feel that it is an improvement. I was a little hasitant do change it at first but now I am glad I did

    Adam- Lol thanks man. I would love to finish this bastard up, but its hard right now because we are in crunch at work right now so I only have like an hour a night to work on it. I hope to finish it up this weekend for sure though.
  • Orgoth02
    Options
    Offline / Send Message
    Orgoth02 polycounter lvl 9
    So I'am pretty much done with this peace. I haven't had a chance to really touch but for about a hour lastnight since last time I posted. I wanted do one more post before I move on.

    render02.jpg
  • PixelMasher
    Options
    Offline / Send Message
    PixelMasher veteran polycounter
    looks great, a little blurry, maybe sharpen the final diffuse a bit to help clean it up some. nice observations and application of crits.
  • Orgoth02
    Options
    Offline / Send Message
    Orgoth02 polycounter lvl 9
    Hey PixelMasher. Thanks for the comments. I think that the blur happened in photoshop when I was compiling the images, I noticed that as well.
  • BradMyers82
    Options
    Offline / Send Message
    BradMyers82 interpolator
    Yeah, this is really well done. Very good execution, and way to go following the crits.
  • Orgoth02
    Options
    Offline / Send Message
    Orgoth02 polycounter lvl 9
    Here is the first pass on the walls. I'm thinking that I might change the middle of the wall's texuture to something different in the concept, but I am still unsure. What do you guys think? P.S lighting was just thrown in.

    thread04-2.jpg
  • Pope Adam
    Options
    Offline / Send Message
    Pope Adam polycounter lvl 11
    So far so good here. I'd think about decreasing the high amount of contrast between the metal bits of the fan and the wall itself. It stands out right now and looks really ... "gamey" ? whereas the rest of the wall is looking quite solid so far.

    Wall is a bit shiny looking, possibly because of the lighting not being figured out yet. Pretty solid so far though, diffuse looks good, I think the wood panels could get a little more attention though, they are a bit flat right now.

    It seems like your very nicely made generator object is being dwarfed by the walls here... is the generator intended as your centerpiece? Or is it just shown here for scale against the enormous wall?

    Lets get those cool steel pillars textured! Looks great so far, finish her up and light it and it'll look super good. Just don't take too much attention away from your major props for the scene

    :P
    ADM
  • Orgoth02
    Options
    Offline / Send Message
    Orgoth02 polycounter lvl 9
    Hey Adam. I just noticed that the fan doesen't have it's texture on it lol. I must of forgot to apply the material. I agree with you about the wood it feels like it is lacking something. I will have to go back and change it up. The compressor is not going to be the center piece just an ambient static object. My center piece/focal point is much bigger and should pop in the scene. I am planning on putting a lot of thing in the scene to help out the size of the wall, plus there will stuff coming from above as well which will make the room seem smaller. Throwing it into Unreal will also help with the perportions also. Great comments though thanks!
  • Pope Adam
    Options
    Offline / Send Message
    Pope Adam polycounter lvl 11
    cant wait to see it :P

    i forgot to check the top of the thread again - I see you've already got other things started on modeling. coolness!
  • Mark Dygert
    Options
    Offline / Send Message
    That's looking great!

    Crits:
    - The slime trail from the fans kind of disappears behind the wood, kind of odd, looks like the wooden part isn't finished yet?

    - While on its own it looks great, you might run into trouble when it's repeated.
    • You might want to make the base texture less detailed and add in some of the wear and dirt with overlays. Things like the red stripe could be a few overlays also.
    - You're probably thinking of it already but if you haven't, doing alternate center pieces that fit into the vents, like large factory style windows or a set of large pipes.

    - Trim pieces, take the wood trim for example. If you break that off and make it 4 sided box that gives you 4 unique sides to detail and with a simple 90 degree rotation in the editor you have 4 pieces of unique trim. It mostly eats up texture space so be careful, but its long rectangle space and its easy to squeeze in on just about any texture sheet.

    Coming along nicely keep pluggin' away!
  • Orgoth02
    Options
    Offline / Send Message
    Orgoth02 polycounter lvl 9
    Hey Hey, well I spent about and hour lastnight reworking some of the texutues on the wall. I changed up the middle texture for the wall to give it some contrast and I brought the slime down to the wood. The wood in general I might have to go back a revisit. These renders are pretty dark...stupid lighting, but they get the point across.

    wall.jpg
  • Harry
    Options
    Offline / Send Message
    Harry polycounter lvl 13
    get out of here stalker
  • Orgoth02
    Options
    Offline / Send Message
    Orgoth02 polycounter lvl 9
    Harry wrote: »
    get out of here stalker

    Not sure what this is refering too.
  • McGreed
    Options
    Offline / Send Message
    McGreed polycounter lvl 15
    I think he might be refering to the game Stalker, maybe that the style reminds him about it :)
  • Jeremy Lindstrom
    Options
    Offline / Send Message
    Jeremy Lindstrom polycounter lvl 18
    watch your scale. If your generator is approximately 4-5 foot, that wood on the walls would end up being like from a redwood, and the rivets are the size of someone's head.
  • Orgoth02
    Options
    Offline / Send Message
    Orgoth02 polycounter lvl 9
    @ Dekard. I agree with you about the scale I am planning on scaling up the generater about 25% or so to compensate for the size for the wall. I might just have to scale the walls down a bit though. I'll see how they feel once I get them in the editor. Thanks for the comment!
  • Orgoth02
    Options
    Offline / Send Message
    Orgoth02 polycounter lvl 9
    I went back and adjusted the scale. I figured that it is better to do it now than later. I think it feels better. The blue box is a 6 foot human for scale.

    scale.jpg
  • byder
    Options
    Offline / Send Message
    Yeah, your work is looking great! Much better scale in my opinion!!! Nice bit of texturing there :D
  • SinisterUrge
    Options
    Offline / Send Message
    Looks cool, like it belongs to a sewers its that dirty and grungy looking. How did you create that effect?
  • Orgoth02
    Options
    Offline / Send Message
    Orgoth02 polycounter lvl 9
    First Unreal test.

    wall-1.jpg
  • Snader
    Options
    Offline / Send Message
    Snader polycounter lvl 15
    seeing as the metal parts on the wall are about half a foot in diameter, you might want to spend some actual geometry there. Right now the wall is rather flat, and seeing as you modelled all the little spikey things on the generator.. yeah
  • Orgoth02
    Options
    Offline / Send Message
    Orgoth02 polycounter lvl 9
    @ Snader- very good point. That thought did cross my mind about modeling those out and I most likely will.
  • Orgoth02
    Options
    Offline / Send Message
    Orgoth02 polycounter lvl 9
    It's been pretty hard to find the motivation to work on this. There is just so much to do. But I WILL finish it even if it takes me a year to do it. Anyways here is a little update. I started on the support walls and did the first past on the damage decals and I modeled out the rivots on the wood. I hope to do more this weekend.

    thread05-1.jpg

    thread06.jpg
  • EvilPixills
    Options
    Offline / Send Message
    EvilPixills polygon
    Looking good man. The only thing that stands out to me are those massive bolts on your horizontal wood beams. Not sure if thats normal or not but it is your project :) Besides that everything is coming along nicely. Keep up the good work.
  • Orgoth02
    Options
    Offline / Send Message
    Orgoth02 polycounter lvl 9
    @EvilPixills- you are completely right. I am just going to take them out and re-think how the beams can be attached to the wall. That seems to be the main thing that people are saying and they are really starting to bother me, So concider them gone!
Sign In or Register to comment.