Tutorial : Hair in Zbrush
polycounter lvl 17
This is a little tutorial which aims to show you how to use the Deco Brush in Zbrush to sculpt hair on a high-poly mesh
The first step is to look at some references. Obviously this is one of the most important steps. Like most things, its easier to do something if you can break it up into smaller
pieces.

Get a better understanding of your desired hairstyle first by breaking it up into primary and secondary groups.
The next step is to build your mesh. You don't need any fancy edge loops when building the mesh, as Zbrush will do most of the work. A fairly simple topology, which is slightly denser than the rest of the mesh (this is too avoid unnecessary subdividing), should suffice. You will need a few extra loops, in places like the side of the head, to support fine hair details.
Most of the work will be done using the Deco Brush. The Deco Brush can be found in Tools>Deco Brush, it's mostly used in the Projection Master, using a tablet. Don't even try using it for hair unless you're using a tablet.
To use it to paint deformations on the mesh, go to Projection Master (Make sure Deformation is checked), click drop now, go to tools>Deco Brush. Uncheck Rgb (Found to the right of Draw), and check zadd. Using your tablet, you can draw long, curvy lines, hold alt to change from Zadd to Zsub.
The hair is made in 3 main steps, done at +/- 50 000 polys, 150 000 polys and 500 000 + Polys.
The first stage (+/- 50 000 Polys):
In this step the Deco Brush, along with the standard, smooth and inflate brush, is used to sculpt in the main, large hair forms. Use a large brush size, and a Z intensity of about 15.
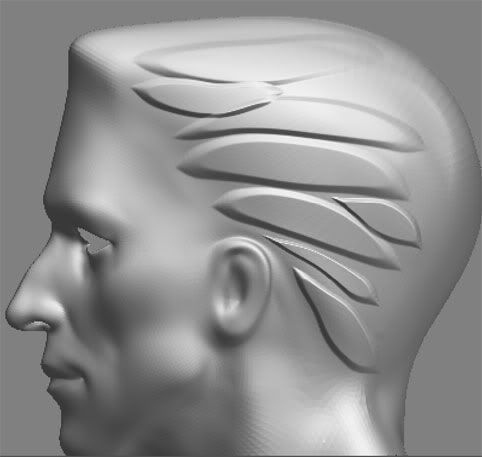
When youve done something similar, go to the Projection Master, and click on Pickup now.
Smooth the result and you should end up with something like this:
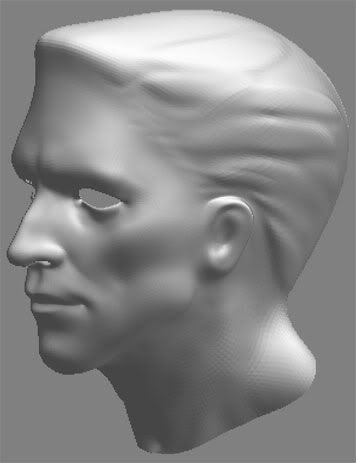
This stage acts more like a guide, and it isnt essential that this looks perfect.
The second stage (+/- 150 000 Polys):
Now we use the Deco brush to break up the forms created in the first step. It's important to use both Zadd and Zsub. The brush size decreases, and the sensitivity drops by about 5.
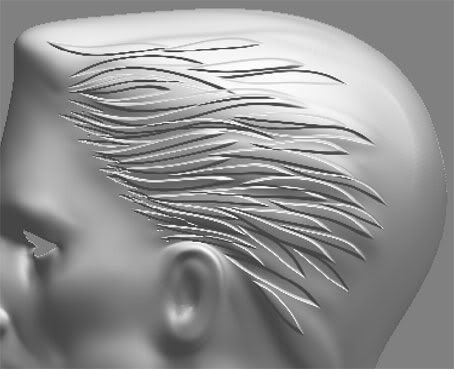
Smooth the result, and then use the deco brush to redefine the hair once more. This might seem stupid, but in practice its actually quite effective, I promise
Redefining the smoothed result

Hair after stage two.
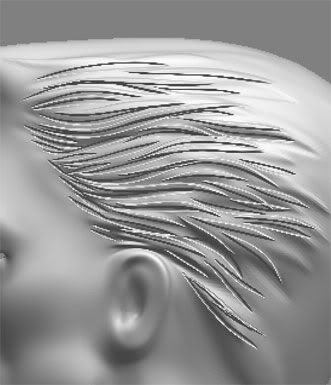
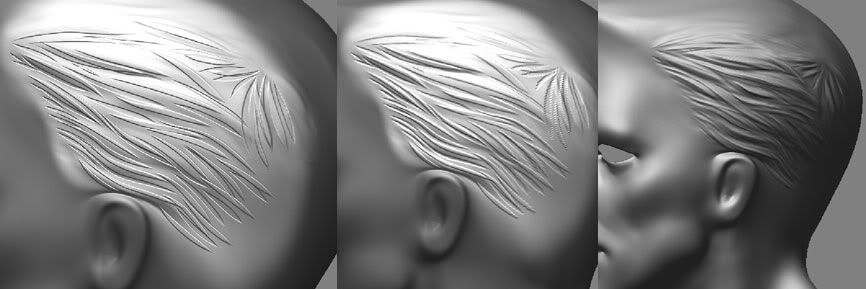
The last stage (+ 500 000 Polys):
Now I focus on creating the finer details. Do not try and create individual strands, but rather divide the larger forms created in the previous step.
By now you should have realised the basic method:
1. Get basic form
2. Break up/detail with deco brush
3. Smooth result
4. Use deco brush again if necessary
5. Subdivide, and start again from step 2.
If your end result extrudes too much, smooth it about 2 subdivisions down.
Since the projection master doesn't easily allow you to use any symmetry modifiers, another method has to be used:
1. Mask the areas you have finished, and want to remain unchanged.
2. Go to your lowest subdivision, then Tools>Deformation>Smart ReSym
3. Do this for every sudiv level, finally ending with the highest one
This is my first tutorial, so if I've stuffed up anywhere, please tell me to fix it
And please ask questions!
The first step is to look at some references. Obviously this is one of the most important steps. Like most things, its easier to do something if you can break it up into smaller
pieces.
Get a better understanding of your desired hairstyle first by breaking it up into primary and secondary groups.
The next step is to build your mesh. You don't need any fancy edge loops when building the mesh, as Zbrush will do most of the work. A fairly simple topology, which is slightly denser than the rest of the mesh (this is too avoid unnecessary subdividing), should suffice. You will need a few extra loops, in places like the side of the head, to support fine hair details.
Most of the work will be done using the Deco Brush. The Deco Brush can be found in Tools>Deco Brush, it's mostly used in the Projection Master, using a tablet. Don't even try using it for hair unless you're using a tablet.
To use it to paint deformations on the mesh, go to Projection Master (Make sure Deformation is checked), click drop now, go to tools>Deco Brush. Uncheck Rgb (Found to the right of Draw), and check zadd. Using your tablet, you can draw long, curvy lines, hold alt to change from Zadd to Zsub.
The hair is made in 3 main steps, done at +/- 50 000 polys, 150 000 polys and 500 000 + Polys.
The first stage (+/- 50 000 Polys):
In this step the Deco Brush, along with the standard, smooth and inflate brush, is used to sculpt in the main, large hair forms. Use a large brush size, and a Z intensity of about 15.
When youve done something similar, go to the Projection Master, and click on Pickup now.
Smooth the result and you should end up with something like this:
This stage acts more like a guide, and it isnt essential that this looks perfect.
The second stage (+/- 150 000 Polys):
Now we use the Deco brush to break up the forms created in the first step. It's important to use both Zadd and Zsub. The brush size decreases, and the sensitivity drops by about 5.
Smooth the result, and then use the deco brush to redefine the hair once more. This might seem stupid, but in practice its actually quite effective, I promise
Redefining the smoothed result
Hair after stage two.
The last stage (+ 500 000 Polys):
Now I focus on creating the finer details. Do not try and create individual strands, but rather divide the larger forms created in the previous step.
By now you should have realised the basic method:
1. Get basic form
2. Break up/detail with deco brush
3. Smooth result
4. Use deco brush again if necessary
5. Subdivide, and start again from step 2.
If your end result extrudes too much, smooth it about 2 subdivisions down.
Since the projection master doesn't easily allow you to use any symmetry modifiers, another method has to be used:
1. Mask the areas you have finished, and want to remain unchanged.
2. Go to your lowest subdivision, then Tools>Deformation>Smart ReSym
3. Do this for every sudiv level, finally ending with the highest one
This is my first tutorial, so if I've stuffed up anywhere, please tell me to fix it
And please ask questions!
Replies
Kevin Albers: Thanks! I originally used this method for high-poly models, which were to be used to generate normal maps. Using it for statues is a great application I never thought of, glad I could help.