Render to Texture and UnrealEd
polycounter lvl 18
Sorry about asking such a vauge question. I'm having trouble with the Render to Texture stuff. I don't know if its my ignorance on the subject or if I'm doing something wrong, but it's not coming out right. I'm mostly interested in the LightMap so I can import the mesh into UnrealEd (Realtime2/UT2k3...hopefully 2k4 soon enough if it makes that much difference) and have it look right.
Here's the steps I'm taking right now:
I've got my model all UV-ed out and textured how I want. It's one object using 2 256x256. I've also set the lighting how I want (subquestion: does light color effect the lightmap?).
Select my lift, I go up to Rendering -> Render to Texture
Drop down to Output, "Add" a CompleteMap. Rename and get it in the correct directory. Target Map Slot: Diffuse Color. I don't really know what a good size would be. From doing them before, 1024 seemed to be closest to the original texture size, but that seems really excessive for 2 256's. (subquestion: is there a way to do rectangular sizes? or does this not matter? I have a really tall mesh with a rectangular texture map on it.)

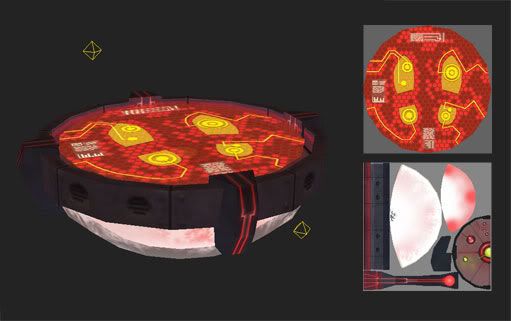
Alright, everything seems to be gravey, so I hit Render and get this (sized down from 1024):

From here on I've seen two different methods (which produce two different results I'm sure). One was from the Max Tutorials. It says to make a new material. From the Material Browser, browse by Selected and grab the Shell Material there and Assign it. This doesn't seem to do anything though. If I set the baked texture to Rendered, delete out the lights, it doesn't give me what the model looks like when all the lights are on it. I wouldn't know how to get this working in Unreal anyway.
The other route was from here which uses Max 5.
http://www.planetunreal.com/fordy/gradientssmeshtutorials/9.html
(I'll do a diffuse map for the sake of the tutorial)
I render out the Diffuse Map then hit Clear Unwrappers and Clear Shell Materials. Then I drag a default material over the used ones and set the diffuse to that liftDiffuseMap.tga file and Assign it. Go into the Unwrap UVW window and do a Flatten Mapping wth the same settings from the Render to Texture Window and get this:

Obviously not even close.
(Also, I want to keep the hologram at 100% self illumination. Should I keep the two objects separate [holo and the base]?)
Oy. This has been killing me for the past couple of days. I couldn't find anything on the UnrealWiki or the UDN, but I might have been looking for the wrong thing. If someone can point me to any good tutorials that would be most kind.
Here's the steps I'm taking right now:
I've got my model all UV-ed out and textured how I want. It's one object using 2 256x256. I've also set the lighting how I want (subquestion: does light color effect the lightmap?).
Select my lift, I go up to Rendering -> Render to Texture
Drop down to Output, "Add" a CompleteMap. Rename and get it in the correct directory. Target Map Slot: Diffuse Color. I don't really know what a good size would be. From doing them before, 1024 seemed to be closest to the original texture size, but that seems really excessive for 2 256's. (subquestion: is there a way to do rectangular sizes? or does this not matter? I have a really tall mesh with a rectangular texture map on it.)
Alright, everything seems to be gravey, so I hit Render and get this (sized down from 1024):
From here on I've seen two different methods (which produce two different results I'm sure). One was from the Max Tutorials. It says to make a new material. From the Material Browser, browse by Selected and grab the Shell Material there and Assign it. This doesn't seem to do anything though. If I set the baked texture to Rendered, delete out the lights, it doesn't give me what the model looks like when all the lights are on it. I wouldn't know how to get this working in Unreal anyway.
The other route was from here which uses Max 5.
http://www.planetunreal.com/fordy/gradientssmeshtutorials/9.html
(I'll do a diffuse map for the sake of the tutorial)
I render out the Diffuse Map then hit Clear Unwrappers and Clear Shell Materials. Then I drag a default material over the used ones and set the diffuse to that liftDiffuseMap.tga file and Assign it. Go into the Unwrap UVW window and do a Flatten Mapping wth the same settings from the Render to Texture Window and get this:
Obviously not even close.
(Also, I want to keep the hologram at 100% self illumination. Should I keep the two objects separate [holo and the base]?)
Oy. This has been killing me for the past couple of days. I couldn't find anything on the UnrealWiki or the UDN, but I might have been looking for the wrong thing. If someone can point me to any good tutorials that would be most kind.
Replies
I changed the Mapping Coordinates -> Object -> Use Existing Channel (wasn't turned on before) -> Channel: 1
AND
Baked Material Settings -> Output Into Source
I get the first image. So I seperate the two (holo and the base) and try a lightmap on the base and get the second image. Now I've got wire lines on the map. Is there an option to turn this off?
Edit: I think my problem was smoothing groups. I was using an older version before I did the smoothing groups.
Edit2: Maybe not...
Edit3: Alright, for anyone else who might be looking for an answer to this wire problem, the uv's can't be sharing the same space. Move any mirrored uv's you may have over then try the Render to Texture bit.
*To move them over, it's best to go to the bottom left UVW coordinate thing, click the left-most button to change from absolute to relative space. Type 1 in the U slot and hit enter. That group of mirrored uv's should now be moved to the right one whole map size. After you Render to Texture, type -1 to move them back.