Beet Rig Breakdown

Phung Nhat Huy shares tips on how to rig a character that he created during his CGMA /CG Society workshop courses Character Facial Rigging for Production by Wade Ryer and Rigging Techniques: Cartoon to Realistic by Nico Sanghrajka.

Could you introduce yourself? Where are you from and what do you do? How did you get into rigging? What led you to rigging as your specialty?
My name is Phung Nhat Huy (you can call me Huy), from Vietnam. I went to Lasalle College of the Arts in Singapore to study and graduated with a degree in Animation Art in 2014. Currently, I’m working as a senior rigger/TD in Omens studio, Singapore, and have been working in the animation industry for 3 years.
Ever since I was in college, I’ve always had a passion for bringing appealing characters to life. Initially, I just wanted to have a good rig so I can animate my characters without worrying about things such as flipping or bad deformation. Rigging was never easy to learn because it involved a lot of technical problem solving and step-by-step tutorials were not reliable in helping me understand it. However, the more characters I rig, the more I understand how rigging works. And the more I understand how rigging works, the more I loved the entire rigging process. Eventually, I decided that rigging was going to be my career which allowed me to solely focus on perfecting my rigs to the best of my ability and let the animators bring them to life. Solving technical problems and seeing nice deformations on my characters have always brought me tremendous pleasure. In my spare time, I also love watching movies, cooking, playing chess and video games.
What projects have you worked on? Are you currently working?
For the past 3 years with Omens Studio, I have been involved in various projects ranging from animated TV series, short films, AR games and commercials such as Leo the Wildlife Ranger, Gnome, Tales of Christmas 2017 and more... I am currently working on some exciting, unannounced projects with the studio as well as a few personal projects that I intend to kick start in my spare time this year.
What did you use to rig this character? Did you also model this? It’s really adorable and appealing. What did you learn from Nico and Wade’s class that helped create this successful rig?
The rig was created entirely from scratch using only Maya native tools with the exception of Michael Comet’s PoseDeformer plugin, which was used to drive some of the cloth-baked Blendshapes for the hoodie. The model was designed and modelled by my girlfriend, Jamie. You can check out her amazing work here .
There are lots of cool techniques, tips & tricks that I have learnt from both Nico and Wade, in particular Nico’s ribbon spine and Wade’s Blendshape method. What I liked about their workshops was that they were not heavily pre-planned. Nico and Wade made mistakes occasionally and because of that, I could see the way they troubleshoot and correct their mistakes which turned out to be incredibly helpful for learning how to problem solve. On top of that, their weekly feedback was highly constructive and insightful.
What challenges did you face? What tips and tricks did you learn from Wade that were different from Nico’s class? What scripting was involved and how did that help while you were rigging this character?
As with most personal projects, I try to push myself, attempting to try
out something I have never done before so I definitely have met many
challenges. In particular, rigs for the hoodie and boot as well as the layering
of different deformers for the facial rig. Although, there were a few
extra features that I have added onto my rig that were not covered in the
workshops, I was able to apply some of the techniques taught in there and came
up with my own solutions.
Nico and Wade’s class were very different from each other as one focused
on body mechanic rigging while the other focused on facial rigging. These
techniques, however, can be applied to any rigging situation. They both did an
excellent job at explaining the concepts behind the techniques.
Generally, most scripts I used were scripts I had written myself which
includes TD_blendshapeAssistant to assist me creating Blendshape and
TD_microControl to generate micro controllers on the character face. There are
also a few one-off scripts that I wrote to simply automate some tedious
processes such as generating helper joints on multiple areas.
Other than that, I used Comet Scripts. They are a bunch of cool utility
scripts from Michael Comet that can help to speed up processes such as naming,
orienting joints et cetera… Another small but cool script that I used was
sk_attrShift for rearranging attributes in the channel box.

Can you give us a short step-by-step approach to successfully rigging the face? Were there any corrective shapes you had to fix on the rig to help with deformations?
Keeping the rig simple is a big challenge in order to avoid overwhelming animators. How did you keep the controls manageable? Did you have the animator in mind?
That is indeed a big challenge, especially in a personal rig where my intention was to add as many features as I can on it. Besides following Nico & Wade’s recommendations, I also consulted various animators to know their workflow and opinions, thereby allowing me to create a more efficient controller layout. In the final rig, I decided to simplify by categorizing controllers into 3 levels basic, midlevel and micro level controllers. Animators can easily choose to hide or unhide controllers of different levels based on their needs at different stages of the animation. This will prevent them from being overwhelmed by too many controllers at once.
What tips can you share for those wanting to get into rigging?
As rigging is a very technical career path, I strongly believe that one should view it as both a form of science and art. Be sceptical of any information that is presented to you, and always put it to the test to make sure that the method you’ve learnt is working. If it’s not working, make sure to find out why and flaws that method brings. Be curious and always explore new methods, even a bad rig can contain some great tricks to learn if one is willing to study it.
On the artistic side, anatomy is the utmost important thing to learn when it comes to rigging characters. You can’t deform a character well if you don’t understand what’s going on underneath its skin. Most importantly, never stop learning. There is always more to learn and the more you know, the better you get at problem solving and coming up with creative solutions.
Overall what were the key things you learned in both classes? How was your overall experience with CGMA?
Overall, besides new techniques, tips and tricks, Nico & Wade has taught me a lot in terms of problem solving and has also helped solidify my understanding of rigging in general.
I’m really grateful for what I have been able to learn in these two
excellent courses and I am looking forward to attending more technical related
workshops from CGMA in the future.
Here is the breakdown of my
Beet rig:
Ribbon Spine:
Although there are many different set ups for the ribbon spine, the
method presented in Nico’s workshop was one of the best because it allows the
spine to rotate in both the forward and reverse direction, making the spine
deformation natural and organic.

I also applied the same technique to the arms and legs, which gave me easy setup for bendy and arm twist.

Auto Clavicle:
In the past, I struggled with finding a solution to achieving an automatically driven clavicle for ik arms due to its cyclic nature. The ik arm is supposed to drive the clavicle. Yet at the same time, the clavicle is the parent of the ik arm, therefore causing a cycle. Nico has provided a simple solution - add another ik chain purely to drive the clavicle but not be driven by it.

This is an extremely useful technique that can be applied to not just the clavicle but the boot rig as well, which you will see later on.
The rigging of the Boots and clothes:
Creating a rig for the pants and hoodies were relatively straightforward. I treated the hoodie as a long dress with individual controllers that were driven by the leg joints. The lucky thing about the hoodie was that it didn’t have to react to the twisting motion of the leg, thus it was only driven by 2 rotation axes, significantly reducing the gimbal lock problem in Euler rotation.

I also added a blendshape to subtly change the silhouette of the sleeve when the arm is lowered to make it more appealing.

With regards to the boots, I could have easily settled for a simple copy of the legs’ skin weights to the boots itself. However, I decided to take it further by adding some sort of fake collision with the leg as well as a sense of ‘looseness’, as if the boots are independent of the leg like in real life.
This proved to be quite a challenge and it took me a few days to solve it. I used the same concept as the auto clavicle setup which was to create a separate leg rig just for the boots. I used the angle between the leg and the foot joints to drive the joint chain of the boots. That setup allowed me to create an offset and the sense of ‘looseness’ mentioned earlier that would work in any poses.

Another addition to the boots was the inclusion of individual ribbon rigs on each strand of shoe lace such that these shoelaces would be able to effortlessly slide on the surface of the boot tongue when required.

Deformation:
The most important aspect of any rig should be its deformation because it will be what the audience see. If the deformation is bad, a rig will ultimately still be considered a bad rig regardless of its complexity.
There are many different methods to improve the deformation of a rig or to create an illusion that there exists muscles and bones underneath all those polygons. These methods can vary from technically expensive ones such as muscle and cloth simulations over a set of muscle rigs to cheaper ones such as blendshapes and the implementation of helper joints. Nico has showed some really cool techniques to create helper joints that were able to significantly improve the rig’s deformation and I have therefore attempted to apply them wherever I could.


In addition to that, I gave myself a small challenge which I thought would be fun to try out. I wanted Beet’s body to be able to deform in 2 modes. One would be a rubbery cartoony mode and the other would consist of a more ‘realistic’ mode with clear distinctions between the upper body and the hip when Beet bends to the side. I achieved this by adding a set of helper joints on each side that are driven by the accumulation of rotation values from the spine joints.

The best thing about using helper joints to help deformation is its transferability. Unlike blendshapes or simulations whereby there is no easy way to transfer these deformations onto another mesh, helper joints allow me to copy skin weights from one mesh to another with the criteria that they are bound to the same set of joints. During this rigging process, the model was updated several times to improve on topology. With the employment of helper joints, transferring deformation between the older models and the updated one became a seamless process.
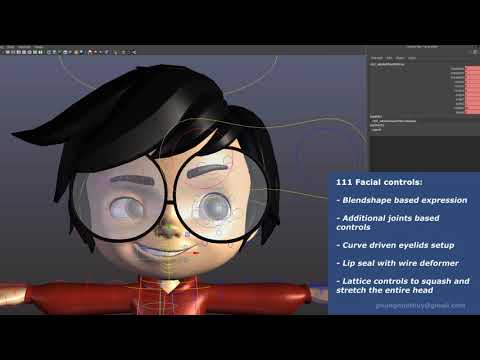
Facial Rigging Breakdown:
I started with a set of 44 blendshapes based on Wade’s instructions, of which closely followed the FACS system. From there, I proceeded to split them into four parts – left, right, up, down depending on specific requirements and facial movements. In total, I have generated 78 basic facial blendshapes. On top of that, I created a few corrective shapes meant to solve any conflicts, should they arise, when multiple blendshapes are combined.
All these Blendshapes were then attached to the rig. They were driven by simple controllers and SDK.

After that, I added joint-based rigs for areas such as jaw, hairs, ears and noses. I also added joint-based rigs for the upper and lower lips to roll in and out on top of existing blendshapes. The teeth and tongue rigs are also joint-based.

One of the best techniques I have learnt from Wade was the eyelid set-up which is based on Marco Giordano’s cartoon eye lid method. This set up allows for great flexibility in shaping the eye lids while at the same time keeping the lids rolled tightly around the eyeballs. At this point, the basic set up for the face is done.

Next, I added additional joint-based controllers on top of the facial rig that allow me to push the rig further if required. These controllers were able to stick to the face surface when it was deformed by the initial rig.

Following this, I added a lattice to deform the entire head for squash and stretch function.

Finally, I used Kimon
Matara’s method to set up the sticky lips. The great thing about this method is
that I can always add this feature onto my final rig without affecting any of
my previous setups.

 https://www.youtube.com/watch?v=I3YrLAavWm4