Home 3D Art Showcase & Critiques

Blue Sun Tech ancillary maintenance section 0-24 (Medium Poly workflow + Unreal)

polycounter lvl 13
Offline / Send Message
Fwap polycounter lvl 13
Hey PC,

Just wrapped up this scene in Unreal 4, used FWVN and a kind of offline POM decal system set up in Maya.
https://www.artstation.com/artwork/1y5zq
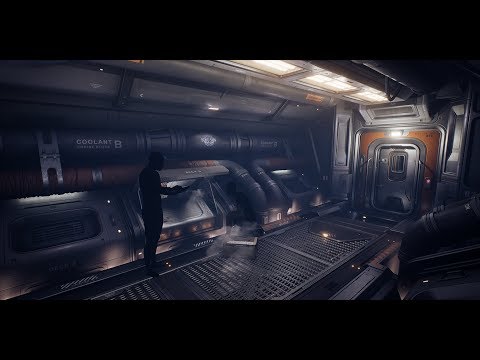
https://www.youtube.com/watch?v=JYPcOa5UrSk

I wrote a couple of Maya scripts that really helped speed this scene along and i'm going to be spending sometime cleaning them up so i can share with yall if anyone is interested.
I'll probably update this thread with some WIPs of the tools and see what everyone things, but they include automatic panel loop tools, tools to assist with placing, mapping and matching attributes on decals ect.


Replies

  • Machintrucs
    Offline / Send Message
    Machintrucs polycounter lvl 8
    Hi,
    Really nice work dude, especially on the decal :O
    How did you manage to get the POM on the decal :O
    I really would like to know how to make that :)


  • CrackRockSteady
  • Fwap
    Offline / Send Message
    Fwap polycounter lvl 13
    Hi,
    Really nice work dude, especially on the decal :O
    How did you manage to get the POM on the decal :O
    I really would like to know how to make that :)


    Thanks for the kind words!
    I used what i'm referring to as offline decals, i think it goes by a couple of names, but basically Unreals defered decal system isn't robust enough to handle the decal work i'm after so i use a mesh decal set up in Maya with the UV sets and tangent normals synced to the source mesh. 

    So in UV set 0 is where i map all my decal info, the source mesh is mapped to a small blank area on the decal sheet, so it's basically receiving 0,0,1 normal information.
    And UV set 1 is where i set my material definition, so i texture the source mesh basically how ever i'd normal texture, and then i transfer attributes in maya matching the vertex normals and the uv position on UV set 1.

    It basically allows me to use one opaque shader for the whole set up, so there's no limitation on what i can use, such as POM ect.

    I'll probably do a full asset breakdown when i finish my scripts to kind of demonstrate what they do, but if you have any more questions just holla i'll try answer them. 


  • Machintrucs
    Offline / Send Message
    Machintrucs polycounter lvl 8
    Fwap said:
    Hi,
    Really nice work dude, especially on the decal :O
    How did you manage to get the POM on the decal :O
    I really would like to know how to make that :)


    Thanks for the kind words!
    I used what i'm referring to as offline decals, i think it goes by a couple of names, but basically Unreals defered decal system isn't robust enough to handle the decal work i'm after so i use a mesh decal set up in Maya with the UV sets and tangent normals synced to the source mesh. 

    So in UV set 0 is where i map all my decal info, the source mesh is mapped to a small blank area on the decal sheet, so it's basically receiving 0,0,1 normal information.
    And UV set 1 is where i set my material definition, so i texture the source mesh basically how ever i'd normal texture, and then i transfer attributes in maya matching the vertex normals and the uv position on UV set 1.

    It basically allows me to use one opaque shader for the whole set up, so there's no limitation on what i can use, such as POM ect.

    I'll probably do a full asset breakdown when i finish my scripts to kind of demonstrate what they do, but if you have any more questions just holla i'll try answer them. 


    Really really thanks you for this answer, I think i understand how to apply this with 3DS Max>
    It does a lot of time that I'm a trying to do that :O
    When I get good results, I'll share some screen with you:)

  • Fwap
    Offline / Send Message
    Fwap polycounter lvl 13
    @Machintrucs
    Can't wait!
    I'm very familiar with the workflow in 3ds max as well, so if you run into any issues let me know and i can help there as well. 
  • AXEL
    Offline / Send Message
    AXEL polycounter lvl 6
    Hey @Fwap I rly rly want to know how to do this in 3ds max but I already spend tons of time searching and found basically nothing. Can you please share the workflow or a thread, article about this in 3ds max ?
    Thank you!
    Oh and AMAZING WORK this looks like a finished aaa game level  that I want to play :) 
     
  • Menchen
    Offline / Send Message
    Menchen polycounter lvl 3
    HOW? How did you achieve that, boy? It is probably the first time I see the "SC decal workflow" looking properly on UE4. Share your secrets with us, master.
  • Fwap
    Offline / Send Message
    Fwap polycounter lvl 13
    AXEL said:
    Hey @Fwap I rly rly want to know how to do this in 3ds max but I already spend tons of time searching and found basically nothing. Can you please share the workflow or a thread, article about this in 3ds max ?
    Thank you!
    Oh and AMAZING WORK this looks like a finished aaa game level  that I want to play :) 
     
    Hey AXEL thanks for the compliment :)
    Here's a link to Obscuras method inside of 3ds max, the thread also has some hand information. It's a good start.
    http://polycount.com/discussion/comment/2410469/#Comment_2410469
    You just want to have two UV sets, or 3 if you plan on baking lighting.
    Apply all your decals to UV set one, i use set 1 for my decals because normal map angles are calculated based on the orientation of the first uv set, a lot less headaches.
    Then map all your textures to the second set, then use the projection modifier to match the UV sets (or UV channels in max) from the source to the decal. then you should have no seams.
    Super quick explination i know, but give it a shot and if you get stuck anywhere send me a message and i can help.

    I definitely want to find time to do a proper break down  soon so that should help.

    Menchen said:
    HOW? How did you achieve that, boy? It is probably the first time I see the "SC decal workflow" looking properly on UE4. Share your secrets with us, master.


    Haha thanks Machen, I'd really really love to do a breakdown but i probably won't get around to it until this weekend.
    That thread i linked AXEL is a good start, but i'd like to have a comprehensive breakdown in one spot for you all.
  • Polynaught
    Offline / Send Message
    Polynaught polycounter lvl 11
    Looking forward to your in-depth explanation. Looks gorgeous.
  • Machintrucs
    Offline / Send Message
    Machintrucs polycounter lvl 8
    Hi @Fwap,
    I think I have manage how to make nice decal with this technique :)
    I have make a little Gif for show you some test I have done


  • Fwap
    Offline / Send Message
    Fwap polycounter lvl 13
    @Machintrucs
    Looks good! Can't wait to see what you do with it :)
  • thatonewhale
    Offline / Send Message
    thatonewhale polycounter lvl 5
    Fwap said:
    Hi,
    Really nice work dude, especially on the decal :O
    How did you manage to get the POM on the decal :O
    I really would like to know how to make that :)


    Thanks for the kind words!
    I used what i'm referring to as offline decals, i think it goes by a couple of names, but basically Unreals defered decal system isn't robust enough to handle the decal work i'm after so i use a mesh decal set up in Maya with the UV sets and tangent normals synced to the source mesh. 

    So in UV set 0 is where i map all my decal info, the source mesh is mapped to a small blank area on the decal sheet, so it's basically receiving 0,0,1 normal information.
    And UV set 1 is where i set my material definition, so i texture the source mesh basically how ever i'd normal texture, and then i transfer attributes in maya matching the vertex normals and the uv position on UV set 1.

    It basically allows me to use one opaque shader for the whole set up, so there's no limitation on what i can use, such as POM ect.

    I'll probably do a full asset breakdown when i finish my scripts to kind of demonstrate what they do, but if you have any more questions just holla i'll try answer them. 


    Really really thanks you for this answer, I think i understand how to apply this with 3DS Max>
    It does a lot of time that I'm a trying to do that :O
    When I get good results, I'll share some screen with you:)

    Would love to see a breakdown of your material set up. I've done a little research, but I feel like my material still isn't close to this.
  • Menchen
    Offline / Send Message
    Menchen polycounter lvl 3
    Well, I figured out how to do it in blender, just use the Data transfer modifier > Face corner data > ProjectedFaceInterpolated/NearestFaceInterpolated (just try what setting works best) > UVs

    It just seems to create weird stretching if the underlying mesh has an UV seam/"cut". But it works.
  • Machintrucs
    Offline / Send Message
    Machintrucs polycounter lvl 8
    @thatonewhale
    I made a simple material with to material fonction for a better visibility.


  • RedLehari
    Offline / Send Message
    RedLehari polycounter lvl 11
    How are you using the decal meshes? Are the decals attached to the base mesh? Floating individual meshes?
    I have the decals as a separate mesh and the effect of the POM just disappear because it seem too be close to the surface of the base Mesh.


    EDIT: I doesn't make sense them being merged I guess. Although by merging the meshes together I can just apply a UVW Map modifier on UV Channel 2 and both the base mesh and the decal will have no seams, seem easier to keep Texel Density constant for when you have a lot of objects. But I don't how it affects the whole method.

    I was having the problem I mentioned above with my POM shader so I recreated another one just like your and now I seem to have some issue.

    https://gyazo.com/6d5a03209016bfa51b2134bedc6642c8
  • Ilya Sinyavtsev
    Offline / Send Message
    Ilya Sinyavtsev polycounter lvl 6
    It's really amazing. Can't wait for a breakdown! 
    Although, it's almost clear how to archive this result. But I would like learn your "decal-modeling" tricks. 
  • Menchen
    Offline / Send Message
    Menchen polycounter lvl 3
    RedLehari said:
    How are you using the decal meshes? Are the decals attached to the base mesh? Floating individual meshes?
    I have the decals as a separate mesh and the effect of the POM just disappear because it seem too be close to the surface of the base Mesh.


    EDIT: I doesn't make sense them being merged I guess. Although by merging the meshes together I can just apply a UVW Map modifier on UV Channel 2 and both the base mesh and the decal will have no seams, seem easier to keep Texel Density constant for when you have a lot of objects. But I don't how it affects the whole method.

    I was having the problem I mentioned above with my POM shader so I recreated another one just like your and now I seem to have some issue.

    https://gyazo.com/6d5a03209016bfa51b2134bedc6642c8
    Seems like the normals are fucked up. Are you using Data Transfer modifier? If so, add another one with "nearest face interpolated" and the normal options checked, with highest priority than your uv-transfering-modifier. Also, make sure that you are getting your "Decal" UVs on the FIRST uv channel, and the "base" UVs on the SECOND one.

    If that produces the same result, check what is your base value in your heightmap texture, and set that value in "Reference plane" input on the POM node.
  • Fwap
    Offline / Send Message
    Fwap polycounter lvl 13
    @RedLehari
    Do you have pixel offset on by chance? If you do, remove that.

    Also yes meshes are merged on export, i generally keep them separate in Maya so i can run some scripts on them, I recommend using transfer attributes to speed through things. 
  • RedLehari
    Offline / Send Message
    RedLehari polycounter lvl 11
    Menchen said:

    If that produces the same result, check what is your base value in your heightmap texture, and set that value in "Reference plane" input on the POM node.
    I'm using the same parameters as Obscura's video on the Projection Modifier as i'm using 3DS Max.

    Sorry if it sounds like a silly/noob question but how do I check my base value of my Heightmap Texture?

    The copy of Machintrucs's POM shader seems to be behaving correct now except I'm getting some sort of artifacts, or maybe that's the correct behavior when viewing from such extreme angle.
    https://gyazo.com/c4105531b202e512d77d5cd12c349cd1

    Here's mine following the UE4 documentation guide.
    https://gyazo.com/465aac3c5f5ee55fcd10ec43d1ed5a3f

    Still I've managed to get the POM working in a different way without blending both material and instead I used two separate Materials for two different Mat IDs.
    https://gyazo.com/cb4ab1cf8662db078774976f1479a4c3
    I feel like the issue here is that I need to fix my Alpha and also need to rethink some of my decals themselves and rebake them.
    Fwap said:
    @RedLehari
    Do you have pixel offset on by chance? If you do, remove that.

    Also yes meshes are merged on export, i generally keep them separate in Maya so i can run some scripts on them, I recommend using transfer attributes to speed through things. 
    I was fumbling with for a while and not sure anymore if I had at the time, but it's working now, thanks.
    Still have some question but I'm going to wait for your breakdowns.

    Thank you soo much for sharing this. And big kudos on the corridor, it looks on point with the actual Starfarer, awesome stuff.
  • Fwap
    Offline / Send Message
    Fwap polycounter lvl 13
    @RedLehari
    Couple things come to mind based on the gifs you showed.
    The first one is to be expected, the depth of the POM is a bit extreme, to compensate you'd need to add more steps.
    Alternatively, the second gif is actually a work around, by using TAA you can dither the results which allows you to use less steps. Although i think the dithering is pretty extreme here, but i think that's partly because of the depth you're trying to achieve and some other problems.

    Couple things I notice in you're technique that could use improvment is, your decals are too far from the source mesh, they really only need to be about 0.001 units away from the source mesh to eliminate Z fighting, you want to keep the decal as close to the source mesh as possible, this will stop natural paralaxing from the discrepancy in distance.

    Also, which UV sets are you using for which part, looks like your decals have normal errors, which makes me think you aren't using UV set 0 or compensating using world space normals and derriving your tangent basis. actually, have you connected your decal normal map up?

    You're base height value should be 0.5, neutral grey, and with standard height map practices this value in the value that doesn't do any displacing. So when baking your heightmap where ever the bake plane is relative to your highpoly is where your mid value is going to be. So think of the position of your bake plane as .5 and your highest point on your high poly being 1 and the lowest being 0, best practice to set up a plane when you're modeling your decal sheet and make sure that every decal border terminates on the same position as the plane

    You can see in my decal sheet i've modeled majority of the decals onto a plane so i can make sure they're aligned with the bake plane.

    I'm trying real hard to get the breakdown out, i've just been really busy at the moment with work and home life.
  • RedLehari
    Offline / Send Message
    RedLehari polycounter lvl 11
    Take your time, I myself will only be able to check properly your reply on Monday as I'm working till late those last days.

    Something that I forgot to ask on my last comment was at which point do you apply the Weighted Normals? I feel like the script I'm using might be screwing things up.
  • Fwap
    Offline / Send Message
    Fwap polycounter lvl 13
    If you're using Maya, at any point really because with match attributes you can sync tangent normals too.
  • Geexile
    Offline / Send Message
    Geexile polycounter lvl 8
    Hey Fwap, this is really great project you have ;) Yeah a detailed breakdown would be really awesome ! :) Thanks
  • CybranM
    Offline / Send Message
    CybranM interpolator
    Looks great! I hope they'll improve the decal system in the next UE4 update
  • RedLehari
    Offline / Send Message
    RedLehari polycounter lvl 11
    Fwap said:
    If you're using Maya, at any point really because with match attributes you can sync tangent normals too.
    Yeah, Max Projection does not transfer the normals.
    Doesn't seem to be anything similar by default on Max, so I'm using a script : "SlideNormalThief".

    POM is working now after all the feedback. Thank you so much everybody for the help.
  • DeathstrokeFTW
    Offline / Send Message
    DeathstrokeFTW polycounter lvl 4
    Looking great! And thanks for the decal technique, now I can start working on my WIP (again) :P
Sign In or Register to comment.