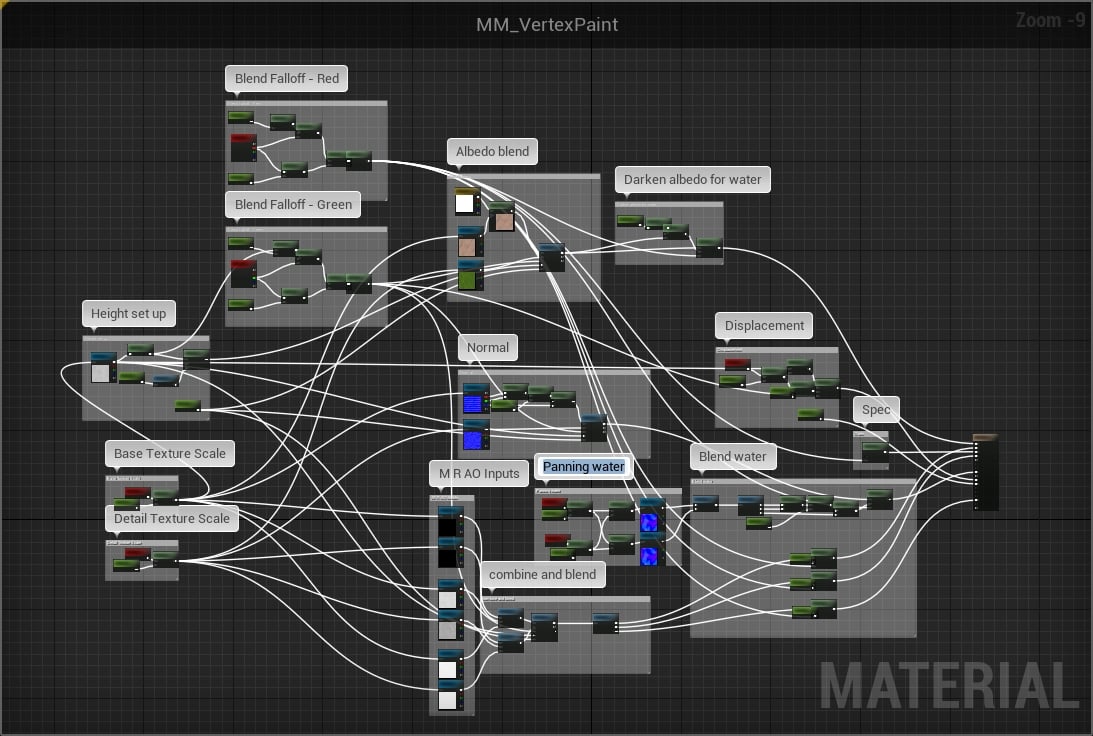
[UE4] Vertex Paint shader (with two material blending, water painting and optional displacement)

For another project I am working on, a requirement I have set myself is that I will need to be able to use vertex paint some meshes. I have been doing some research based on this requirement and how to develop the shader, and thought it would be good to share my findings and hopefully help out anybody else looking to learn more about vertex painting in UE4. As you can see from the post title the shader has quite a few features, but the shader is quite simple to build. It uses some of the more complex material nodes and features, but hopefully I have explained them with enough detail that it should be easy enough to follow along.
Some of the learning resources I have used are:
- Blueprint Games - [TUTORIAL] UE4 Vertex Painting - https://www.youtube.com/watch?v=AS_y7Dui_1Y This is a great starting point for understanding the basics of vertex painting and how to blend two materials using the Lerp node.
- Romain Dauger - Last of Us: Capturing the Spirit and The Look - https://80.lv/articles/last-of-us-capturing-the-spirit-and-the-look/ This is a great article for anybody wanting to generally learn more about developing environments in UE4 but the author includes an example of shader that he developed for vertex painting. While quite complex, it is a valuable learning resource if you take some time to pick it apart.
- Barry lowndes - Tessellation and vertex painting in UE4 - https://www.youtube.com/watch?v=Z2eray1zJGw In the video there is an another example of basic material blending with lerp nodes, but there is a great example of how to control the falloff between the blend of two materials.
- Tech Art Aid - UE4: Detailed Texture Blending with HeightLerp and Vertex Painting - https://www.youtube.com/watch?v=dghCetkArJI This video shows how to use the HeightLerp node to blend materials giving better control of the blend and allows you to place the blended material in the cracks of the base material using it's height map.
Based on what I learnt from these tutorials, the requirements I gathered for my own shader are:
- Ability to blend between two materials based on the height map of the base material.
- Base material and detail material should have all texture inputs parameterised for material instances and controls for scale of each material.
- A colour picker to blend with the base material's albedo to make small tweaks to the colour. A colour picker should be rather than grayscale input so that a tint can be added as well as darken or lighten the material's colour.
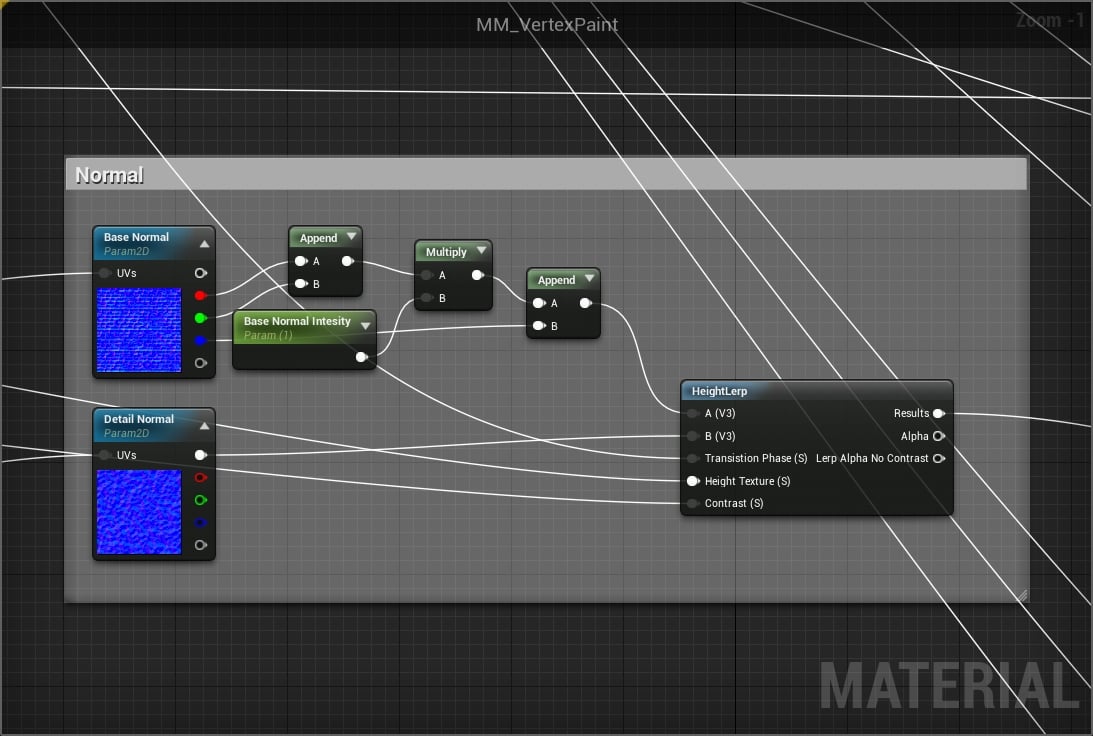
- Control of the base material's normal map intensity.
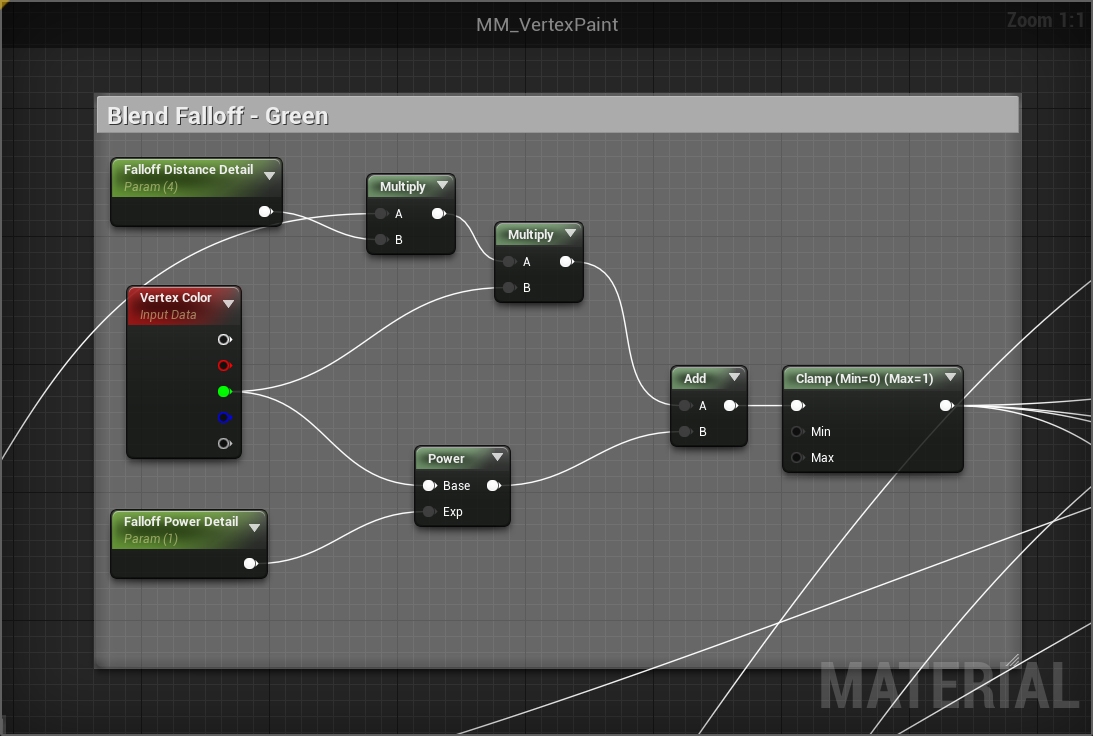
- Extra control of how the materials blend should be added by tweaking the falloff of the blend and should have controls for material instances.
- Use one channel of vertex paint to add water (on the floor) and another channel to add a detail layer (this could be to add dirt or streaks at the top of a wall by scaling the texture into place).
- Areas where water is painted should darken the albedo of the base material but should have a control to scale the darkness applied.
- The water material should have scale and normal map intensity controls for material instances.
- Painted water should replace the normal data of the base material with a panning 'water' normal map texture to give a sense of movement as final renders will include a fly through of the scene.
- Displacement should be an optional feature which can be used for materials which have more depth e.g. bricks.
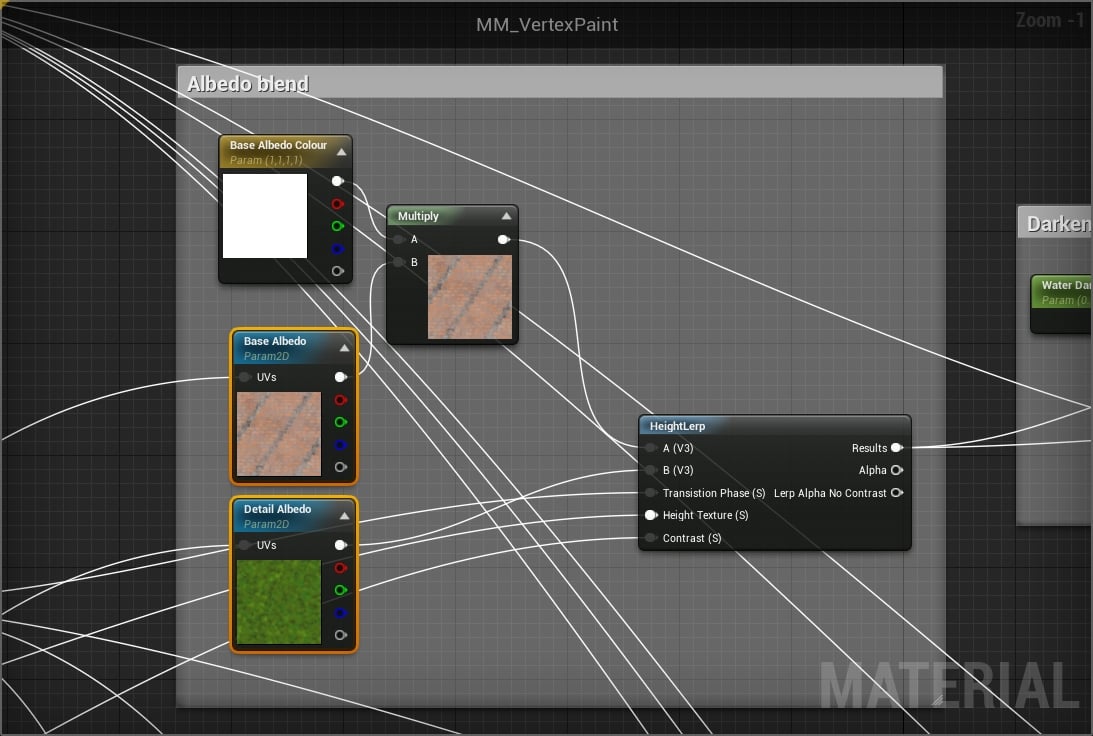
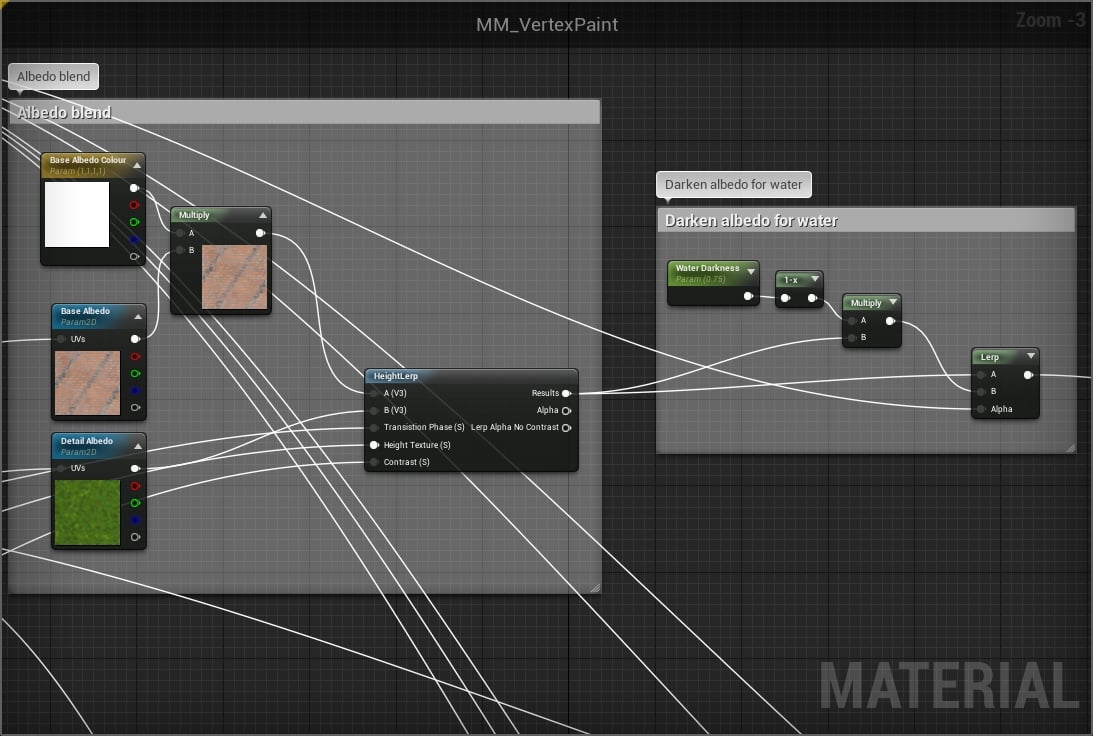
1 and 3 - For the base and detail materials each texture map for albedo, metallic, roughness, ambient occlusion and normal has a parameterised texture sample. The albedo of the base material can be multiplied by the value of a paramterised vector 3 node (which has a default value of white so no change is made to new material instances) for control of the tint. HeightLerp nodes are used to blend the two materials as this gives better control than a standard Lerp node.
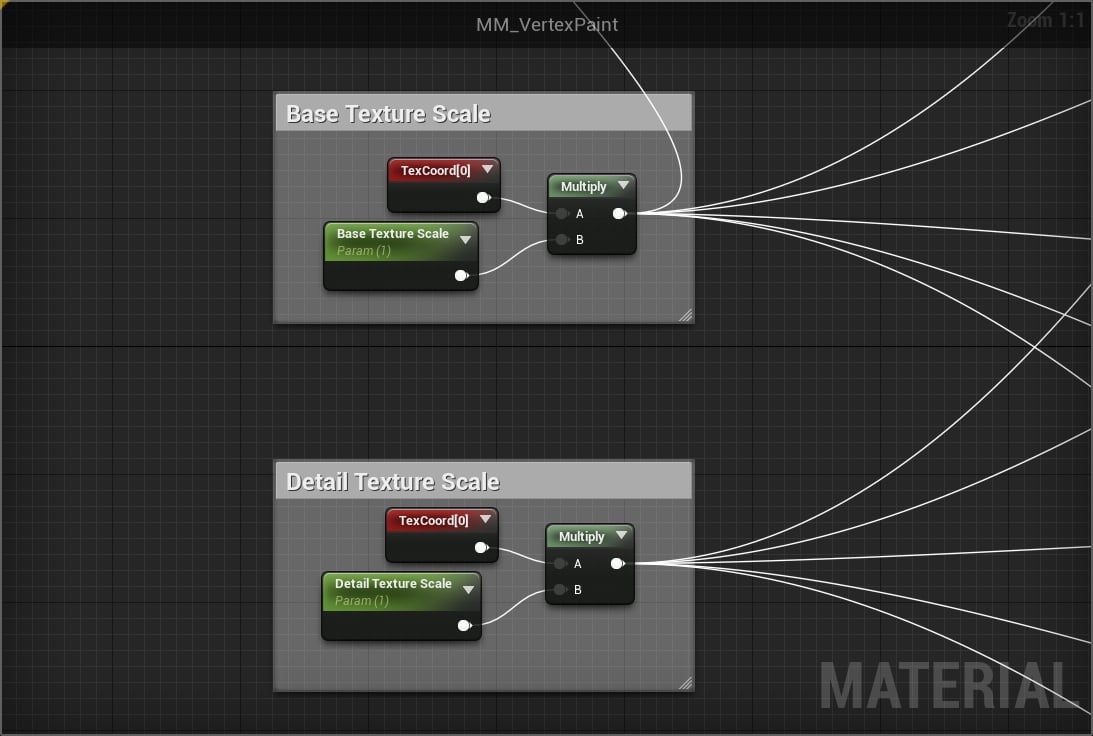
2 - A scalar parameter nodes are multiplied to give individual control of the scales of the base and detail material. The result of each multiply node is plugged into the textures sample for each map of the base and detail materials.
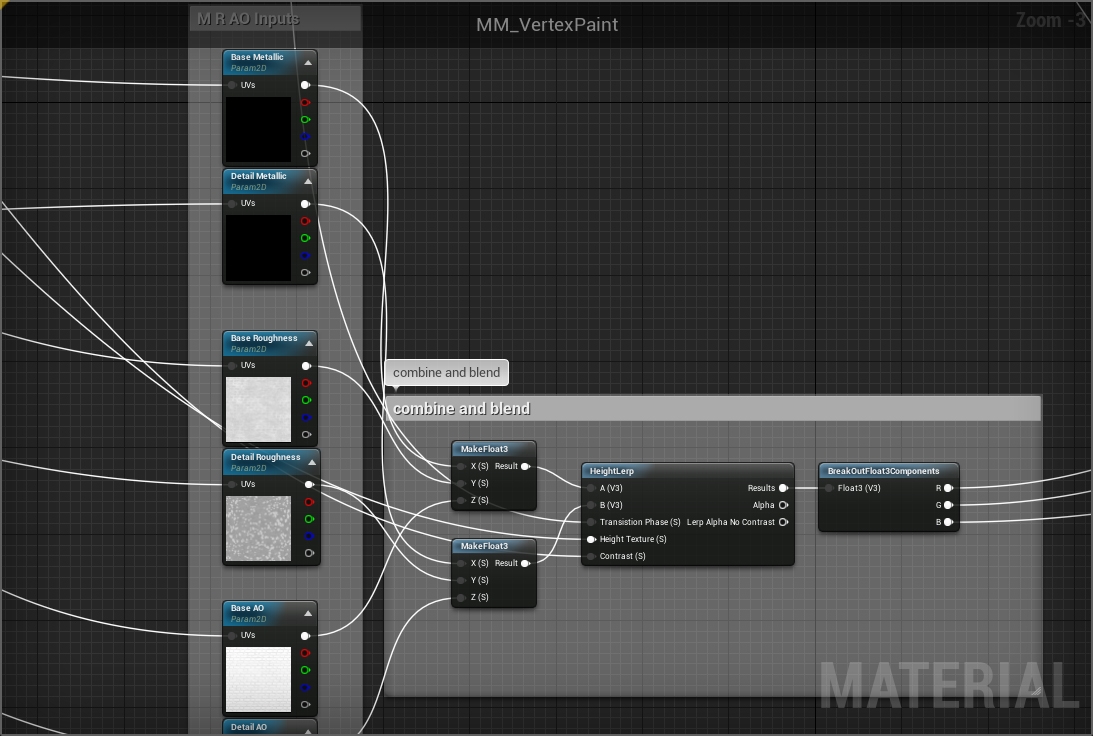
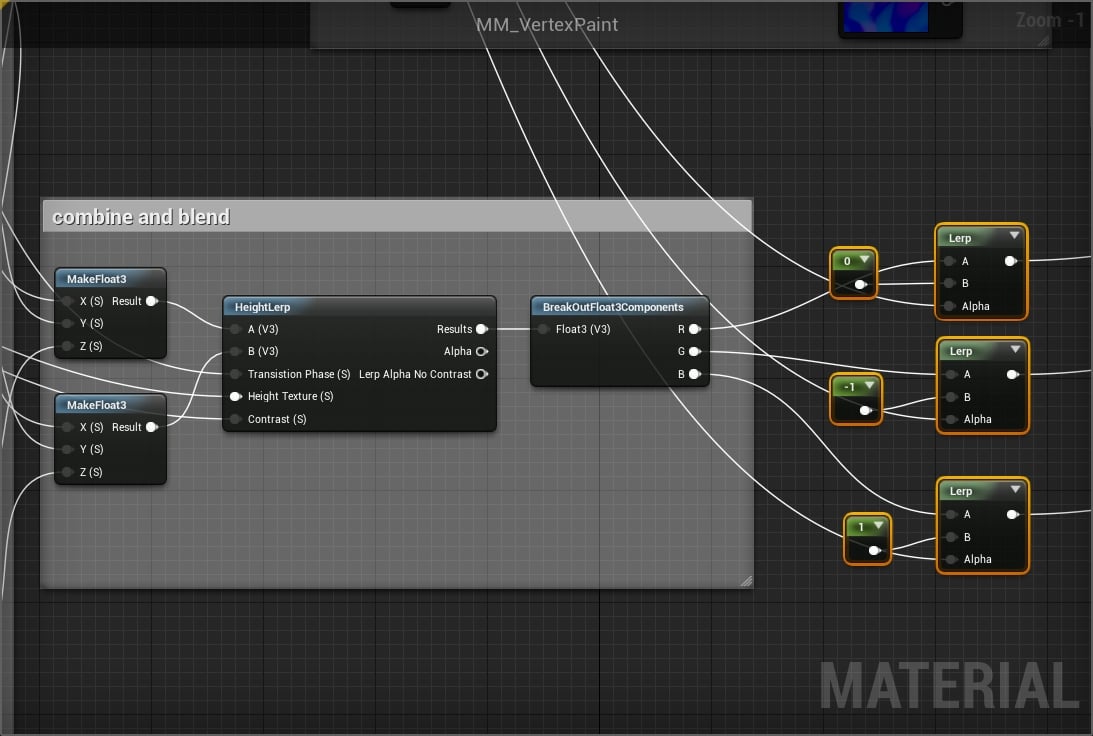
1 and 2 - The metallic, roughness and ambient occlusion texture maps for base and detail material are combined using MakeFloat3 nodes before blending to avoid using three separate HeightLerp nodes. The result of the blend is then split using a BreakOutFloat3Components.
1 and 4 - The normal map for the base material can be intensified by using a scalar parameter and mulpiying the result of appending the red and green channels, and then appending the blue channel as this should be be changed when modifying a normal map. This is then blended with the detail material's normal map with a HeightLerp node.
5 and 6 - The falloff of the blend between the two materials is given extra control by taking the vertex paint data and multiplying it by the product of multiplying the height map of the base material with a scalar parameter. This gives control of how far the falloff of the blend spreads. This is then added to the product of another scalar parameter which is combined with the vertex paint data, giving control of the intensity of the value in the falloff (the grey areas between the black and white of the areas which have and don't have vertex paint applied). A duplicate of this set of nodes are used to control the falloff of the red channel for painting the water. The result is clamped before using in the HeightLerp nodes to ensure safe values are used in the blend.
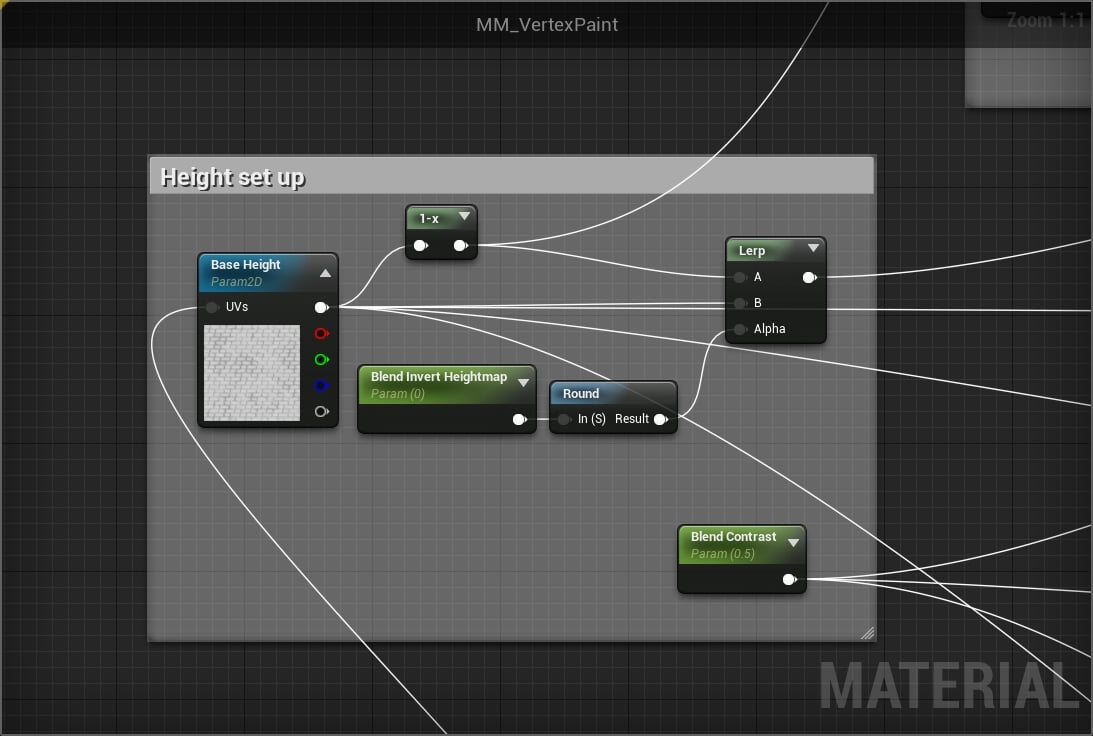
The height map of the base material is sampled and paramterised so that it can also be changed in material instances. There is no need to sample the height map of the detail material as this is not required for the blend. The Blend Invert Heightmap (a scalar parameter with minimum value of 0 and maximum of 1) and Round node are optional which gives an extra control if the height map is required to be inverted (a switch could also be used here but I believe this is slightly better for performance). This is done with the minus one and Lerp nodes. The round node ensures the value from the scalar parameter is either 0 or 1 so the regular and inverted height maps are not blended in the Lerp node and only one value or the other is passed to the Height Texture input of each HeightLerp node used to blend the base and detail materials.
Here you can also see the scalar parameter for the Blend Contrast. This is plugged into the Contrast input of each HeightLerp node and gives an overall control of the falloff of the blend previously described. This value is useful for blending different types of material, for example, something with a stronger pattern works better with a higher contrast so it is less obvious where the blend is happening.
7 - A scalar parameter (with a minimum value of 0, and maximum of 1) is multiplied by the result of the blended albedo result to control the darkening of albedo where water is painted. The minus one node is added so that a 0 value is no darkening and 1 gives the result black tar-like effect which makes more sense to me and is optional. This result is blended with a standard Lerp node over the result of the previous HeightLerp blend (using the red channel vertex paint data as the alpha input) so that water can be painted on top of the blended material if desired. This result is then plugged into the albedo input for the material.
The result of the BreakOutFloat3Components used to combine the base and detail material's metallic, roughness and ambient occlusion is blended with values of 0, -1 and 1 respectively for the water material (-1 is used for the roughness as this gives a slightly better result). Again the result of these blends use the same red channel vertex data as the alpha input.
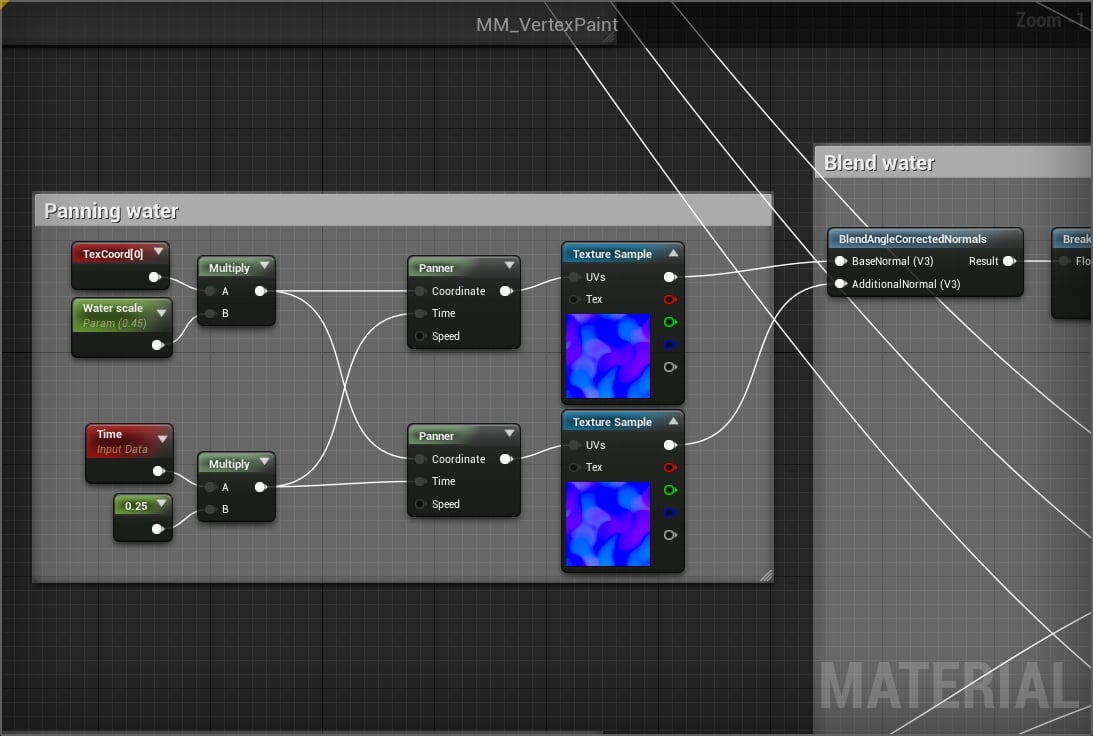
9 - Similar to the control for the base and detail material's texture inputs, to control the scale of the water texture a scalar parameter is multiplied and plugged into the panner node used to create the movement in the water material. A Time node is also multiplied by a constant and plugged into the panner to determine the current panning position. The water normal map is sampled twice with a different panner plugged into it so that left/right, and up/down movement can be controlled independently. In the top Panner a value of -0.25 is entered into Speed X in the details/property of the node. This gives a slow right to left movement, and in the second panner a value of 0.1 is entered into Speed Y give upwards movement. The result of these two texture samples are combined using a BlendAngleCorrectedNormals node which correctly blends normal map data as each channel of the normal map needs to be combined differently than the way the Lerp or multiply nodes work.
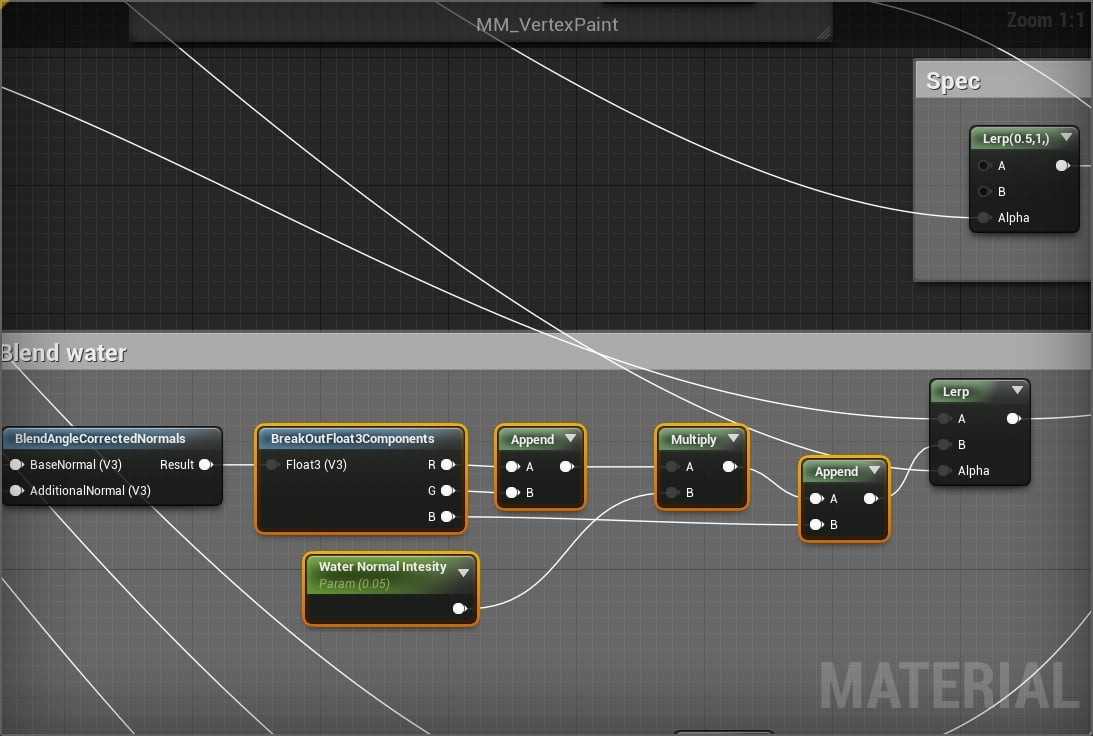
8 - The normal map intensity for the water material is controlled in the same way as the base material described above. The result of this is blended using a standard Lerp node with the result of HeightLerp for the base and detail material's normal map data using the vertex paint red channel data as per other texture maps, and plugged into the shader Normal input. Here you can also see the blend for the Specular input. This simply blends the default grey value (0.5) for the blended base/detail material with a value of 1 for the water, again based on the vertex paint red channel data. This is optional, but adds a little realism to the water texture.
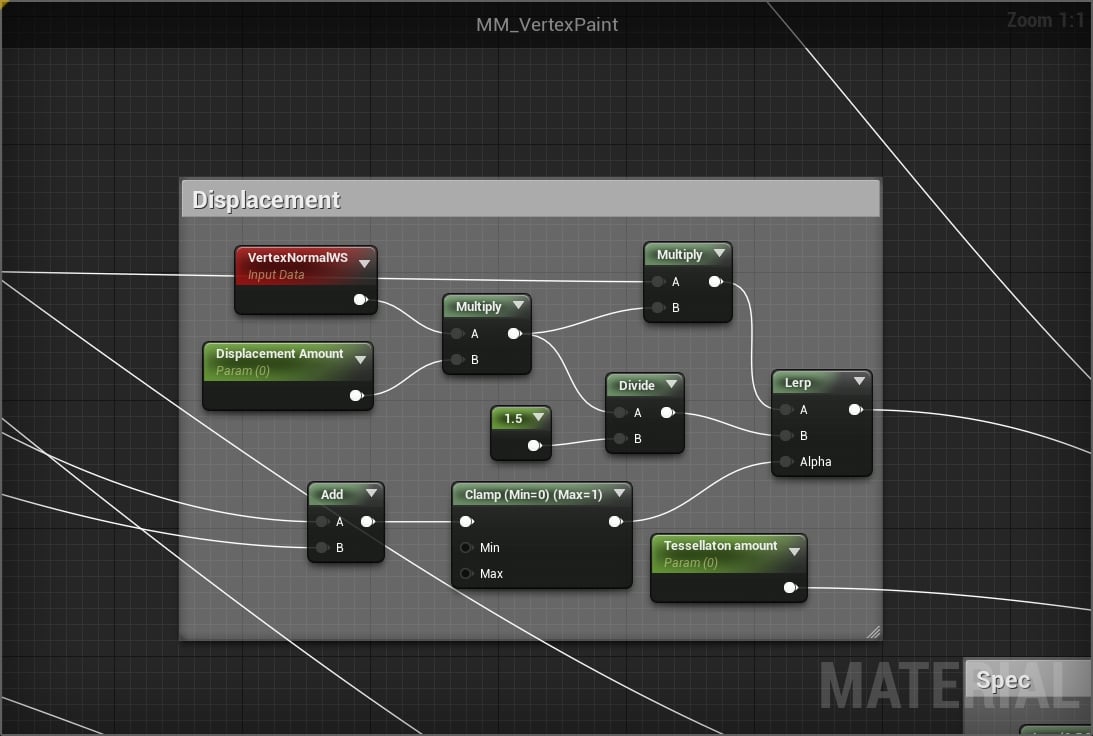
10 - For displacement to be available in the shader, the option for D3D11Tesselation Mode needs to be set to either Flat Tessellation or PN Triangles (more info on the difference is available here) in the shader details/properties panel which is accessed by clicking any empty space in the material editor window. To actually create the displacement effect a VertexNormalWS node is multiplied by a scalar parameter (the displacement amount with a default value of 0 which makes the feature optional as this value is used in a new new material instances) which gives an overall control for the displacement in the material. This value is multiplied by the height map of the base material to give the displacement value. The multiply result of the VertexNormalWS and scalar parameter nodes is also used for the displacement amount for the detail texture, however the value is divided by 1.5 which I found to be a good value to keep the displacement from going past the base material. These two values are blended with a Lerp node using combined values of the calculation for the falloff for the red and green channel vertex data (where the clamp node is used). This ensures that when the detail or water material are painted the displacement is pushed to a value which matches the amount of vertex paint applied (i.e. if the detail material fully covers the base material then the displacement is pushed to a maximum 'flat' value). A clamp node is used to ensure that the displacement of the water is not added on top of the detail material and this value is used in the Lerp node to blend the displacement value of base and detail materials and is plugged into the World Displacement input of the shader.
Finally, a scalar parameter is used to control the tessellation amount and also has a default value of 0 making the feature optional in the shader for new material instances (a maximum of 2 is also set as values above this are not really needed unless the base mesh is very low resolution). This value is plugged directly into the Tessellation Multiplier input of the shader.
Here is an example of painting the detail material. Note: the Displacement value is exaggerated to show the effect of the detail material pushing through to the maximum value and totally covering the base material.
This is example of painting water where you can see the panning water texture.
I hope this was useful as a learning material and if you have any questions, comments or critiques (or spotted any mistakes) please let me know.
Replies